fisherman sweater - Coats & Clark
fisherman sweater - Coats & Clark
fisherman sweater - Coats & Clark

You also want an ePaper? Increase the reach of your titles
YUMPU automatically turns print PDFs into web optimized ePapers that Google loves.
<strong>fisherman</strong> <strong>sweater</strong><br />
64<br />
the yarn<br />
what you’ll need<br />
YARN<br />
MODA DEA Washable Wool, 3.5<br />
oz/100g balls, each approx<br />
166yd/152m (merino wool superwash)<br />
n 10 (11, 12, 13, 14) balls #4440<br />
Moss<br />
CROCHET HOOK<br />
n Size I/9 (5.5 mm) crochet hook<br />
or any size to obtain correct<br />
gauge<br />
NOTIONS<br />
n Yarn needle<br />
Stitch markers<br />
Washable Wool in Moss<br />
crochet today • dec 2006 / jan 2007<br />
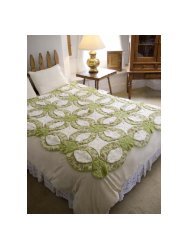
Show off your crochet cables skills<br />
with this sensational <strong>sweater</strong>!<br />
By Joyce Nordstrom<br />
SKILL LEVEL: experienced<br />
finished measurements<br />
S (M, L, 1X, 2X)<br />
Pattern is written for smallest size. Changes for<br />
larger sizes are given in parentheses.<br />
finished chest: 38 (42, 46, 52, 56)"/96.5 (106.5,<br />
116.5, 132, 142)cm<br />
gauge<br />
14 sts and 12 rows = 4"/10 cm over hdc using size<br />
I/9 (5.5mm) crochet hook.<br />
Remember to check gauge for best results!<br />
how to make a gauge swatch<br />
Ch 16.<br />
Row 1 Hdc in 3rd ch from hook and each ch across<br />
– 14 hdc.<br />
Row 2 Ch 2, turn, hdc in each hdc across.<br />
Repeat Row 2 twenty more times. Swatch should<br />
measure 4" x 4"/10 x 10cm. If necessary, adjust<br />
hook size to obtain correct gauge.<br />
PATTERN STITCHES<br />
note always remember to skip the stitch behind all<br />
FPdc and FPtr stitches.<br />
TUSCAN CABLE (multiple of 14 sts)<br />
Row 1 and all odd rows Hdc in each st across.<br />
Row 2 FPdc around first hdc 2 rows below; hdc in<br />
next 4 hdc, sk 2 hdc, FPtr around next 2 hdc 2 rows<br />
below; working in front of previous 2 FPtr, FPtr<br />
around 2 sked hdc 2 rows below, hdc in next 4 hdc;<br />
FPdc around next hdc 2 rows below.<br />
Row 4 FPdc around FPdc 2 rows below; hdc in next<br />
3 hdc, FPtr around next 2 FPtr 2 rows below (slanted<br />
FPtr), hdc in next 2 hdc, FPtr around next 2 FPtr 2<br />
rows below, hdc in next 3 hdc; FPdc around next<br />
FPdc 2 rows below.<br />
Row 6 FPdc around FPdc 2 rows below; hdc in next<br />
2 hdc, FPtr around next 2 FPtr 2 rows below, hdc in<br />
next 4 hdc, FPtr around next 2 FPtr 2 rows below,<br />
Abbreviations used<br />
in this pattern<br />
ch chain<br />
dc double crochet<br />
dec decrease(ing)<br />
hdc half double<br />
crochet<br />
lp(s) loop<br />
rem remaining<br />
sc single crochet<br />
sk(ed) skip(ped)<br />
sl st slip stitch<br />
st(s) stitch(es)<br />
yo yarn over<br />
special abbreviations<br />
pm Place marker.<br />
FPdc (Front Post double crochet) Yo,<br />
insert hook from front to back to front<br />
around post of indicated stitch; yo and<br />
draw up lp, [yo and draw through 2 lps on<br />
hook] twice. Skip stitch behind FPdc.<br />
FPtr (Front Post treble crochet) Yo twice,<br />
insert hook from front to back to front<br />
around post of indicated st; yo and draw<br />
up lp, [yo and draw through 2 lps on<br />
hook] 3 times. Skip stitch behind FPtr.<br />
popcorn Work 4 FPdc around indicated<br />
st; drop lp from hook, insert hook into top<br />
of first FPdc of popcorn and into dropped<br />
lp, draw dropped lp through first FPdc.<br />
sc3tog (sc 3 sts together) [Insert hook in<br />
next st, yo and draw up a lp] 3 times, yo<br />
and draw through all 4 lps on hook.<br />
hdc in next 2 hdc; FPdc around next FPdc 2 rows<br />
below.<br />
Row 8 Repeat Row 4.<br />
Row 10 FPdc around FPdc 2 rows below; hdc in next<br />
4 hdc, sk 2 FPtr 2 rows below, FPtr around next 2<br />
FPtr 2 rows below; working in front of previous FPtr,<br />
FPtr around 2 sked FPtr 2 rows below, hdc in next 4<br />
hdc; FPdc around next FPdc 2 rows below.<br />
Repeat Rows 3-10 for pattern.<br />
3-POST CABLE (multiple of 9 sts)<br />
Row 1 and all odd rows Hdc in each st across.<br />
Row 2 FPdc around first hdc 2 rows below; hdc in<br />
next 2 hdc, FPdc around next 3 hdc 2 rows below,<br />
hdc in next 2 hdc; FPdc in next hdc 2 rows below.<br />
Be creative your way! • See Resources on page 98 for helpful info and instructions.<br />
PHOTOGRAPHS BY ROSE CALLAHAN; HAIR & MAKEUP BY SHANNON GREY WILLIAMS FOR FORD ARTISTS—NYC<br />
If you’re not ready<br />
to try this <strong>sweater</strong>,<br />
check out the<br />
cabled scarf on<br />
page 68.
<strong>fisherman</strong><br />
<strong>sweater</strong><br />
66<br />
tip<br />
Always remember<br />
to skip the stitches<br />
behind the post<br />
stitches.<br />
crochet today • dec 2006 / jan 2007<br />
Row 4 FPdc around FPdc 2 rows below; hdc in next 2<br />
hdc, sk first FPdc 2 rows below, FPdc around next 2<br />
FPdc 2 rows below; working in front of previous 2<br />
FPdc, FPdc around sked FPdc 2 rows below, hdc in<br />
next 2 hdc; FPdc around next FPdc 2 rows below.<br />
Row 6 FPdc around FPdc 2 rows below; hdc in next<br />
2 hdc, FPdc around next 3 FPdc 2 rows below, hdc in<br />
next 2 hdc; FPdc around next FPdc 2 rows below.<br />
Repeat Rows 3-6 for pattern.<br />
CELTIC BOBBLES (multiple of 13 sts)<br />
Row 1 and all odd rows Hdc in each st across.<br />
Row 2 FPdc around first hdc 2 rows below; (hdc in<br />
next 2 hdc, FPdc around next hdc 2 rows below) 4<br />
times.<br />
Row 4 FPdc around FPdc 2 rows below; hdc in next<br />
5 hdc, popcorn around next FPdc 2 rows below, hdc<br />
in next 5 hdc; FPdc around next FPdc 2 rows below.<br />
Row 6 FPdc around FPdc 2 rows below; hdc in next<br />
4 hdc, popcorn around next hdc 2 rows below, FPdc<br />
around top of next popcorn 2 rows below, popcorn<br />
around next hdc 2 rows below, hdc in next 4 hdc;<br />
FPdc around next FPdc 2 rows below.<br />
Row 8 FPdc around FPdc 2 rows below; hdc in next<br />
3 hdc, FPdc around next popcorn 2 rows below, hdc<br />
in next hdc, FPdc around next FPdc 2 rows below,<br />
hdc in next hdc, FPdc around next popcorn 2 rows<br />
below, hdc in next 3 hdc; FPdc around next FPdc 2<br />
rows below.<br />
Row 10 FPdc around FPdc 2 rows below; (hdc in next<br />
2 hdc, FPdc around next FPdc 2 rows below) 4 times.<br />
Repeat Rows 3-10 for pattern.<br />
SWEATER BACK<br />
Ch 68 (76, 84, 92, 100)<br />
Foundation Row Hdc in 3rd ch from hook and each<br />
ch across – 66 (74, 82, 90, 98) hdc (2 sked ch are not<br />
counted as a st).<br />
Row 1 (wrong side) Ch 2, turn, hdc in each st across.<br />
Row 2 (cable set-up row – right side) Ch 2, turn,<br />
hdc in first 2 (6, 10, 14, 18) hdc; PM, work Row 2 of<br />
celtic bobbles pattern; PM, hdc in next hdc; PM,<br />
work Row 2 of 3-post cable pattern; PM, hdc in next<br />
hdc; PM, work Row 2 of tuscan cable pattern, PM;<br />
hdc in next hdc, PM; work Row 2 of 3-post cable<br />
pattern, PM; hdc in next hdc, PM; work Row 2 of<br />
celtic bobbles pattern, PM; hdc in last 2 (6, 10, 14,<br />
18) hdc.<br />
Row 3 Ch 2, turn, hdc in each st across.<br />
note refer to markers placed in cable set-up row to<br />
help ensure proper placement of cable pattern<br />
stitches.<br />
Row 4 Ch 2, turn, hdc in first 2 (6, 10, 14, 18) hdc;<br />
work Row 4 of celtic bobbles pattern; hdc in next<br />
hdc; work Row 4 of 3-post cable pattern; hdc in next<br />
hdc; work Row 4 of tuscan cable pattern; hdc in next<br />
hdc; work Row 4 of 3-post cable pattern; hdc in next<br />
hdc; work Row 4 of celtic bobbles pattern, PM; hdc<br />
in last 2 (6, 10, 14, 18) hdc.<br />
Row 5 Ch 2, turn, hdc in each st across.<br />
Continue in established patterns, repeating each as<br />
necessary, until piece measures 21 (21 1 ⁄2, 22, 22,<br />
22 1 ⁄2)"/53.5 (54.5, 56, 56, 57)cm from beginning.<br />
Fasten off.<br />
SWEATER FRONT<br />
Work as for Back until piece measures 13 (13, 13 1 ⁄2,<br />
13 1 ⁄2, 14)"/33 (33, 34.5, 34.5, 35.5) cm from beginning;<br />
end by working a wrong side row.<br />
left front<br />
Work in established patterns across 31 (35, 39, 43,<br />
47) sts, PM (for neck edge); leave rem sts unworked.<br />
Dec 1 st at neck edge every row 4 times, then every<br />
2nd row 8 times. Work even in established patterns<br />
on rem 19 (23, 27, 31, 35) sts until piece measures<br />
same as Back. Fasten off.<br />
right front<br />
Sk 4 unworked sts at marked neck edge. Join yarn in<br />
next st and work in established patterns across rem<br />
31 (35, 39, 43, 47) sts. Dec 1 st at neck edge every<br />
row 4 times, then every 2nd row 8 times. Work even<br />
in established patterns on rem 19 (23, 27, 31, 35) sts<br />
until piece measures same as Back. Fasten off.<br />
SLEEVE (make 2)<br />
Ch 29 (31, 33, 35, 37).<br />
Foundation Row Hdc in 3rd ch from hook and each<br />
ch across – 27 (29, 31, 33, 35) hdc (2 sked ch are not<br />
counted as a st).<br />
Row 1 (wrong side) Ch 2, turn, hdc in each st across.<br />
Row 2 (cable set-up row – right side) Ch 2, turn,<br />
hdc in first 9 (10, 11, 12, 13) hdc; work Row 2 of 3-<br />
post cable pattern; hdc in next 9 (10, 11, 12, 13) hdc.<br />
Row 3 Ch 2, turn, hdc in each st across.<br />
Row 4 (increase) Ch 2, turn, 2 hdc in first hdc<br />
(increase made), hdc in next 8 (9, 10, 11, 12) hdc; work<br />
Row 4 of 3-post cable pattern; hdc in next 8 (9, 10, 11,<br />
celtic bobbles pattern<br />
12) hdc, 2 hdc in last hdc – 29 (31,<br />
33, 35, 37) sts.<br />
Continue in established pattern.<br />
ELOY CABLE<br />
Increase<br />
SWEATER<br />
1 st on each edge every<br />
other row 2 (2, 2, 3, 4) more times,<br />
then every 3rd row 11 (11, 10, 10,<br />
9) times. Work even in established<br />
pattern on rem 55 (57, 57, 61, 63)<br />
sts until piece measures 17 (17 1 ⁄2,<br />
17 1 ⁄2, 18, 18)"/43 (44.5, 44.5, 45.5,<br />
45.5)cm from beginning. Fasten off.<br />
finishing<br />
Sew shoulder seams. With top<br />
center of sleeve at shoulder seam,<br />
sew sleeves in place. Sew sleeve<br />
seams and sew side seams to<br />
within 2"/5cm of lower edge of<br />
<strong>sweater</strong>.<br />
neck edging<br />
With right side facing, join yarn in<br />
neck opening at top of left<br />
shoulder.<br />
21 (21½, 22, 22, 22½)”<br />
Row 1 Work sc evenly spaced<br />
down left front, across center<br />
front, up right front and around<br />
back of neck, join with sl st in<br />
first sc.<br />
Rows 2-4 Ch 1, working in back<br />
lps only, sc in each sc to 3 sc at<br />
center front, sc3tog, sc in rem sc<br />
around; join with sl st in first sc.<br />
Fasten off.<br />
lower edging<br />
Row 1 Work sc evenly spaced<br />
around lower edge of <strong>sweater</strong>,<br />
working (sc, ch 1, sc) at each corner;<br />
join with sl st in first sc.<br />
Rows 2 and 3 Ch 1, working in<br />
back lps only, sc in each sc around,<br />
working (sc, ch 1, sc) in each ch-1<br />
corner space; join with sl st in first<br />
sc. Fasten off.<br />
5½ (6½, 7½, 9, 10)”<br />
sleeve<br />
8”<br />
edging<br />
Row 1 Work sc evenly spaced<br />
around cuff of sleeve; join with sl<br />
st in first sc.<br />
Rows 2 and 3 Ch 1, working in<br />
back lps only, sc in each sc around;<br />
join with sl st in first sc. Fasten<br />
off.<br />
Weave in all ends. n<br />
front<br />
&<br />
back<br />
19 (21, 23, 26, 28)”<br />
ELOY CABLE SWEATER<br />
tuscan cable pattern<br />
13 (13, 13½, 13½, 14)”<br />
8 (8½, 8½, 8½, 8½)”<br />
21 (21½, 22, 22, 22½)”<br />
8”<br />
front<br />
&<br />
back<br />
19 (21, 23, 26, 28)”<br />
15¾ (16½, 16½, 17½, 18)”<br />
sleeve<br />
7¾ (8½, 9, 9½, 10)”<br />
3-post cable<br />
pattern<br />
5½ (6½, 7½, 9, 10)”<br />
17 (17½, 17½, 18, 18)”<br />
13 (13, 13½, 13½, 14)”<br />
8 (8½, 8½, 8½, 8½)”
starter scarf<br />
HERE’S HOW Follow along with these photos as you work to be sure you’re on track!<br />
Remember, all<br />
odd-numbered<br />
rows are hdc<br />
only.<br />
what you’ll need<br />
YARN<br />
MODA DEA Washable Wool, 3.5<br />
oz/100g balls, each approx<br />
166yd/152m (wool superwash)<br />
n 2 balls #4440 Moss<br />
CROCHET HOOK<br />
n Size I/9 (5.5 mm) crochet hook<br />
or any size to obtain correct<br />
gauge<br />
NOTIONS<br />
n Yarn needle<br />
Abbreviations<br />
Please refer to list<br />
on page 64.<br />
If you’re new to cables, give this scarf a try. It’s based<br />
on the Tuscan Cables repeat from the Fisherman<br />
Sweater. Once you’ve mastered this pattern, you may<br />
be ready to try the <strong>sweater</strong>!<br />
SKILL LEVEL: intermediate<br />
finished measurements<br />
Approx 6"/15cm wide x 60"/152.5cm long<br />
gauge<br />
12 hdc and 10 rows = 4"/10cm square using size I/9<br />
(5.5mm) crochet hook.<br />
Remember to check gauge for best results!<br />
how to make a gauge swatch<br />
Work rows 1-10 of scarf. Garment should measure<br />
6"/15cm wide x 4"/10cm long. If necessary, adjust<br />
hook size to obtain correct gauge.<br />
Make a longer<br />
or shorter<br />
scarf by<br />
repeating Rows<br />
3-10 more or<br />
fewer times.<br />
note<br />
Always remember to skip the stitch behind all FPdc<br />
and FPtr stitches.<br />
SCARF<br />
Ch 20.<br />
Foundation Row Hdc in 3rd ch from hook and each<br />
ch across - 18 hdc.<br />
Row 1 (wrong side) and all odd rows Ch 2, turn, hdc<br />
in each st across.<br />
Row 2 (right side) Ch 2, turn, hdc in first 2 hdc, FPdc<br />
around next hdc 2 rows below; hdc in next 4 hdc, sk<br />
2 hdc, FPtr around next 2 hdc 2 rows below; working<br />
in front of previous 2 FPtr, FPtr around 2 skipped hdc<br />
2 rows below, hdc in next 4 hdc; FPdc around next<br />
hdc 2 rows below, hdc in last 2 hdc.<br />
Row 4 Ch 2, turn, hdc in first 2 hdc, FPdc around<br />
FPdc 2 rows below; hdc in next 3 hdc, FPtr around<br />
next 2 FPtr 2 rows below (slanted FPtr), hdc in next<br />
2 hdc, FPtr around next 2 FPtr 2 rows below (slanted<br />
FPtr), hdc in next 3 hdc; FPdc around next FPdc 2<br />
rows below, hdc in last 2 hdc.<br />
Row 6 Ch 2, turn, hdc in first 2 hdc, FPdc around<br />
next FPdc 2 rows below; hdc in next 2 hdc, FPtr<br />
around next 2 FPtr 2 rows below, hdc in next 4 hdc,<br />
FPtr around next 2 FPtr 2 rows below, hdc in next 2<br />
hdc; FPdc around next FPdc 2 rows below, hdc in<br />
last 2 hdc.<br />
Row 8 Repeat Row 4.<br />
Row 10 Ch 2, turn, hdc in first 2 hdc, FPdc around<br />
next FPdc 2 rows below; hdc in next 4 hdc, sk 2 FPtr<br />
2 rows below, FPtr around next 2 FPtr 2 rows below;<br />
working in front of previous 2 FPtr, FPtr around 2<br />
sked FPtr 2 rows below, hdc in next 4 hdc; FPdc<br />
around next FPdc 2 rows below, hdc in last 2 hdc.<br />
Rows 11-146 Repeat Rows 3-10 seventeen times.<br />
Row 147 Ch 2, turn, hdc in each st across.<br />
Fasten off.<br />
Row 2: First FPtc will be worked into the<br />
stitch indicated.<br />
Row 4: after working two FPtcs around two<br />
FPtrs two rows below.<br />
Row 2: after first two FPtc have been worked.<br />
Row 4: completed.<br />
Row 2: completed (note that the second two<br />
FPtcs now cross in front of the first two FPtcs).<br />
Row 6: after working two FPtcs around two<br />
FPtrs two rows below.<br />
Row 6: completed. Row 8: completed. Row 10: after skipping first two FPtrs and<br />
working into second two FPtcs.<br />
finishing<br />
Weave in all ends. n<br />
Row 10: working back into the two skipped<br />
FPtcs.<br />
Row 10: completed.<br />
Row 4: worked again, for pattern repeat.<br />
dec 2006 / jan 2007 • crochet today 69