Walkstation User Guide - Steelcase
Walkstation User Guide - Steelcase
Walkstation User Guide - Steelcase

You also want an ePaper? Increase the reach of your titles
YUMPU automatically turns print PDFs into web optimized ePapers that Google loves.
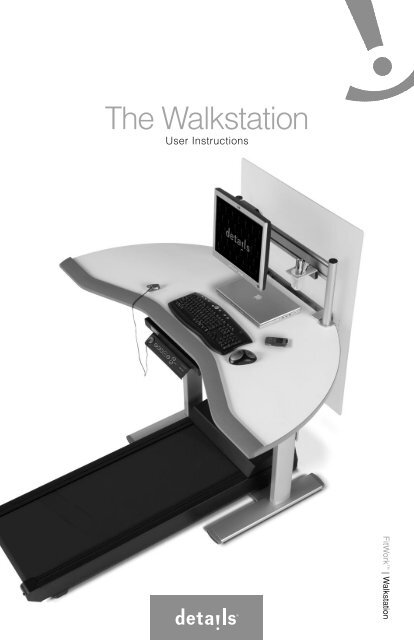
The <strong>Walkstation</strong><br />
<strong>User</strong> Instructions<br />
FitWork | <strong>Walkstation</strong>
<strong>Walkstation</strong> Safety Instructions<br />
When using the <strong>Walkstation</strong>, basic safety<br />
precautions should always be followed,<br />
including, but not limited to, the following:<br />
• Read and understand all instructions and warnings prior to use.<br />
• Obtain a medical exam before beginning any conditioning program.<br />
If at any time during the session you feel faint, dizzy, or experience pain,<br />
stop and consult your physician.<br />
• If you are pregnant or have any medical condition<br />
that could make you dizzy or off-balance, do not use the <strong>Walkstation</strong>.<br />
• Obtain proper instruction prior to use.<br />
• Inspect the treadmill for incorrect, worn, or loose components<br />
and do not use until corrected, replaced, or tightened prior to use.<br />
• Always use the Magnetic Safety Clip and attach it to your clothing<br />
at about waist height.<br />
• Body orientation should be centered and forward facing at all times.<br />
• Do not look behind you while unit is in operation.<br />
• Do not try to walk too fast. Utilize a comfortable speed.<br />
• Do not lean forward or round / hunch your back and keep your head up.<br />
• Do not wear loose or dangling clothing while using the treadmill.<br />
• Read, understand, and test the emergency stop procedures before use.<br />
• Care should be used when mounting or dismounting the treadmill.<br />
• Do not operate electrically powered treadmills in damp or wet locations.<br />
• Disconnect all power before servicing the treadmill.<br />
• Use molded front edge as a keyboard wrist-rest and hand-hold/grip.<br />
• Footwear should be comfortable, closed-toe, and provide suitable<br />
support for walking.<br />
• Keep items within close reach.<br />
• Keep worksurface free from clutter.<br />
• Place unit clear of furniture and other obstructions.<br />
• Maximum worksurface load is 225 lbs.<br />
• Keep all cables unobstructed and located in Cableway<br />
or other cable management system.<br />
• Keep a minimum of 3 feet of clearance at the rear & both sides of the treadmill.<br />
• While treadmill is in operation, user is multi-tasking. Avoid distraction.<br />
• Do not exceed maximum user weight of 350 lbs.<br />
• Keep the top side of the moving surface clean and dry.<br />
• Keep treadmill feet securely nested in openings in the treadmill receiver.<br />
3 W A L K S T A T I O N U S E R I N S T R U C T I O N S
• Do not place any object(s) on or underneath the treadmill belt,<br />
even when unit is not in use.<br />
• Do not cover treadmill keypad.<br />
• Keep children and animals away.<br />
• Moving surfaces are potentially hazardous. If attention is not paid<br />
to the conditions of the equipment, death or serious injury could occur.<br />
Cable Management:<br />
• When installing equipment, either on the worksurface or below,<br />
be sure that the connecting cables are free of obstruction.<br />
• Horizontal wire management channels are provided as standard<br />
and can be found on the underside of the worksurface.<br />
Use these channels to minimize possible entanglements.<br />
Accessory Power Cord Length:<br />
• Ensure that power cords for all accessory items – computers, lights,<br />
monitors, etc. – are of sufficient length to reach outlets throughout the range of<br />
worksurface height adjustment. Do not subject the cords to any strain while<br />
adjustment of the surface is taking place.<br />
• Always check for proper operating clearance before placing any item on,<br />
next to, above or below the worksurface.<br />
Orientation and Space Planning:<br />
Much insight has been gained from early adopters on the importance of<br />
proper placement and orientation of the <strong>Walkstation</strong> in the office environment.<br />
Placement and orientation are critical to insuring that users feel the right<br />
balance of privacy and accessibility as well as safety.<br />
• Place close to the workgroup to allow for quick transitions to and from a<br />
regular workstation.<br />
• Orient unit so that co-workers approach the user on the <strong>Walkstation</strong> from the<br />
front or within a 45° of front.<br />
• Do not place where co-workers must approach the user from side of behind.<br />
• Do not place in heavy traffic aisles.<br />
• Orient so that user can view co-workers if team interaction is high.<br />
• Leave 36" behind treadmill surface to nearest panel or wall.<br />
Visit <strong>Steelcase</strong>.com Planning Ideas for <strong>Walkstation</strong> Planning ideas.<br />
w w w . d e t a i l s - w o r k t o o l s . c o m 4
<strong>Walkstation</strong> Features<br />
1 Commercial grade treadmill with maximum speed of 2 mph in 0.1 mph increments<br />
and no incline adjustability<br />
2 Patented Soft System ® surface with Neoprene shock absorbers in front third of the deck<br />
3 Stowable digital display and touch pad controller<br />
4 Urethane high profile soft edge – hand hold and built in wrist rest<br />
5 Magnetic Safety Clip<br />
6 Quiet high torque motor<br />
7 Treadmill receiver plate<br />
8 Optional SlatRail or Slatwall to accommodate adjustable monitor arm and worktools<br />
9 Optional Privacy Screen, Modesty Screen and Cableway<br />
) Treadbelt roller adjustment bolts<br />
Full electric height-adjustability<br />
instantly adapts to different users.<br />
9<br />
4<br />
5<br />
8<br />
24 1 ⁄4" – 52"<br />
range<br />
3<br />
Distance from floor<br />
to top of belt - 6"<br />
6<br />
7<br />
1 2<br />
)<br />
5 W A L K S T A T I O N U S E R I N S T R U C T I O N S
<strong>Walkstation</strong> Ergonomic Tips<br />
Ergonomic tips for healthy working and walking:<br />
• Remember to maintain an active upright walking posture.<br />
• Adjust the monitor to your eye level and 18 – 23 inches away from your face.<br />
• Your keyboard should be at elbow level with your wrist in a neutral position.<br />
• Place your mouse at elbow level near to your keyboard.<br />
• Your phone should be at elbow level next to your keyboard.<br />
Use of a headset while operating the <strong>Walkstation</strong> is strongly suggested.<br />
• Wear comfortable, closed-toe shoes that provide suitable support for walking.<br />
• Keep items within close reach.<br />
Before Getting Started:<br />
• Obtain a medical exam before beginning any conditioning program.<br />
If at any time during the session you feel faint, dizzy, or experience pain,<br />
stop and consult your physician.<br />
Getting Started:<br />
• Thoroughly stretch and warm up before operating the <strong>Walkstation</strong>;<br />
• Follow a training / ramp-up schedule. Most people utilize the <strong>Walkstation</strong><br />
at 1 mph (range of 0.3 – 2 mph). It is about comfort, NOT speed.<br />
Everyone is different and has different stride lengths.<br />
Suggested training / ramp-up schedule:<br />
Weeks 1-2: up to 15 min. per hr., on the hr. Weeks 5-6: up to 25 min. per hr., on the hr.<br />
Weeks 3-4: up to 20 min. per hr., on the hr. Weeks 6-8: up to 30 min. per hr., on the hr.<br />
W A L K S T A T I O N U S E R I N S T R U C T I O N S 6
<strong>Walkstation</strong> Display Console Specifics<br />
<strong>Walkstation</strong> Console Display:<br />
• Speed: Miles per hour in 0.10 increments (2 mph maximum)<br />
• Calories: Estimated total calories burned based on user input of weight<br />
• Time: Time elapsed in your session<br />
• Distance: Miles traveled in 0.01 mile increments<br />
• Warning:<br />
Read and understand all directions<br />
Consult a physician before using this equipment<br />
Stop using this equipment if you feel pain, faint, dizzy, or short of breath<br />
Speed Calories Time Distance<br />
WARNING read and understand all instructions. consult a physician before using this equipment. stop using this equipment if you feel pain, faint, dizzy, or short of breath.<br />
<strong>Walkstation</strong> Console Keypad:<br />
= Magnet for Magnetic Safety Clip<br />
• Enter: Accepts session parameters<br />
• Stop: Stops the belt and pauses session<br />
If held for 3 seconds, resets all session information<br />
• Speed: Press the – key to decrease speed<br />
Press the + key to increase speed<br />
• Start: Starts the belt and begins the session<br />
• Desk Height: Adjusts the desk height up / down<br />
7 W A L K S T A T I O N U S E R I N S T R U C T I O N S
<strong>Walkstation</strong> <strong>User</strong> Instructions<br />
W A R N I N G<br />
THIS IS NOT AN EXERCISE MACHINE. Read and follow all manufacturer’s<br />
instructions for the proper use and operation of the <strong>Walkstation</strong> and adjustable<br />
height worksurface before initial use of this worksurface. Failure to follow<br />
these instructions at any time could result in serious personal injury.<br />
To Start the <strong>Walkstation</strong>:<br />
Review all precautions prior to using the <strong>Walkstation</strong>.<br />
When ENTERING the workstation area, and before operating the Walking Platform:<br />
• Ensure that the Walking Platform switch is in the ON position<br />
but belt is not moving;<br />
• Straddle the Walking Platform belt by standing on stationary side straddle<br />
covers and adjust the worksurface to desired height;<br />
• Never adjust the worksurface height while Walking Platform is moving;<br />
• Attach the Magnetic Safety Clip to your clothing near the center of your body,<br />
just below worksurface level, attach other end to the magnetic reciever on<br />
the console keypad;<br />
• For your personal safety, the Magnetic Safety Clip must remain attached<br />
to your clothing while the Walking Platform is in operation;<br />
• Use + and – to adjust setting to your proper weight. Press ENTER.<br />
• Press START button. The treadmill will beep three times and then start<br />
at 0.3 mph. To adjust speed, use FAST + and SLOW – keys.<br />
When Exiting the <strong>Walkstation</strong> Area:<br />
• Do not allow Walking Platform belt to remain running while<br />
workstation is unoccupied.<br />
• Stop the Walking Platform by pushing the STOP button on control panel;<br />
• Wait for the belt to stop moving;<br />
• Remove Magnetic Safety Clip from your clothing and exit the workstation.<br />
Using the Worksurface and Treadmill Controls on Console:<br />
Worksurface<br />
• Height Adjustment – Worksurface up Worksurface down<br />
W A L K S T A T I O N U S E R I N S T R U C T I O N S 8
Walking Platform Operation<br />
• Start – Press START to start belt moving.<br />
• Stop – Press STOP to stop belt moving.<br />
• Pause – Press STOP to stop belt moving & hold session information on display.<br />
• Reset – Press and hold STOP for at least 3 seconds at any time<br />
during operation or pause.<br />
• Emergency Stop – Pull off magnet on end of Magnetic Safety Clip from its<br />
indicated connection on keypad. Belt will slow and stop.<br />
3 Pre-set Programmable Height-AdjusTable Table Controller<br />
(Sit-to-<strong>Walkstation</strong> only)<br />
Operating the Height-AdjusTable Table Controller<br />
The table control panel has six buttons for user control.<br />
• Press and hold either the Up or Down arrow to reach the desired height.<br />
As a safety feature, the user must continuously hold down the button in<br />
order for the table to move.<br />
• The buttons labeled 1-3 each store a desired pre-set height into the<br />
control panel memory.<br />
• The S button is used to store the desired pre-set height for each button labeled 1-3.<br />
Store Height into Memory<br />
To set into memory the desired height for either seated, standing, or walking<br />
work, use the three pre-set buttons.<br />
• Press either the Up or Down arrow until the desired height is attained.<br />
• Press and hold the S button along with your choice of buttons 1-3 to set that<br />
particular height. Hold for three seconds.<br />
• To pre-set additional heights repeat this sequence using the remaining 1-3 buttons.<br />
Adjust Table to a Stored Memory Position<br />
To switch to a stored height in memory, use the<br />
three pre-set buttons.<br />
• Press and hold the numbered button that has the pre-set<br />
height stored into memory.<br />
9 W A L K S T A T I O N U S E R I N S T R U C T I O N S
Odometer:<br />
The <strong>Walkstation</strong> keeps track of your total distance walked and estimated<br />
calories burned. It does so in three ways:<br />
• Normal Accumulation in the Display: While you are walking, the display shows<br />
distance and calories. If you pull the Magnetic Safety Clip or press and hold<br />
the STOP key to reset the <strong>Walkstation</strong>, the distance and calories will reset.<br />
• Session Odometer Function: You may be on and off the <strong>Walkstation</strong> many<br />
times each day but still want to keep track of your distance and calories for that<br />
day (or that week). The session odometer function will work for this purpose,<br />
which displays accumulated distance and calories.<br />
- To view the session odometer: while the <strong>Walkstation</strong> is running, press the<br />
ENTER key.<br />
- To clear the session odometer: while the <strong>Walkstation</strong> is running, press and<br />
hold the ENTER key.<br />
• Overall Odometer: the <strong>Walkstation</strong> also has an overall odometer function,<br />
which can be used for longer periods of time such as several months.<br />
- To view the overall odometer: while the <strong>Walkstation</strong> is prompting for<br />
weight such as at the beginning of a session, press the STOP and +<br />
keys simultaneously.<br />
- To clear the overall odometer: while the <strong>Walkstation</strong> is prompting for weight,<br />
press the STOP and + and – keys simultaneously.<br />
For Private Use:<br />
The treadmill ships in “Public Use” mode allowing the weight to return to the<br />
default after each use. To save the weight and set for “Private Use”, follow these<br />
steps to enter Engineering Mode: (It may be easier if you have 2 people.)<br />
STEP 1: Turn off the treadmill<br />
STEP 2: Press and hold STOP, SPEED - , & SPEED +<br />
STEP 3: While still holding the buttons have someone else turn the treadmill<br />
back on. It may take a couple seconds, but display will read<br />
“ENGINEERING MODE”<br />
STEP 4: Press ENTER twice or until display reads “WEIGHT 150”<br />
STEP 5: Press SPEED + to toggle the to read “WEIGHT SAVED”<br />
STEP 6: Press START to save the change. Screen will read “SAVED”<br />
STEP 7: Press STOP to exit ENGINEERING MODE.<br />
After completing these steps, the treadmill will be back in Normal Operation<br />
Mode. The next time the user enters a weight, it will be saved for each use.<br />
W A L K S T A T I O N U S E R I N S T R U C T I O N S 10
<strong>Walkstation</strong> Troubleshooting<br />
Symptom Cause Solution<br />
Circuit breaker<br />
on treadmill trips<br />
when the power cord<br />
is plugged into wall.<br />
A Damaged motor<br />
B Damage or defective<br />
motor power supply board<br />
C Damaged motor<br />
control circuit board<br />
D Restricted belt or flywheel<br />
E Treadbelt over tensioned<br />
A Service required<br />
B Service required<br />
C Service required<br />
D Check and remove<br />
obstruction or call dealer<br />
E See page 11 for Treadbelt<br />
adjustment information<br />
Computer display LED’s<br />
do not illuminate.<br />
A No power to treadmill<br />
B Circuit breaker trip<br />
C Upper wire harness<br />
not connected or not<br />
completely connected<br />
A Restore power at electrical<br />
outlet or reset circuit<br />
breaker if in on/off position<br />
B Circuit breaker trip<br />
C Upper wire harness<br />
not connected or not<br />
completely connected<br />
Treadbelt tracks<br />
left to right.<br />
A Uneven floor<br />
B Rear roller not<br />
properly adjusted<br />
C Treadmill feet NOT seated<br />
properly in treadmill<br />
receiver plates<br />
A Move treadmill to even<br />
surface or level with shims.<br />
See page 11 for Treadbelt<br />
adjustment information<br />
B See page 11 for Treadbelt<br />
adjustment information<br />
C Move treadmill feet so both<br />
are seated through holes<br />
in treadmill receiver plate<br />
Treadbelt feels<br />
unsmooth,<br />
jerks intermittently.<br />
A Object between<br />
belt and deck<br />
B Object under belt<br />
C Loose tread motor drive belt<br />
D Loose treadbelt tension<br />
A Remove object<br />
between belt and deck<br />
B Remove object<br />
from under belt<br />
C Service required<br />
D See page 11 for Treadbelt<br />
adjustment information<br />
Squeaking noise while<br />
using the treadmill.<br />
A Poly V-belt slipping<br />
B Motor brush noise excessive<br />
C Treadmill feet NOT seated<br />
properly in treadmill<br />
receiver plates<br />
A Service required<br />
B Service required<br />
C Move treadmill feet so both<br />
are seated through holes<br />
in treadmill receiver plate<br />
Treadmill does<br />
not turn on.<br />
A Unit and table aren’t<br />
plugged into a working<br />
electrical outlet<br />
B Insecure cable connections<br />
A Restore power at electrical<br />
outlet or reset circuit<br />
breaker if in on/off position<br />
B Secure cable connections<br />
11 W A L K S T A T I O N U S E R I N S T R U C T I O N S
Error Message Cause Solution<br />
LUBE<br />
Indicates that the accumulated<br />
distance is such that the deck<br />
needs to be lubed<br />
Lube deck with liquid silicone<br />
lubricant available from Details<br />
Inspect wax bar assembly<br />
on commercial models,<br />
if worn to less than 1 ⁄4"<br />
in thickness, replace wax bar<br />
CLEAN<br />
Indicates that the accumulated<br />
distance is such that the machine<br />
needs to be cleaned<br />
Remove motor cover and<br />
vacuum dust from area<br />
Wipe down the exposed<br />
area of the deck beside<br />
the straddle covers with<br />
a clean, dry cloth<br />
MOTOR<br />
Indicates that the accumulated<br />
time on the treadmill is such<br />
that the motor brushes need to<br />
be changed / checked<br />
Check / replace motor<br />
brushes as needed<br />
Reset timer<br />
CALIBRATE<br />
Micro-controller cannot<br />
adjust belt speed to target<br />
See page 11 for Treadmill<br />
Calibration information<br />
EEPROM<br />
Software error during<br />
treadmill startup diagnostics<br />
Restart Treadmill,<br />
if error persists,<br />
replace display console<br />
RECALIBRATE<br />
Treadmill has lost<br />
calibration settings<br />
See page 11 for Treadmill<br />
Calibration information<br />
W A L K S T A T I O N U S E R I N S T R U C T I O N S 12
Work.<br />
Make it a moving experience.<br />
d e t a i l s - w o r k t o o l s . c o m<br />
For further information, please go to the Details website<br />
details-worktools.com or call 800.833.0411<br />
P.O. Box 1967 / CD-5E Grand Rapids, MI 49501-1967 www.details-worktools.com<br />
For a better day at work. <br />
©2009 <strong>Steelcase</strong> Inc. All rights reserved. 12/09<br />
Details Part No. 005734D Rev. D<br />
A S t e e l c a s e<br />
C o m p a n y