How-to Guide tooLS you wiLL need MAteRiALS you wiLL ... - Jewson
How-to Guide tooLS you wiLL need MAteRiALS you wiLL ... - Jewson
How-to Guide tooLS you wiLL need MAteRiALS you wiLL ... - Jewson

You also want an ePaper? Increase the reach of your titles
YUMPU automatically turns print PDFs into web optimized ePapers that Google loves.
<strong>How</strong>-<strong>to</strong> <strong>Guide</strong><br />
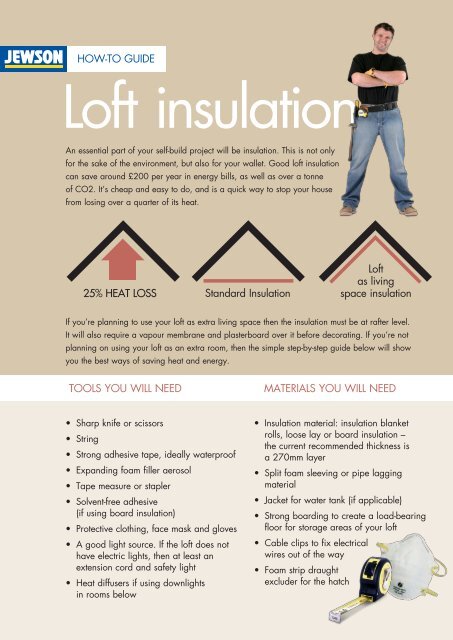
Loft insulation<br />
An essential part of <strong>you</strong>r self-build project will be insulation. This is not only<br />
for the sake of the environment, but also for <strong>you</strong>r wallet. Good loft insulation<br />
can save around £200 per year in energy bills, as well as over a <strong>to</strong>nne<br />
of CO2. It’s cheap and easy <strong>to</strong> do, and is a quick way <strong>to</strong> s<strong>to</strong>p <strong>you</strong>r house<br />
from losing over a quarter of its heat.<br />
25% HEAT LOSS Standard Insulation<br />
Loft<br />
as living<br />
space insulation<br />
If <strong>you</strong>’re planning <strong>to</strong> use <strong>you</strong>r loft as extra living space then the insulation must be at rafter level.<br />
It will also require a vapour membrane and plasterboard over it before decorating. If <strong>you</strong>’re not<br />
planning on using <strong>you</strong>r loft as an extra room, then the simple step-by-step guide below will show<br />
<strong>you</strong> the best ways of saving heat and energy.<br />
TOOLS <strong>you</strong> will <strong>need</strong><br />
MATERIALS <strong>you</strong> will <strong>need</strong><br />
• Sharp knife or scissors<br />
• String<br />
• Strong adhesive tape, ideally waterproof<br />
• Expanding foam filler aerosol<br />
• Tape measure or stapler<br />
• Solvent-free adhesive<br />
(if using board insulation)<br />
• Protective clothing, face mask and gloves<br />
• A good light source. If the loft does not<br />
have electric lights, then at least an<br />
extension cord and safety light<br />
• Heat diffusers if using downlights<br />
in rooms below<br />
• Insulation material: insulation blanket<br />
rolls, loose lay or board insulation –<br />
the current recommended thickness is<br />
a 270mm layer<br />
• Split foam sleeving or pipe lagging<br />
material<br />
• Jacket for water tank (if applicable)<br />
• Strong boarding <strong>to</strong> create a load-bearing<br />
floor for s<strong>to</strong>rage areas of <strong>you</strong>r loft<br />
• Cable clips <strong>to</strong> fix electrical<br />
wires out of the way<br />
• Foam strip draught<br />
excluder for the hatch
PREPARATION<br />
• First, decide what <strong>you</strong> want <strong>to</strong> use the loft for<br />
as this will determine what kind of insulation<br />
<strong>you</strong> will <strong>need</strong>.<br />
• The simplest way of insulating is by rolling out a<br />
double layer of insulation blanket between the<br />
joists then cross-wise over them.<br />
• If <strong>you</strong> plan <strong>to</strong> use the loft for s<strong>to</strong>rage, then <strong>you</strong><br />
will <strong>need</strong> strong boarding, making sure each<br />
piece is big enough <strong>to</strong> cover at least three joists<br />
for stability<br />
• Next, measure <strong>you</strong>r loft. Check the space<br />
between joists and buy insulation at the<br />
appropriate width and length.<br />
• Make sure <strong>you</strong>’re fully protected with overalls,<br />
mask and gloves. Insulation can be irritating <strong>to</strong><br />
the skin and its fibres must not be inhaled.<br />
• Check that <strong>you</strong>r work area is properly lit<br />
• Ensure all other work <strong>to</strong> the loft is complete and<br />
safe (such as plumbing and wiring).<br />
• If <strong>you</strong>r loft isn’t fully boarded, make sure <strong>you</strong><br />
tread carefully, as the spaces between the joists<br />
won’t hold <strong>you</strong>r weight. This will avoid damage<br />
<strong>to</strong> the ceiling below and injury <strong>to</strong> <strong>you</strong>.<br />
DOING THE JOB<br />
ALTERNATIVE MATERIALS<br />
• First, check that <strong>you</strong> won’t be covering any<br />
electrical wires, as this can cause overheating.<br />
• Fasten any wires <strong>to</strong> the sides of joists with the<br />
cable clips.<br />
• If there are any downlights inset in<strong>to</strong> the ceiling<br />
of the room below, make sure <strong>you</strong> fit downlight<br />
heat diffusers <strong>to</strong> these before laying the insulation<br />
– again <strong>to</strong> avoid overheating.<br />
• Next, unroll the insulation blanket from the eaves<br />
<strong>to</strong> the centre making sure it completely fills the<br />
space between the joists. Leave a gap at the very<br />
edge of the eaves <strong>to</strong> ensure natural ventilation<br />
and eliminate condensation.<br />
• Roll out <strong>to</strong> the centre, then cut and repeat from<br />
the other end, making sure the ends butt snugly<br />
against each other.<br />
• Once this layer is complete, repeat at 90°<br />
from the previous layer, going perpendicular<br />
<strong>to</strong> the direction of the joists. Do not compress<br />
either layer, as this will compromise its thermal<br />
performance<br />
If the spaces between <strong>you</strong>r joists are not uniform,<br />
then a roll of insulation blanket may not be<br />
appropriate. In these cases, it may preferable <strong>to</strong><br />
empty sacks of loose-lay material in<strong>to</strong> the spaces<br />
between joists.<br />
Before doing this, make sure none of the<br />
material can disappear down the cavity wall<br />
by blocking the eaves with lengths of timber<br />
between the joists. As above, be careful not<br />
<strong>to</strong> block this area completely, so as <strong>to</strong> avoid<br />
condensation. Also, seal any holes in the ceiling,<br />
such as those through which pipes or wiring are<br />
fed, with expanding foam filler.<br />
Next, empty sacks of loose-lay in<strong>to</strong> the spaces.<br />
Use the edge of a piece of wood <strong>to</strong> smooth and<br />
level off the layer. Once this is laid, be aware<br />
that every time <strong>you</strong> open or close the loft the<br />
draught can blow the material about, so a layer<br />
of blanket insulation or board insulation over the<br />
<strong>to</strong>p is advisable.<br />
LAYER 1<br />
JOISTS<br />
LAYER 1<br />
JOISTS<br />
LAYER 2<br />
LAYER 1<br />
JOISTS<br />
LAYER 1<br />
JOISTS<br />
LAYER 1<br />
• Insulate over the cold-water tank, but not under it.<br />
If it’s <strong>to</strong>o well insulated from heat below it<br />
may freeze (see other essentials below for<br />
more information)
BOARDING<br />
• If <strong>you</strong> intend <strong>to</strong> use some or the entire loft for<br />
s<strong>to</strong>rage, <strong>you</strong> will <strong>need</strong> <strong>to</strong> lay boarding across<br />
the joists.<br />
• In this case, <strong>you</strong> will only be able <strong>to</strong> lay<br />
insulation up <strong>to</strong> the level of the <strong>to</strong>ps of the joists.<br />
For further insulation performance <strong>you</strong> can lay<br />
one or two layers of board insulation between<br />
the joists and the load-bearing boarding.<br />
• Cut it <strong>to</strong> shape with a sharp blade and fix it in<br />
place with a solvent-free adhesive.<br />
• Then either nail or glue the load-bearing<br />
boarding (usually chipboard) on <strong>to</strong>p.<br />
OTHER ESSENTIALS<br />
• Don’t forget <strong>to</strong> insulate the cold-water tank and all<br />
pipes. If these are a uniform shape and size then<br />
ready-made jackets are available <strong>to</strong> fit straight<br />
on<strong>to</strong> the tank, and split-foam pipe sleeves will just<br />
slip straight on<strong>to</strong> the pipes.<br />
• If the tank and pipe runs are more complicated<br />
shapes the tank can be wrapped in insulation<br />
blanket (take care <strong>to</strong> ensure no fibres drop in<strong>to</strong><br />
the water).<br />
• The pipes must be wrapped in pipe lagging.<br />
Wrap it round in a spiral motion, including all<br />
taps & joints, and fasten with string, wire or tape.<br />
• Cut two sections of insulation blanket – one for<br />
the lid of the water tank and one for the loft<br />
hatch. Wrap both in plastic and secure with<br />
staples or tape. Finally, fix a length of foam<br />
draught excluder all round the entrance <strong>to</strong> the<br />
loft hatch.<br />
WE USE LEADING BRANDS YOU CAN TRUST