Dahon Boost OWNER'S MANUAL - NYCeWheels - Electric Bikes
Dahon Boost OWNER'S MANUAL - NYCeWheels - Electric Bikes Dahon Boost OWNER'S MANUAL - NYCeWheels - Electric Bikes
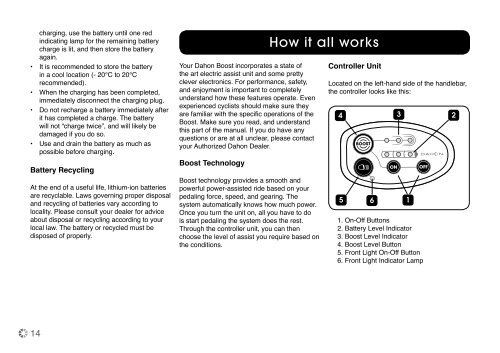
charging, use the battery until one red indicating lamp for the remaining battery charge is lit, and then store the battery again. • It is recommended to store the battery in a cool location (- 20°C to 20°C recommended). • When the charging has been completed, immediately disconnect the charging plug. • Do not recharge a battery immediately after it has completed a charge. The battery will not “charge twice”, and will likely be damaged if you do so. • Use and drain the battery as much as possible before charging. Battery Recycling At the end of a useful life, lithium-ion batteries are recyclable. Laws governing proper disposal and recycling of batteries vary according to locality. Please consult your dealer for advice about disposal or recycling according to your local law. The battery or recycled must be disposed of properly. Your Dahon Boost incorporates a state of the art electric assist unit and some pretty clever electronics. For performance, safety, and enjoyment is important to completely understand how these features operate. Even experienced cyclists should make sure they are familiar with the specific operations of the Boost. Make sure you read, and understand this part of the manual. If you do have any questions or are at all unclear, please contact your Authorized Dahon Dealer. Boost Technology Boost technology provides a smooth and powerful power-assisted ride based on your pedaling force, speed, and gearing. The system automatically knows how much power. Once you turn the unit on, all you have to do is start pedaling the system does the rest. Through the controller unit, you can then choose the level of assist you require based on the conditions. How it all works Controller Unit Located on the left-hand side of the handlebar, the controller looks like this: 1. On-Off Buttons 2. Battery Level Indicator 3. Boost Level Indicator 4. Boost Level Button 5. Front Light On-Off Button 6. Front Light Indicator Lamp 14
1. On-Off Buttons • Gently press the ON button to activate the unit. The Battery level lights will flash for several seconds before becoming fixed at the current battery charge level. • The unit will start in the Normal mode, so both the left and middle Boost level indicator lamps should also come on. • NOTE: Always keep your feet off the pedals when setting the control-switch to “ON”. • The Chainwheel has a built-in sensor to detect the force with which the pedal is pressed. It is important that the no load is on the pedals when you first turn the unit on for correct operation. • To switch off the unit gently press the OFF button. This will turn the unit off and all lamps on the controller should go out. 2. Battery Level Indicator Battery level is indicated by three lamps. It functions when the unit is turned on. They represent the level of charge currently in the battery. Status of the Lights Three Red lamps lit Two Red lamps lit One Red lamp lit One Red lamp flashing fast One Red lamp flashing slowly What it Means The Battery is full or above twothirds The remaining battery charge has decreased The batter charge is becoming low and should be recharged soon The battery is nearly completely discharged. Please charge the battery as soon as possible. The battery is completely discharged. Please charge the battery as soon as possible. 3. Boost Mode Indicator The Boost mode or ‘power level’ is shown by three blue lamps. You can choose the boost level by using the Boost Level Button. You can choose between three Boost settings: • ECO Mode: (Indicated by single left hand lamp being lit) The most economical of the three Boost Modes. The Eco mode will provide assistance up to 15kmh, but at lower power level than the Normal or Boost modes. The level of assistance gradual decreases as you approach 15 kmh. Good for using on the flat or when you want to conserve battery charge. 15
- Page 1 and 2: Dahon Boost OWNER’S MANUAL
- Page 3 and 4: Welcome/Intro • Completely read t
- Page 5 and 6: c. battery and charger 1. Battery 2
- Page 7 and 8: If the battery is wet or dirty, wip
- Page 9 and 10: • Remove the charging plug from t
- Page 11 and 12: Charging with Installed Battery It
- Page 13: Range for Battery Running distance
- Page 17 and 18: General Operation • When you firs
- Page 19 and 20: Initial inspection after 2 months
- Page 21 and 22: When riding the bike Symptom Please
- Page 23 and 24: Specifications Motor Unit • Type
- Page 25 and 26: Notes 25
- Page 27 and 28: Notes 27
charging, use the battery until one red<br />
indicating lamp for the remaining battery<br />
charge is lit, and then store the battery<br />
again.<br />
• It is recommended to store the battery<br />
in a cool location (- 20°C to 20°C<br />
recommended).<br />
• When the charging has been completed,<br />
immediately disconnect the charging plug.<br />
• Do not recharge a battery immediately after<br />
it has completed a charge. The battery<br />
will not “charge twice”, and will likely be<br />
damaged if you do so.<br />
• Use and drain the battery as much as<br />
possible before charging.<br />
Battery Recycling<br />
At the end of a useful life, lithium-ion batteries<br />
are recyclable. Laws governing proper disposal<br />
and recycling of batteries vary according to<br />
locality. Please consult your dealer for advice<br />
about disposal or recycling according to your<br />
local law. The battery or recycled must be<br />
disposed of properly.<br />
Your <strong>Dahon</strong> <strong>Boost</strong> incorporates a state of<br />
the art electric assist unit and some pretty<br />
clever electronics. For performance, safety,<br />
and enjoyment is important to completely<br />
understand how these features operate. Even<br />
experienced cyclists should make sure they<br />
are familiar with the specific operations of the<br />
<strong>Boost</strong>. Make sure you read, and understand<br />
this part of the manual. If you do have any<br />
questions or are at all unclear, please contact<br />
your Authorized <strong>Dahon</strong> Dealer.<br />
<strong>Boost</strong> Technology<br />
<strong>Boost</strong> technology provides a smooth and<br />
powerful power-assisted ride based on your<br />
pedaling force, speed, and gearing. The<br />
system automatically knows how much power.<br />
Once you turn the unit on, all you have to do<br />
is start pedaling the system does the rest.<br />
Through the controller unit, you can then<br />
choose the level of assist you require based on<br />
the conditions.<br />
How it all works<br />
Controller Unit<br />
Located on the left-hand side of the handlebar,<br />
the controller looks like this:<br />
1. On-Off Buttons<br />
2. Battery Level Indicator<br />
3. <strong>Boost</strong> Level Indicator<br />
4. <strong>Boost</strong> Level Button<br />
5. Front Light On-Off Button<br />
6. Front Light Indicator Lamp<br />
14


