Use & Care Guide - Crosley
Use & Care Guide - Crosley
Use & Care Guide - Crosley

You also want an ePaper? Increase the reach of your titles
YUMPU automatically turns print PDFs into web optimized ePapers that Google loves.
OWNER’S GUIDE<br />
READ AND SAVE THESE INSTRUCTIONS<br />
Record Model No. and Serial No. of this dehumidifier in space provided below. These numbers are<br />
printed on the nameplate located behind the bucket.<br />
M odel No. ___________________________________________________<br />
Serial No. ____________________________________________________<br />
IM PORTANT: Keep a copy of your bill of sale. The date on the bill establishes the warranty period<br />
should service be required. If service is performed, it is in your best interest to obtain and keep all<br />
receipts.<br />
Register Your Product<br />
The self-addressed PRODUCT REGISTRATION CARD should be filled in completely, signed, and<br />
returned to the Frigidaire Company.<br />
2 Warranty<br />
3 Important Safety Instructions<br />
3 Location<br />
3 How It Works<br />
4 Operation &Features<br />
6 Fault Codes<br />
7 Removing Collected Water<br />
8 <strong>Care</strong> and Cleaning<br />
8 Storage<br />
9 Avoid Service Checklist<br />
Contents<br />
Operate dehumidifier only as instructed in this Owner’s <strong>Guide</strong>. These instructions are not meant to<br />
cover every possible condition and situation that may occur. Common sense and caution must be<br />
used when installing, operating, and maintaining any appliance.<br />
DEHUMIDIFIER<br />
P/N 66166044
DEHUMIDIFIER WARRANTY<br />
Your product is protected by this warranty<br />
Your appliance is warranted by Electrolux. Electrolux has authorized Frigidaire Consumer Services and their authorized servicers to perform service under this warranty.<br />
Electrolux authorizes no one else to change or add to any of these obligations under this warranty. Any obligations for service and parts under this warranty<br />
must be performed by Frigidaire Consumer Services or an authorized Frigidaire servicer.<br />
WARRANTY FRIGIDAIRE, THROUGH ITS AUTHORIZED THE CONSUMER WILL BE<br />
PERIOD SERVICERS, WILL: RESPONSIBLE FOR:<br />
FULL ONE-YEAR<br />
WARRANTY<br />
One year from original<br />
purchase date.<br />
Pay all costs for repairing or replacing parts of this<br />
appliance which prove to be defective in materials or<br />
workmanship.<br />
Costs of service calls that are listed under NOR-<br />
MAL RESPONSIBILITIES OF THE CONSUMER.*<br />
LIMITED 2ND-5TH<br />
YEAR WARRANTY<br />
(Sealed System)<br />
Second through fifth years<br />
from original purchase<br />
date.<br />
Repair or replace any parts in the Sealed Refrigeration<br />
System (compressor, condenser, evaporator and tubing)<br />
proves to be defective in materials or workmanship.<br />
Diagnostic costs and any removal, transportation<br />
and reinstallation costs which are required because<br />
of service. Costs for labor, parts and transportation<br />
other than with respect to the Sealed Refrigeration<br />
System.<br />
*NORMAL<br />
RESPONSIBILITIES<br />
OF THE CONSUMER<br />
EXCLUSIONS<br />
This warranty applies only to products in ordinary household use, and the consumer is responsible for the<br />
items listed below.<br />
1. Proper use of the appliance in accordance with instructions provided with the product.<br />
2. Proper installation by an authorized servicer in accordance with instructions provided with the appliance and in accordance<br />
with all local plumbing, electrical and/or gas codes.<br />
3. Proper connection to a grounded power supply of sufficient voltage, replacement of blown fuses, repair of loose connections<br />
or defects in house wiring.<br />
4. Expenses for making the appliance accessible for servicing, such as removal of trim, cupboards, shelves, etc., which are not a<br />
part of the appliance when it was shipped from the factory.<br />
5. Damages to finish after installation.<br />
6. Damage to unit after remove from packaging carton.<br />
This warranty does not cover the following:<br />
1. CONSEQUENTIAL OR INCIDENTAL DAMAGES SUCH AS PROPERTY DAMAGE AND INCIDENTAL EXPENSES RESULTING FROM<br />
ANY BREACH OF THIS WRITTEN OR ANY IMPLIED WARRANTY.<br />
Note: Some states do not allow the exclusion or limitation of incidental or consequential damages, so this limitation or<br />
exclusion may not apply to you.<br />
2. Service calls which do not involve malfunction or defects in workmanship or material, or for appliances not in ordinary<br />
household use. The consumer shall pay for such service calls.<br />
3. Damages caused by services performed by persons other than authorized Frigidaire servicers; use of parts other than Frigidaire<br />
Genuine Renewal Parts; obtained from persons other than such servicers; or external causes such as abuse, misuse, inadequate<br />
power supply or acts of God.<br />
4. Products with original serial numbers that have been removed or altered and cannot be readily determined.<br />
IF YOU NEED SERVICE<br />
Keep your bill of sale, delivery slip, or some other appropriate payment record. The date on the bill establishes the warranty period<br />
should service be required. If service is performed, it is in your best interest to obtain and keep all receipts. This written warranty<br />
gives you specific legal rights. You may also have other rights that vary from state to state. Service under this warranty must be<br />
obtained by following these steps, in order:<br />
1. Contact Frigidaire Consumer Services or an authorized Frigidaire servicer.<br />
2. If there is a question as to where to obtain service, contact our Consumer Relations Department at:<br />
Frigidaire<br />
P.O. Box 212378<br />
Augusta, GA 30917<br />
800-444-4944<br />
CANADA<br />
Electrolux Canada Group<br />
6150 McLaughlin Road<br />
Mississauga, Ontario L5R 4C2<br />
1-866-213-9397<br />
Product features or specifications as described or illustrated are subject to change without notice. All warranties are made by Electrolux.<br />
This warranty applies only in the 50 states of the U.S.A., Puerto Rico and Canada.<br />
FOR SERVICE CALL 1-800-444-4944.<br />
2
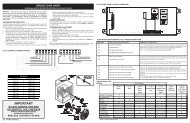
Important Safety<br />
Instructions<br />
Avoid fire hazard or<br />
electric shock. Do not use an extension<br />
cord or an adaptor plug. Do not remove<br />
grounding prong from power cord.<br />
Grounding type<br />
w all receptacle<br />
Pow er supply<br />
cord w ith 3-prong<br />
grounding plug<br />
Do not, under<br />
any circumstances,<br />
cut, remove,<br />
or bypass the<br />
grounding prong<br />
from this plug.<br />
Read all instructions before using this dehumidifier. To reduce the risk of fire,<br />
electric shock, or injury to persons when using your dehumidifier, follow basic<br />
precautions, including the following:<br />
ForYourSafety<br />
Do not store or use gasoline or other flammable vapors and liquids in the vicinity of<br />
this or any other appliance. Read product labels for flammability and other warnings.<br />
Child Safety Precautions<br />
• Destroy the carton, plastic bags, and any packing materials immediately after the<br />
dehumidifier is unpacked. Children should never use these items for play.<br />
• Do not leave children unattended in an area where the appliance is operating.<br />
• Do not allow them to sit or stand on the appliance.<br />
Electrical Information<br />
• For your safety and protection, this dehumidifier is equipped with a three-prong<br />
grounding plug on the power cord. Do not, under any circumstances, cut or<br />
remove the round ground prong from the plug.<br />
• Your dehumidifier must be plugged directly into a properly grounded and<br />
polarized three-prong receptacle. If the wall receptacle you intend to use will not<br />
accept a three-prong plug, or if you are not sure the outlet is adequately<br />
grounded or protected by a time delay fuse or circuit breaker, have a qualified<br />
electrician install the proper outlet according to the National Electrical Code and<br />
applicable local codes and ordinances. Do not use an extension cord or an<br />
adapter plug.<br />
• Never unplug the dehumidifier by pulling on the power cord. Always grip the<br />
plug firmly and pull straight out from the receptacle.<br />
• Do not pinch, bend, or knot the power cord.<br />
Location<br />
Selecting a Location<br />
IM PORTANT:<br />
1. Dehumidifier must be operated in an enclosed area to be most effective.<br />
Close all doors, w indow s, and other outside openings to the room. The<br />
effectiveness of the dehumidifier depends on the rate at w hich new<br />
moisture-laden air enters<br />
the room.<br />
2. Place dehumidifier in a location that does not restrict airflow through the<br />
front of the unit or out of the louvers on the sides of cabinet.<br />
3. A dehumidifier operating in a basement w ill have little or no effect in<br />
drying an adjacent enclosed storage area, such as a closet, unless there<br />
is adequate circulation of air in and out of the area. It may be necessary<br />
to install a second dehumidifier in the enclosed area for satisfactory<br />
drying.<br />
4. The dehumidifier must be installed on a level floor that will support it<br />
with a full bucket of water.<br />
5. There should be a minimum of 12 inches clearance around the dehumidifier.<br />
How It Works<br />
When the unit is started, the fan begins to pull moisture-laden air across the<br />
dehumidifying coils. The coils condense or draw moisture from the air, and air flows<br />
through the side louvers into the room as dry, warm air. Moisture removed from air<br />
is collected in a bucket on the front of the dehumidifier.<br />
Theunitisdesignedtooperatebetween41F(5C),and96F(35C).<br />
If the unit is switched off and needs to be switched on again, wait three minutes<br />
before doing so.<br />
Make sure the tank is fitted correctly otherwise unit will not turn on.<br />
3
OPERATION & FEATURES<br />
Allow the unit to reach room temperature before operating.<br />
To begin operating the dehumidifier, follow these steps:<br />
1. Plug the power cord into a properly grounded 110/120 volt AC outlet. Note the<br />
POWER indicators will illuminate.<br />
2. To turn the unit on press the ON/OFF button. The unit will run in the factory<br />
setting of CONTINUOUS and high fan speed.After a few seconds the unit will<br />
display the actual room's relative humidity. This will be the case after each<br />
and every change of setting.It is recommended you leave the unit running in<br />
the CONTINUOUS setting for the first three or four days until the sweating<br />
and dampness odors have stopped.<br />
4
3. After a few days when the Relative Humidity has declined, press the HUMIDITY<br />
or buttons to choose a value between 35% to 80%, so the room is kept at a<br />
comfortable concentration.Pressing the or buttons will change the humidity selection<br />
in 5% increments.If at any time you want to return to the CONTINUOUS Mode,<br />
pressing the HUMIDITY button will lower the Relative Humidity through the 5%<br />
increments until the Continuous indicator is lit and the display reads CO.<br />
4. You can also use the FAN SPEED button to change the fan speed to HIGH or LOW.<br />
The indicator light will show the setting you have selected. A higher fan<br />
speed will result in quicker moisture removal.<br />
5. The FILTER RESET light will illuminate after 250 hours of operation. At this time<br />
refer to the <strong>Care</strong> and Cleaning section to remove and clean the filter. Once the filter<br />
has been cleaned , to extinguish the light simply press the FILTER button.<br />
5
6. The TIMER function enables you to either start or stop the unit in the choice of<br />
2 or 4 hours.If the unit is running then selecting TIMER at 2 hours will turn the unit<br />
off after 2 hours.If the unit is off pressing the TIMER button and selecting say 4 hours,<br />
the unit will turn on after 4 hours and remain working in the selected mode.The<br />
POWER indicator must be lit to make sure power is being supplied to the unit.<br />
7. To shut the unit down, press the ON/OFF button. Note: the power indicator will<br />
still be lit when the unit is turned off. Only removing the plug will extinguish these<br />
lights.<br />
FAULT CODES<br />
If the display reads "F1" or "F2", a sensor has failed. Contact your Authorized<br />
Frigidaire Service Center.<br />
6
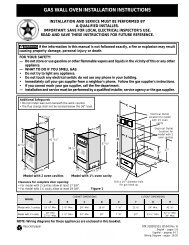
REMOVING COLLECTED WATER<br />
1. Emptying the Bucket:<br />
a. When the bucket is full the unit will shut down and the BUCKET FULL<br />
indicator light will illuminate.<br />
b. Do not move the unit at this point otherwise water may spill on the floor.<br />
c. Press sides of bucket gently to unclip the bucket from the unit.<br />
d. Remove the bucket as shown in the photographs below and empty the<br />
bucket.<br />
e. Replace the empty bucket back into the unit and once seated correctly<br />
the unit will start up again.<br />
f. You should hear a click when the bucket is in the correct position.<br />
<br />
diagram<br />
7
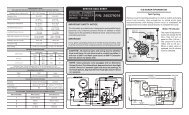
2. Continuous Drainage:<br />
a. For constant drainage operation, you will need a garden hose and a<br />
drain nearby to discharge the water into.<br />
b. Remove the bucket from the unit and set aside.<br />
c. Lift up the side flap located on the left side of the unit as looking from the front. (fig.1)<br />
d. Insert the female threaded end of the hose through the opening. (fig.2)<br />
e. Screw the garden hose onto the threaded portion of the tray<br />
underneath the bucket opening. (fig.3)<br />
f. Make sure the hose is secure so there are not leaks.<br />
g. Direct the hose toward the drain making sure that there are no kinks<br />
that will stop the water flowing.<br />
h. Place the end of the hose into the drain.<br />
i. Place the bucket back in the unit and make sure that it is located correctly. (fig.4)<br />
j. Select the desired humidity setting and fan speed on the unit for<br />
continuous draining to start.<br />
fig.1<br />
Note: If the unit stops operating check that the bucket full light is illuminated. If it<br />
is remove the bucket and empty the contents and then check the seal between<br />
the hose and the drip tray. If there is a small leak then replace the hose gasket<br />
and re-tighten the hose.<br />
CARE AND CLEANING<br />
1. Filter<br />
a. Remove the filter every two weeks based on normal<br />
operating conditions.<br />
pull filter downwards.<br />
c. Wash the filter with clean water then dry.<br />
d. Re-install the filter, replace Bucket.<br />
2. Cabinet<br />
a. Dust cabinet with an oil-free cloth, or using a damp cloth.<br />
b. Vacuum grill using brush attachment.<br />
3. Water Bucket<br />
a. Clean bucket with warm water and detergent.<br />
STORAGE<br />
fig.2<br />
fig.3<br />
fig.4<br />
When unit is not in use unplug and use the cord wrap shown for your model type.<br />
8
Avoid Service Checklist<br />
Before calling for service, review this list. It may save you time and expense. This<br />
list includes common occurrences that are not the result of defective workmanship<br />
or materials in this appliance.<br />
OCCURRENCE<br />
DEHUM IDIFIER DOES NOT OPERA TE.<br />
SOLUTION<br />
Plug is disconnected from outlet. Push plug firmly into wall outlet.<br />
House fuse blown or circuit breaker tripped. Replace fuse with time delay type or reset circuit<br />
breaker.<br />
The dryness level you selected has been reached. Dehumidifier automatically shuts off when<br />
selected amount of moisture has been removed from the air. If you want to remove more<br />
moisture, Select 'CONTINUOUS' by using the humidity button or knob. After the dehumidifier starts,<br />
reset the control to the desired setting.<br />
Bucket not installed properly. See “ Removing Collected Water.”<br />
Water in the bucket has reached its preset level. Dehumidifier automatically turns off when this<br />
occurs. Empty bucket and return bucket to position.<br />
Dehumidifier is not turned on. Turn unit on.<br />
DEHUM IDIFIER RUNS TOO M UCH.<br />
W indows or doors near dehumidifier are open to outdoors. Close all windows or doors to outside.<br />
Area to be dehumidified is too large. Check with your dealer to see if capacity is adequate.<br />
Air movement through dehumidifier is blocked. Grill or filter may be dirty. <strong>Use</strong> brush attachment of<br />
vacuum cleaner to clean grill. See “ <strong>Care</strong> and Cleaning.” Dehumidifier must be placed in a space<br />
that does not restrict air flowing into the rear coil or out of the front grill.<br />
Dehumidifier has been installed or restarted recently. The higher the moistuire in the room, the<br />
longer the dehumidifier will operate.<br />
Dehumidifier is in the CONT mode and will remain on in this mode use the humidity<br />
button or knob to set a RH% higher level.<br />
DEHUM IDIFIER I S OPERA TING BUT<br />
ROOM IS NOT DRY ENOUGH.<br />
Humidity setting is too high. Press the HUMIDITY button or rotate knob to a lower setting<br />
or choose CONTINUOUS for maximum dryness.<br />
Dehumidifier has been installed or restarted recently. The higher the moisture in the room air, the<br />
longer it takes for the room air to become dry.<br />
Dehumidifier does not have sufficient clearance to operate. Air flow to front grill is blocked. See<br />
“ Selecting a Location.”<br />
Room temperature is too low. Unit will not operate satisfactorily if the room temperature is below<br />
41°F (5°C). See “ Operating Conditions.”<br />
Refer to causes under DEHUMIDIFIER RUNS TOO MUCH.<br />
FROST A PPEA RS ON COILS A BOV E<br />
BUCK ET OR DRIP TRA Y .<br />
Dehumidifier has been turned on recently. This is normal due to refrigerant rushing through the<br />
coil. Frost will usually disappear within 60 minutes.<br />
Room Temperature is too low. All models will operate satisfactorily at temperatures greater than<br />
41°F (5°C).<br />
NOISE IS LIK E A FA N.<br />
Air is moving through the dehumidifier. This is a normal sound.<br />
If These Solutions Fail, Call 1-800-444-4944 For Frigidaire Service.<br />
9