Operating and brewing instructions 50l april 2008 - Speidel Tank
Operating and brewing instructions 50l april 2008 - Speidel Tank
Operating and brewing instructions 50l april 2008 - Speidel Tank

Create successful ePaper yourself
Turn your PDF publications into a flip-book with our unique Google optimized e-Paper software.
<strong>Operating</strong> <strong>and</strong> <strong>brewing</strong> <strong>instructions</strong><br />
for<br />
<strong>Speidel</strong>´s Master Brewer<br />
Updated July <strong>2008</strong>
1 GENERAL........................................................................................................... 1<br />
2 PRESENTATION OF THE MASTER BREWER ................................................. 2<br />
2.1 Components <strong>and</strong> extent of supply ......................................................................................................... 2<br />
2.2 Installation of the Master Brewer ......................................................................................................... 2<br />
2.3 Cleaning the Master Brewer.................................................................................................................. 2<br />
2.4 Storage of the Master Brewer................................................................................................................ 3<br />
2.5 Technical data about the Master Brewer ............................................................................................. 3<br />
2.6 Language selection.................................................................................................................................. 3<br />
3 WORKING WITH THE MASTER BREWER ....................................................... 4<br />
3.1 Advice about safety................................................................................................................................. 4<br />
3.2 Advice about the temperature control unit .......................................................................................... 4<br />
3.3 Advice about the recirculating pump.................................................................................................... 5<br />
3.4 Advice about the container’s lid ............................................................................................................ 5<br />
3.5 Advice about hygiene.............................................................................................................................. 5<br />
4 BREWING WITH THE MASTER BREWER........................................................ 6<br />
4.1 Introduction ............................................................................................................................................ 6<br />
4.2 Preparations ............................................................................................................................................ 6<br />
4.3 Programming / starting the Master Brewer......................................................................................... 7<br />
4.4 Mashing (<strong>brewing</strong>).................................................................................................................................. 7<br />
4.5 Running off.............................................................................................................................................. 9<br />
4.6 Boiling the hops..................................................................................................................................... 10<br />
4.7 Cooling................................................................................................................................................... 12<br />
4.8 Main fermentation ................................................................................................................................ 12<br />
4.9 Maturation (ripening)........................................................................................................................... 13<br />
5 A BREWING EXAMPLE AND BRIEF INSTRUCTIONS................................... 15<br />
6 BREWING DEFECTS AND ELIMINATING PROBLEMS ................................. 18<br />
7 LEGAL ASPECTS OF DOMESTIC BREWING (VALID JUST FOR GERMANY)..... 20<br />
8 ADVICE ABOUT LITERATURE AND PURCHASING SOURCES ................... 21<br />
9 BREWING RECORD......................................................................................... 22<br />
10 PUMP CLEANING ............................................................................................ 23<br />
11 WARNINGS ...................................................................................................... 26
<strong>Speidel</strong>’s Master Brewer<br />
1 General<br />
Dear Customer,<br />
You have acquired a new device from our company. We thank you for choosing it. We<br />
give priority to the quality <strong>and</strong> functionality of our products.<br />
Use:<br />
The Master Brewer is designed <strong>and</strong> produced to brew small quantities of beer (approx. 50<br />
litres).<br />
<strong>Operating</strong> <strong>instructions</strong>:<br />
We have written these operating <strong>and</strong> <strong>brewing</strong> <strong>instructions</strong> in order to ensure that the<br />
Master Brewer is commissioned <strong>and</strong> operated reliably <strong>and</strong> safely from the start. Please<br />
read them through carefully <strong>and</strong> completely, before you start to brew for the first time.<br />
Your Master Brewer will work to your full satisfaction <strong>and</strong> have a long service life, if you<br />
have followed this advice <strong>and</strong> <strong>instructions</strong> precisely.<br />
Advice about safety:<br />
Please follow the advice about safety.<br />
Declaration of conformity:<br />
We, SPEIDEL <strong>Tank</strong>- und Behälterbau GmbH, of Krummenstrasse 2, D-72131<br />
Ofterdingen, declare ourselves to be solely responsible for the product - which is named<br />
in these <strong>instructions</strong> as ‘<strong>Speidel</strong>’s Master Brewer’ <strong>and</strong> to which this declaration refers -<br />
complying with the regulations of the following European Guidelines: 89/336/EWG <strong>and</strong><br />
72/73/EWG.<br />
Legally binding signature: Ofterdingen, November 2006.<br />
Stefan <strong>Speidel</strong><br />
<strong>Speidel</strong> <strong>Tank</strong>- und Behälterbau GmbH<br />
Krummenstrasse 2, D-72131 Ofterdingen.<br />
Page 1 of 26
<strong>Speidel</strong>’s Master Brewer<br />
2 Presentation of the Master Brewer<br />
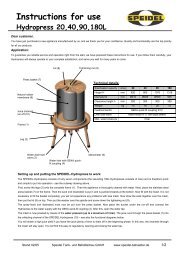
2.1 Components <strong>and</strong> extent of supply<br />
Please find out about the components <strong>and</strong> the extent of supply from the following<br />
illustration (the cooling spiral <strong>and</strong> fermenting cask are not included).<br />
2.2 Installation of the Master Brewer<br />
The Master Brewer must be placed on a sturdy, stable <strong>and</strong> horizontal base before use<br />
or before the <strong>brewing</strong> process. Note that the Master Brewer can weigh up to 90 kg<br />
when it is in a filled condition <strong>and</strong> full up with boiling hot wort. Horizontal installation<br />
is a prerequisite for the pumped recirculation during the <strong>brewing</strong> process. Avoid a<br />
wobbly base. A sturdy wooden box or a table that is not too high is ideally suitable.<br />
The Master Brewer is not allowed to be moved during the <strong>brewing</strong> process. The<br />
h<strong>and</strong>les are only intended for transporting <strong>and</strong> h<strong>and</strong>ling it in an empty condition. It is<br />
imperative to keep children away from the device when it is in use.<br />
2.3 Cleaning the Master Brewer<br />
The Master Brewer must be cleaned immediately after the <strong>brewing</strong> process. The<br />
cleaning is considerably eased by preventing the residual wort <strong>and</strong> malt from drying<br />
out. All stainless steel parts can be cleaned with a conventional, domestic washing-up<br />
liquid [mixed with water]. Scouring agents <strong>and</strong> sponges or brushes that cause<br />
scratches are unsuitable. The heating spiral can best be cleaned with a pipe-cleaning<br />
thread. The pump <strong>and</strong> the drive ball located inside it should also be flushed out<br />
regularly. Fresh water is pumped through the pump several times beforeh<strong>and</strong>. Just<br />
invert the Master Brewer <strong>and</strong> loosed the screwed connection – which should only be<br />
tightened manually – in order to open the pump. The pump can be easily removed by<br />
completely detaching the plug’s screwed connection from the Master Brewer. Care<br />
Page 2 of 26
<strong>Speidel</strong>’s Master Brewer<br />
must be taken when cleaning the <strong>brewing</strong> boiler, that no sprayed water or moisture<br />
comes into contact with the electrical components. The power supply must be<br />
disconnected in order to clean the Master Brewer. The Master Brewer <strong>and</strong> the<br />
associated internal fitments only have to be freed of dust <strong>and</strong> dirt with warm water<br />
before the <strong>brewing</strong> begins. The pump <strong>and</strong> conduits also have to be rinsed out by means<br />
of pumped recirculation. Take care that you also include the malt pipe’s seal <strong>and</strong> the<br />
stop cock. Ensure that no residue at all from the flushing agent remains in the Master<br />
Brewer any longer, which could have a negative effect on the beer’s content of foam.<br />
2.4 Storage of the Master Brewer<br />
The Master Brewer must be stored in dry conditions. Avoid contact with ferrous or<br />
rusty objects.<br />
2.5 Technical data about the Master Brewer<br />
Weight:<br />
24 kg with fittings <strong>and</strong> the lifting stirrup.<br />
Heating spiral: 3,200 watts of heat output.<br />
Pump:<br />
2 x 23 watts.<br />
Mains power supply: 230 V.<br />
Capacity:<br />
a <strong>brewing</strong> quantity of approx. 50 litres of manufactured beer<br />
(normal beer) = approx. 53 litres of wort.<br />
2.6 Language selection<br />
<strong>Speidel</strong>s<br />
Ist Temp<br />
Braumeister<br />
T=015°C<br />
The language selection menu is accessed from the basic<br />
display by pressing <strong>and</strong> holding the UP ARROW (LNG) for 3<br />
seconds. The language can then be set using the arrow<br />
buttons to GERMAN, ENGLISH, FRENCH or SPANISH.<br />
The selected language is accepted by pressing the ENTER<br />
button.<br />
Page 3 of 26
<strong>Speidel</strong>’s Master Brewer<br />
!<br />
3 Working with the Master Brewer<br />
3.1 Advice about safety<br />
Caution: danger of burning! The container, lid <strong>and</strong> fittings become very hot. The<br />
boiler contains boiling wort at the end of the <strong>brewing</strong> process. Follow the advice about<br />
installation. Never move the Master Brewer when it is in a hot condition. Keep<br />
children away. You should always use oven cloths or gloves when working on <strong>and</strong><br />
with the Master Brewer.<br />
Caution: danger of condensation! Take care when lifting the lid, that the condensed<br />
water on its underside runs back into the container. Hold the lid obliquely over the<br />
container accordingly.<br />
Caution: electricity! Only carry out cleaning work on the Master Brewer when the<br />
plug has been pulled out of the mains socket outlet (separated from the mains power<br />
supply). Avoid overloading the electrical fuse. Do not connect any other appliance<br />
with a high electrical rating to the same fuse because the Master Brewer has a high<br />
consumption of electricity. Important: for operation of the control unit, the plug<br />
connections on the rear side (pump <strong>and</strong> heating) of the unit must be locked at all times.<br />
<strong>Operating</strong> the unit without the plug connections locked will create the danger of<br />
overheating, damage to the Master Brewer <strong>and</strong> danger to the user.<br />
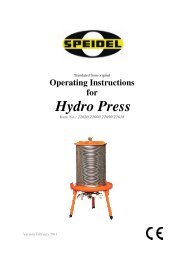
3.2 Advice about the temperature control unit<br />
UP ARROW<br />
• Increase time / temperature in<br />
programming mode <strong>and</strong> in<br />
manual operation<br />
• Language settings (3 sec)<br />
• Up + down arrows = Stop<br />
automatic or return from manual<br />
operation<br />
LED heating<br />
LED pump<br />
Display<br />
ENTER<br />
• Switch to programming mode (1 sec)<br />
• Confirmation of values in programming<br />
mode<br />
• Technology of requests in automatic<br />
operation<br />
• Pump On/Off in manual operation<br />
DOWN ARROW<br />
• Reduce time / temperature in programming mode <strong>and</strong> in<br />
manual operation<br />
• Switch to manual operation (1sec)<br />
• Up + down arrows = Stop automatic or return from<br />
manual operation<br />
START<br />
• Start automatic <strong>brewing</strong> (1 sec)<br />
• Confirmation but within the <strong>brewing</strong> process<br />
• Heating On/Off in manual operation<br />
Automatic operation: Start by pressing START (1 sec). A comprehensive description<br />
is given in the following chapter “Brewing with the Master<br />
Brewer”.<br />
Programming module: The programming module is accessed by pressing the ENTER<br />
button (1 sec). A comprehensive description is also given in<br />
the following chapter “Brewing with the Master Brewer”.<br />
Manual operation: Press ↓ (1sec) to switch to manual operation of the Master<br />
Brewer. The heating (H) is switched on/off by pressing<br />
START. Pressing ENTER also activates the pump (P). The<br />
temperature can be set by means of the arrow buttons. Pressing<br />
Page 4 of 26
<strong>Speidel</strong>’s Master Brewer<br />
Cancel / back:<br />
↓+↑ simultaneously returns to the initial display of the Master<br />
Brewer.<br />
In all operating modes (automatic, programming mode <strong>and</strong><br />
manual operation), pressing the buttons ↓+↑ returns the user to<br />
the initial position.<br />
3.3 Advice about the recirculating pump<br />
The recirculating pump can be switched on <strong>and</strong> off via the switch that is located on the<br />
electrical box. It is important that the pump is ventilated after filling up with <strong>brewing</strong><br />
water, so that it has the full output. This is done by switching the pump on <strong>and</strong> off<br />
several times when filled up with water <strong>and</strong> a mounting position of the pump of 45°<br />
(until no bubbles of air escape any longer <strong>and</strong> hardly any noise can be heard from the<br />
pump).<br />
3.4 Advice about the container’s lid<br />
The lid assists the temperature being reached more quickly during heating. The<br />
ventilating slots avoid pressure building up in the boiler <strong>and</strong> they allow the air to<br />
circulate slightly. Water condenses on the lid’s underside at higher temperatures. Care<br />
must be taken when lifting the lid, that the lid’s rim is held over the boiler’s opening,<br />
so that the condensation which runs off (when holding the lid obliquely), runs back<br />
into the boiler <strong>and</strong> does not run down outside it.<br />
3.5 Advice about hygiene<br />
Hygiene is of paramount importance when <strong>brewing</strong> beer. The beer or the wort is<br />
exposed to the danger of infection in the cold area especially (when cooling, bottling<br />
[decanting] <strong>and</strong> fermenting), which can spoil the beer <strong>and</strong> ruin the whole work.<br />
Therefore pay special attention to absolutely clean containers, (fermenting cask <strong>and</strong><br />
bottles) <strong>and</strong> working materials (spoons, stop cocks <strong>and</strong> seals). Sulphurous acid is<br />
particularly suitable for disinfecting these containers <strong>and</strong> objects: it is obtainable from<br />
specialized vintners <strong>and</strong> hobby-<strong>brewing</strong> shops. This powder is mixed with water <strong>and</strong><br />
thinned: it is suitable for pouring into the fermenting bung, for disinfecting the<br />
fermenting container, other utensils <strong>and</strong> even the h<strong>and</strong>s. It is typically recommended to<br />
use a bucket of sulphurous acid, in which the h<strong>and</strong>s <strong>and</strong> utensils are disinfected during<br />
the <strong>brewing</strong> <strong>and</strong> before the bottling. The fermenting cask containing 3 to 5 litres of<br />
sulphurous acid is sealed <strong>and</strong> allowed to st<strong>and</strong> for several hours. Shake the cask<br />
several times in the meantime, then empty it <strong>and</strong> allow droplets to drain out before<br />
use. It is unnecessary to rinse it out with water. A few droplets or residue from the<br />
sulphurous acid in the beer are not a cause for concern as a result. Storage casks <strong>and</strong><br />
maturing casks are disinfected just like the fermenting containers. The bottles are<br />
disinfected by heating them up in an oven, if the beer is decanted into bottles with<br />
stirrup stoppers for maturation <strong>and</strong> storage after the fermentation. The rubber seals are<br />
removed from the stirrup stoppers <strong>and</strong> then boiled in hot water or immersed in<br />
sulphurous acid. The bottles are heated up in the oven to a temperature of approx.<br />
130°C. The bottles are allowed to cool down to room temperature after that by means<br />
of switching off the oven <strong>and</strong> they are then sealed with the disinfected seals. It is thus<br />
guaranteed that the fermented beer will be decanted into absolutely sterile containers.<br />
This work should be done several days before the fermenting, so that the decanting<br />
process can take place quickly <strong>and</strong> not at a frantic pace.<br />
Page 5 of 26
<strong>Speidel</strong>’s Master Brewer<br />
4 Brewing with the Master Brewer<br />
4.1 Introduction<br />
Manufacturing beer with the Master Brewer can be split up into different phases: each<br />
of which is described in detail below. These phases are described generally first of all,<br />
in order to cover the <strong>brewing</strong> process <strong>and</strong> all sorts of beer <strong>and</strong> recipes for them. The<br />
following section gives a definitive example of <strong>brewing</strong> for the novice brewer, as well<br />
as a special recipe with exact information about quantities, <strong>brewing</strong> times <strong>and</strong><br />
temperature levels. It would be ideal if you could review the individual steps that lead<br />
to the manufactured beverage first of all, before you begin with <strong>brewing</strong> the beer. It is<br />
recommended to keep a record [e.g., a logbook] of <strong>brewing</strong> (refer to the record in the<br />
appendix or at www.speidel-behaelter.de), so as to ensure that you do not omit any<br />
steps: it will give you a review of your <strong>brewing</strong> processes retrospectively too. Some<br />
more advice: you should allow a whole day for your first <strong>brewing</strong> attempt <strong>and</strong> do the<br />
<strong>brewing</strong> with another person because that is more enjoyable <strong>and</strong> one can make good<br />
use of the extra help. You should also bear in mind that <strong>brewing</strong> beer requires some<br />
experience <strong>and</strong> one becomes more proficient when progressing from one <strong>brewing</strong><br />
process to the other. Do not be disappointed therefore, if the first beer does not meet<br />
your expectations completely. A poem expresses this idea best of all.<br />
4.2 Preparations<br />
“The first beer tastes so awful<br />
that the farmer wets his trousers:<br />
as an example for the others.<br />
The second beer is a mediocre score,<br />
you drink three measures <strong>and</strong> then pee four.<br />
The third beer is from the core,<br />
men <strong>and</strong> women drink it gladly for ever more.”<br />
Obtaining the ingredients<br />
Obtain the requisite <strong>brewing</strong> ingredients in good time (hops, malt <strong>and</strong> yeast). It is<br />
important that the malt is fresh while doing so. The malt should be used as quickly as<br />
possible after the milling (grinding or crushing of the grains – not too finely). The<br />
quantitative information varies somewhat according to the recipe: whereby the amount<br />
of malt should be about 10 kg, whereas the amount of hops should be between 80 g<br />
<strong>and</strong> 120 g. The hops are usually offered in pressed form as pellets. Dry yeast is<br />
recommended for the fermentation because it is easier to store <strong>and</strong> it has a longer shelf<br />
life. These ingredients have to be bought in a hobby-<strong>brewing</strong> shop or via the internet.<br />
A third possibility of procuring the ingredients is from a brewery in your vicinity. Just<br />
have a go at making enquiries!<br />
Cleaning the equipment<br />
The Master Brewer is rinsed out with warm water <strong>and</strong> the pump is rinsed through by<br />
means of switching it on, before the <strong>brewing</strong>. The other utensils like beer spindles, a<br />
wooden spoon <strong>and</strong> fermenting container should be ready for use <strong>and</strong> they must have<br />
been cleaned too. Refer to the advice in the sections entitled “Advice about hygiene”<br />
<strong>and</strong> “Cleaning the Master Brewer” for this purpose.<br />
Page 6 of 26
<strong>Speidel</strong>’s Master Brewer<br />
Softening the <strong>brewing</strong> water<br />
The <strong>brewing</strong> water can be softened if necessary. The water (cold tap water) is boiled<br />
for 30 minutes in the Master Brewer for this purpose, then it is cooled <strong>and</strong> stored<br />
temporarily – e.g., in the fermenting container – until the <strong>brewing</strong>. The separated lime<br />
has been deposited on the bottom of the container <strong>and</strong> it will be disposed of. The<br />
Master Brewer is designed to brew approximately 50 litres of manufactured beer<br />
(normal beer). Between 55 <strong>and</strong> 60 litres of <strong>brewing</strong> water will be required for this<br />
purpose in that case. However, normal (hygienically faultless, colourless <strong>and</strong><br />
odourless) cold tap water is also usable for the novice or for the first <strong>brewing</strong> attempts,<br />
in order to keep the expense <strong>and</strong> effort somewhat limited at the beginning. The<br />
<strong>brewing</strong> water should have a hardness of less than 10° dH on principle. The softer the<br />
water, the more suitable it is for <strong>brewing</strong>.<br />
4.3 Programming / starting the Master Brewer<br />
<strong>Speidel</strong>s<br />
act temp<br />
Braumeister<br />
T=015°C<br />
Connect the Master Brewer. The controls are then in the basic<br />
condition. To programme a recipe <strong>and</strong> its time <strong>and</strong> temperature<br />
values, press the ENTER button for 1 sec.<br />
prog<br />
set time<br />
1. phase<br />
t=005min<br />
Select the time <strong>and</strong> temperature with the aid of the ARROW<br />
BUTTONS, confirming each value by pressing the ENTER<br />
button. Programme the mashing, phases 1-5 <strong>and</strong> the boiling of<br />
the hops. The mode 5 is set to 0 <strong>and</strong> is only used for special<br />
recipes.<br />
Water filled in ?<br />
start<br />
After confirming all programme stages with ENTER, the<br />
display returns to the basic condition. From here, you can now<br />
start the automatic <strong>brewing</strong> by pressing the START button (1<br />
sec). Now follow the <strong>instructions</strong> of the programme!<br />
4.4 Mashing (<strong>brewing</strong>)<br />
The mixing of crushed malt [i.e. grist] <strong>and</strong> water is described as mashing. The<br />
objective of the entire mashing process is to dissolve the malt starch that is stored in<br />
the malt <strong>and</strong> to convert it into sugar with the aid of enzymes that are present in the<br />
malt. The various enzymes are effective at different temperatures, which is why the<br />
various temperature stages are then passed through as well.<br />
Mashing<br />
About 53 litres of <strong>brewing</strong> water is poured into the boiler (up to approx. 2 cm below<br />
the upper marker) first of all. The malt pipe is not installed yet while doing so. The<br />
markers that are fitted on the connecting rod indicate the level of 45 litres, 50 litres<br />
<strong>and</strong> 55 litres. Confirm that you have added the water by pressing START. This<br />
switches the pump <strong>and</strong> heating on. The pump switches on <strong>and</strong> off several times in<br />
order to ventilate it.<br />
Page 7 of 26
<strong>Speidel</strong>’s Master Brewer<br />
heating<br />
temp S/I 038/019°C<br />
The pump <strong>and</strong> heating remain switched on until the<br />
programmed mashing temperature is reached. The set<br />
temperature <strong>and</strong> actual temperature are shown on the display.<br />
auto<br />
38°C reached<br />
quit<br />
On reaching the mashing temperature, a signal tone sounds,<br />
which must be acknowledged by pressing the ENTER button.<br />
The pump is now switched off.<br />
The malt pipe can now be installed in the boiler with the seal<br />
facing downwards. Make sure that the pipe is clean, centred<br />
Fill in malt<br />
quit <strong>and</strong> lying flat on the bottom. Now insert the first sieve base<br />
(with the pipe’s jointing sleeve facing upwards) into the malt<br />
pipe <strong>and</strong> put the first filter cloth on top of it. The cloth must lie<br />
on the sheet metal sieve <strong>and</strong> it is not allowed to float upwards.<br />
The whole malt is now poured into the malt pipe with a scoop,<br />
then stirred in well. Take care that the malt is poured in neatly<br />
<strong>and</strong> that nothing falls into the tank, which could block the pump. Now put the second<br />
filter cloth on top <strong>and</strong> then the second sheet metal sieve over that again (with the<br />
pipe’s jointing sleeve facing upwards). This is screwed together with the stirrup <strong>and</strong><br />
wing nut for fastening <strong>and</strong> clamping down the malt pipe, <strong>and</strong> is pressed downwards<br />
while doing so.<br />
Malt filled in ?<br />
start<br />
When you have filled in the malt, confirm this by pressing<br />
ENTER. The inquiry “Malt filled?” appears again as a check.<br />
You can now start the actual <strong>brewing</strong> process of the Master<br />
Brewer by pressing START. The pump <strong>and</strong> heating are<br />
switched on. The wort rises in the pipe <strong>and</strong> flows over. The<br />
circulation has started <strong>and</strong> the malt will be washed out by<br />
means of pumped recycling during the next phases.<br />
Protein mode<br />
The malt’s large molecules of protein are split up into small components during the<br />
protein mode. The protein mode is not only important for clarification <strong>and</strong> fullbodiedness<br />
but for the beer’s foaming stability <strong>and</strong> capacity to bind carbonic acid. The<br />
temperature is approximately 52°C <strong>and</strong> it is maintained for 5 to 20 minutes according<br />
to the programmed recipe.<br />
1.phase<br />
temp S/I<br />
005min<br />
052/042°C<br />
The display now shows the mode, set <strong>and</strong> actual temperature<br />
<strong>and</strong> the time. On reaching the set temperature, the time display<br />
changes to a downward-counting remaining time display<br />
(flashing) for this phase. The further phases take place<br />
completely automatically, during which the display again<br />
shows the corresponding times <strong>and</strong> temperatures as in Phase 1.<br />
Page 8 of 26
<strong>Speidel</strong>’s Master Brewer<br />
Maltose mode<br />
During the maltose mode, which is the second phase, the molecules of starch are<br />
converted into fermentable sugar with the aid of other enzymes that are present in the<br />
malt. This phase is an important stage of the <strong>brewing</strong> process for forming alcohol<br />
because the greatest amounts of sugar are formed during it. Extending the mode means<br />
gaining more sugar in the wort, which lead to a stronger beer. Shortening the time<br />
means that the beer will be more full-bodied on account of more dextrines. The<br />
temperature is approximately 63°C <strong>and</strong> it will be maintained for a duration of<br />
approximately 35 minutes. As in Phase 1, the controls show the relevant data in the<br />
display. The complete further process (Phase 2 to Phase 5) is h<strong>and</strong>led completely<br />
automatically by the controls. In this phase <strong>and</strong> also in the following phase, the pump<br />
is switched off briefly twice (PUMP PAUSE), in order to move the malt into a new<br />
position <strong>and</strong> thereby achieve a better yield. The Master Brewer’s lid is on in order to<br />
save energy.<br />
Saccharifaction mode 1<br />
Other starchy constituents are split up with the aid of active molecules in this<br />
temperature level during the third mashing phase <strong>and</strong> they are liquefied in the wort.<br />
The temperature level is approximately 73°C <strong>and</strong> will also be maintained for 35<br />
minutes.<br />
Saccharification mode 2<br />
Residual starches are saccharified in the final phase <strong>and</strong> they thus form even more<br />
unfermentable extracts, which allow the beer to become somewhat more full-bodied.<br />
The wort is heated up to 78°C while doing so <strong>and</strong> with continuously pumped<br />
recirculation: it has to be held there for between 10 <strong>and</strong> 20 minutes. An iodine test can<br />
be used to establish whether any residual starch is still present in the wort. Put some<br />
drops of wort on a white plate <strong>and</strong> add some salt for this purpose. The saccharification<br />
will be sufficient if the sample turns brownish red or yellow. If that is not the case,<br />
then the last temperature level must be held longer. In the last phase, no more pump<br />
pauses will take place because of clarification of the wort.<br />
4.5 Running off<br />
End of phase<br />
quit<br />
Remove malt pipe<br />
quit<br />
On completion of the programme <strong>brewing</strong> phases, a signal<br />
tone again sounds. This must also be acknowledged by<br />
pressing ENTER. The pump switches off, <strong>and</strong> the so-called<br />
‘running-off’ process is requested (“Remove malt pipe”). One<br />
describes the separation of crushed malt from the beer wort as<br />
‘running off’. Running off with the Master Brewer is a<br />
relatively easy, quick <strong>and</strong> clean matter compared with many<br />
other methods of domestic <strong>brewing</strong> <strong>and</strong> it represents one of the<br />
Master Brewer’s main concepts. Remove the wing nut together<br />
with the holding-down stirrup. The draining stirrup is laid on<br />
the <strong>brewing</strong> boiler’s rim: the malt pipe is then pulled carefully<br />
<strong>and</strong> slowly out of the boiler with the lifting stirrup. One hangs<br />
the malt pipe in the holding stirrup on the lower supporting bolts, so that the beer wort<br />
drains out of the malt into the boiler. One can still leach the last residues of extracts by<br />
washing out the malt husks subsequently with an aftermash. One describes the process<br />
as ‘sparging’ (the process is not absolutely necessary). The so-called ‘sparging’ takes<br />
place by pouring in hot water at 78 °C (no boiling water) into the malt pipe from<br />
Page 9 of 26
<strong>Speidel</strong>’s Master Brewer<br />
above. Remove the upper sheet metal sieve including the sieve cloth <strong>and</strong> pierce the<br />
malt husks with the aid of a long wooden spoon, so that ‘encapsulated’ beer wort can<br />
run off or drain downwards again. The temperature continues to be maintained<br />
constantly at the preset temperature of 78°C during the purging. Remove the malt pipe<br />
completely after 15 to 20 minutes <strong>and</strong> dispose of the malt husks. It is recommended<br />
for reasons of safety to always work with heatproof gloves in this case because all<br />
parts will have been heated up to high temperatures by now.<br />
Boiling<br />
start<br />
After removing the malt pipe, acknowledge this again by<br />
pressing ENTER. Now press START to begin boiling the<br />
hops. The pump <strong>and</strong> heating are switched on, <strong>and</strong> the<br />
automatic process is continued.<br />
The wort content must now be tested, after the purging process has been completed.<br />
This test is important in order to achieve the desired content of basic wort <strong>and</strong> thus to<br />
be able to set adjust the beer’s alcoholic content later on. Take a sample by filling a<br />
measuring cylinder (accessory) <strong>and</strong> establish the level of wort when the sample was<br />
taken. Use the three level rings indicating 45, 50 <strong>and</strong> 55 litres that are located on the<br />
connecting rod as an aid for this purpose. Estimate the liquid’s level in between<br />
accordingly. The removed wort must be cooled down to 20°C so that the basic wort<br />
can be measured with a beer spindle (accessory), in order to obtain an exact<br />
measurement. A water bath with ice cubes, or a similar arrangement, is suitable for<br />
this purpose. However, you do not need to wait until you can take the measurement<br />
because the basic wort has a certain relationship with the liquid’s level. Just continue<br />
cheerfully with the next phase of boiling the hops <strong>and</strong> then carry out the corrections or<br />
adjust the basic wort as the case may be.<br />
4.6 Boiling the hops<br />
Boiling<br />
temp S/I<br />
080min<br />
100/098°C<br />
As described in the previous section, the automatic process<br />
has been continued, <strong>and</strong> the boiling of the hops started to.<br />
The display again shows the time <strong>and</strong> temperature of the<br />
phase. Since the set temperature of 100°C cannot always be<br />
reached, the time begins to run with an additional period of 3<br />
min after reaching at least 95°C. The beer wort is boiled<br />
during this phase. Coagulatable protein substances are separated on the one h<strong>and</strong> <strong>and</strong><br />
the wort is sterilized on the other h<strong>and</strong>: i.e., all of the bacteria that could otherwise<br />
spoil the fermentation is destroyed. As has already been stated when describing the<br />
previous phase, the original wort can be adjusted in this case by means of vaporized<br />
water or by replenishing with water. The hops - which give the beer its requisite<br />
bitterness <strong>and</strong> also impart spiciness - can then be added during the boiling time of 80<br />
to 90 minutes. The amount of added hops can vary according to the recipe <strong>and</strong><br />
individual’s preference. After the wort that has been sampled at the end of the<br />
preceding phase has been measured for its content of basic wort, one adjusts this<br />
content with the liquid level. If the original wort’s content corresponds to the set value,<br />
then the level must be maintained at the same level by replenishing with boiling water.<br />
If the original wort’s content is too high, then the wort will be diluted by the<br />
replenishing <strong>and</strong> the liquid’s level will rise accordingly. Care has to be taken while<br />
Page 10 of 26
<strong>Speidel</strong>’s Master Brewer<br />
doing so, that the vaporized water is also replaced. Conversely, the liquid’s level will<br />
fall when the content of basic wort is too low (by the water vaporizing), which leads to<br />
a higher concentration of sugar <strong>and</strong> thus to a higher alcoholic content too. The <strong>brewing</strong><br />
boiler must be open when the boiling phase is carried out. This prevents the wort from<br />
overboiling on the one h<strong>and</strong> <strong>and</strong> it is primarily essential for boiling the hops, so that<br />
unwanted aromatic substances - which would spoil the beer’s taste - can evaporate.<br />
Adding hops to the beer originally served to improve the beer’s shelf life <strong>and</strong><br />
conservation. Add the first hops to the boiling wort between 10 to 15 minutes after the<br />
boiling begins, according to the kind of hops <strong>and</strong> content of bitter substances. The<br />
hops remain in the wort until the boiling time has ended because its substances only<br />
take effect after a longer boiling time <strong>and</strong> they give the intended bitterness of hops to<br />
the beer. Resins <strong>and</strong> oils in the hops will also be released while doing so, which<br />
subsequently give full-bodiedness to the wort together with the malt aroma. Hops can<br />
then be added again approximately 10 minutes before the boiling ends: which only<br />
contributes to the aromatization. It is not possible to separate the bitter substances any<br />
longer during the remaining time. The quantity of hops differs according to the recipe<br />
<strong>and</strong> type of beer. Furthermore, it is dependent on the hops too, which can vary<br />
according to the place where <strong>and</strong> in which year they are cultivated. The hops can be<br />
added in the form of pellets or dried hops. The content of bitter substances is given in<br />
bitter units (BE) <strong>and</strong> it is between 10 to 20 BEs for wheat beer <strong>and</strong> between 25 to 45<br />
BEs for Pilsener beer. Information about the content of bitter substances to the hops is<br />
given as a percentage of alpha acids, which can be between 2% to 4% (approximately<br />
8% for pellets). The quantity of hops can be calculated with the following formula:<br />
Quantity of hops in grams = bitter units (BE) x litres of beer x 10<br />
% of alpha acids x % of bitter substances utilized<br />
It can be assumed that 30% of the bitter substances will be used during a total boiling<br />
duration of between 80 to 90 minutes.<br />
Example:<br />
It is intended to brew 50 litres of wheat beer with a content of bitter substances of 15<br />
BE. The available hops have a 3% content of alpha acids. The following amount of<br />
hops thus results, which will be added when the boiling process begins. The hops<br />
which are added shortly before the boiling ends, are not allowed for in this calculation<br />
because no appreciable quantities of bitter substances will be added to the wort any<br />
more during the brief time.<br />
Grams of hops = 15BE x 50 litres x 10 = 83g<br />
3% x 30%<br />
End of cooking<br />
quit<br />
On completion of the boiling time, a signal tone sounds again,<br />
indicating the end of the <strong>brewing</strong> process. This is<br />
acknowledged by pressing ENTER, <strong>and</strong> the heating is then<br />
switched off.<br />
Page 11 of 26
<strong>Speidel</strong>’s Master Brewer<br />
4.7 Cooling<br />
You must work in absolutely sterile conditions from now on because contamination<br />
that is caused by bacteria which are present in the air or on dirty equipment [e.g.,<br />
utensils] during all of the further working steps, can utterly ruin your work All of the<br />
equipment that is now used must be thoroughly cleans or disinfected as the case may<br />
be. Follow the advice in the section entitled “Advice about hygiene”.<br />
Before inserting the cooling spiral, we recommend vigorous stirring of the still hot<br />
wort using a long cooking spoon. This produces a so-called “whirlpool effect”, which<br />
assists the deposition of cloudy materials contained in the wort, thereby clarifying the<br />
wort.<br />
The cooling process primarily serves to cool the wort <strong>and</strong> to deposit the protein<br />
substances <strong>and</strong> hop constituents that have been separated during the boiling. These<br />
cooler sludge substances settle on the bottom slowly <strong>and</strong> they remain on the<br />
container’s bottom when the clear wort is drained off. Stirring or moving the cooled<br />
down wort should definitely be avoided because the deposited cooler sludge will be<br />
churned up again <strong>and</strong> runs off with the wort into the fermenting container. It is<br />
recommended to use a so-called wort cooler (a cooling spiral - refer to accessories) for<br />
cooling, which is placed in the wort immediately after the boiling ends <strong>and</strong> it must also<br />
be disinfected beforeh<strong>and</strong> because of that. The cooling takes place with hot water. The<br />
water that flows through the cooling spiral extracts heat from the wort <strong>and</strong> cools it<br />
down to the desired temperature of 20°C in 30 to 40 minutes. Caution: almost boiling<br />
water flows from the wort cooler’s outlet at the beginning (danger of scalding), which<br />
can be re-utilized for cleaning work later on. It is primarily important to achieve rapid<br />
cooling between 40°C <strong>and</strong> 20°C, when the wort is particularly susceptible to an<br />
infection. Take the cooling spiral carefully out of the tank when the wort has cooled<br />
down to 20°C <strong>and</strong> then allow the beer wort to flow into a disinfected fermenting cask<br />
via the stop cock (refer to accessories). However, approximately 6% (3 litres for 50<br />
litres of wort) will still be drawn off in a sealable container beforeh<strong>and</strong> <strong>and</strong> frozen<br />
afterwards. This wort will later serve as an additive to the fermented beer, in order to<br />
achieve a subsequent fermentation <strong>and</strong> sufficient formation of carbonic acid [i.e.,<br />
carbon dioxide] in the filled bottles. Use a suitable <strong>and</strong> clean hose or a hopper for<br />
bottling. The last litres will be decanted by tilting the Master Brewer carefully –<br />
provided that no cooler sludge flows with it into the fermenting container. The<br />
fermenting container or fermenting cask should be chosen to be distinctly larger than<br />
the amount of wort, in order to have adequate fermenting space <strong>and</strong> thus to avoid the<br />
fermenting foam from overflowing. The residue <strong>and</strong> the cooler sludge that are located<br />
on the Master Brewer’s bottom can be thrown away. The Master Brewer is not needed<br />
any longer now: please clean it as quickly as possible in order to prevent it from<br />
drying out <strong>and</strong> you will thereby ease the cleaning process considerably.<br />
4.8 Main fermentation<br />
The yeast is added to the wort after the cooled down wort has been decanted into a<br />
fermenting cask (a 601-PE cask with a stop cock - refer to accessories). Dry yeast is<br />
recommended for this purpose, which is easily added with the wort to the cask. You<br />
have to decide in this phase whether you want to prepare bottom-fermented or topfermented<br />
beer. Top-fermented yeast namely needs 15°C to 23°C for the fermenting<br />
process, whereas bottom-fermented yeast is active at 4°C to 12°C. The addition of<br />
yeast is thus dependent on each recipe too <strong>and</strong> from the desired kind of beer. Wheat<br />
beer <strong>and</strong> Koelsch are top-fermented sorts of beer. Maerzen <strong>and</strong> Pilsener are typical<br />
sorts of bottom-fermented beers. The alcoholic fermentation of beer is set in motion by<br />
Page 12 of 26
<strong>Speidel</strong>’s Master Brewer<br />
the activity of organisms in the beer yeast, which convert the fermentable sugar into<br />
alcohol <strong>and</strong> carbonic acid. The cask is sealed with a lid <strong>and</strong> a fermenting bung<br />
immediately after adding the yeast. Sulphurous acids should be filled in the fermenting<br />
bung, so that no foreign organisms can enter the cask. You must also bear in mind that<br />
you should be working in absolutely sterile conditions, in order to prevent the beer<br />
from becoming infected with foreign organisms. The cask is never allowed to be<br />
sealed completely: the CO2 that arises from the fermentation can thus escape. Put the<br />
cask in a darkened room, which has the requisite temperature for the yeast. The<br />
fermentation of bottom-fermented beer can also take place in a refrigerator that is not<br />
too cold, whereas top-fermented beer can be fermented at room temperature. It is<br />
therefore suitable for the novice to begin with top-fermented beers because certainly<br />
not everyone has an extra refrigerator available. It is particularly important to maintain<br />
the temperature. The yeast cells can become active only slowly or even not at all when<br />
temperatures are too low. The yeast cells can die when temperatures are too high. The<br />
fermentation should be active 6 to 12 hours after adding the yeast: which can be easily<br />
established when bubbles of gas escape through the fermenting bung. The fermenting<br />
duration amounts to between 2 <strong>and</strong> 4 days. Dark flakes of yeast can occur on the<br />
fermenting foam during the fermenting process, which can be skimmed off with a<br />
sterilized wooden spoon. The stop cock must be cleaned immediately <strong>and</strong> disinfected<br />
by applying sulphurous acid with swab of cotton wool, if you remove wort via the stop<br />
cock during the main fermentation (e.g., for taking measurements with the beer<br />
spindle), in order to prevent it from drying out <strong>and</strong> to avoid it from becoming infected<br />
subsequently by bacteria sticking to it.<br />
4.9 Maturation (ripening)<br />
The sugar that remains from the main fermentation <strong>and</strong> is added afterwards, is<br />
fermented during the subsequent fermentation or maturation – the fresh beer is<br />
enriched with carbonic acid, which is significant for the foam’s formation <strong>and</strong><br />
maintenance later on: it matures to a tasty full-bodiedness. The beer is clarified<br />
naturally during the maturation. If the fermenting activity is now set (no fermenting<br />
gases escape), then one can commence with the decanting [i.e., bottling]. The<br />
following preparations have to be made for this purpose: prepare the maturing<br />
containers or bottles <strong>and</strong> thaw out the frozen wort.<br />
Subsequent fermentation in bottles is the best possibility available to you <strong>and</strong> it is also<br />
preferred by most hobby brewers. Further possibilities are various, pressure-resistant<br />
containers like special 5 litre tins or appropriate beer <strong>and</strong> pressure casks. Working in<br />
sterile conditions is always vital at this stage too. All equipment must therefore by<br />
thoroughly cleaned <strong>and</strong> disinfected before use. The following method of procedure is<br />
recommended when using stirrup bottles: rinse out <strong>and</strong> clean the bottles thoroughly<br />
with warm water, in order to remove liquid <strong>and</strong> dried residues. Then put the bottles in<br />
the oven (leave space between the bottles <strong>and</strong> remove the seals) <strong>and</strong> heat them up to<br />
130°C. The temperature must be maintained for a maximum of 5 minutes. Leave the<br />
bottles lying there to cool down as well. The rubber seals are disinfected separately in<br />
boiling water. The bottles are sealed immediately after they have cooled down in order<br />
for them to be airtight <strong>and</strong> they are then prepared for filling. This preparation should<br />
have already taken place during the fermenting process or even earlier, so that you do<br />
not have to work at a frantic pace on the filling day <strong>and</strong> so that you can concentrate on<br />
the essentials. Larger bottles can also be used, in order to limit the outlay of time for<br />
cleaning the bottles <strong>and</strong> filling them.<br />
The thawed-out wort is now added carefully to the fresh beer in the fermenting<br />
container about 1 to 2 hours before the filling begins. The thawed-out cooler sludge<br />
Page 13 of 26
<strong>Speidel</strong>’s Master Brewer<br />
can thus be deposited again. A hose that is pushed onto the stop cock <strong>and</strong> reaches<br />
down to the bottom of the bottle serves for the filling. That avoids the foam forming<br />
too profusely <strong>and</strong> it also prevents too much carbonic acid from being lost. The bottles<br />
are filled up to between 90% <strong>and</strong> 95% of their capacity (thus leaving some fermenting<br />
space) <strong>and</strong> sealed immediately. Take care in this case too that deposits on the bottom<br />
of the fermenting cask are not churned up <strong>and</strong> decanted into the bottles with the beer.<br />
The beer is still stored for 1 to 2 days after the filling, at the same temperature as for<br />
the main fermentation. They are then stored at 10°C to 12°C for top-fermented beer<br />
<strong>and</strong> 0°C to 2°C for bottom-fermented beer. Important: the bottles must definitely be<br />
ventilated after approximately 12 hours during the subsequent fermentation <strong>and</strong> then<br />
once again during the first 2 or 3 days, in order to avoid excess pressure because of the<br />
CO2. The bottles are stored st<strong>and</strong>ing, so that particles of sludge can be deposited on<br />
the bottom. This way of manufacturing beer concerns a naturally cloudy beer. A<br />
nutritious beer was always naturally cloudy in former times because it contains the<br />
valuable B vitamins that are combined with the yeast cells. The first tasting can take<br />
place after a storage time of 4 to 6 weeks. A somewhat longer storage leads to an even<br />
more matured taste.<br />
Your self-brewed beer is now ready for drinking: you can pour it out after chilling <strong>and</strong><br />
enjoy it with your friends! Cheers!<br />
Page 14 of 26
<strong>Speidel</strong>’s Master Brewer<br />
5 A <strong>brewing</strong> example <strong>and</strong> brief <strong>instructions</strong><br />
We want to demonstrate <strong>brewing</strong> with the Master Brewer by using a definitive example<br />
that will guide you through the first <strong>brewing</strong> process step by step, as follows.<br />
Beer type: Light wheat beer: top-fermented.<br />
Quantity of beer: 50 litres of manufactured beer.<br />
Basic wort: 11 to 12 ° Plato.<br />
Ingredients<br />
10 kg coarsely crushed <strong>brewing</strong> malt (50% wheat malt, 50% barley malt <strong>and</strong> some<br />
caramalt if necessary).<br />
60 litres of moderately-hard <strong>brewing</strong> water or tap water (53 litres to begin, with <strong>and</strong><br />
the rest for topping up).<br />
90g of hops with 3% of alpha acid (approx. 60g immediately after boiling begins <strong>and</strong><br />
approx. 30 g several minutes before boiling ends).<br />
dry yeast for over-fermenting.<br />
Obtain the ingredients according to the above information.<br />
Clean the Master Brewer <strong>and</strong> place it on a sturdy base in the<br />
kitchen or on the terrace. Also clean the other requisite<br />
utensils like the malt scoop, wooden spoon, wort spindle,<br />
cooling spiral, fermenting cask with accessories, etc. <strong>and</strong><br />
keep them within easy reach.<br />
Programme the recipe – Press ENTER for 1 sec. In the<br />
programming mode, you can set times <strong>and</strong> temperatures<br />
for the relevant recipe. Any st<strong>and</strong>ard recipe already used is<br />
already saved. After confirming all values with ENTER<br />
you return to the basic setting. Start the automatic process<br />
by pressing START (1 sec). The Master Brewer leads you<br />
through the following <strong>brewing</strong> process.<br />
Pour in 53 litres of <strong>brewing</strong> water – up to about 2 cm below the<br />
upper mark on the connecting rod or on the level gauge.<br />
Follow the <strong>instructions</strong> of the <strong>brewing</strong> controls, <strong>and</strong> confirm<br />
that the Master Brewer has been filled with water by pressing<br />
ENTER. The pump ventilates itself automatically <strong>and</strong> the<br />
Master Brewer comes up to the programmed mashing<br />
temperature.<br />
Page 15 of 26
<strong>Speidel</strong>’s Master Brewer<br />
On reaching the mashing temperature, a signal tone sounds,<br />
which must be acknowledged by pressing the ENTER button.<br />
The malt pipe can now be inserted with the seal facing<br />
downwards. Make sure that the pipe is clean, centred <strong>and</strong> lying<br />
flat on the bottom of the boiler. Now insert the first sieve base<br />
into the malt pipe <strong>and</strong> put the first filter cloth on top of it. The<br />
cloth must lie on the sheet metal sieve <strong>and</strong> it is not allowed to<br />
float upwards.<br />
Pour 10 kg of malt into the malt pipe. It is important while doing<br />
so, that no malt is spilt next to it because that could block the<br />
pump. Stir in the malt with a wooden spoon <strong>and</strong> allow it to rise for<br />
several minutes. Push the second filter cloth onto the malt after<br />
that <strong>and</strong> then push on the second sheet metal sieve (pipe facing<br />
upwards again). Put on the holding-down stirrup <strong>and</strong> tighten it<br />
with the wing nut.<br />
Continue the automatic process by pressing START. Lightly<br />
coloured <strong>brewing</strong> water rises up <strong>and</strong> runs over. The<br />
circulation has begun. The next <strong>brewing</strong> phases are carried out<br />
fully automatically in accordance with the programme. During<br />
some <strong>brewing</strong> phases, the controls initiate a brief pump pause<br />
in order to reposition the malt. To display shows the actual<br />
<strong>and</strong> set temperatures, together with the remaining time, which<br />
starts to countdown after reaching the set time (flashing).<br />
On completion of the <strong>brewing</strong> phases, a signal tone sounds again.<br />
Acknowledge this by pressing ENTER. Remove the wing nut <strong>and</strong><br />
holding-down stirrup. It is definitely recommended to use kitchen<br />
gloves because all parts are very hot. Put the supporting stirrup onto<br />
the boiler. Use both h<strong>and</strong>s to pull out the malt pipe with the lifting<br />
stirrup <strong>and</strong> hang it on the lower bolts in the supporting stirrup.<br />
Allow the malt to drain off. Pierce the malt several times<br />
downwards with the wooden spoon, so that the beer wort can run<br />
off better. Completely remove the malt pipe with the malt after 15<br />
to 20 minutes.<br />
Continue by pressing START in order to start boiling the hops.<br />
Avoid over-boiling. Add the first 60g of hops 10 minutes after<br />
boiling begins. Do not put on the lid when the hops are boiling<br />
either. Steam must be able to escape. Replenish to compensate for<br />
the evaporated amount of water or adjust the basic wort. Add the<br />
last 30 g of hops 10 minutes before boiling ends.<br />
Page 16 of 26
<strong>Speidel</strong>’s Master Brewer<br />
Stir the hot wort vigorously (whirlpool effect) in order to clarify<br />
the wort. Put the cooling spiral (accessory) into the middle of the<br />
boiler immediately after the boiling ends. Connect the spiral to<br />
cold water <strong>and</strong> begin the cooling. Caution: boiling hot water will<br />
flow out of the spiral at the beginning. Cool down the beer wort<br />
to 20°C. You must work in sterile conditions from now on<br />
because of the risk of infection. Allow the separated cooler sludge<br />
to be deposited on the bottom. Avoid vibrations. Duration of<br />
approximately 35 minutes.<br />
Decant into a sterilized 60l plastic cask by means of a hopper (refer to<br />
the illustration) or hose. Disinfect the cask <strong>and</strong> decanting aids<br />
beforeh<strong>and</strong> with sulphurous acid. Do not allow the residues on the<br />
boiler's bottom to flow out with the wort.<br />
Add 7g of dry yeast into the wort <strong>and</strong> seal with fermenting cask with<br />
the fermenting bung <strong>and</strong> the sulphurous acid that is poured in above.<br />
Store the container in darkness at 16°C to 20°C. The fermentation<br />
begins after approximately 12 hours. Do not forget: decant 1.5l of<br />
wort into a container or similar receptacle <strong>and</strong> freeze it (before adding<br />
the yeast).<br />
The fermenting duration is 3 to 5 days. The fermentation has been<br />
completed when no fermenting gases escape any longer. The<br />
maturing bottles must have already been prepared during the<br />
fermentation. Sterilize the stirrup bottles in the oven at 130°C <strong>and</strong><br />
allow them to cool down in the oven. Boil the rubber seals.<br />
Thaw out the frozen wort <strong>and</strong> carefully pour it into the<br />
fermenting cask 1 hour before the decanting [i.e., bottling].<br />
Use a ladle to skim off the foam that is floating on top. Do not<br />
move the cask any more. Decant into the bottles with a hose.<br />
Only fill the bottles up to between 90% <strong>and</strong> 95% of their<br />
capacity. Allow the bottles to st<strong>and</strong> at the same temperature<br />
for 1 to 2 days <strong>and</strong> briefly ventilate them daily (only at a high<br />
overpressure). Then allow the beer to mature at 10°C to 15°C<br />
for another 3 to 4 weeks.<br />
You can find further recipes at www.speidel-behaelter.de<br />
Page 17 of 26
<strong>Speidel</strong>’s Master Brewer<br />
6 Brewing defects <strong>and</strong> eliminating problems<br />
Problem<br />
Eliminating the problem<br />
Fountains of wort shoot up during circulation. The malt is crushed too finely.<br />
If necessary, crush the malt yourself (only break<br />
it up).<br />
Blocked pump.<br />
Put on the filter cloth <strong>and</strong> sheet metal sieve<br />
properly. Pour the malt into the malt pipe<br />
carefully. No malt into the boiler!<br />
The temperature’s initiation time is very long. Put the lid on when heating. Place the Master<br />
Brewer so that it is protected from the wind.<br />
Condensation leaks out of the lid.<br />
Place the Master Brewer horizontally.<br />
The recirculation process does not run properly. Check whether the pump is functioning <strong>and</strong> has<br />
been ventilated. Check that the malt pipe is<br />
evenly supported <strong>and</strong> that the seal does not leak.<br />
The wort runs off very slowly or not at all<br />
during the purging.<br />
Pierce the malt with a wooden spoon several<br />
times from above, down to the sheet metal<br />
sieve. The malt is crushed too finely -> Just<br />
break up the grains, do not crush them too<br />
finely.<br />
Problem<br />
The beer stinks <strong>and</strong> smells sour.<br />
The alcoholic content is too high.<br />
The alcoholic content is too low.<br />
Strange smells of all kinds.<br />
The fermentation does not function properly.<br />
The beer is cloudy.<br />
There is too little carbonic acid.<br />
There is too much carbonic acid - the beer<br />
foams over.<br />
Eliminating the problem<br />
Bacteria have multiplied: throw the beer away.<br />
Work properly in the cold area. The <strong>brewing</strong><br />
times could be too short, which has produced<br />
too much starch in the beer. Stop replenishing<br />
by malt. The replenishment is too hot (over<br />
80°C).<br />
Reduce the content of original wort by adding<br />
water when boiling the hops.<br />
Increase the content of original wort by boiling<br />
longer (water vaporizes).<br />
Greater cleanliness. Avoid touching the mould<br />
<strong>and</strong> using metals other than stainless steel.<br />
Avoid illuminating the beer during storage.<br />
Add more yeast. ‘Activate’ the yeast. Check the<br />
fermenting temperature. Ventilate the wort by<br />
stirring.<br />
Store the beer longer. Subsequently ferment<br />
colder. No losses when bottling (decanting).<br />
Too much carbonic acid is lost when bottling or<br />
hosing. Freeze more wort <strong>and</strong> add it before the<br />
decanting.<br />
Too much pressure – ventilate the stirrup bottles<br />
more frequently. Bottled too soon – the<br />
fermentation had not ended yet. Too much wort<br />
Page 18 of 26
<strong>Speidel</strong>’s Master Brewer<br />
Poor content of foam.<br />
was added before the bottling.<br />
Too little carbonic acid. Shorten the protein<br />
mode. Mash at a higher temperature. It is better<br />
to remove hot cooler sludge. Ferment at lower<br />
temperatures.<br />
Page 19 of 26
<strong>Speidel</strong>’s Master Brewer<br />
7 Legal aspects of domestic <strong>brewing</strong> (valid just for Germany)<br />
For the legal aspects in your country, please contact your local departements!!!<br />
Hobby brewers who prepare beer in their households for their own consumption, are allowed<br />
to manufacture up to 200 litres of beer per year tax-free. This beer is not allowed to be sold.<br />
The hobby brewer must notify the <strong>brewing</strong> procedure to the responsible main customs <strong>and</strong><br />
excise office before beginning it for the first time. The following regulations are prescribed by<br />
the Beer Tax Law’s enabling legislation (BierStV).<br />
Article 2 - Manufacture by domestic <strong>and</strong> hobby brewers<br />
(1) Beer that is prepared by domestic <strong>and</strong> hobby brewers in their households for solely their own consumption<br />
<strong>and</strong> it not sold, is exempt from taxes up to a quantity of 2 hectolitres in one calendar year. Beer that is<br />
manufactured in non-commercial, community breweries, is deemed to have been manufactured in the domestic<br />
brewer’s household.<br />
(2) Domestic <strong>and</strong> hobby brewers have to notify the main customs <strong>and</strong> excise office beforeh<strong>and</strong> about the start of<br />
manufacture <strong>and</strong> the manufacturing location. The quantity of beer that will be probably be produced in one<br />
calendar year must be given in the notice. The main customs <strong>and</strong> excise office can permit easements.<br />
You can find the customs <strong>and</strong> excise office that is responsible for you – <strong>and</strong> to which you<br />
must notify your first <strong>brewing</strong> process – at www.zoll-d.de . The customs <strong>and</strong> excise office can<br />
be notified by fax or letter. The notice could look like the example given below.<br />
Main customs <strong>and</strong> excise office's address<br />
Sender's address<br />
Date<br />
Dear Sir or Madam,<br />
Re. Notice about the manufacture of beer in a private household<br />
I intend to manufacture beer in my aforementioned dwelling.<br />
Manufacturing location<br />
(If different from the sender's address.)<br />
Date of manufacture<br />
Quantity of beer<br />
50 litres of top-fermentation wheat beer.<br />
Original wort content of approximately 11°Plato.<br />
I do not intend to manufacture more than 200 litres of beer in the calendar year of<br />
2007.<br />
Yours faithfully,<br />
Page 20 of 26
<strong>Speidel</strong>’s Master Brewer<br />
8 Advice about literature <strong>and</strong> purchasing sources<br />
Numerous internet pages <strong>and</strong> books which solely deal with the subject of domestic <strong>brewing</strong>,<br />
can be acquired on the internet <strong>and</strong> specialized book shops. It is also advisable to obtain many<br />
helpful tricks <strong>and</strong> tips from there, which will certainly assist you further on the way to<br />
becoming a ‘true’ master brewer. We would like to recommend two books in this case.<br />
Dave Miller´s Home<strong>brewing</strong> Guide<br />
by Dave Miller<br />
Paperback – 368 pages – Storey Publishing<br />
Date of publication: Oktober 1995<br />
ISBN: 0882669052<br />
Home<strong>brewing</strong><br />
by Al Korzonas<br />
Hardback – Sheaf & Vine<br />
Date of publication: September 1997<br />
ISBN: 0965521907<br />
Purchase sources for ingredients can be found on our Internet site <strong>and</strong> at www.speidelbehaelter.de<br />
Page 21 of 26
<strong>Speidel</strong>’s Master Brewer<br />
9 Brewing record<br />
Basic data<br />
Date: Date: Date:<br />
Recipe<br />
Malt in kg , hops in g, water in litres:<br />
Brewing process<br />
Processing phase Processing phase Duration<br />
Mashing<br />
Mashing<br />
1st phase, protein mode<br />
2nd phase, maltose mode<br />
3rd phase, saccharification 1:<br />
4th phase, saccharification 2:<br />
Iodine test: Running off: Replenishment in litres:<br />
Measuring the ACTUAL content of<br />
wort:<br />
Measuring the SET content of wort:<br />
°Plato:<br />
Litres:<br />
Litres:<br />
Boiling the wort:<br />
Total duration:<br />
1st addition of hops:<br />
Boiling the wort:<br />
Efflorescence: Cooling: Removing the wort: Efflorescence: Cooling: Removing the wort:<br />
Fermenting process <strong>and</strong> subsequent ripening<br />
Date when the fermentation began:<br />
Date when the fermentation began:<br />
Bottling date: Bottling date: Bottling date: Bottling date:<br />
Tasting<br />
Taste, colour, foaming properties, carbonic acids <strong>and</strong> defects<br />
Improvements<br />
Page 22 of 26
<strong>Speidel</strong>’s Master Brewer<br />
10 Pump cleaning<br />
Fill with water to a level about<br />
2 cm above the heating coils <strong>and</strong><br />
then, using the controls, heat up<br />
manually to approx. 35°C.<br />
Then unplug the Braumeister!<br />
Now <strong>brewing</strong> residues can be<br />
removed from inside the<br />
container <strong>and</strong> the heating coils<br />
with a brush; this is best done<br />
directly after every brew.<br />
Thorough cleaning includes<br />
cleaning out the suction<br />
<strong>and</strong> pressure openings.<br />
After cleaning the heating coils, the inside wall of the container <strong>and</strong> the suction <strong>and</strong><br />
pressure openings, the Braumeister must be emptied <strong>and</strong> once again rinsed out thoroughly .<br />
The next step is to clean the pump (P.24).<br />
Page 23 of 26
<strong>Speidel</strong>’s Master Brewer<br />
Open the pump:<br />
It should be possible to open the pump housing<br />
by h<strong>and</strong>. If it is not, you should use a small block<br />
of wood <strong>and</strong> a hammer to release the union-nut.<br />
In the interior of the pump, the impeller wheel will<br />
now be visible.<br />
Caution:<br />
- the pump impeller may fall out!<br />
- damage to the impeller wheel will cause the<br />
pump to stop working properly later on!<br />
The impeller wheel is taken out of the housing for<br />
cleaning.<br />
Any <strong>brewing</strong> sediments must not be allowed to block the<br />
holes <strong>and</strong> must therefore be removed carefully.<br />
The pump housing should also be carefully cleaned.<br />
After this, replace the impeller wheel carefully in the<br />
housing.<br />
Finally, to secure the pump once more, the union<br />
nut should only be tightened by h<strong>and</strong>.<br />
Accessories: Cleaning set (item No.: 78027)<br />
Page 24 of 26
<strong>Speidel</strong>’s Master Brewer<br />
Page 25 of 26
<strong>Speidel</strong>’s Master Brewer<br />
11 Warnings<br />
Before <strong>brewing</strong>, the Braumeister must be placed on<br />
a stable, flat <strong>and</strong> level surface.<br />
Danger! Electric current!<br />
The appliance, that is the pump, heating <strong>and</strong><br />
the controls are all LIVE!<br />
Caution! Danger of burns or scalding!<br />
Boiler, components <strong>and</strong> the boiler's contents will all get very hot.<br />
To avoid burns, it is recommended you wear heat-resistant gloves.<br />
To avoid electric shocks, the appliance must always be unplugged<br />
when cleaning or maintenance work is being carried out.<br />
Be sure to keep children away from the appliance – particularly<br />
whilst <strong>brewing</strong>, as the vessel <strong>and</strong> its contents become extremely hot!<br />
Page 26 of 26