Operators handbook TR7750 - Jotron
Operators handbook TR7750 - Jotron
Operators handbook TR7750 - Jotron

Create successful ePaper yourself
Turn your PDF publications into a flip-book with our unique Google optimized e-Paper software.
OPERATOR AND INSTALLATION MANUAL<br />
TR-810<br />
VHF AM GROUND TO AIR COMMUNICATION RADIO<br />
www.jotron.com
The equipment is designed to meet the essential requirements of European Directives<br />
1999/5/EC, 89/336EEC as amended by Directive 93/68/EEC and 72/23/EEC<br />
The following standards are applied:<br />
EMC: EN 301 489-22 v. 1.3.1<br />
FCC part 15 and part 87<br />
Health and Safety: IEC 60945 ed.4 and EN60950-1<br />
Radio specifications: EN 300 676-1 v.1.4.1<br />
For an updated list of approvals and statements of conformity, these are available on:<br />
www.jotron.com<br />
84417_O&I_TR-810_C Introduction Page iii
BITE<br />
Built In Test Equipment<br />
bps<br />
Bits Per Second.<br />
DSP<br />
Digital Signal Processor<br />
ETSI<br />
European Telecommunication Standardisation Institute<br />
ICAO<br />
International Civil Aviation Organization<br />
IEC<br />
International Electro-technical Commission.<br />
OCP<br />
<strong>Operators</strong> Control Panel (In this manual: Front module)<br />
PA<br />
Power Amplifier<br />
PSU<br />
Power Supply Unit. Separate unit to power the equipment.<br />
PTT<br />
Push To Talk<br />
RF<br />
Radio Frequency<br />
S/N<br />
SIGNAL- TO-NOISE RATIO<br />
VSWR<br />
Voltage Standing Wave Ratio<br />
84417_O&I_TR-810_C Introduction Page iv
NO INIT DATE PAGE(S) VERSION REASON FOR CHANGE<br />
1 ES 09.05.08 Total: 33 84417_OM_TR-810_A New manual<br />
2 ES 08.07.08 1-1, 2-1 84417_OM_TR-810_B Change in Tables<br />
3 ES 14.10.08 ALL<br />
Total:32<br />
4<br />
5<br />
6<br />
7<br />
8<br />
9<br />
10<br />
11<br />
12<br />
13<br />
14<br />
15<br />
16<br />
17<br />
18<br />
19<br />
20<br />
84417_O&I_TR-810_C<br />
Operation and<br />
Installation manual<br />
84417_O&I_TR-810_C Introduction Page v
The information in this book has been carefully checked and is believed to be accurate.<br />
However, no responsibility is assumed for inaccuracies.<br />
<strong>Jotron</strong> AS reserves the right to make changes without further notice to any products or<br />
modules described herein to improve reliability, function or design. <strong>Jotron</strong> AS does not<br />
assume any liability arising out of the application or use of the described product.<br />
This equipment contains CMOS integrated circuits. Observe handling precautions to avoid<br />
static discharges which may damage these devices.<br />
Some RF semiconductor devices used in this equipment may contain Beryllium Oxide. If<br />
inhaled, dust from this oxide can be toxic. No danger will arise from normal handling but no<br />
attempt should be made to tamper with these devices. On no account must these transistors<br />
be destroyed or discarded with industrial or domestic waste, but should be returned to the<br />
manufacturers for subsequent disposal.<br />
84417_O&I_TR-810_C Introduction Page vi
Connectors and cables<br />
Do not force plugs in place, as this may damage the pins in the plugs.<br />
Do not pull the cables when removing connectors from the TR-810, take instead a firm grip<br />
around the connector, press in the locking pin and pull.<br />
Display and front panel<br />
Avoid touching the display with sharp objects, as scratches can reduce the visibility.<br />
Storage and safe handling<br />
Storage temperature is between -40C to + 70 C.<br />
Cleaning of the equipment can be done with a cloth soaked in a mixture of ordinary dishdetergent<br />
and water.<br />
1. Do not place liquid-filled containers on top of the equipment.<br />
2. Immediately turn off the power if water or other liquid leaks into the equipment.<br />
Continued use of the equipment can cause fire or electrical shock. Contact <strong>Jotron</strong><br />
AS for service.<br />
3. Immediately turn off the power if the equipment is emitting smoke or fire.<br />
4. Do not operate the equipment with wet hands.<br />
84417_O&I_TR-810_C Introduction Page vii
This device complies with part 15 of the FCC Rules. Operation is subject to the following two<br />
conditions: (1) This device may not cause harmful interference, and (2) this device must<br />
accept any interference received, including interference that may cause undesired<br />
operation.<br />
Changes or modifications not expressly approved by the party responsible for compliance<br />
could void the user's authority to operate the equipment.<br />
This equipment has been tested and found to comply with the limits for a Class B digital<br />
device, pursuant to part 15 of the FCC Rules. These limits are designed to provide reasonable<br />
protection against harmful interference in a residential installation. This equipment<br />
generates, uses and can radiate radio frequency energy and, if not installed and used in<br />
accordance with the instructions, may cause harmful interference to radio communications.<br />
However, there is no guarantee that interference will not occur in a particular installation.<br />
If this equipment does cause harmful interference to radio or television reception, which can<br />
be determined by turning the equipment off and on, the user is encouraged to try to correct<br />
the interference by one or more of the following measures:<br />
--Reorient or relocate the receiving antenna.<br />
--Increase the separation between the equipment and transceiver.<br />
--Connect the equipment into an outlet on a circuit different from that<br />
to which the transceiver is connected.<br />
--Consult the dealer or an experienced radio/TV technician for help.<br />
84417_O&I_TR-810_C Introduction Page viii
1 INTRODUCTION .................................................................................................................. 1-1<br />
1.1 MODELS COVERED BY THIS MANUAL .............................................................................................. 1-1<br />
1.2 LAYOUT OF THE TRANSCEIVER ....................................................................................................... 1-2<br />
1.3 APPLICATIONS ............................................................................................................................ 1-2<br />
2 TECHNICAL SPECIFICATIONS ................................................................................................ 2-1<br />
2.1 GENERAL SPECIFICATION, TR-810 ................................................................................................. 2-1<br />
3 FUNCTIONAL DESCRIPTION ................................................................................................. 3-1<br />
3.1 FRONT MODULE CONTROLS .......................................................................................................... 3-1<br />
3.1.1 Display............................................................................................................................. 3-1<br />
3.1.2 Scroll/Select switch and Navigation buttons A, B and C ................................................. 3-2<br />
3.1.3 ON/OFF button ............................................................................................................... 3-2<br />
3.1.4 Front Mic/Headset connector ......................................................................................... 3-2<br />
3.1.5 Preset channel buttons ................................................................................................... 3-3<br />
3.2 TRANSCEIVER, REAR CONNECTIONS ................................................................................................ 3-3<br />
3.2.1 Antenna connector (50 ohm N) ...................................................................................... 3-3<br />
3.2.2 DC Connector .................................................................................................................. 3-3<br />
3.2.3 I/O connector (RJ45) ....................................................................................................... 3-4<br />
3.2.4 MIC II connector (RJ45) ................................................................................................... 3-4<br />
4 INSTALLATION .................................................................................................................... 4-1<br />
4.1 COMPASS SAFE DISTANCE ............................................................................................................. 4-1<br />
4.2 INTRODUCTION. ......................................................................................................................... 4-1<br />
4.3 INITIAL INSPECTION ..................................................................................................................... 4-1<br />
4.4 INSTALLATION OF TR-810 ............................................................................................................ 4-2<br />
4.4.1 Split installation parts ..................................................................................................... 4-2<br />
4.4.2 Measures of TR-810 ........................................................................................................ 4-3<br />
4.4.3 Desktop Mounting .......................................................................................................... 4-4<br />
4.4.4 Flush mounting ............................................................................................................... 4-5<br />
4.5 ANTENNA CONNECTORS ............................................................................................................... 4-6<br />
4.6 DC CONNECTION ........................................................................................................................ 4-6<br />
4.7 REMOTE SIGNALS ........................................................................................................................ 4-6<br />
5 OPERATING INSTRUCTIONS ................................................................................................. 5-1<br />
5.1 INTRODUCTION .......................................................................................................................... 5-1<br />
5.1.1 Note on frequency setting .............................................................................................. 5-2<br />
5.2 USER MENU – TRANSCEIVER (RESTRICTED ACCESS LEVEL) .................................................................. 5-3<br />
5.3 USER MENU – TRANSCEIVER (NON-RESTRICTED ACCESS LEVEL) ........................................................... 5-4<br />
5.4 USER MENU – TRANSCEIVER (TECHNICIAN) ..................................................................................... 5-4<br />
5.5 SETTING, INFORMATION AND CONFIGURATION MENUS – TRANSCEIVER ................................................ 5-5<br />
5.6 SERVICE INFORMATION MENUS – TRANSCEIVER ............................................................................... 5-6<br />
5.7 BITE INFORMATION MENUS – TRANSCEIVER .................................................................................... 5-6<br />
6 ERROR CONDITIONS AND CORRECTIVE ACTIONS ................................................................. 6-1<br />
7 LIST OF TABLES AND FIGURES .............................................................................................. 7-1<br />
84417_O&I_TR-810_C Introduction Page ix
1 Introduction<br />
1.1 Models covered by this manual<br />
The following models / variants are covered by this operator manual<br />
Model P/N Accessories Output Frequency range Modes<br />
TR-810 Transceiver 83200 See Table 1.1-2 10 Watt 118-137 MHz AM<br />
Vehicle version<br />
TR-810 Transceiver<br />
Desktop version<br />
83200 See Table 1.1-2 10 Watt 118-137 MHz AM<br />
Table 1.1-1, Radio models<br />
Accessory<br />
X = Standard supply O = Optional supply<br />
Part<br />
number<br />
TR-810<br />
Vehicle version<br />
TR-810<br />
Desktop version<br />
5m extension cable for split mount 84317 X X<br />
Hand microphone 84092 X X<br />
Console bracket 84084 X X<br />
Lock screws 84086 X X<br />
Front module bracket (for split mount) 84391 X X<br />
Operation and Installation manual 84417 X X<br />
Antenna with cable (Vehicle kit) 97976 X<br />
Antenna adapter FME - BNC 84605 X<br />
DC cable with fuses for vehicle mount 84329 X<br />
Power AC/DC with connector 84330 X<br />
DC/DC converter with separation 84545 X<br />
Antenna adapter BNC - N 80577 X<br />
Front cover plate with flange (for split mount) 84082 O<br />
Console cover plate (for split mount) 84416 O<br />
Base antenna 91794 O<br />
Coax cable RG-213 – 30m 97898 O<br />
N-connector for RG-213 98244 O<br />
Antenna ½``flammable retardant cable 82907 O<br />
N-connector for ½``flammable retardant cable 82908 O<br />
Antenna lightning protector 80322 O<br />
Technical manual 84096 O O<br />
Table 1.1-2, Accessory list<br />
84417_O&I_TR-810_C Introduction Page 1-1
1.2 Layout of the transceiver<br />
The TR-810 VHF AM transceiver is designed for use in ground to air communication in the<br />
118-137MHz air band, with selectable channel spacing, 8.33KHz* or 25KHz. The transceiver<br />
operates in accordance to ICAO recommendations and conforms to the requirements of<br />
European Telecom Standard Institute, ETSI, EN 300 676 standard. The transceiver will be<br />
delivered with 10 Watt, 40 Watt PEP, output power.<br />
*) 8.33KHz are only applicable outside USA and Canada<br />
Figure 1.2-1, Transceiver, TR-810 with microphone<br />
1.3 Applications<br />
The TR-810 AM transceiver can be used for ground to air voice and can be operated in the<br />
following modes:<br />
Locally, mounted into a vehicle, with a microphone connected to the front module<br />
connector or to the transceiver unit micII connector. An external loudspeaker can be<br />
connected to the transceiver unit I/O connector.<br />
Locally, mounted as a desktop, with microphone and/or headphone connected to the<br />
front module connector or the microphone connected to the transceiver unit rear<br />
connector. An external loudspeaker can be connected to the transceiver unit I/O<br />
connector.<br />
Locally, flush mounted on a horizontal or vertical plate, with microphone and /or<br />
headphone connected to the front module connector or the microphone connected<br />
to the transceiver unit micII connector. An external loudspeaker can be connected to<br />
the transceiver unit I/O connector.<br />
84417_O&I_TR-810_C Introduction Page 1-2
2 Technical SPECIFICATIONS<br />
2.1 General specification, TR-810<br />
Radio performance<br />
EN 300 676 v.1.3.1<br />
TR-810<br />
Temperature range<br />
-20°C to +55°C (operating) -40°C to +70°C (storage)<br />
Humidity<br />
90% @+40°C (non condensing)<br />
Shock & Vibration Transport: EN 300 019-2-2<br />
Shock & Vibration Ground Vehicle installations: EN 300 019-2-5<br />
Shock & Vibration Portable and non-stationary use: EN 300 019-2-7<br />
Safety According to EN/IEC 60950<br />
EMC EN 301 489-1 v.1.5.1, EN 301 489-22 v.1.3.1 , IEC 60945<br />
MTBF<br />
>10 years / unit<br />
MTTR<br />
40dB with a frequency offset of ± 150kHz<br />
RX Adjacent channel rejection >80dB >65dB<br />
RX THD<br />
< 100µV, 1kHz<br />
RX Sensitivity @1V / 30% pd 10dB SINAD (CCITT)<br />
RX Image and IF frequency response >100 dB<br />
RX Intermodulation immunity >80 dBc<br />
RX Squelch operation<br />
Adjustable -1µV pd. to 25µV pd., Hysteresis:< 3dB, Opening/Closing: < 50ms<br />
RX Audio AGC<br />
30% - 90%, 4W<br />
RX Headphone<br />
8 - 32Ω >100mW<br />
RX External speaker<br />
>4W @ 4Ω, adjustable volume from front panel<br />
RX Signal / Noise<br />
>45dB on any output @100V, 30%, 1kHz<br />
RX Monitor output<br />
600Ω (unbalanced) -7dBm @ 90% modulation<br />
RX Harmonic distortion<br />
90dB @ 1MHz offset<br />
RX Blocking<br />
>95dB @1MHz offset<br />
RX Dynamic range<br />
>110dB<br />
RX Spurious response rejection >90dB<br />
84417_O&I_TR-810_C Technical SPECIFICATIONS Page 2-1
3 Functional description<br />
3.1 Front module controls<br />
Scroll /Select<br />
switch (SW)<br />
Navigation<br />
button (A)<br />
Display<br />
Preset Channel<br />
buttons<br />
Mic/Headset<br />
connector<br />
Navigation<br />
button (C)<br />
Navigation<br />
button (B)<br />
Internal<br />
loadspeaker<br />
Figure 3.1-1, Front module controls<br />
3.1.1 Display<br />
The display shows the most important operational parameters, selected channel and<br />
frequency.<br />
In addition, the display will show various menus, submenus and operational parameters to<br />
be accessed by the Scroll/Select switch and Navigation buttons A, B and C.<br />
The bottom line of the display will show icons to indicate different status:<br />
TX<br />
LP<br />
SQ<br />
Indicates that the key button on the microphone is pressed, and the radio is<br />
transmitting.<br />
Indicates that the radio transmitter has decreased the output level to Low Power.<br />
See chapter 5.7 for details.<br />
Indicates that the Squelch is open and/or a signal is received.<br />
!<br />
Indicates an Alarm condition. An alarm text will be shown at the right side of this<br />
symbol.<br />
84417_O&I_TR-810_C Functional description Page 3-1
3.1.2 Scroll/Select switch and Navigation buttons A, B and C<br />
The Scroll/Select switch together with the navigation buttons, A, B and C, are used to<br />
navigate through the menus. The Scroll/Select switch has three actions: It can be turned<br />
clockwise, anti-clockwise, or momentarily pressed.<br />
In general the use of the navigation buttons are:<br />
A has two functions:<br />
B has two functions:<br />
C has two functions:<br />
SW Scroll/Select right:<br />
SW Scroll/Select left:<br />
SW Scroll/Select press:<br />
Select Channel or One step back<br />
Squelch on/off or Enter/Confirm a selected submenu<br />
Enter Main menu or Power on/off<br />
Increase a value (up)<br />
Decrease a value (down)<br />
Enter/Confirm<br />
The user interface will indicate which navigation button to use.<br />
3.1.3 ON/OFF button<br />
Navigation button C.<br />
To switch the transceiver ON, press and hold button for 1 second.<br />
To switch the transceiver OFF, press button once to enter the Main menu. Then press and<br />
hold the button for 5 seconds.<br />
3.1.4 Front Mic/Headset connector<br />
The front Mic/Headset connector is used for multiple purposes. First it is used to connect a<br />
microphone and/or a headset to the front module of the transceiver for local operation. The<br />
headset output contains the sidetone generated from the output of the transmitter together<br />
with the received audio when the transmitter is not keyed.<br />
In addition the Mic/Headset connector has a RS232 serial line that can be used to control<br />
radio parameters from an external unit, or to upload new firmware into the radio unit for<br />
future upgrades. A service dongle can be inserted to access the service menu.<br />
Microphone Connector Front<br />
Name PIN Purpose<br />
MIC. INPUT 1<br />
MIC. GND 2<br />
Headset 3<br />
RS232 4 RS232 TD<br />
RS232 5 RS232 RD<br />
KEY 6 Grounding this pin will key the transmitter<br />
+12VDC 7 +12 VDC to external equipment (10mA)<br />
GND 8 Common ground<br />
Table 3.1.4-1, Front Mic/Headset connector, pin out<br />
84417_O&I_TR-810_C Functional description Page 3-2
3.1.5 Preset channel buttons<br />
These buttons are used to bring already stored channels.<br />
3.2 Transceiver, rear connections<br />
Mic II<br />
connector<br />
I/O<br />
connector<br />
Antenna<br />
connector<br />
DC<br />
Connector<br />
Figure 3.2-1, TR-810 transceiver unit, rear view<br />
3.2.1 Antenna connector (50 ohm N)<br />
Interface to the antenna cable for the transceiver Connector (50 ohm BNC).<br />
This connector is connected to the antenna relay internally in the transceiver unit.<br />
3.2.2 DC Connector<br />
The DC wires are connected to the external DC supply (+12V to + 28V 10%), or directly to<br />
the cars battery via a separate external fuse.<br />
Red wire is the positive connection and Black wire is the negative.<br />
A thin Green wire is together with the DC input wires. This wire can be connected to +<br />
voltage through the ignition key, to automatically turn the TR-810 off when the ignition is<br />
turned off.<br />
To ignore this possibility, this wire has to be connected to a constant + voltage.<br />
84417_O&I_TR-810_C Functional description Page 3-3
DC Connector<br />
Name PIN Purpose<br />
Red wire 1 Connected to + DC voltage<br />
Black wire 2 Connected to minus<br />
Green wire 3 Ignition + DC voltage sense<br />
Table 3.2.2-1, DC connector, pin out<br />
3.2.3 I/O connector (RJ45)<br />
The transceiver unit I/O connector is used for multiple purposes described in the table.<br />
I/O Connector<br />
Name PIN Purpose<br />
EX-SPEAKER 1 To external speaker.<br />
EX-SPEAKER 2 To external speaker.<br />
MONITOR 3 To tape recorder etc. 600Ω unbalanced<br />
LOW POWER 4 Grounding this pin will force the transmitter to<br />
low power (Gas alarm)<br />
NC 5 Not in use<br />
MUTE 6 Used to mute external equipment. Triggered by<br />
squelch<br />
+12VDC 7 +12 VDC to external equipment (10mA)<br />
GND 8 Common ground<br />
Table 3.2.3-1, I/O connector, pin out<br />
3.2.4 MIC II connector (RJ45)<br />
The microphone can be connected to this connector if it is convenient to have the microphone<br />
connected at the rear side of the transceiver unit. See chapter 4.7 and 5.5 for selecting an external<br />
microphone.<br />
Rear mic. Connector<br />
Name PIN Purpose<br />
MIC. INPUT 1<br />
MIC. GND 2<br />
Headset 3<br />
NC 4 Not in use<br />
NC 5 Not in use<br />
KEY 6 Grounding this pin will key the transmitter<br />
+12VDC 7 +12 VDC to external equipment (10mA)<br />
GND 8 Common ground<br />
Table 3.2.4-1, MIC II connector, pin out<br />
84417_O&I_TR-810_C Functional description Page 3-4
4 Installation<br />
4.1 Compass safe distance<br />
The Compass safe distance for the TR-810 is minimum 110cm.<br />
4.2 Introduction.<br />
The procedures for installing the transceiver are described in Table 4.2-1 below.<br />
It is recommended that these procedures are completed in the order shown.<br />
Procedure<br />
Reference<br />
1 Initial inspection 4.3<br />
2 Install equipment 4.4<br />
4 Connect remote connectors as required 4.7<br />
5 Connect antenna 4.5<br />
6 Connect DC supply 4.6<br />
Table 4.2-1, Installation procedures<br />
4.3 Initial inspection<br />
Items included for a TR-810 transceiver<br />
1 TR-810 transceiver<br />
2 CD with <strong>Operators</strong> Manual<br />
3 Accessories ordered according to model and installation. See Table 1.1-2,<br />
Accessory list<br />
Table 4.3-1, Inspection procedures<br />
On receipt of the radio unit, remove all transit packaging and check that there is no damage<br />
to the equipment. If damage is evident, contact <strong>Jotron</strong> AS immediately and retain the<br />
original transit packaging.<br />
84417_O&I_TR-810_C Installation Page 4-1
4.4 Installation of TR-810<br />
4.4.1 Split installation parts<br />
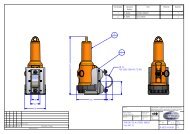
Figure 4.4.1-1 shows some extra parts used for split installation. The TR-810 can be mounted<br />
as a Mobile radio, Desk top or Flush mounted into a horizontal or vertical area. The front<br />
module can be mounted separately away from the transceiver unit using an extension cable<br />
and a mounting plate or a bracket.<br />
Item Document Title<br />
Quantity<br />
number number<br />
1 82767 TRANSCEIVER UNIT W/ DESKTOP BRACKET 1<br />
2 84082 FRONT COVER PLATE W/FLANGE 1<br />
3 84416 CONSOLE MOUNTING PLATE FRONT MODULE 1<br />
4 84414 BRACKET FRONT MODULE 1<br />
5 82276 DIN912-CYL HEAD UMBRAKO M4X10 2<br />
Figure 4.4.1-1, Examples of various parts used for split installation<br />
84417_O&I_TR-810_C Installation Page 4-2
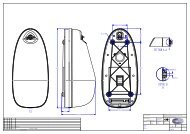
4.4.2 Measures of TR-810<br />
Figure 4.4.2-1, Measures of TR-810<br />
84417_O&I_TR-810_C Installation Page 4-3
4.4.3 Desktop Mounting<br />
Figure 4.4.3-1, Standard desktop mounting<br />
Figure 4.4.3-2, Split desktop mounting<br />
84417_O&I_TR-810_C Installation Page 4-4
4.4.4 Flush mounting<br />
Figure 4.4.4-1, Standard flush mounting<br />
Hole in desk or wall for the connection cable between<br />
front module and transceiver unit<br />
Figure 4.4.4-2, Split flush mounting<br />
84417_O&I_TR-810_C Installation Page 4-5
4.5 Antenna connectors<br />
The antenna should be of good quality with regards to gain and VSWR to obtain maximum<br />
performance. Make sure that the VSWR on the antenna is low, and that the cable from the<br />
transmitter to the antenna is of good quality to avoid mismatch and unnecessary losses.<br />
A cable loss of 1 dB is the same as reducing the power output of a 10W transmitter to less<br />
than 8.5W. Similarly, a cable loss of 2 dB is the same as reducing the output power to less<br />
than 7W.<br />
In areas were thunderstorms and lightning is a problem, surge arrestors should be mounted<br />
between the antenna connector and the antenna cable. The arrestors should be of good<br />
quality and be capable of handling the output power of the transmitter.<br />
The antenna input of the transceiver is the BNC-type antenna connector on the back of the<br />
transceiver unit.<br />
4.6 DC connection<br />
Refer to chapter 2.1 for voltage limits.<br />
4.7 Remote signals<br />
Several remote signals are available on the rear interfaces of the transceiver unit.<br />
These signals can be grouped into: Audio signals, Key signals and I/O signals.<br />
Note, for all interface signals, RJ45 connectors are used. As far as practically possible, the<br />
pairs used on a standard ethernet connection are used when a signal is input/output as a<br />
pair to the radio (e.g. audio lines).<br />
For interconnections between the front module and transceiver unit, standard Cat5E,<br />
ethernet cable should be used. This is a good quality, screened cable, with 1 to 1<br />
connections between the two connectors.<br />
Refer to chapter 3.1.4, 3.2.3 and 3.2.4 for an overview of the different connectors.<br />
The following audio remote signals are available on the rear connectors:<br />
Monitor out: Monitor signal, usually connected to a recording unit.<br />
Microphone input: MIC II connector for connection of microphone at the rear of the<br />
transceiver unit.<br />
See Table 4.7-1 for menu settings.<br />
Loudspeaker output: For connection of an external loudspeaker. See Table 4.7-1 for menu<br />
settings.<br />
84417_O&I_TR-810_C Installation Page 4-6
Menu path: Parameter Range Default Details<br />
Radio Ctrl ►<br />
Audio Mic Rear On/ Off Off Set to “On” when the microphone is<br />
connected to the Mic II connector at<br />
the rear side of the transceiver unit<br />
Audio Ex. speaker Track On/Off Off Set to “On” when an external<br />
loudspeaker is connected to the I/O<br />
connector at the rear side of the<br />
transceiver unit, and shall follow the<br />
volume adjustment of the internal<br />
speaker .<br />
Audio Ex. speaker Mute on TX<br />
On/Off<br />
RX settings Ex. Speaker Volume balance<br />
between<br />
internal and<br />
external<br />
loadspeaker<br />
Off<br />
Equal<br />
Set to “On” when an external<br />
loudspeaker is going to be silenced<br />
when TX is keyed.<br />
When an external loudspeaker is<br />
connected to the I/O connector at the<br />
rear side of the transceiver unit,<br />
adjust volume balance between the<br />
internal and external loudspeaker..<br />
Table 4.7-1, Settings associated with microphone and loudspeaker connections<br />
See chapter 5.2 and 5.3 to enter menus.<br />
84417_O&I_TR-810_C Installation Page 4-7
5 Operating Instructions<br />
5.1 Introduction<br />
To set up the TR-810 transceiver unit, various parameters can be selected from the front<br />
panel. This section details how this is done and the range of all parameters.<br />
Since the transceiver unit contains no manual tuning points or switches, all parameters can<br />
in principal be set from the front panel, however except in some rare occasions, most<br />
parameters should be left at their default (factory preset) values.<br />
There are 2 user levels that can be selected to limit the user access to certain parameters.<br />
A service level for technical people can be entered by inserting a dongle into the front<br />
connector.<br />
These user levels are:<br />
Restricted<br />
Operation<br />
Limits front panel operation to select preset channels and adjust<br />
audio output levels, turn the squelch on/off and change the display<br />
appearance. Use this level when the radio is used in cases where the<br />
user should be restricted to use preset channels only (0 – 63).<br />
Same as restricted, but in addition the local user has full access to<br />
change and store channel names, the squelch operating level and<br />
frequencies.<br />
Technician<br />
This level gives the local user access to the most used installation<br />
specific parameters (line levels, output power, etc.) and should be<br />
used only for installation or maintenance of the transceiver.<br />
In the following section, these symbols and abbreviations are used to explain navigation in<br />
menus / setting of values:<br />
Scroll/Select switch =<br />
Navigation button A (top left button) =<br />
Navigation button B (middle left button) =<br />
Navigation button C (on/off button) =<br />
Clockwise = CW<br />
Counter Clockwise = CCW<br />
84417_O&I_TR-810_C Operating Instructions Page 5-1
5.1.1 Note on frequency setting<br />
The frequency is set according to the procedure described in ICAO annex 10. This is a way of<br />
setting the frequency in a mixed 8.33* and 25 kHz environment. The frequency set does not<br />
always reflect the actual transmit or receive frequency but is the frequency used to orally<br />
communicate the frequency between controllers and pilots.<br />
The frequency and bandwidth used are in accordance with the table below:<br />
Display<br />
Actual<br />
frequency<br />
[MHz]<br />
Bandwidth<br />
[kHz]<br />
118.000 118.000 25<br />
118.005 118.0000 8.33*<br />
118.010 118.0083 8.33*<br />
118.015 118.0167 8.33*<br />
118.025 118.025 25<br />
118.030 118.0250 8.33*<br />
118.035 118.0333 8.33*<br />
118.040 118.04167 8.33*<br />
118.050 118.050 25<br />
118.055 118.0500 8.33*<br />
118.060 118.0583 8.33*<br />
118.065 118.0667 8.33*<br />
118.075 118.075 25<br />
118.080 118.0750 8.33*<br />
118.085 118.0833 8.33*<br />
118.090 118.09167 8.33*<br />
118.100 118.100 25<br />
………. ……… ……..<br />
136.975 136.975 25<br />
136.980 136.9750 8.33*<br />
136.985 136.9833 8.33*<br />
136.990 136.99167 8.33*<br />
*) 8.33KHz are only applicable outside USA and Canada<br />
Table 5.1.1-1, Frequency setting 8.33 and 25 kHz channels<br />
84417_O&I_TR-810_C Operating Instructions Page 5-2
5.2 User menu – transceiver (Restricted access level)<br />
Main display window in restricted mode.<br />
Display<br />
Description<br />
When the transceiver is switched on, it will show the name of the last<br />
selected channel and the frequency. This is the start-up menu.<br />
Any fault indications will be shown at the bottom line of the display.<br />
Rotating will set the volume in the front speaker and, if connected<br />
and activated, also the remote speaker.<br />
Press to Save the speaker volume level. Press to go one step back.<br />
Press to navigate to the channel recall screen.<br />
Select any channel (up to 63) that is previously stored in the transceiver, by<br />
rotating . Press to Recall the selected channel.<br />
If no channel is stored, the display will show: DEFAULT<br />
136.000MHz<br />
Press to navigate to the squelch adjustment screen.<br />
This setting adjusts the squelch operating level.<br />
Rotate CW or CCW to adjust the squelch operating level.<br />
Press to Save the selected squelch operating level.<br />
Press to access the Main menu options available for the current user<br />
level. Select sub-menu by rotating .<br />
Press<br />
Rotate<br />
Press<br />
to navigate to the Display contrast adjustment screen.<br />
CW or CCW to adjust the Display contrast level.<br />
to save the selected squelch operating level.<br />
Select sub-menu for System software information by rotating .<br />
Press<br />
Press<br />
to navigate to the System software information screen.<br />
to return to Main menu.<br />
The Transceiver Ctrl submenu is for non-restricted users and technicians<br />
only.<br />
Press to navigate to the Transceiver Ctrl information screen.<br />
For details refer to chapter 5.3.<br />
Table 5.2-1, User menu selections transceiver - restricted access level<br />
84417_O&I_TR-810_C Operating Instructions Page 5-3
5.3 User menu – transceiver (Non-restricted access level)<br />
Main display window for user levels: Operator and Technician<br />
Display<br />
Description<br />
Select number by rotating CW or CCW. Press to step to the next<br />
digit. When all four digits are set correctly, press to save.<br />
The input password is described in the technical manual.<br />
Select sub-menu for Transceiver Ctrl information by rotating .<br />
Press to enter selected sub-menu.<br />
For details of sub-menus refer to chapter 5.5.<br />
Select sub-menu for Transceiver Ctrl information by rotating .<br />
Press to enter selected sub-menu.<br />
For details of sub-menus refer to chapter 5.5.<br />
Table 5.3-1, User menu selections transceiver- Operator and Technician levels<br />
5.4 User menu – transceiver (Technician)<br />
Main display window for user levels: Technician<br />
Display<br />
Description<br />
Inserting a dongle into the front connector will access the Service menu.<br />
Select Service menu by rotating .<br />
Press to enter selected sub-menu.<br />
Select sub-menu for Service information by rotating .<br />
Press to enter selected sub-menu.<br />
For details of sub-menus refer to chapter 5.6.<br />
Select sub-menu for Service information by rotating .<br />
Press to enter selected sub-menu.<br />
For details of sub-menus refer to chapter 5.6.<br />
Table 5.4-1, User menu selections transceiver- Technician levels<br />
84417_O&I_TR-810_C Operating Instructions Page 5-4
5.5 Setting, information and configuration menus – transceiver<br />
Under the menu selection from the transceiver Ctrl menu, various submenus are available<br />
for the non-restricted users and Technician. The submenus and details for them are shown<br />
in the tables below.<br />
Menu Submenu Description<br />
RX settings<br />
►<br />
Ext. Speaker<br />
AAGC<br />
Noise Blank<br />
Squelch<br />
Access to configuration parameters for:<br />
- External speaker (Balance between internal and<br />
external speaker if both are selected. See Audio menu).<br />
- AAGC on/off setting<br />
- Noise blanking level adjustment<br />
- Squelch operation level adjustment<br />
TX settings<br />
►<br />
TX Power<br />
Time Out<br />
Modulation<br />
Access to configuration parameters for:<br />
- TX output power setting<br />
- Timeout setting<br />
- Modulation level setting<br />
Channel setup<br />
►<br />
Sel.Visibility<br />
Sel.Rx only<br />
Freq and name<br />
No of channels<br />
25KHz step<br />
Access to configuration parameters for :<br />
- Setting the channels visible for the restricted user<br />
- Configure a channel as a receiver only channel<br />
- Setting the frequency and names of the channels<br />
- Setting the number of channels for the transceiver (≤ 63)<br />
- Selecting 25KHz step also as a 8.33KHz transceiver<br />
Audio<br />
►<br />
Headphone<br />
Sidetone levl<br />
Mic Rear<br />
Ex. Speaker<br />
Access to configuration parameters for :<br />
- Headphone<br />
- Side-tone level<br />
- Mic Rear on/off<br />
- Tracking and muting of External speaker.<br />
Bite<br />
►<br />
Displays information about a number of selected critical<br />
parameters inside the transceiver. For details regarding<br />
information, refer to chapter 5.7.<br />
Password<br />
►<br />
Access to change password<br />
Table 5.5-1, Submenus available on the transceiver<br />
84417_O&I_TR-810_C Operating Instructions Page 5-5
5.6 Service information menus – transceiver<br />
Under the menu selection from the Service menu, various submenus are available for the<br />
technician. The submenus and details for them are shown in the tables below.<br />
Menu Submenu Description<br />
Service<br />
Service<br />
AGC<br />
TCXO<br />
Access to configuration parameters for:<br />
- AGC on/off setting<br />
Access to configuration parameters for:<br />
Fine tuning of oscillator frequency<br />
Service Noise Squelch Access to configuration parameters for:<br />
- Noise squelch level adjustment<br />
Service Limiter Access to configuration parameters for:<br />
- Limitation of modulation level<br />
Service<br />
Service<br />
Power Adj<br />
Menu timeout<br />
Access to configuration parameters for:<br />
- Fine tuning of power output level<br />
Access to configuration parameters for:<br />
Will be fixed as a default value later<br />
Table 5.6-1, Submenus available on the Service menu<br />
5.7 Bite information menus – transceiver<br />
Under the menu selection from the Bite menu, various submenus are available for the<br />
technician. The submenus and details for them are shown in the tables below.<br />
Menu path: Bite Range Default Details<br />
Parameter:<br />
Temp PA -20 °C to +95 °C 32°C Alarm Temp Pa<br />
Internal temperature of the RF Module is out of<br />
range (above 85˚C). Check X-82770 Transceiver<br />
Board, PA stage.Possible faults: IC140 or some of its<br />
surrounding components.<br />
Fwd power<br />
0,2W to 10W<br />
10W<br />
Alarm Pwr<br />
Transmitted output power is below 0.2W. Check X-<br />
82770 Transceiver Board, PA stage, output amplifier<br />
or some of its surrounding components.<br />
SWR 0W to 10W 0W Alarm SWR<br />
Reflected power exceeds threshold. Possible faults:<br />
Defective antenna, antenna cable, cavity filter out of<br />
tune etc.<br />
Input volt 10VDC to 28VDC 13,8V<br />
RSSI 1.1 V at 1 uV 0,9V<br />
12V 10VDC to 14VDC 12V Alarm 12V<br />
The +12V is out of The +12V is out of range. Check X-82770<br />
Transceiver Board, and measure test point TP_+12V.<br />
Possible faults in: Power supply.<br />
84417_O&I_TR-810_C Operating Instructions Page 5-6
Menu path: Bite Range Default Details<br />
Parameter:<br />
5 volt 4,3VDC to 5,6VDC 5V Alarm 5V<br />
The +5V is out of range. Check X-82770 Transceiver<br />
Board, and measure test point TP_+5V.<br />
Possible faults: Step down converter IC143 or some<br />
of its surrounding components.<br />
5 volt REF 4,3VDC to 5,6VDC 5V Alarm 5V REF<br />
The +5V_REF is out of range. Check X-82770<br />
Transceiver Board, and measure test point<br />
TP+5V_REF. Possible faults: Regulator IC126 or some<br />
of its surrounding components.<br />
3 volt 2,7VDC to 3,3VDC 3V Alarm 3V<br />
The +3V is out of range. Check X-82770 Transceiver<br />
Board, and measure test point TP_+3V. Possible<br />
faults: Regulator IC141 or some of its surrounding<br />
components.<br />
Current < 5A 4,0A Alarm Cur<br />
The current consumption in the transceiver is too<br />
high (above 5A). Check X-82770 Transceiver Board.<br />
Possible faults: +12V shorted to GND, defective<br />
output stage etc.<br />
IF current 20mA to 60mA 40mA Alarm IF<br />
The current consumption in the 1 IF circuit is out of<br />
range. Check X-99205 Main Board, 1 IF mixer.<br />
Possible faults: Q143 or some of its surrounding<br />
components.<br />
LNA current 10mA to 30mA 24mA Alarm LNA<br />
The current consumption in LNA is out of range.<br />
Check X-82770 Transceiver Board, Front ended.<br />
Possible faults: Transistor Q148 and its surrounding<br />
components.<br />
Modulation 0% to 100% 90%<br />
Synth TX<br />
Synth RX<br />
Alarm Synth TX<br />
Transmitter synthesizer is out of lock. Check X-<br />
82770 Transceiver Board, TX Synth & VCO. Possible<br />
faults: Defective synthesizer circuit IC127, oscillator<br />
Q126 or any surrounding components. Check critical<br />
soldering points.<br />
Alarm Synth RX<br />
Receiver synthesizer is out of lock. Check X-82770<br />
Transceiver Board, RX Dual synth & VCO. Possible<br />
faults: Defective synthesizer circuit IC137, oscillators<br />
Q131/Q142 or any surrounding components. Check<br />
critical soldering points.<br />
Table 5.7-1, Submenus available on the Bite menu<br />
84417_O&I_TR-810_C Operating Instructions Page 5-7
6 Error conditions and corrective actions<br />
When the internal BITE (Built In Test Equipment) in the transceiver unit detects a failure, the<br />
alarm indicator on the front module display will be lit.<br />
Details about the fault that caused the alarm are accessible for the technician. See chapter<br />
5.7.<br />
The technician can access the BITE measurements to get more detailed information about<br />
the cause of the alarm. If the TR-810 stop functioning for internal reasons, the whole<br />
transceiver unit has to be replaced.<br />
84417_O&I_TR-810_C Error conditions and corrective actions Page 6-1
7 List of tables and figures<br />
TABLE 1.1-1, RADIO MODELS ..................................................................................................................... 1-1<br />
TABLE 1.1-2, ACCESSORY LIST ..................................................................................................................... 1-1<br />
TABLE 3.1.4-1, FRONT MIC/HEADSET CONNECTOR, PIN OUT........................................................................... 3-2<br />
TABLE 3.2.3-1, DC CONNECTOR, PIN OUT .................................................................................................... 3-4<br />
TABLE 3.2.4-1, I/O CONNECTOR, PIN OUT .................................................................................................... 3-4<br />
TABLE 3.2.5-1, MIC II CONNECTOR, PIN OUT ................................................................................................ 3-4<br />
TABLE 4.2-1, INSTALLATION PROCEDURES .................................................................................................... 4-1<br />
TABLE 4.3-1, INSPECTION PROCEDURES ........................................................................................................ 4-1<br />
TABLE 4.7-1, SETTINGS ASSOCIATED WITH MICROPHONE AND LOUDSPEAKER CONNECTIONS ................................. 4-7<br />
TABLE 3.1.4-1, FRONT MIC/HEADSET CONNECTOR, PIN OUT ............................................................................................ 3-2<br />
TABLE 3.2.2-1, DC CONNECTOR, PIN OUT ..................................................................................................................... 3-4<br />
TABLE 3.2.3-1, I/O CONNECTOR, PIN OUT .................................................................................................................... 3-4<br />
TABLE 3.2.4-1, MIC II CONNECTOR, PIN OUT ................................................................................................................ 3-4<br />
FIGURE 4.4.1-1, EXAMPLES OF VARIOUS PARTS USED FOR SPLIT INSTALLATION ..................................................................... 4-2<br />
FIGURE 4.4.2-1, MEASURES OF TR-810 ...................................................................................................................... 4-3<br />
FIGURE 4.4.3-1, STANDARD DESKTOP MOUNTING .......................................................................................................... 4-4<br />
FIGURE 4.4.3-2, SPLIT DESKTOP MOUNTING .................................................................................................................. 4-4<br />
FIGURE 4.4.4-1, STANDARD FLUSH MOUNTING .............................................................................................................. 4-5<br />
FIGURE 4.4.4-2, SPLIT FLUSH MOUNTING ...................................................................................................................... 4-5<br />
TABLE 5.1.1-1, FREQUENCY SETTING 8.33 AND 25 KHZ CHANNELS ................................................................................... 5-2<br />
TABLE 5.2-1, USER MENU SELECTIONS TRANSMITTER - RESTRICTED ACCESS LEVEL ............................................... 5-3<br />
TABLE 5.3-1, USER MENU SELECTIONS TRANSCEIVER- OPERATOR AND TECHNICIAN LEVELS ................................... 5-4<br />
TABLE 5.4-1, USER MENU SELECTIONS TRANSCEIVER- TECHNICIAN LEVELS ......................................................... 5-4<br />
TABLE 5.5-1, SUBMENUS AVAILABLE ON THE TRANSCEIVER .............................................................................. 5-5<br />
TABLE 5.6-1, SUBMENUS AVAILABLE ON THE SERVICE MENU ........................................................................... 5-6<br />
TABLE 5.7-1, SUBMENUS AVAILABLE ON THE BITE MENU ................................................................................ 5-7<br />
FIGURE 1.3-1, TRANSCEIVER, TR-810 WITH MICROPHONE.............................................................................. 1-2<br />
FIGURE 3.1-1, FRONT MODULE CONTROLS .................................................................................................... 3-1<br />
FIGURE 3.2-1, TR-810 TRANSCEIVER UNIT, REAR VIEW ................................................................................... 3-3<br />
FIGURE 4.4.1-1, EXAMPLES OF VARIOUS PARTS USED FOR SPLIT INSTALLATION ................................................... 4-2<br />
FIGURE 4.4.2-1, MEASURES OF TR-810 ...................................................................................................... 4-3<br />
FIGURE 4.4.3-1, STANDARD DESKTOP MOUNTING ......................................................................................... 4-4<br />
FIGURE 4.4.3-2, SPLIT DESKTOP MOUNTING ................................................................................................. 4-4<br />
FIGURE 4.4.4-1, STANDARD FLUSH MOUNTING ............................................................................................. 4-5<br />
FIGURE 4.4.4-2, SPLIT FLUSH MOUNTING ..................................................................................................... 4-5<br />
84417_O&I_TR-810_C List of tables and figures Page 7-1