Bomb Manual pdf - Whirlwind
Bomb Manual pdf - Whirlwind
Bomb Manual pdf - Whirlwind

Create successful ePaper yourself
Turn your PDF publications into a flip-book with our unique Google optimized e-Paper software.
Warranty:<br />
This product is warranted to be free of defects in materials<br />
or workmanship to the original purchaser for a period of 2<br />
years from the date of purchase. Should warranty service<br />
be required, return the unit postage paid along with the<br />
original sales receipt to:<br />
<strong>Whirlwind</strong> Music Dist., Inc.<br />
99 Ling Road<br />
Rochester NY 14612<br />
<strong>Whirlwind</strong> will, at its option, repair or replace the unit.<br />
This warranty does not cover damage resulting from<br />
abuse, unauthorized modifications or use of the product in<br />
unintended applications.<br />
HANDMADE IN ROCHESTER, N Y<br />
1-800-733-9473 | www.whirlwindusa.com<br />
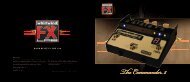
The <strong>Bomb</strong> - 26dB of Clean Boost<br />
<strong>Bomb</strong> manual.indd 2-3<br />
10/8/10 10:27 AM
Th e <strong>Bomb</strong> Boost Pedal<br />
4<br />
2<br />
7<br />
5<br />
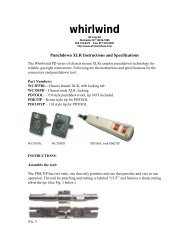
1: INPUT JACK Connect a cord from your instrument here. Removing the cord from the INPUT jack<br />
when not in use disconnects the battery which will prolong battery life.<br />
2: OUTPUT JACK Connect a cord out to your amplifier here.<br />
3: 9 VOLT INPUT Connect an optional power supply here. Accepts an industry standard 9 Volt regulated<br />
DC supply with a 2.1mm barrel type connector, center contact negative. The <strong>Whirlwind</strong> PS9V-EFX<br />
power supply is recommended for proper operation.<br />
4: This controls the amount of boost applied to the signal. At full counter-clockwise (“1”), there is no<br />
boost, the unit is at unity gain. As the knob is turned up, the gain gradually increases until it reaches<br />
+26 dB of gain at full up (“11”).<br />
3 1 The <strong>Bomb</strong><br />
6<br />
5: STATUS LED Illuminates when the effect is active.<br />
6: FOOTSWITCH Turns the effect on and off. When OFF, the unit is completely removed from the signal<br />
path (TRUE BYPASS).<br />
7: BATTERY COMPARTMENT Remove 4 screws on the bottom of the unit to access the battery. Be sure to<br />
leave the protective insulator in place to prevent the circuit board from contacting the metal case.<br />
<strong>Bomb</strong> manual.indd 4-5<br />
10/8/10 10:27 AM