Wireless Access Point
Wireless Access Point
Wireless Access Point

Create successful ePaper yourself
Turn your PDF publications into a flip-book with our unique Google optimized e-Paper software.
<strong>Wireless</strong> <strong>Access</strong> <strong>Point</strong><br />
802.11g<br />
Manual
Table of Contents<br />
Chapter 1 Introduction..............................................................................1<br />
1.1 Package Contents ..........................................................................................2<br />
1.2 Features..........................................................................................................2<br />
1.3 Specifications ................................................................................................2<br />
1.4 Physical Description......................................................................................3<br />
Chapter 2 <strong>Wireless</strong> LAN <strong>Access</strong> <strong>Point</strong> Connection ................................5<br />
Chapter 3 <strong>Wireless</strong> LAN <strong>Access</strong> <strong>Point</strong> Configuration............................6<br />
3.1 Getting Started...............................................................................................6<br />
3.2 Configuring the <strong>Access</strong> <strong>Point</strong>......................................................................11<br />
3.2.1 Client Mode configuration.................................................................................12<br />
3.2.2 AP Mode configuration......................................................................................15<br />
3.2.3 Repeater Mode configuration ............................................................................17<br />
3.2.4 P2P Mode configuration ....................................................................................20<br />
3.2.5 PMP Mode configuration .................................................................................21<br />
3.2.6 WEP Setting..................................................................................................23<br />
3.2.7 WPA Setting .................................................................................................25<br />
3.2.8 Advanced Setting..........................................................................................26<br />
3.2.9 <strong>Access</strong> Filter .................................................................................................27<br />
3.2.10 Status Setup ..................................................................................................29<br />
3.2.11 Admin Setup .................................................................................................30<br />
3.2.10 LAN Setup ....................................................................................................32<br />
Charpter 4 Troubleshooting ...................................................................33
Chapter 1<br />
Introduction<br />
This product is an access point for IEEE 802.11g/b 2.4GHz wireless network.<br />
You can use this access point to build up a wireless LAN.<br />
The product supports WPA-PSK, WEP, ESSID and MAC address filter<br />
functions to consolidate the wireless network security. With ESSID<br />
authentication, WPA-PSK, 64/128 bit WEP encryption and MAC address<br />
filtering you can prevent unauthorized wireless stations from accessing your<br />
wireless network.<br />
The product’s dipole antenna is detachable by connecting to a RP-SMA<br />
connector. Users can install a high gain antenna to the connector for better<br />
network link quality so that you can build wireless network with more<br />
flexibility.<br />
This product provides easy to use user interface and allows users to<br />
configuring from web browser. With the versatile of features, this product is<br />
the best choice for you to integrate your wireless and wired network<br />
seamlessly.
1.1 Package Contents<br />
The <strong>Access</strong> <strong>Point</strong> includes the following items:<br />
• One <strong>Access</strong> <strong>Point</strong><br />
• One Power Adapter<br />
• One User’s Manual<br />
1.2 Features<br />
• Complies with the IEEE 802.11g/b 2.4GHz specification.<br />
• High data rate 54, 48, 36, 24, 18, 12, 11, 5.5, 2 and 1Mbps network<br />
speed.<br />
• Seamlessly integrate wireless and wired Ethernet LAN networks.<br />
• Auto rate fallback in case of obstacles or interferences.<br />
• Provide 64/128-bit WEP Data Encryption function to protect the<br />
wireless data transmissions.<br />
• Supports Web-based configuration.<br />
1.3 Specifications<br />
• Standards: IEEE 802.11g/b (<strong>Wireless</strong>), IEEE 802.3 (Wired)<br />
• Data Rate: 54/48/36/24/18/12/11/5.5/2/1Mbps auto fallback<br />
• Security: 64/128-bit WEP Data Encryption<br />
• Frequency Band: 2.400~2.4835GHz (Industrial Scientific Medical<br />
Band)<br />
• Antenna: External detachable dipole antenna (with RP-SMA<br />
connector)<br />
• Connectors: 10/100Mbps RJ-45 x 1
• Power: 12VDC, 1A<br />
• Transmit Power: 16dBm (Typical)<br />
• LEDs: Power, LAN Link/Activity, <strong>Wireless</strong> Activity<br />
• Dimension: 30(H) x 127(W) x 87(D) mm<br />
• Temperature:<br />
Operating: 32~131°F (0~55°C)<br />
Storage: -4~158°F(-20~70°C)<br />
• Humidity: 10-90% (Noncondensing)<br />
1.4 Physical Description<br />
Front Panel<br />
On the <strong>Access</strong> <strong>Point</strong>’s front panel there are LED lights that inform you of<br />
the <strong>Access</strong> <strong>Point</strong>’s current status. Below is an explanation of each LED.<br />
LED Color Status Description<br />
Power Green Lit Power is supplied.<br />
Off No Power.<br />
<strong>Wireless</strong><br />
Activity<br />
Green Flash Antenna is transmitting or receiving data.<br />
Off<br />
Antenna is not transmitting or receiving data.<br />
LAN Green On A valid link is established.<br />
Link/Activity<br />
Flash It is transmitting or receiving data.<br />
Off No link is established.
Back Panel<br />
<strong>Access</strong> <strong>Point</strong>’s connection ports are located on the back panel. Below is the<br />
description of each connection port.<br />
1 Antenna Connector<br />
This round connection is standard Reverse SMA connector where any<br />
antennas with Reverse SMA connector can connect to the <strong>Access</strong> <strong>Point</strong>.<br />
2 DC Adapter Port<br />
Insert the power jack of the power adapter into this port.<br />
3 LAN Port<br />
The <strong>Access</strong> <strong>Point</strong>’s LAN port is where you connect to your LAN’s<br />
network devices.<br />
4 Reset<br />
The Reset button allows you to do one of two things.<br />
1) If problems occur with your <strong>Access</strong> <strong>Point</strong>, press the reset button<br />
with a pencil tip (for less than 5 seconds) and the <strong>Access</strong> <strong>Point</strong> will<br />
re-boot itself, keeping your original configurations.<br />
2) If problems persist or you experience extreme problems or you<br />
forgot your password, press the reset button for longer than 5<br />
seconds and the <strong>Access</strong> <strong>Point</strong> will reset itself to the factory default
settings (warning: your original configurations will be replaced<br />
with the factory default settings).
Chapter 2 <strong>Wireless</strong> LAN <strong>Access</strong><br />
<strong>Point</strong> Connection<br />
1. Locate an optimum location for the <strong>Wireless</strong> LAN <strong>Access</strong> <strong>Point</strong>.<br />
The best location for your <strong>Access</strong> <strong>Point</strong> is usually at the center of your<br />
wireless network, with line of sight to all of your mobile stations.<br />
2. Connect the <strong>Wireless</strong> LAN <strong>Access</strong> <strong>Point</strong> to your router, hub or<br />
switch.<br />
Connect one end of standard UTP cable to the <strong>Access</strong> <strong>Point</strong>’s LAN Port<br />
and connect the other end of the cable to a switch, a router or a hub. The<br />
<strong>Access</strong> <strong>Point</strong> will then be connected to your existed wired LAN<br />
Network.<br />
3. Connect the DC Power Adapter to the <strong>Wireless</strong> LAN <strong>Access</strong> <strong>Point</strong>’s<br />
Power Socket.<br />
Only use the power adapter supplied with the <strong>Access</strong> <strong>Point</strong>. Using a<br />
different adapter may damage the product.<br />
The Hardware Installation is completely also you can start to enjoy the<br />
wireless network environment.<br />
Please follow below step to access the UI to configure the more function.
Chapter 3 <strong>Wireless</strong> LAN <strong>Access</strong><br />
<strong>Point</strong> Configuration<br />
3.1 Getting Started<br />
This <strong>Access</strong> <strong>Point</strong> provides web-based configuration tool allowing you to<br />
configure from wired or wireless stations. Follow the instructions below to<br />
get started configuration.<br />
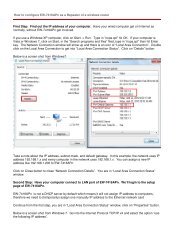
From Wired Station<br />
1. Make sure your wired station is in the same subnet with the <strong>Access</strong><br />
<strong>Point</strong>.<br />
The default IP Address and Sub Mask of the <strong>Access</strong> <strong>Point</strong> is:<br />
Default IP Address: 192.168.2.1<br />
Default Subnet: 255.255.255.0<br />
Configure your PC to be in the same subnet with the <strong>Access</strong> <strong>Point</strong>.<br />
1a) Windows 95/98/Me<br />
1. Click the Start button and select Settings, then click Control Panel. The Control<br />
Panel window will appear.<br />
2. Double-click Network icon. The Network window will appear.<br />
3. Check your list of Network Components. If TCP/IP is not installed, click the Add<br />
button to install it now. If TCP/IP is installed, go to step 6.<br />
4. In the Network Component Type dialog box, select Protocol and click Add<br />
button.<br />
5. In the Select Network Protocol dialog box, select Microsoft and TCP/IP and then<br />
click the OK button to start installing the TCP/IP protocol. You may need your<br />
Windows CD to complete the installation.<br />
6. After installing TCP/IP, go back to the Network dialog box. Select TCP/IP from<br />
the list of<br />
Network Components and then click the Properties button.<br />
7. Check each of the tabs and verify the following settings:<br />
Bindings: Check Client for Microsoft Networks and File and printer sharing
for Microsoft Networks.<br />
Gateway: All fields are blank.<br />
DNS Configuration: Select Disable DNS.<br />
WINS Configuration: Select Disable WINS Resolution.<br />
IP Address: Select Specify an IP Address. Specify the IP Address and<br />
Subnet Mask as following example.<br />
1 IP Address: 192.168.2.3 (any IP address within<br />
192.168.2.2~192.168.2.254 is available, do not setup 192.168.2.1)<br />
2 Subnet Mask: 255.255.255.0<br />
8. Reboot the PC. Your PC will now have the IP Address you specified.<br />
1b) Windows 2000<br />
1. Click the Start button and select Settings, then click Control Panel. The Control<br />
Panel window will appear.<br />
2. Double-click Network and Dial-up Connections icon. In the Network and Dial-up<br />
Connection window, double-click Local Area Connection icon. The Local Area<br />
Connection window will appear.<br />
3. In the Local Area Connection window, click the Properties button.<br />
4. Check your list of Network Components. You should see Internet Protocol<br />
[TCP/IP] on<br />
your list. Select it and click the Properties button.<br />
5. In the Internet Protocol (TCP/IP) Properties window, select Use the following IP<br />
address and specify the IP Address and Subnet mask as following.<br />
IP Address: 192.168.2.3 (any IP address within<br />
192.168.2.2~192.168.2.254 is available, do not setup 192.168.2.1)<br />
Subnet Mask: 255.255.255.0<br />
6. Click OK to confirm the setting. Your PC will now have the IP Address you<br />
specified.<br />
1c) Windows NT<br />
1. Click the Start button and select Settings, then click Control Panel. The Control<br />
Panel window will appear.<br />
2. Double-click Network icon. The Network window will appear. Select the Protocol<br />
tab from the Network window.
3. Check if the TCP/IP Protocol is on your list of Network Protocols. If TCP/IP is not<br />
installed, click the Add button to install it now. If TCP/IP is installed, go to step 5.<br />
4. In the Select Network Protocol window, select the TCP/IP Protocol and click the<br />
Ok button to start installing the TCP/IP protocol. You may need your<br />
Windows CD to complete the installation.<br />
5. After you install TCP/IP, go back to the Network window. Select TCP/IP from the<br />
list of Network Protocols and then click the Properties button.<br />
6. Check each of the tabs and verify the following settings:<br />
IP Address: Select Specify an IP address. Specify the IP Address and<br />
Subnet Mask as following example.<br />
3 IP Address: 192.168.2.3 (any IP address within<br />
192.168.2.2~192.168.2.254 is available, do not setup 192.168.2.1)<br />
4 Subnet Mask: 255.255.255.0<br />
• DNS: Let all fields are blank.<br />
• WINS: Let all fields are blank.<br />
• Routing: Let all fields are blank.<br />
7. Click OK to confirm the setting. Your PC will now have the IP Address you<br />
specified.<br />
2. Enter 192.168.2.1 from Web Browser to get into the <strong>Access</strong> <strong>Point</strong>’s<br />
configuration tool.<br />
3. A screen will be popped up and request you to enter user name and<br />
password. The default user name and password is as follows.<br />
User Name: Admin<br />
Password: 1234<br />
Enter the default user name and password, then press OK button<br />
directly.
4. You can start configuring the <strong>Access</strong> <strong>Point</strong>.<br />
From <strong>Wireless</strong> Station<br />
1. Make sure your wireless station is in the same subnet with the <strong>Access</strong><br />
<strong>Point</strong>. Please refer to the step 1 above for configuring the IP Address<br />
and Sub Mask of the wireless station.<br />
2. Connect to the <strong>Access</strong> <strong>Point</strong>.<br />
The <strong>Access</strong> <strong>Point</strong>’s ESSID is “default” and the WEP Encryption<br />
function is disabled. Make sure your wireless station is using the same<br />
ESSID as the <strong>Access</strong> <strong>Point</strong> and associate your wireless station to the<br />
<strong>Access</strong> <strong>Point</strong>.<br />
3. Enter 192.168.2.1 from Web Browser to get into the <strong>Access</strong> <strong>Point</strong>’s<br />
configuration tool.<br />
4. Enter the user name and password and then press OK button and you<br />
are available to configure the <strong>Access</strong> <strong>Point</strong> now.
3.2 Configuring the <strong>Access</strong> <strong>Point</strong><br />
This <strong>Access</strong> <strong>Point</strong> supports Client, AP, Repeater and Bridge modes. “Client<br />
Mode” is used to let a network device with only wired Ethernet function to<br />
have wireless LAN communication capability. It provides both Ad Hoc and<br />
Infrastructure modes for the “Station Mode”. With “Station-Ad Hoc mode”,<br />
it can let your network device join a wireless LAN with peer-to-peer<br />
communication. With “Station-Infrastructure mode”, it can let your network<br />
device join a wireless LAN through an access point. “AP Mode” provides<br />
pure access point function. The simplest way to build up a wireless LAN is<br />
to use “AP Mode”. If you want a repeater to bridge with another reapter and<br />
provide connection service for other wireless station at the same time, you<br />
have to set the access point to “Repeater mode”. You can use two access<br />
points with “P2P mode” to bridge two wired Ethernet networks together. If<br />
you want to bridge more than two wired Ethernet networks together, you<br />
have to use enough access points with “PMP mode”. An access point with<br />
“P2P mode” or “PMP mode” can only be used to bridge wired Ethernet<br />
networks together. It can’t accept connection from other wireless station at<br />
the same time.
3.2.1 Client Mode configuration<br />
It is used to let a network device with only wired Ethernet function to have<br />
wireless LAN communication capability. It provides both Ad Hoc and<br />
Infrastructure modes for the “Client Mode”. With “Ad Hoc mode”, it can let<br />
your network device join a wireless LAN with peer-to-peer communication.<br />
With “Infrastructure mode”, it can let your network device join a wireless<br />
LAN through an access point.
Parameter<br />
Station Mode<br />
MAC Cloning Mode<br />
SSID<br />
Site Survey<br />
Operation Mode<br />
Description<br />
802.11b mode: It allows to select the transmit rate up to 11Mbps<br />
802.11g mode: It allows to select the transmit rate up to 54Mbps<br />
Disabled: It will use it’s own MAC address to access the wireless LAN.<br />
Enabled: It will use PC’s MAC address to access the wireless LAN.<br />
The SSID (up to 32 printable ASCII characters) is the unique name<br />
identified in a WLAN. The ID prevents the unintentional merging of two<br />
co-located WLANs. Please make sure that the SSID of all stations in the<br />
same WLAN network are the same. The default SSID is “default”.<br />
Click “Site Survey” button, then a “<strong>Wireless</strong> Site Survey Table” will pop<br />
up. It will list all available access points near by. You can select one<br />
access point in the table and it will join wireless LAN through this access<br />
point.<br />
AD-Hoc: It can let your network device join a wireless LAN with
peer-to-peer communication.<br />
Infrastructure: It can let your network device join a wireless LAN<br />
through an access point.<br />
Channel<br />
Select the appropriate channel from the list provided to correspond with<br />
your network settings. Channels differ from country to country.<br />
Channel 1-11 (North America)<br />
Channel 1-14 (Japan)<br />
Channel 1-13 (Europe)<br />
There are 14 channels available.<br />
Security<br />
Disable: Disable the security function.<br />
WEP: WEP is an authentication algorithm, which protects authorized<br />
<strong>Wireless</strong> LAN users against eavesdropping. The Authentication type and<br />
WEP key of wireless stations must be the same with the <strong>Access</strong> <strong>Point</strong>.<br />
This <strong>Access</strong> <strong>Point</strong> supports 64/128-bit WEP Encryption function. With this<br />
function, your data will be transmitted over the wireless network securely.<br />
# You can refer to the detail setting from chapter 3.2.6.<br />
WPA: You can use a pre-shared key to authenticate wireless stations<br />
and encrypt data during communication. When you enabled WPA mode,<br />
you can not use WEP encryption.<br />
# You can refer to the detail setting from chapter 3.2.7.<br />
Preamble Type<br />
Preamble type defines the length of preamble block in the frames during<br />
the wireless communication.<br />
Auto select: It will auto switch to the more suitable method.<br />
Short: It is suitable for high traffic wireless network<br />
Long: It can provide more reliable communication<br />
Transmit Rate<br />
When you enable the station mode selection to “802.11b” and it allows<br />
you to select the speed of 1-11Mbps. When you enable the station mode<br />
selection to “802.11g” and it allows you to select the speed of 1-54Mbps.<br />
Click Apply button at the bottom of the screen to save the above configurations. You can now<br />
configure other advance sections or start using the <strong>Access</strong> <strong>Point</strong>.<br />
Site Survey table:
When this access point is in “Client-Infrastructure mode”, it should associate<br />
with an access point and connect to your wireless LAN through the<br />
associated access point. “<strong>Wireless</strong> Site Survey” searches for all available<br />
access points near by. You can select one access point listed in this table.<br />
3.2.2 AP Mode configuration<br />
This <strong>Access</strong> <strong>Point</strong> supports AP modes. “AP Mode” provides pure access
point function. The simplest way to build up a wireless LAN is to use “AP<br />
Mode”.<br />
Parameter<br />
Mode<br />
SSID<br />
Broadcast SSID<br />
Description<br />
802.11b mode: It allows to select the transmit rate up to 11Mbps<br />
802.11g mode: It allows to select the transmit rate up to 54Mbps<br />
Mixed mode: It provides best performance for 11g transmission when<br />
you enable the AP mode selection to “Mixed mode”.<br />
The SSID (up to 32 printable ASCII characters) is the unique name<br />
identified in a WLAN. The ID prevents the unintentional merging of two<br />
co-located WLANs. Please make sure that the SSID of all stations in the<br />
same WLAN network are the same. The default SSID is “default”.<br />
It will respond to Broadcast SSID requests. If you enable this function,<br />
every wireless station located within the coverage of this access point
can discover this access point easily. If you are building a public wireless<br />
network, enabling this feature is recommended. Disabling "Response to<br />
Broadcast ESSID requests" can provide better security.<br />
Channel<br />
Select the appropriate channel from the list provided to correspond with<br />
your network settings. Channels differ from country to country.<br />
Channel 1-11 (North America)<br />
Channel 1-14 (Japan)<br />
Channel 1-13 (Europe)<br />
There are 14 channels available.<br />
Security<br />
Disable: Disable the security function.<br />
WEP: WEP is an authentication algorithm, which protects authorized<br />
<strong>Wireless</strong> LAN users against eavesdropping. The Authentication type and<br />
WEP key of wireless stations must be the same with the <strong>Access</strong> <strong>Point</strong>.<br />
This <strong>Access</strong> <strong>Point</strong> supports 64/128-bit WEP Encryption function. With this<br />
function, your data will be transmitted over the wireless network securely.<br />
# You can refer to the detail setting from chapter 3.2.6.<br />
WPA: You can use a pre-shared key to authenticate wireless stations<br />
and encrypt data during communication. When you enabled WPA mode,<br />
you can not use WEP encryption.<br />
# You can refer to the detail setting from chapter 3.2.7.<br />
Advance setting<br />
It provides more powerful features for you to configuring.<br />
# You can refer to the detail setting from chapter 3.2.8.<br />
<strong>Access</strong> Filter<br />
This <strong>Access</strong> <strong>Point</strong> allows you to provide a Filter List of MAC addresses<br />
that are allowed associating with this AP.<br />
# You can refer to the detail setting from chapter 3.2.9.<br />
Click Apply button at the bottom of the screen to save the above configurations. You can now<br />
configure other advance sections or start using the <strong>Access</strong> <strong>Point</strong>.
3.2.3 Repeater Mode Configuration<br />
If you want a repeater to bridge with another repeater and provide<br />
connection service for othrt wireless station at the same time, you have to set<br />
the access point to “Repeater mode”.<br />
Parameter<br />
Parent MAC Address<br />
Child MAC Address<br />
Mode<br />
Description<br />
You have to enter the MAC addresses of other repeater that join the<br />
bridging work.<br />
You have to enter the MAC addresses of other repeater that join the<br />
bridging work.<br />
802.11b mode: It allows to select the transmit rate up to 11Mbps<br />
802.11g mode: It allows to select the transmit rate up to 54Mbps<br />
Mixed mode: It provides best performance for 11g transmission when
you enable the AP mode selection to “Mixed mode”.<br />
Broadcast SSID<br />
It will respond to Broadcast SSID requests. If you enable this function,<br />
every wireless station located within the coverage of this access point<br />
can discover this access point easily. If you are building a public wireless<br />
network, enabling this feature is recommended. Disabling "Response to<br />
Broadcast ESSID requests" can provide better security.<br />
Channel<br />
Select the appropriate channel from the list provided to correspond with<br />
your network settings. Channels differ from country to country.<br />
Channel 1-11 (North America)<br />
Channel 1-14 (Japan)<br />
Channel 1-13 (Europe)<br />
There are 14 channels available.<br />
Security<br />
Disable: Disable the security function.<br />
WEP: WEP is an authentication algorithm, which protects authorized<br />
<strong>Wireless</strong> LAN users against eavesdropping. The Authentication type and<br />
WEP key of wireless stations must be the same with the <strong>Access</strong> <strong>Point</strong>.<br />
This <strong>Access</strong> <strong>Point</strong> supports 64/128-bit WEP Encryption function. With this<br />
function, your data will be transmitted over the wireless network securely.<br />
# You can refer to the detail setting from chapter 3.2.6.<br />
WPA: You can use a pre-shared key to authenticate wireless stations<br />
and encrypt data during communication. When you enabled WPA mode,<br />
you can not use WEP encryption.<br />
# You can refer to the detail setting from chapter 3.2.7.<br />
Advance setting<br />
It provides more powerful features for you to configuring.<br />
# You can refer to the detail setting from chapter 3.2.8.<br />
<strong>Access</strong> Filter<br />
This <strong>Access</strong> <strong>Point</strong> allows you to provide a Filter List of MAC addresses<br />
that are allowed associating with this AP.<br />
# You can refer to the detail setting from chapter 3.2.9.<br />
Click Apply button at the bottom of the screen to save the above configurations. You can now<br />
configure other advance sections or start using the <strong>Access</strong> <strong>Point</strong>.
3.2.4 P2P Mode configuration<br />
This function provides to bridge more than 2 wired Ethernet networks<br />
together by wireless LAN. You can use two access points with “P2P mode”<br />
to bridge two wired Ethernet networks together.<br />
Parameter<br />
AP MAC Address<br />
Mode<br />
Channel<br />
Description<br />
You have to enter the MAC addresses of other access points that join the<br />
bridging work.<br />
802.11b mode: It allows to select the transmit rate up to 11Mbps<br />
802.11g mode: It allows to select the transmit rate up to 54Mbps<br />
Mixed mode: It provides best performance for 11g transmission when<br />
you enable the AP mode selection to “Mixed mode”.<br />
Select the appropriate channel from the list provided to correspond with
your network settings. Channels differ from country to country.<br />
Channel 1-11 (North America)<br />
Channel 1-14 (Japan)<br />
Channel 1-13 (Europe)<br />
There are 14 channels available.<br />
Security<br />
Disable: Disable the security function.<br />
WEP: WEP is an authentication algorithm, which protects authorized<br />
<strong>Wireless</strong> LAN users against eavesdropping. The Authentication type and<br />
WEP key of wireless stations must be the same with the <strong>Access</strong> <strong>Point</strong>.<br />
This <strong>Access</strong> <strong>Point</strong> supports 64/128-bit WEP Encryption function. With this<br />
function, your data will be transmitted over the wireless network securely.<br />
# You can refer to the detail setting from chapter 3.2.6.<br />
Advance setting<br />
It provides more powerful features for you to configuring.<br />
# You can refer to the detail setting from chapter 3.2.8.<br />
Click Apply button at the bottom of the screen to save the above configurations. You can now<br />
configure other advance sections or start using the <strong>Access</strong> <strong>Point</strong>.<br />
3.2.5 PMP Mode Configuration<br />
This function provides to bridge more than 2 wired Ethernet networks<br />
together by wireless LAN. You can use two access points with “P2P mode”<br />
to bridge two wired Ethernet networks together.
Parameter<br />
AP MAC Address<br />
Mode<br />
Channel<br />
Description<br />
If you want to bridge more than one wired Ethernet networks together<br />
with wireless LAN, you have to enter the MAC addresses of other access<br />
points that join the bridging work.<br />
802.11b mode: It allows to select the transmit rate up to 11Mbps<br />
802.11g mode: It allows to select the transmit rate up to 54Mbps<br />
Mixed mode: It provides best performance for 11g transmission when<br />
you enable the AP mode selection to “Mixed mode”.<br />
Select the appropriate channel from the list provided to correspond with<br />
your network settings. Channels differ from country to country.<br />
Channel 1-11 (North America)<br />
Channel 1-14 (Japan)<br />
Channel 1-13 (Europe)<br />
There are 14 channels available.
Security<br />
Disable: Disable the security function.<br />
WEP: WEP is an authentication algorithm, which protects authorized<br />
<strong>Wireless</strong> LAN users against eavesdropping. The Authentication type and<br />
WEP key of wireless stations must be the same with the <strong>Access</strong> <strong>Point</strong>.<br />
This <strong>Access</strong> <strong>Point</strong> supports 64/128-bit WEP Encryption function. With this<br />
function, your data will be transmitted over the wireless network securely.<br />
# You can refer to the detail setting from chapter 3.2.6.<br />
Advance setting<br />
It provides more powerful features for you to configuring.<br />
# You can refer to the detail setting from chapter 3.2.8.<br />
Click Apply button at the bottom of the screen to save the above configurations. You can now<br />
configure other advance sections or start using the <strong>Access</strong> <strong>Point</strong>.<br />
3.2.6 WEP Setting
Parameter<br />
Authentication Type<br />
WEP Length<br />
Mode<br />
Description<br />
There are two authentication types: “Open System” and “Shared Key”.<br />
Open System: wireless stations can associate with this access point<br />
without WEP encryption.<br />
Shared Key: you should also setup WEP key in the “Encryption” page<br />
and wireless stations should use WEP encryption in the authentication<br />
phase to associate with this access point. If you select “Both”, the<br />
wireless client can associate with this access point by using any one of<br />
these two authentication types.<br />
WEP-64: input 10-digit Hex values (in the “A-F”, “a-f” and “0-9” range) or<br />
5-digit ASCII character as the encryption keys.<br />
WEP-128: input 26-digit Hex values (in the “A-F”, “a-f” and “0-9” range) or<br />
13-digit ASCII characters as the encryption keys.<br />
HEX: input Hex values (in the “A-F”, “a-f” and “0-9” range)
ASCII: input alphanumeric format.<br />
Passphrase<br />
Enter passphrase and click “Generate”, then the access point will<br />
automatically generate WEP keys by the passphrase for you.<br />
Key 1 - Key 4<br />
To entry 10 Hex digits for 64 bit key, 26 Hex digits for 128 bit key.<br />
Default TX Key<br />
Select the WEP key used to encrypt data transmitted in the wireless<br />
network.<br />
Click Apply button at the bottom of the screen to save the above configurations. You can now<br />
configure other advance sections or start using the <strong>Access</strong> <strong>Point</strong>.<br />
3.2.7 WPA Setting<br />
Parameter<br />
Authentication Type<br />
Passphrase<br />
Description<br />
The Pre-shared key is used to authenticate and encrypt data transmitted<br />
in the wireless network.<br />
To entry at least 8 characters pass phrase as the pre-shared keys.
Group Re-Key Time<br />
It will auto re-gererate the Key after the defult time (86400) has passed,<br />
(second)<br />
or you can change the default time by yourself.<br />
Click Apply button at the bottom of the screen to save the above configurations. You can now<br />
configure other advance sections or start using the <strong>Access</strong> <strong>Point</strong>.<br />
3.2.8 Advanced Setting<br />
Parameter<br />
Beacon Interval (20-1000)<br />
Description<br />
The period of time that this access point broadcast a beacon. Beacon is
used to synchronize the wireless network.<br />
RTS Threshold (256-2432) When the packet size is smaller the RTS threshold, the access point will<br />
not use the RTS/CTS mechanism to send this packet.<br />
DTIM Period (1-255) This is the interval of the Delivery Traffic Indication Message (DTIM). A<br />
DTIM field is a countdown field informing stations of the next window for<br />
listening to broadcast and multicast messages. When the <strong>Access</strong> <strong>Point</strong><br />
has buffered broadcast or multicast messages for associated stations, it<br />
sends the next DTIM with a DTIM Interval value. Stations for the <strong>Access</strong><br />
<strong>Point</strong> hear the beacons and awaken to receive the broadcast and<br />
multicast messages.<br />
Protection Mode<br />
It provides best performance for 11g transmission when you enable it.<br />
Transmit Rate<br />
When you enable the station mode selection to “802.11b” and it allows<br />
you to select the speed of 1-11Mbps. When you enable the station mode<br />
selection to “802.11g” and it allows you to select the speed of 1-54Mbps.<br />
Preamble Type<br />
Preamble type defines the length of preamble block in the frames during<br />
the wireless communication.<br />
Auto select: It will auto switch to the more suitable method.<br />
Short: It is suitable for high traffic wireless network<br />
Long: It can provide more reliable communication<br />
Click Apply button at the bottom of the screen to save the above configurations. You can now<br />
configure other advance sections or start using the <strong>Access</strong> <strong>Point</strong>.<br />
3.2.9 <strong>Access</strong> Filter<br />
This <strong>Access</strong> <strong>Point</strong> allows you to provide a Filter List of MAC addresses that<br />
are allowed/denied associating with this AP.
Parameter<br />
MAC Filtering<br />
Filter Mode<br />
Description<br />
You can enable or disable the MAC Filtering function.<br />
If you select “Only deny PCs with MAC listed below to access this<br />
device”, then all the PCs in the list will be denied to access and all other<br />
PCs will be allowed to access. If you select “Only allow PCs with MAC<br />
listed below to access this device”, then all PCs in the list will be allowed<br />
to access but all other PCs will be denied to access.
Filter List<br />
Enter the MAC address of PC that will be managed by the MAC Filtering<br />
rule.<br />
Click Apply button at the bottom of the screen to save the above configurations. You can now<br />
configure other advance sections or start using the <strong>Access</strong> <strong>Point</strong>.<br />
3.2.10 Status Setup<br />
Parameter<br />
Ethernet<br />
Description<br />
It shows the default IP address, Subnet Mask, Gateway and Link status<br />
information.
<strong>Wireless</strong><br />
It shows the current <strong>Wireless</strong> information.<br />
3.2.11 Admin Setup<br />
Parameter<br />
FW Version<br />
FW Upgrade<br />
Description<br />
It shows current FW version.<br />
This tool allows you to upgrade the <strong>Access</strong> <strong>Point</strong>’s system firmware. To<br />
upgrade the firmware of your <strong>Access</strong> <strong>Point</strong>, you need to download the<br />
firmware file to your local hard disk, and enter that file name and path in
the appropriate field on this page. You can also use the Browse button to<br />
find the firmware file on your PC. Please reset the <strong>Access</strong> <strong>Point</strong> when the<br />
upgrade process is complete.<br />
New Password<br />
Enter the password (up to 32-digit alphanumeric string) you want to login<br />
to the <strong>Access</strong> <strong>Point</strong>. Note that the password is case-sensitive.<br />
Reconfirm Password Reconfirm the password (up to 32-digit alphanumeric string) you want to<br />
login to the <strong>Access</strong> <strong>Point</strong>. Note that the password is case-sensitive.<br />
Click Apply button at the bottom of the screen to save the above configurations. You can now<br />
configure other advance sections or start using the <strong>Access</strong> <strong>Point</strong>.<br />
3.2.12 LAN Setup
Parameter<br />
Device Name<br />
Automatic IP<br />
Fixed IP<br />
Description<br />
It shows current FW version.<br />
Selecting this option is not advised unless you have direct access to the<br />
device that provides the IP address.<br />
Specify IP: Designate the <strong>Access</strong> <strong>Point</strong>’s IP Address. This IP Address<br />
should be unique in your network. The default IP Address is 192.168.2.1.<br />
Subnet Mask: Specify a Subnet Mask for your LAN segment. Gateway:<br />
Specify the default gateway IP of this <strong>Access</strong> <strong>Point</strong>.<br />
Click Apply button at the bottom of the screen to save the above configurations. You can now<br />
configure other advance sections or start using the <strong>Access</strong> <strong>Point</strong>.<br />
Chapter4 Troubleshooting<br />
This chapter provides solutions to problems usually encountered during the<br />
installation and operation of the <strong>Access</strong> <strong>Point</strong>.<br />
1. How to manually find your PC’s IP and MAC Address?<br />
1) In Windows, open the Command Prompt program<br />
2) Type Ipconfig /all and Enter<br />
1 Your PC’s IP address is the one entitled IP address<br />
2 Your PC’s MAC Address is the one entitled Physical Address<br />
2. What is BSS ID?<br />
A group of wireless stations and an <strong>Access</strong> <strong>Point</strong> compose a Basic<br />
Service Set (BSS). Computers in a BSS must be configured with the<br />
same BSSID.<br />
3. What is ESSID?<br />
An Infrastructure configuration could also support roaming capability<br />
for mobile workers. More than one BSS can be configured as an<br />
Extended Service Set (ESS). Users within an ESS could roam freely
etween BSSs while maintaining a continuous connection to the<br />
wireless network stations and the <strong>Wireless</strong> LAN <strong>Access</strong> <strong>Point</strong>s.<br />
4. Can data be intercepted while transmitting through the air?<br />
WLAN features two-fold protection in security. On the hardware side,<br />
as with Direct Sequence Spread Spectrum technology, it has the inherent<br />
scrambling security feature. On the software side, the WLAN series<br />
offers the encryption function (WEP) to enhance security and access<br />
control.<br />
5. What is WEP?<br />
WEP stands for Wired Equivalent Privacy, a data privacy mechanism<br />
based on a 64(40)-bit shared key algorithm.<br />
6. What is a MAC Address?<br />
The Media <strong>Access</strong> Control (MAC) address is a unique number assigned<br />
by the manufacturer to any Ethernet networking device, such as a<br />
network adapter, that allows the network to identify it at the hardware<br />
level. For all practical purposes, this number is usually permanent.<br />
Unlike IP addresses which can change every time a computer logs on to<br />
the network, the MAC address of a device stays the same, making it a<br />
valuable identifier for the network.