TinyOS Programming - Computer Systems Laboratory
TinyOS Programming - Computer Systems Laboratory
TinyOS Programming - Computer Systems Laboratory

You also want an ePaper? Increase the reach of your titles
YUMPU automatically turns print PDFs into web optimized ePapers that Google loves.
<strong>TinyOS</strong> <strong>Programming</strong><br />
Philip Levis and David Gay<br />
July 16, 2009
ii<br />
Acknolwedgements<br />
We’d like to thank several people for their contributions to this book. First is Mike Horton, of Crossbow,<br />
Inc., who first proposed writing it. Second is Pablo Guerrero, who gave detailed comments and corrections.<br />
Third is Joe Polastre of Moteiv, who gave valable feedback on how to better introduce generic components.<br />
Fourth, we’d like to thank Phil’s father, who although he doesn’t program, read the entire thing! Fifth, John<br />
Regehr, Ben Greenstein and David Culler provided valuable feedback on this expanded edition. Last but<br />
not least, we would like to thank the <strong>TinyOS</strong> community and its developers. Many of the concepts in this<br />
book – power locks, tree routing, and interface type checking – are the work and ideas of others, which we<br />
merely present.<br />
Chapter 10 of this book is based on: Software design patterns for <strong>TinyOS</strong>, in ACM Transactions on<br />
Embedded Computing <strong>Systems</strong> (TECS), Volume 6, Issue 4 (September 2007), c○ACM, 2007.<br />
http://doi.acm.org/10.1145/1274858.1274860
Contents<br />
I <strong>TinyOS</strong> and nesC 1<br />
1 Introduction 3<br />
1.1 Networked, Embedded Sensors . . . . . . . . . . . . . . . . . . . . . . . . . . . . . . . . . 3<br />
1.1.1 Anatomy of a Sensor Node (Mote) . . . . . . . . . . . . . . . . . . . . . . . . . . . 4<br />
1.2 <strong>TinyOS</strong> . . . . . . . . . . . . . . . . . . . . . . . . . . . . . . . . . . . . . . . . . . . . . 5<br />
1.2.1 What <strong>TinyOS</strong> provides . . . . . . . . . . . . . . . . . . . . . . . . . . . . . . . . . 5<br />
1.3 Example Application . . . . . . . . . . . . . . . . . . . . . . . . . . . . . . . . . . . . . . 6<br />
1.4 Compiling and Installing Applications . . . . . . . . . . . . . . . . . . . . . . . . . . . . . 7<br />
1.5 The rest of this book . . . . . . . . . . . . . . . . . . . . . . . . . . . . . . . . . . . . . . 7<br />
2 Names and Program Structure 9<br />
2.1 Hello World! . . . . . . . . . . . . . . . . . . . . . . . . . . . . . . . . . . . . . . . . . . 9<br />
2.2 Essential Differences: Components, Interfaces and Wiring . . . . . . . . . . . . . . . . . . 12<br />
2.3 Wiring and Callbacks . . . . . . . . . . . . . . . . . . . . . . . . . . . . . . . . . . . . . . 13<br />
2.4 Summary . . . . . . . . . . . . . . . . . . . . . . . . . . . . . . . . . . . . . . . . . . . . 14<br />
II Basic <strong>Programming</strong> 17<br />
3 Components and interfaces 19<br />
3.1 Component signatures . . . . . . . . . . . . . . . . . . . . . . . . . . . . . . . . . . . . . 19<br />
3.1.1 Visualizing components . . . . . . . . . . . . . . . . . . . . . . . . . . . . . . . . 20<br />
3.1.2 The “as” keyword and clustering interfaces . . . . . . . . . . . . . . . . . . . . . . 20<br />
3.1.3 Clustering interfaces . . . . . . . . . . . . . . . . . . . . . . . . . . . . . . . . . . 21<br />
3.2 Interfaces . . . . . . . . . . . . . . . . . . . . . . . . . . . . . . . . . . . . . . . . . . . . 22<br />
3.2.1 Generic Interfaces . . . . . . . . . . . . . . . . . . . . . . . . . . . . . . . . . . . 24<br />
3.2.2 Bidirectional Interfaces . . . . . . . . . . . . . . . . . . . . . . . . . . . . . . . . . 25<br />
3.3 Component implementations . . . . . . . . . . . . . . . . . . . . . . . . . . . . . . . . . . 26<br />
3.3.1 Modules . . . . . . . . . . . . . . . . . . . . . . . . . . . . . . . . . . . . . . . . 26<br />
3.3.2 A basic configuration . . . . . . . . . . . . . . . . . . . . . . . . . . . . . . . . . . 27<br />
3.3.3 Module variables . . . . . . . . . . . . . . . . . . . . . . . . . . . . . . . . . . . . 28<br />
3.3.4 Generic Components . . . . . . . . . . . . . . . . . . . . . . . . . . . . . . . . . . 29<br />
3.4 Split-phase interfaces . . . . . . . . . . . . . . . . . . . . . . . . . . . . . . . . . . . . . . 30<br />
3.4.1 Read . . . . . . . . . . . . . . . . . . . . . . . . . . . . . . . . . . . . . . . . . . 31<br />
3.4.2 Send . . . . . . . . . . . . . . . . . . . . . . . . . . . . . . . . . . . . . . . . . . 32<br />
3.5 Module memory allocation, avoiding recursion, and other details . . . . . . . . . . . . . . . 32<br />
3.5.1 Memory ownership and split-phase calls . . . . . . . . . . . . . . . . . . . . . . . . 33<br />
iii
Contents<br />
iv<br />
3.5.2 Constants and saving memory . . . . . . . . . . . . . . . . . . . . . . . . . . . . . 36<br />
3.5.3 Platform Independent Types . . . . . . . . . . . . . . . . . . . . . . . . . . . . . . 37<br />
3.5.4 Global names . . . . . . . . . . . . . . . . . . . . . . . . . . . . . . . . . . . . . . 39<br />
3.5.5 nesC and the C preprocessor . . . . . . . . . . . . . . . . . . . . . . . . . . . . . . 40<br />
3.5.6 C Libraries . . . . . . . . . . . . . . . . . . . . . . . . . . . . . . . . . . . . . . . 41<br />
3.6 Exercises . . . . . . . . . . . . . . . . . . . . . . . . . . . . . . . . . . . . . . . . . . . . 42<br />
4 Configurations and wiring 43<br />
4.1 Configurations . . . . . . . . . . . . . . . . . . . . . . . . . . . . . . . . . . . . . . . . . . 44<br />
4.1.1 The -> and
v<br />
Contents<br />
6.3 Single-hop networking . . . . . . . . . . . . . . . . . . . . . . . . . . . . . . . . . . . . . 79<br />
6.3.1 Sending packets . . . . . . . . . . . . . . . . . . . . . . . . . . . . . . . . . . . . 80<br />
6.3.2 Receiving packets . . . . . . . . . . . . . . . . . . . . . . . . . . . . . . . . . . . 82<br />
6.3.3 Selecting a communication stack . . . . . . . . . . . . . . . . . . . . . . . . . . . . 83<br />
6.4 Multi-hop networking: collection, dissemination and base stations . . . . . . . . . . . . . . 84<br />
6.4.1 Collection . . . . . . . . . . . . . . . . . . . . . . . . . . . . . . . . . . . . . . . . 85<br />
6.4.2 Dissemination . . . . . . . . . . . . . . . . . . . . . . . . . . . . . . . . . . . . . 86<br />
6.4.3 Wiring collection and dissemination . . . . . . . . . . . . . . . . . . . . . . . . . . 86<br />
6.4.4 Base station for collection and dissemination . . . . . . . . . . . . . . . . . . . . . 87<br />
6.5 Storage . . . . . . . . . . . . . . . . . . . . . . . . . . . . . . . . . . . . . . . . . . . . . 90<br />
6.5.1 Volumes . . . . . . . . . . . . . . . . . . . . . . . . . . . . . . . . . . . . . . . . . 90<br />
6.5.2 Configuration data . . . . . . . . . . . . . . . . . . . . . . . . . . . . . . . . . . . 91<br />
6.5.3 Block and Log storage . . . . . . . . . . . . . . . . . . . . . . . . . . . . . . . . . 93<br />
6.6 Exercises . . . . . . . . . . . . . . . . . . . . . . . . . . . . . . . . . . . . . . . . . . . . 98<br />
7 Mote-PC communication 99<br />
7.1 Basics . . . . . . . . . . . . . . . . . . . . . . . . . . . . . . . . . . . . . . . . . . . . . . 99<br />
7.1.1 Serial Communication Stack . . . . . . . . . . . . . . . . . . . . . . . . . . . . . . 99<br />
7.2 Using mig . . . . . . . . . . . . . . . . . . . . . . . . . . . . . . . . . . . . . . . . . . . . 100<br />
7.2.1 Sending and receiving mig-generated packets . . . . . . . . . . . . . . . . . . . . . 102<br />
7.3 Using ncg . . . . . . . . . . . . . . . . . . . . . . . . . . . . . . . . . . . . . . . . . . . . 104<br />
7.4 Packet Sources . . . . . . . . . . . . . . . . . . . . . . . . . . . . . . . . . . . . . . . . . 105<br />
7.5 Example: Simple Reliable Transmission . . . . . . . . . . . . . . . . . . . . . . . . . . . . 106<br />
7.5.1 Reliable Transmission Protocol . . . . . . . . . . . . . . . . . . . . . . . . . . . . 106<br />
7.5.2 Reliable Transmission in Java . . . . . . . . . . . . . . . . . . . . . . . . . . . . . 107<br />
7.5.3 Reimplementing TestSerial . . . . . . . . . . . . . . . . . . . . . . . . . . . . . . . 110<br />
7.6 Exercises . . . . . . . . . . . . . . . . . . . . . . . . . . . . . . . . . . . . . . . . . . . . 110<br />
III Advanced <strong>Programming</strong> 111<br />
8 Advanced Components 113<br />
9 Advanced Wiring 115<br />
10 Design Patterns 117<br />
11 Advanced Concurrency 119<br />
12 Device drivers and the hardware abstraction architecture (HAA) 121<br />
13 Advanced Applications 123<br />
IV Appendix and References 125<br />
A <strong>TinyOS</strong> APIs 127<br />
A.1 Booting . . . . . . . . . . . . . . . . . . . . . . . . . . . . . . . . . . . . . . . . . . . . . 127<br />
A.2 Communication . . . . . . . . . . . . . . . . . . . . . . . . . . . . . . . . . . . . . . . . . 127
Contents<br />
vi<br />
A.2.1 Single-hop . . . . . . . . . . . . . . . . . . . . . . . . . . . . . . . . . . . . . . . 127<br />
A.2.2 Multihop collection . . . . . . . . . . . . . . . . . . . . . . . . . . . . . . . . . . . 129<br />
A.2.3 Multihop dissemination . . . . . . . . . . . . . . . . . . . . . . . . . . . . . . . . 129<br />
A.2.4 Binary Reprogramming . . . . . . . . . . . . . . . . . . . . . . . . . . . . . . . . 130<br />
A.3 Time . . . . . . . . . . . . . . . . . . . . . . . . . . . . . . . . . . . . . . . . . . . . . . . 130<br />
A.4 Sensing . . . . . . . . . . . . . . . . . . . . . . . . . . . . . . . . . . . . . . . . . . . . . 131<br />
A.5 Storage . . . . . . . . . . . . . . . . . . . . . . . . . . . . . . . . . . . . . . . . . . . . . 131<br />
A.6 Data structures . . . . . . . . . . . . . . . . . . . . . . . . . . . . . . . . . . . . . . . . . 132<br />
A.6.1 BitVectorC . . . . . . . . . . . . . . . . . . . . . . . . . . . . . . . . . . . . . . . 132<br />
A.6.2 QueueC . . . . . . . . . . . . . . . . . . . . . . . . . . . . . . . . . . . . . . . . . 132<br />
A.6.3 BigQueueC . . . . . . . . . . . . . . . . . . . . . . . . . . . . . . . . . . . . . . . 132<br />
A.6.4 PoolC . . . . . . . . . . . . . . . . . . . . . . . . . . . . . . . . . . . . . . . . . . 132<br />
A.6.5 StateC . . . . . . . . . . . . . . . . . . . . . . . . . . . . . . . . . . . . . . . . . . 133<br />
A.7 Utilities . . . . . . . . . . . . . . . . . . . . . . . . . . . . . . . . . . . . . . . . . . . . . 133<br />
A.7.1 Random numbers . . . . . . . . . . . . . . . . . . . . . . . . . . . . . . . . . . . . 133<br />
A.7.2 Leds . . . . . . . . . . . . . . . . . . . . . . . . . . . . . . . . . . . . . . . . . . . 134<br />
A.7.3 Cyclic redundancy checks . . . . . . . . . . . . . . . . . . . . . . . . . . . . . . . 134<br />
A.7.4 Printf . . . . . . . . . . . . . . . . . . . . . . . . . . . . . . . . . . . . . . . . . . 134<br />
A.8 Low Power . . . . . . . . . . . . . . . . . . . . . . . . . . . . . . . . . . . . . . . . . . . 135
Code Examples<br />
2.1 Powerup in C . . . . . . . . . . . . . . . . . . . . . . . . . . . . . . . . . . . . . . . . . . 9<br />
2.2 PowerupC module in nesC . . . . . . . . . . . . . . . . . . . . . . . . . . . . . . . . . . . 9<br />
2.3 Simple nesC interfaces . . . . . . . . . . . . . . . . . . . . . . . . . . . . . . . . . . . . . 10<br />
2.4 PowerupAppC configuration in nesC . . . . . . . . . . . . . . . . . . . . . . . . . . . . . . 10<br />
2.5 Powerup with blinking LED in C . . . . . . . . . . . . . . . . . . . . . . . . . . . . . . . . 13<br />
2.6 Powerup with blinking LED in nesC (slightly simplified) . . . . . . . . . . . . . . . . . . . 13<br />
2.7 Powerup with blinking LED configuration (slightly simplified) . . . . . . . . . . . . . . . . 14<br />
3.1 The signature and implementation blocks . . . . . . . . . . . . . . . . . . . . . . . . . . . 19<br />
3.2 Signatures of PowerupC and LedsC . . . . . . . . . . . . . . . . . . . . . . . . . . . . . . 20<br />
3.3 MainC’s signature . . . . . . . . . . . . . . . . . . . . . . . . . . . . . . . . . . . . . . . . 20<br />
3.4 The LedsP module . . . . . . . . . . . . . . . . . . . . . . . . . . . . . . . . . . . . . . . 21<br />
3.5 PowerupC and an alternative signature . . . . . . . . . . . . . . . . . . . . . . . . . . . . . 21<br />
3.6 Interface declarations for Leds and Boot . . . . . . . . . . . . . . . . . . . . . . . . . . . . 22<br />
3.7 The Init and Boot interfaces. . . . . . . . . . . . . . . . . . . . . . . . . . . . . . . . . . . 22<br />
3.8 Signatures of MainC and PowerupC . . . . . . . . . . . . . . . . . . . . . . . . . . . . . . 22<br />
3.9 The Queue interface . . . . . . . . . . . . . . . . . . . . . . . . . . . . . . . . . . . . . . . 24<br />
3.10 Using a queue of 32–bit integers . . . . . . . . . . . . . . . . . . . . . . . . . . . . . . . . 24<br />
3.11 Providing a 16–bit or a 32–bt queue . . . . . . . . . . . . . . . . . . . . . . . . . . . . . . 24<br />
3.12 The Notify interface . . . . . . . . . . . . . . . . . . . . . . . . . . . . . . . . . . . . . . . 25<br />
3.13 UserButtonC . . . . . . . . . . . . . . . . . . . . . . . . . . . . . . . . . . . . . . . . . . 25<br />
3.14 Simplified Timer interface showing three commands and one event . . . . . . . . . . . . . . 26<br />
3.15 PowerupC module code . . . . . . . . . . . . . . . . . . . . . . . . . . . . . . . . . . . . . 26<br />
3.16 The module PowerupToggleC . . . . . . . . . . . . . . . . . . . . . . . . . . . . . . . . . 27<br />
3.17 The PowerupToggleAppC configuration . . . . . . . . . . . . . . . . . . . . . . . . . . . . 27<br />
3.18 Example uses of the components keyword . . . . . . . . . . . . . . . . . . . . . . . . . . . 28<br />
3.19 The Get interface . . . . . . . . . . . . . . . . . . . . . . . . . . . . . . . . . . . . . . . . 28<br />
3.20 A Self–Incrementing Counter . . . . . . . . . . . . . . . . . . . . . . . . . . . . . . . . . . 29<br />
3.21 Generic module SineSensorC and generic configuration TimerMilliC . . . . . . . . . . . . . 29<br />
3.22 Instantiating a generic component . . . . . . . . . . . . . . . . . . . . . . . . . . . . . . . 30<br />
3.23 Signature of BitVectorC . . . . . . . . . . . . . . . . . . . . . . . . . . . . . . . . . . . . . 30<br />
3.24 QueueC signature . . . . . . . . . . . . . . . . . . . . . . . . . . . . . . . . . . . . . . . . 30<br />
3.25 The Read interface . . . . . . . . . . . . . . . . . . . . . . . . . . . . . . . . . . . . . . . 31<br />
3.26 The split–phase Send interface . . . . . . . . . . . . . . . . . . . . . . . . . . . . . . . . . 32<br />
3.27 The Send interface . . . . . . . . . . . . . . . . . . . . . . . . . . . . . . . . . . . . . . . 34<br />
3.28 The Receive interface . . . . . . . . . . . . . . . . . . . . . . . . . . . . . . . . . . . . . . 34<br />
3.29 The signature of PoolC . . . . . . . . . . . . . . . . . . . . . . . . . . . . . . . . . . . . . 36<br />
3.30 CC2420 packet header . . . . . . . . . . . . . . . . . . . . . . . . . . . . . . . . . . . . . 37<br />
3.31 The dreaded “packed” attribute in the 1.x MintRoute library . . . . . . . . . . . . . . . . . 37<br />
vii
Code Examples<br />
viii<br />
3.32 The CC2420 header . . . . . . . . . . . . . . . . . . . . . . . . . . . . . . . . . . . . . . . 38<br />
3.33 TinyError.h, a typical nesC header file . . . . . . . . . . . . . . . . . . . . . . . . . . . . . 39<br />
3.34 Including a header file in a component . . . . . . . . . . . . . . . . . . . . . . . . . . . . . 39<br />
3.35 Indirectly including a header file . . . . . . . . . . . . . . . . . . . . . . . . . . . . . . . . 40<br />
3.36 Fancy.nc: C preprocessor example . . . . . . . . . . . . . . . . . . . . . . . . . . . . . . . 40<br />
3.37 FancyModule.nc: C preprocessor pitfalls . . . . . . . . . . . . . . . . . . . . . . . . . . . . 40<br />
3.38 Fancy.h: the reliable way to use C preprocessor symbols . . . . . . . . . . . . . . . . . . . 41<br />
3.39 Using a C library function . . . . . . . . . . . . . . . . . . . . . . . . . . . . . . . . . . . 41<br />
4.1 Signature of part of the CC1000 radio stack . . . . . . . . . . . . . . . . . . . . . . . . . . 43<br />
4.2 The PowerupToggleAppC configuration revisited . . . . . . . . . . . . . . . . . . . . . . . 45<br />
4.3 C code generated from the PowerupToggleAppC configuration . . . . . . . . . . . . . . . . 45<br />
4.4 The LedsC configuration . . . . . . . . . . . . . . . . . . . . . . . . . . . . . . . . . . . . 46<br />
4.5 CC2420ReceiveC’s use of the as keyword . . . . . . . . . . . . . . . . . . . . . . . . . . . 47<br />
4.6 Naming generic component instances . . . . . . . . . . . . . . . . . . . . . . . . . . . . . 47<br />
4.7 MainC and LedsP . . . . . . . . . . . . . . . . . . . . . . . . . . . . . . . . . . . . . . . . 47<br />
4.8 Valid alternate of PowerupToggleAppC . . . . . . . . . . . . . . . . . . . . . . . . . . . . 48<br />
4.9 Invalid alternate of PowerupToggleAppC . . . . . . . . . . . . . . . . . . . . . . . . . . . 48<br />
4.10 LedsC revisited . . . . . . . . . . . . . . . . . . . . . . . . . . . . . . . . . . . . . . . . . 49<br />
4.11 BlinkC signature . . . . . . . . . . . . . . . . . . . . . . . . . . . . . . . . . . . . . . . . 49<br />
4.12 The RandomC configuration . . . . . . . . . . . . . . . . . . . . . . . . . . . . . . . . . . 50<br />
4.13 The RandomMlcgC signature . . . . . . . . . . . . . . . . . . . . . . . . . . . . . . . . . . 50<br />
4.14 Seed Initialization in RandomMlcgP . . . . . . . . . . . . . . . . . . . . . . . . . . . . . . 51<br />
4.15 ActiveMessageC for the CC2420 . . . . . . . . . . . . . . . . . . . . . . . . . . . . . . . . 53<br />
4.16 The signature of CC2420ActiveMessageC . . . . . . . . . . . . . . . . . . . . . . . . . . . 54<br />
4.17 Fan–out on CC2420TransmitC’s Init . . . . . . . . . . . . . . . . . . . . . . . . . . . . . . 54<br />
4.18 StdControl and SplitControl initialization interfaces . . . . . . . . . . . . . . . . . . . . . . 55<br />
4.19 Why the metaphor of “wires” is only a metaphor . . . . . . . . . . . . . . . . . . . . . . . 56<br />
4.20 The combine function for error t . . . . . . . . . . . . . . . . . . . . . . . . . . . . . . . . 57<br />
4.21 Fan–out on SoftwareInit . . . . . . . . . . . . . . . . . . . . . . . . . . . . . . . . . . . . 57<br />
4.22 Resulting code from fan–out on SoftwareInit . . . . . . . . . . . . . . . . . . . . . . . . . 58<br />
4.23 AMSenderC signature . . . . . . . . . . . . . . . . . . . . . . . . . . . . . . . . . . . . . 58<br />
4.24 RadioCountToLedsAppC . . . . . . . . . . . . . . . . . . . . . . . . . . . . . . . . . . . . 59<br />
4.25 PoolC . . . . . . . . . . . . . . . . . . . . . . . . . . . . . . . . . . . . . . . . . . . . . . 60<br />
4.26 Exposing a generic component instance as a singleton . . . . . . . . . . . . . . . . . . . . . 60<br />
5.1 The main <strong>TinyOS</strong> scheduling loop from SchedulerBasicP.nc . . . . . . . . . . . . . . . . . 64<br />
5.2 A troublesome implementation of a magnetometer sensor . . . . . . . . . . . . . . . . . . . 67<br />
5.3 Signal handler that can lead to an infinite loop . . . . . . . . . . . . . . . . . . . . . . . . . 68<br />
5.4 An improved implementation of FilterMagC . . . . . . . . . . . . . . . . . . . . . . . . . . 68<br />
6.1 Anti–theft: simple flashing LED . . . . . . . . . . . . . . . . . . . . . . . . . . . . . . . . 71<br />
6.2 The Leds interface . . . . . . . . . . . . . . . . . . . . . . . . . . . . . . . . . . . . . . . 72<br />
6.3 The Boot interface . . . . . . . . . . . . . . . . . . . . . . . . . . . . . . . . . . . . . . . 72<br />
6.4 The full Timer interface . . . . . . . . . . . . . . . . . . . . . . . . . . . . . . . . . . . . . 73<br />
6.5 WarningTimer.fired with drift problem fixed . . . . . . . . . . . . . . . . . . . . . . . . . . 73<br />
6.6 Anti–Theft: application–level configuration . . . . . . . . . . . . . . . . . . . . . . . . . . 74<br />
6.8 Anti–theft: detecting dark conditions . . . . . . . . . . . . . . . . . . . . . . . . . . . . . . 75<br />
6.9 Anti–Theft: wiring to light sensor . . . . . . . . . . . . . . . . . . . . . . . . . . . . . . . 76<br />
6.10 ReadStream Interface . . . . . . . . . . . . . . . . . . . . . . . . . . . . . . . . . . . . . . 77<br />
6.11 Anti–theft: detecting movement . . . . . . . . . . . . . . . . . . . . . . . . . . . . . . . . 78
ix<br />
Code Examples<br />
6.12 The AMSend interface . . . . . . . . . . . . . . . . . . . . . . . . . . . . . . . . . . . . . 80<br />
6.13 Anti–Theft: reporting theft over the radio . . . . . . . . . . . . . . . . . . . . . . . . . . . 81<br />
6.14 The SplitControl interface . . . . . . . . . . . . . . . . . . . . . . . . . . . . . . . . . . . 82<br />
6.16 Anti–Theft: changing settings . . . . . . . . . . . . . . . . . . . . . . . . . . . . . . . . . 83<br />
6.17 Serial vs Radio–based AM components . . . . . . . . . . . . . . . . . . . . . . . . . . . . 83<br />
6.19 Anti–Theft: reporting theft over a collection tree . . . . . . . . . . . . . . . . . . . . . . . . 85<br />
6.20 DisseminationValue interface . . . . . . . . . . . . . . . . . . . . . . . . . . . . . . . . . . 86<br />
6.21 Anti–Theft: settings via a dissemination tree . . . . . . . . . . . . . . . . . . . . . . . . . . 86<br />
6.22 The StdControl interface . . . . . . . . . . . . . . . . . . . . . . . . . . . . . . . . . . . . 86<br />
6.23 The DisseminationUpdate interface . . . . . . . . . . . . . . . . . . . . . . . . . . . . . . 88<br />
6.24 AntiTheft base station code: disseminating settings . . . . . . . . . . . . . . . . . . . . . . 88<br />
6.25 The RootControl interface . . . . . . . . . . . . . . . . . . . . . . . . . . . . . . . . . . . 88<br />
6.26 AntiTheft base station code: reporting thefts . . . . . . . . . . . . . . . . . . . . . . . . . . 88<br />
6.27 AntiTheft base station wiring . . . . . . . . . . . . . . . . . . . . . . . . . . . . . . . . . . 89<br />
6.28 ConfigStorageC signature . . . . . . . . . . . . . . . . . . . . . . . . . . . . . . . . . . . . 90<br />
6.29 Mount interface for storage volumes . . . . . . . . . . . . . . . . . . . . . . . . . . . . . . 91<br />
6.30 ConfigStorage interface . . . . . . . . . . . . . . . . . . . . . . . . . . . . . . . . . . . . . 91<br />
6.31 Anti–Theft: reading settings at boot time . . . . . . . . . . . . . . . . . . . . . . . . . . . . 92<br />
6.32 Anti–Theft: saving configuration data . . . . . . . . . . . . . . . . . . . . . . . . . . . . . 93<br />
6.33 BlockStorageC signature . . . . . . . . . . . . . . . . . . . . . . . . . . . . . . . . . . . . 93<br />
6.34 The BlockWrite interface . . . . . . . . . . . . . . . . . . . . . . . . . . . . . . . . . . . . 94<br />
6.35 Simultaneously sampling and storing to flash (most error–checking ommitted) . . . . . . . . 94<br />
6.36 The BlockRead interface . . . . . . . . . . . . . . . . . . . . . . . . . . . . . . . . . . . . 95<br />
6.37 LogStorageC signature . . . . . . . . . . . . . . . . . . . . . . . . . . . . . . . . . . . . . 96<br />
6.38 The LogWrite interface . . . . . . . . . . . . . . . . . . . . . . . . . . . . . . . . . . . . . 96<br />
6.39 Logging a sample summary (error–checking ommitted) . . . . . . . . . . . . . . . . . . . . 96<br />
6.40 The LogRead interface . . . . . . . . . . . . . . . . . . . . . . . . . . . . . . . . . . . . . 97<br />
7.1 Serial AM Packet layout . . . . . . . . . . . . . . . . . . . . . . . . . . . . . . . . . . . . 100<br />
7.2 TestSerial packet layout . . . . . . . . . . . . . . . . . . . . . . . . . . . . . . . . . . . . . 100<br />
7.3 Backing array methods . . . . . . . . . . . . . . . . . . . . . . . . . . . . . . . . . . . . . 102<br />
7.4 Sending packets with mig and MoteIF . . . . . . . . . . . . . . . . . . . . . . . . . . . . . 102<br />
7.5 Interface for handling received packets . . . . . . . . . . . . . . . . . . . . . . . . . . . . . 103<br />
7.6 Receiving packets with mig and MoteIF . . . . . . . . . . . . . . . . . . . . . . . . . . . . 103<br />
7.7 Constants and packet layout for Oscillscope application . . . . . . . . . . . . . . . . . . . . 104<br />
7.8 Class generated by ncg . . . . . . . . . . . . . . . . . . . . . . . . . . . . . . . . . . . . . 105<br />
7.9 Simplified code to save received samples . . . . . . . . . . . . . . . . . . . . . . . . . . . . 105<br />
7.10 Reliable Transmission Protocol in Java –Transmission . . . . . . . . . . . . . . . . . . . . . 107<br />
7.11 Reliable Transmission Protocol in Java –Reception . . . . . . . . . . . . . . . . . . . . . . 109<br />
7.12 A reliable TestSerial.java . . . . . . . . . . . . . . . . . . . . . . . . . . . . . . . . . . . . 110
Code Examples<br />
x
<strong>Programming</strong> hints, condensed<br />
<strong>Programming</strong> Hint 1: Use the “as” keyword liberally. (page 21)<br />
<strong>Programming</strong> Hint 2: Never write recursive functions within a module. In combination with the <strong>TinyOS</strong><br />
coding conventions, this guarantees that all programs have bounded stack usage. (page 33)<br />
<strong>Programming</strong> Hint 3: Never use malloc and free. Allocate all state in components. If your application<br />
requirements necessitate a dynamic memory pool, encapsulate it in a component and try to limit the set of<br />
users. (page 33)<br />
<strong>Programming</strong> Hint 4: When possible, avoid passing pointers across interfaces; when this cannot be avoided<br />
only one component should be able to modify a pointer’s data at any time. (page 34)<br />
<strong>Programming</strong> Hint 5: Conserve memory by using enums rather than const variables for integer constants,<br />
and don’t declare variables with an enum type. (page 37)<br />
<strong>Programming</strong> Hint 6: Never, ever use the “packed” attribute in portable code. (page 38)<br />
<strong>Programming</strong> Hint 7: Use platform independent types when defining message structures. (page 38)<br />
<strong>Programming</strong> Hint 8: If you have to perform significant computation on a platform independent type or<br />
access it many (hundreds or more) times, temporarily copy it to a native type. (page 39)<br />
<strong>Programming</strong> Hint 9: Interfaces should #include the header files for the types they use. (page 40)<br />
<strong>Programming</strong> Hint 10: Always #define a preprocessor symbol in a header file. Use #include to load the<br />
header file in all components and interfaces that use the symbol. (page 41)<br />
<strong>Programming</strong> Hint 11: If a component is a usable abstraction by itself, its name should end with C. If it is<br />
intended to be an internal and private part of a larger abstraction, its name should end with P. Never wire to<br />
P components from outside your package (directory). (page 50)<br />
<strong>Programming</strong> Hint 12: Auto-wire Init to MainC in the top-level configuration of a software abstraction.<br />
(page 52)<br />
<strong>Programming</strong> Hint 13: When using layered abstractions, components should not wire across multiple<br />
abstraction layers: they should wire to a single layer. (page 54)<br />
<strong>Programming</strong> Hint 14: Never ignore combine warnings. (page 58)<br />
<strong>Programming</strong> Hint 15: Keep tasks short. (page 66)<br />
<strong>Programming</strong> Hint 16: If an event handler needs to make possibly long-executing command calls, post a<br />
task to make the calls. (page 66)<br />
<strong>Programming</strong> Hint 17: Don’t signal events from commands — the command should post a task that signals<br />
the event. (page 68)<br />
xi
<strong>Programming</strong> hints, condensed<br />
xii
Preface<br />
This book provides an in-depth introduction to writing nesC code for the <strong>TinyOS</strong> 2.0 operating system.<br />
While it goes into greater depth than the <strong>TinyOS</strong> tutorials on this subject, there are several topics that are<br />
outside its scope, such as the structure and implementation of radio stacks or existing <strong>TinyOS</strong> libraries. It<br />
focuses on how to write nesC code, and explains the concepts and reasons behind many of the nesC and<br />
<strong>TinyOS</strong> design decisions. If you are interested in a brief introduction to <strong>TinyOS</strong> programming, then you<br />
should probably start with the tutorials. If you’re interested in details on particular <strong>TinyOS</strong> subsystems you<br />
should probably consult TEPs (<strong>TinyOS</strong> Enhancement Proposals), which detail the corresponding design<br />
considerations, interfaces, and components. Both of these can be found in the doc/html directory of a<br />
<strong>TinyOS</strong> distribution.<br />
While some of the contents of this book are useful for 1.x versions of <strong>TinyOS</strong>, they do have several<br />
differences from <strong>TinyOS</strong> 2.0 which can lead to different programming practices. If in doubt, referring to the<br />
TEP on the subject is probably the best bet, as TEPs often discuss in detail the differences between 1.x and<br />
2.0.<br />
For someone who has experience with C or C++, writing simple nesC programs is fairly straightforward:<br />
all you need to do is implement one or two modules and wire them together. The difficulty (and intellectual<br />
challenge) comes when building larger applications. The code inside <strong>TinyOS</strong> modules is fairly analogous to<br />
C coding, but configurations – which stitch together components – are not.<br />
This book is a first attempt to explain how nesC relates to and differs from other C dialects, stepping<br />
through how the differences lead to very different coding styles and approaches. As a starting point, this<br />
book assumes that<br />
1. you know C, C++, or Java reasonably well, understand pointers and that<br />
2. you have taken an undergraduate level operating systems class (or equivalent) and know about concurrency,<br />
interrupts and preemption.<br />
Of course, this book is as much a description of nesC as it is an argument for a particular way of using<br />
the language to achieve software engineering goals. In this respect, it is the product of thousands of hours of<br />
work by many people, as they learned and explored the use of the language. In particular, Cory Sharp, Kevin<br />
Klues, and Vlado Handziski have always pushed the boundaries of nesC programming in order to better<br />
understand which practices lead to the simplest, most efficient, and robust code. In particular, Chapter 10 is<br />
an edited version of a paper we wrote together, while using structs as a compile-time checking mechanism<br />
in interfaces (as Timer does) is an approach invented by Cory.<br />
This book is divided into four parts. The first part, Chapters 1–2, gives a high-level overview of <strong>TinyOS</strong><br />
and the nesC language. The second part, Chapters 3–7 goes into nesC and <strong>TinyOS</strong> at a level sufficient<br />
for writing applications. The third part, not included in this online version of the text, goes into more<br />
advanced <strong>TinyOS</strong> and nesC programming, as is sometimes needed when writing new low-level systems or<br />
high performance applications. The book ends with an appendix summarizing the basic application-level<br />
<strong>TinyOS</strong> APIs.<br />
xiii
Preface<br />
xiv
Part I<br />
<strong>TinyOS</strong> and nesC<br />
1
Introduction<br />
This book is about writing <strong>TinyOS</strong> systems and applications in the nesC language. This chapter gives a<br />
brief overview of <strong>TinyOS</strong> and its intended uses. <strong>TinyOS</strong> is an open-source project which a large number of<br />
research universities and companies contribute to. The main <strong>TinyOS</strong> website, http://www.tinyos.net,<br />
has instructions for downloading and installing the <strong>TinyOS</strong> programming environment. The website has a<br />
great deal of useful information which this book doesn’t cover, such as common hardware platforms and<br />
how to install code on a node.<br />
1.1 Networked, Embedded Sensors<br />
<strong>TinyOS</strong> is designed to run on small, wireless sensors. Networks of these sensors have the potential to<br />
revolutionize a wide range of disciplines, fields, and technologies. Recent example uses of these devices<br />
include:<br />
Golden Gate Bridge Safety. High-speed accelerometers collect synchonized data on the movement of<br />
and oscillations within the structure of San Francisco’s Golden Gate Bridge. This data allows the maintainers<br />
of the bridge to easily observe the structural health of the bridge in response to events such as high winds<br />
or traffic, as well as quickly assess possible damage after an earthquake [6]. Being wireless avoids the need<br />
for installing and maintaining miles of wires.<br />
Volcanic Monitoring. Accelerometers and microphones observe seismic events on the Reventador and<br />
Tungurahua volcanoes in Ecuador. Nodes locally compare when they observe events to determine their<br />
location, and report aggregate data to a camp several kilometers away using a long-range wirelesss link.<br />
Small, wireless nodes allow geologists and geophysicsts to install dense, remote scientific instruments [21],<br />
obtaining data that answers otherwise questions about unapproachable environments.<br />
Datacenter Provisioning. Data centers and enterprise computing systems require huge amounts of<br />
energy, to the point at which they are placed in regions that have low power costs. Approximately 50% of the<br />
energy in these systems goes into cooling, in part due to highly conservative cooling systems. By installing<br />
wireless sensors across machine racks, the data center can automatically sense what areas need cooling and<br />
can adjust which computers do work and generate heat [12]. Dynamically adapting these factors can greatly<br />
reduce power consumption, making the IT infrastructure more efficient and reducing environmental impact.<br />
While these three application domains are only a small slice of where networks of sensors are used, they<br />
show the key differences between these networks and most other computing systems. First, these “sensor<br />
networks” need to operate unattended for long periods of time. Second, they gather data from and respond to<br />
an unpredictable environment. Finally, for reasons of cost, deployment simplicity, and robustness, they are<br />
wireless. Together, these three issues – longevity, embedment, and wireless communication – cause sensor<br />
networks to use different approaches than traditional, wired, and human-centric or machine-centric systems.<br />
The sheer diversity of sensor network applications means that there are many network architectures,<br />
3
1.1. Networked, Embedded Sensors 4<br />
sensor code<br />
(nesC/<strong>TinyOS</strong>)<br />
base station code<br />
(nesC/<strong>TinyOS</strong>)<br />
gateway code<br />
(Java, C, ...)<br />
patch of sensors<br />
data sink<br />
gateway<br />
Internet<br />
Figure 1.1: A typical sensor network architecture. Patches of ultra-low power sensors, running<br />
nesC/<strong>TinyOS</strong>, communicate to gateway nodes through data sinks. These gateways connect to the larger<br />
Internet.<br />
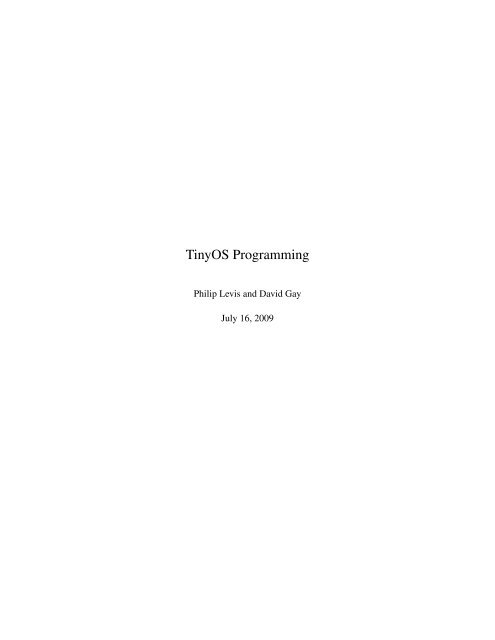
Figure 1.2: A Telos sensor produced by Moteiv. The top of the node has the radio, sensors, and circuitry for<br />
the USB connector. The bottom, not shown, has the processor and flash storage chip. The antenna is part of<br />
the printed circuit board (PCB).<br />
but a dominant portion of deployments tend to follow a common one, shown in Figure 1.1 [13, 17, 21] of<br />
ultra-low power sensors self-organize to form an ad-hoc routing network to one or more data sink nodes.<br />
These sensor sinks are attached to gateways, which are typically a few orders of magnitude more powerful<br />
than the sensors: gateways run an embedded form of Linux, Windows, or other multitasking operating<br />
system. Gateways have an Internet connection, either through a cell phone network, long-distance wireless,<br />
or even just wired Ethernet.<br />
Energy concerns dominate sensor hardware and software design. These nodes need to be wireless,<br />
small, low-cost, and operate unattended for long periods. While it is often possible to provide large power<br />
resources, such as large solar panels, periodic battery replacement, or wall power, to small number of<br />
gateways, doing so to every one of hundreds of sensors is infeasible.<br />
1.1.1 Anatomy of a Sensor Node (Mote)<br />
Since energy consumption determines sensor node lifetime, sensor nodes, commonly referred to as motes,<br />
tend to have very limited computational and communication resources. Instead of a full-fledged 32-bit or
5 1.2. <strong>TinyOS</strong><br />
64-bit CPU with megabytes or gigabytes of RAM, they have 8-bit or 16-bit microcontrollers with a few<br />
kilobytes of RAM. Rather than gigahertz, these microcontrollers run at 1-10 megahertz. Their low-power<br />
radios can send tens to hundreds of kilobits per second, rather than 802.11’s tens of megabits. As a result,<br />
software needs to be very efficient, both in terms of CPU cycles and in terms of memory use.<br />
Figure 1.2 shows a sample node platform, the Telos, which is designed for easy experimentation and<br />
low-power operation. It has a TI MSP430 16-bit microcontroller with 10kB of RAM and 48kB of flash<br />
program memory. Its radio, a TI CC2420 which follows the IEEE 802.15.4 standard, can send up to 250kbps.<br />
In terms of power, the radio dominates the system: on a pair of AA batteries, a Telos can have the radio on<br />
for about 4 days. Lasting longer than four days requires keeping the node in a deep sleep state most of the<br />
time, waking only when necessary, and sleeping as soon as possible.<br />
The other mote discussed in this book, the micaz from Crossbow Technology is similar: it has an<br />
Atmel ATmega128 8-bit microcontroller with 4kB of RAM, 128kB of flash program memory, uses the same<br />
CC2420 radio chip, also runs off a pair of AA batteries and has a similar power consumption profile.<br />
Networks, once deployed, gather data uninterrupted for weeks, months, or years. As the placement<br />
of sensors is in and of itself very application-specific, it is rare for networks to need to support multiple<br />
concurrent applications, or even require more than the occasional reprogramming. Therefore, unlike general-purpose<br />
computing systems, which emphasize run-time flexibility and composability, sensor network systems tend<br />
to be highly optimized. Often, the sensor suite itself is selected for the specific application: volcaninc<br />
monitoring uses accelerometers and microphones, while datacenter provisioning uses temperature sensors.<br />
1.2 <strong>TinyOS</strong><br />
<strong>TinyOS</strong> is a lightweight operating system specifically designed for low-power wireless sensors. <strong>TinyOS</strong><br />
differs from most other operating systems in that its design focuses on ultra low-power operation. Rather<br />
than a full-fledged processor, <strong>TinyOS</strong> is designed for the small, low-power microcontrollers motes have.<br />
Furthermore, <strong>TinyOS</strong> has very aggressive systems and mechanisms for saving power.<br />
<strong>TinyOS</strong> makes building sensor network applications easier. It provides a set of important services and<br />
abstractions, such as sensing, communication, storage, and timers. It defines a concurrent execution model,<br />
so developers can build applications out of reusable services and components without having to worry about<br />
unforeseen interactions. <strong>TinyOS</strong> runs on over a dozen generic platforms, most of which easily support<br />
adding new sensors. Furthermore, <strong>TinyOS</strong>’s structure makes it reasonably easy to port to new platforms.<br />
<strong>TinyOS</strong> applications and systems, as well as the OS itself, are written in the nesC language. nesC is<br />
a C dialect with features to reduce RAM and code size, enable significant optimizations, and help prevent<br />
low-level bugs like race conditions. Chapter 2 goes into the details on how nesC differs significantly from<br />
other C-like languages, and most of this book is about how to best use those features to write robust, efficient<br />
code.<br />
1.2.1 What <strong>TinyOS</strong> provides<br />
At a high level, <strong>TinyOS</strong> provides three things to make writing systems and applications easier:<br />
• a component model, which defines how you write small, reusable pieces of code and compose them<br />
into larger abstractions,<br />
• a concurrent execution model, which defines how components interleave their computations as well<br />
as how interrupt and non-interrupt code interact,<br />
• application programming interfaces (APIs), services, component libraries and an overall component<br />
structure that simplify writing new applications and services.
1.3. Example Application 6<br />
Application<br />
Timer<br />
Sensors<br />
Routing<br />
Radio<br />
Figure 1.3: Example application architecture. Application code uses a timer to act periodically, sensors to<br />
collect data, and a routing layer to deliver data to a sink.<br />
The component model is grounded in nesC. It allows you to write pieces of reusable code which<br />
explicitly declare their dependencies. For example, a generic user button component that tells you when a<br />
button is pressed sits on top of an interrupt handler. The component model allows the button implementation<br />
to be independent of which interrupt that is – e.g., so it can be used on many different hardware platforms<br />
– without requiring complex callbacks or magic function naming conventions. Chapter 2 and Chapter 3<br />
describe the basic component model.<br />
The concurrent execution model enables <strong>TinyOS</strong> to support many components needing to act at the<br />
same time while requiring little RAM. First, every I/O call in <strong>TinyOS</strong> is split-phase: rather than block until<br />
completion, a request returns immediately and the caller gets a callback when the I/O completes. Since the<br />
stack isn’t tied up waiting for I/O calls to complete, <strong>TinyOS</strong> only needs one stack, and doesn’t have threads.<br />
Instead, Chapter 5 introduces tasks, which are lightweight deferred procedure calls. Any component can<br />
post a task, which <strong>TinyOS</strong> will run at some later time. Because low-power devices must spend most of<br />
their time asleep, they have low CPU utilization and so in practice tasks tend to run very soon after they are<br />
posted (within a few milliseconds). Furthermore, because tasks can’t preempt each other, task code doesn’t<br />
need to worry about data races. Low-level interrupt code (discussed in the advanced concurrency chapter,<br />
Chapter 11) can have race conditions, of course: nesC detects possible data races at compile time and warns<br />
you.<br />
Finally, <strong>TinyOS</strong> itself has a set of APIs for common functionality, such as sending packets, reading<br />
sensors, and responding to events. Uses of these are sprinkled throughpout the entire book, and presented<br />
in more detail in Chapter 6 and Appendix A. In addition to programming interfaces, <strong>TinyOS</strong> also provides<br />
a component structure and component libraries. For example, Chapter 12 describes <strong>TinyOS</strong>’s Hardware<br />
Abstraction Architecture (HAA), which defines how to build up from low-level hardware (e.g. a radio<br />
chip) to a hardware-independent abstraction (e.g. sending packets). Part of this component structure<br />
includes resource locks, covered in Chapter 11, which enable automatic low-power operation, as well as<br />
the component libraries that simplify writing such locks.<br />
<strong>TinyOS</strong> itself is continually evolving. Within the <strong>TinyOS</strong> community, “Working Groups” form to tackle<br />
engineering and design issues within the OS, improving existing services and adding new ones. This<br />
book is therefore really a snapshot of the OS in time. As Chapter 12 discusses and Appendix A present,<br />
<strong>TinyOS</strong> has a set of standard, stable APIs for core abstractions, but this set is always expanding as new<br />
hardware and applications emerge. The best way to stay up to date with <strong>TinyOS</strong> is to check its web page<br />
http://www.tinyos.net and participate in its mailing lists. The website also covers advanced <strong>TinyOS</strong><br />
and nesC features which are well beyond the scope of this book, including binary components, over-the-air<br />
reprogramming services, debugging tools, and a nesC reference manual.<br />
1.3 Example Application<br />
To better understand the unique challenges faced by sensor networks, we walk through a basic data collection<br />
application. Nodes running this application periodically wake up, sample some sensors, and send the data
7 1.4. Compiling and Installing Applications<br />
through an ad-hoc collection tree to a data sink (as in Figure 1.1). As the network must last for a year, nodes<br />
spend 99% of their time in a deep sleep state.<br />
In terms of energy, the radio is by far the most expensive part of the node. Lasting a year requires telling<br />
the radio to be in a low power state. Low power radio implementation techniques are beyond the scope of<br />
this book, but the practical upshot is that packet transmissions have higher latency. [14]<br />
Figure 1.3 shows the four <strong>TinyOS</strong> APIs the application uses: low power settings for the radio, a timer,<br />
sensors, and a data collection routing layer. When <strong>TinyOS</strong> tells the application that the node has booted, the<br />
application code configures the power settings on the radio and starts a periodic timer. Every few minutes,<br />
this timer fires and the application code samples its sensors. It puts these sensor values into a packet and<br />
calls the routing layer to send the packet to a data sink.. In practice, applications tend to be more complex<br />
than this simple example. For example, they include additional services such as a management layer which<br />
allows an administrator to reconfigure parameters and inspect the state of the network, as well as over-the-air<br />
programming so the network can be reprogrammed without needing to collect all of the nodes. However,<br />
these four abstractions – power control, timers, sensors, and data collection – encompass the entire datapath<br />
of the application.<br />
1.4 Compiling and Installing Applications<br />
You can download the latest <strong>TinyOS</strong> distribution, the nesC compiler, and other tools at http://www.tinyos.net.<br />
Setting up your programming environment is outside the scope of this book; the <strong>TinyOS</strong> website has<br />
step-by-step tutorials to get you started. One part of <strong>TinyOS</strong> is an extensive build system for compiling<br />
applications. Generally, to compile a program for a sensor platform, one types make , e.g.,<br />
make telosb. This compiles a binary. To install that binary on a node, you plug the node into your<br />
PC using a USB or serial connection, and type make install. The tutorials go into<br />
compilation and installation options in detail.<br />
1.5 The rest of this book<br />
The rest of this book goes into how to program in nesC and write <strong>TinyOS</strong> applications. It is divided into<br />
three parts. The first is a short introduction to the major programming concepts of nesC. The second part<br />
addresses basic application programming using standard <strong>TinyOS</strong> APIs. The third part digs a little deeper,<br />
and looks into how those <strong>TinyOS</strong> APIs are implemented. For example, the third part describes how <strong>TinyOS</strong><br />
abstracts hardware, so you can write a driver for a new sensor.<br />
Chapter by chapter, the book is structured as follows:<br />
• Chapter 1 is this chapter.<br />
• Chapter 2 describes the major way that nesC breaks from C and C-like languages: how programs are<br />
built out of components, and how components and interfaces help manage programs’ namespaces.<br />
• Chapter 3 presents components and how they interact via interfaces.<br />
• Chapter 4 goes into greater detail into configurations, components which connect other components<br />
together.<br />
• Chapter 5 covers the basic <strong>TinyOS</strong> execution model and gives guidance on how and when to use<br />
tasks.
1.5. The rest of this book 8<br />
• Chapter 6 takes the material from the prior three chapters and brings it together into an example of<br />
writing a full-fledged application that sends an alarm when a node observes a change in its environment.<br />
In the process, it covers the major <strong>TinyOS</strong> APIs (timing, sensing, communication and storage).<br />
• Chapter 7 details the PC-side tools for communicating with nodes connected over the serial port, and<br />
covers the <strong>TinyOS</strong> serial stack and packet formats.<br />
• Chapter 8 introduces more advanced component topics, such as parameterized interfaces and attributes.<br />
While applications typically don’t use these mechanisms, they are indispensible when writing reusable<br />
libraries and systems.<br />
• Chapter 9 goes into wiring parameterized interfaces, which form the basis for most reusable systems.<br />
After describing the basic mechanisms for managing interfaces keys, it goes through four examples<br />
of increasing complexity.<br />
• Chapter 10 presents eight common <strong>TinyOS</strong> design patterns: commonly useful and powerful ways of<br />
organizing components.<br />
• Chapter 11 concludes the advanced programming topics by covering concurrency.<br />
asynchronous code, the <strong>TinyOS</strong> task model, and power locks.<br />
It describes<br />
• Chapter 12 describes the Hardware Abstraction Architecture (HAA), the three-level hierarchy <strong>TinyOS</strong><br />
uses to raise low-level hardware abstractions to hardware-independent, application-level services.<br />
• Chapter 13 goes step-by-step through an advanced application that identifies the location of an event<br />
based on when nodes sense it. It uses lower-layer interfaces to implement time synchronization and<br />
high-frequency sampling.<br />
• Appendix A gives a concise overview of major <strong>TinyOS</strong> application interfaces.<br />
Throughout the book, you will find programming hints: general best-use practices that we’ve distilled<br />
from the many users of <strong>TinyOS</strong> and nesC. Page xi lists them all in one place.<br />
Finally, the complete source code for example applications presented in this book (in Chapters 6, 7<br />
and 13) is available in <strong>TinyOS</strong>’s contributed code directory, under the name “<strong>TinyOS</strong> <strong>Programming</strong>” — see<br />
http://www.tinyos.net for details.
Names and Program Structure<br />
Program structure is the most essential and obvious difference between C and nesC. C programs are composed<br />
of variables, types and functions defined in files that are compiled separately and then linked together. nesC<br />
programs are built out of components that are connected (“wired”) by explicit program statements; the nesC<br />
compiler connects and compiles these components as a single unit. To illustrate and explain these differences<br />
in how programs are built, we compare and contrast C and nesC implementations of two very simple “hello<br />
world”-like mote applications, Powerup (boot and turn on a LED) and Blink (boot and repeatedly blink a<br />
LED).<br />
2.1 Hello World!<br />
The closest mote equivalent to the classic “Hello World!” program is the “Powerup” application that simply<br />
turn on one of the motes LEDs at boot, then goes to sleep.<br />
A C implementation of Powerup is fairly simple:<br />
#include "mote.h"<br />
int main()<br />
{<br />
mote_init();<br />
led0_on();<br />
sleep();<br />
}<br />
Listing 2.1: Powerup in C<br />
The Powerup application is compiled and linked with a “mote” library which provides functions to perform<br />
hardware initialization (mote init), LED control (led0 on) and put the mote in to a low-power sleep mode<br />
(sleep). The “mote.h” header file simply provides declarations of these and other basic functions. The usual<br />
C main function is called automatically when the mote boots. 1<br />
The nesC implementation of Powerup is split into two parts. The first, the PowerupC module, contains<br />
the executable logic of Powerup (what there is of it. . . ):<br />
module PowerupC {<br />
uses interface Boot;<br />
uses interface Leds;<br />
}<br />
implementation {<br />
1 The C compiler, library and linker typically arrange for this by setting the mote’s hardware reset vector to point to a piece of<br />
assembly code that sets up a C environment, then calls main.<br />
9
2.1. Hello World! 10<br />
}<br />
event void Boot.booted() {<br />
call Leds.led0On();<br />
}<br />
Listing 2.2: PowerupC module in nesC<br />
This code says that PowerupC interacts with the rest of the system via two interfaces, Boot and Leds,<br />
and provides an implementation for the booted event of the Boot interface that calls the led0On 2 command<br />
of the Leds interface. Comparing with the C code, we can see that the booted event implementation takes the<br />
place of the main function, and the call to the led0On command the place of the call to the led0 on library<br />
function.<br />
This code shows two of the major differences between nesC and C: where C programs are composed<br />
of functions, nesC programs are built out of components that implement a particular service (in the case of<br />
PowerupC, turning a LED on at boot-time). Furthermore, C functions typically interact by calling each other<br />
directly, while the interactions between components are specified by interfaces: the interface’s user makes<br />
requests (calls commands) on the interface’s provider, the provider makes callbacks (signals events) to the<br />
interface’s user. Commands and events themselves are like regular functions (they can contain arbitrary C<br />
code); calling a command or signaling an event is just a function call. PowerupC is a user of both Boot<br />
and Leds; the booted event is a callback signaled when the system boots, while the led0On is a command<br />
requesting that LED 0 be turned on.<br />
nesC interfaces are similar to Java interfaces, with the addition of a command or event keyword to<br />
distinguish requests from callbacks:<br />
interface Boot {<br />
event void booted();<br />
}<br />
interface Leds {<br />
command void led0On();<br />
command void led0Off();<br />
command void led0Toggle();<br />
...<br />
}<br />
Listing 2.3: Simple nesC interfaces<br />
The second part of Powerup, the PowerupAppC configuration, specifies how PowerupC is connected to<br />
<strong>TinyOS</strong>’s services:<br />
configuration PowerupAppC { }<br />
implementation {<br />
components MainC, LedsC, PowerupC;<br />
}<br />
MainC.Boot -> PowerupC.Boot;<br />
PowerupC.Leds -> LedsC.Leds;<br />
Listing 2.4: PowerupAppC configuration in nesC<br />
2 LEDs are numbered in <strong>TinyOS</strong>, as different platforms have different color LEDs.
11 2.1. Hello World!<br />
Figure 2.1: Wiring Diagram for Powerup application<br />
.nc<br />
.nc<br />
.nc app.c binary<br />
nesC<br />
compiler<br />
Native C<br />
compiler<br />
Figure 2.2: The nesC compilation model. The nesC compiler loads and reads in nesC components, which it<br />
compiles to a C file. This C file is passed to a native C compiler, which generates a mote binary.<br />
This says that the PowerupAppC application is built out of three components (modules or configurations),<br />
MainC (system boot), LedsC (LED control), and PowerupC (our powerup module). PowerupAppC explicitly<br />
specifies the connections (or wiring) between the interfaces provided and used by these components. When<br />
MainC has finished booting the system it signals the booted event of its Boot interface, which is connected<br />
by the wiring in PowerupAppC to the booted event in PowerupC. This event then calls the led0On command<br />
of its Leds interface, which is again connected (wired) by PowerupAppC to the Leds interface provided by<br />
LedsC. Thus the call turns on LED 0. The resulting component diagram is shown in Figure 2.1 — this<br />
diagram was generated automatically from PowerupAppC by nesdoc, nesC’s documentation generation<br />
tool.<br />
PowerupAppC illustrates the third major difference between C and nesC: wiring makes the connections<br />
expressed by linking the C version of Powerup with its “mote” library explicit. In the C version, Powerup<br />
calls a global function named led0 on which is connected to whatever library provides a function with<br />
the same name; if two libraries provide such a function then (typically) the first one named on the linker<br />
command line “wins”. Using a nesC configuration, the programmer instead explicitly selects which component’s<br />
implementation of the function to use.<br />
The nesC compiler can take advantage of this explicit wiring to build highly optimized binaries. Current<br />
implementations of the nesC compiler (nesc1) take nesC files describing components as input and output a<br />
C file. The C file is passed to a native C compiler that can compile to the desired microcontroller or processor.<br />
Figure 2.2 shows this process. The nesC compiler carefully constructs the generated C file to maximize the<br />
optimization abilities of the C compiler. For example, since it is given a single file, the C compiler can freely<br />
optimize across call boundaries, inlining code whenever needed. The nesC compiler also prunes dead code<br />
which is never called and variables which are never accessed: since there is no dynamic linking in nesC, it<br />
has a complete picture of the application call graph. This speeds the C compilation and reduces program<br />
size in terms of both RAM and code.
2.2. Essential Differences: Components, Interfaces and Wiring 12<br />
2.2 Essential Differences: Components, Interfaces and Wiring<br />
The three essential differences between C and nesC — components, interfaces and wiring — all relate to<br />
naming and organizing a program’s elements (variables, functions, types, etc). In C, programs are broken<br />
into separate files which are connected via a global namespace: a symbol X declared in one file is connected<br />
by the linker to a symbol X defined in another file. For instance, if file1.c contains:<br />
extern void g(void); /* declaration of g */<br />
int main() /* definition of main */<br />
{<br />
g(); g();<br />
}<br />
and file2.c contains:<br />
void g(void)<br />
{<br />
printf("hello world!");<br />
}<br />
then compiling and linking file1.c and file2.c connects the calls to g() in main to the definition<br />
of g in file2.c. The resulting program prints “hello world!” twice.<br />
Organizing symbols in a global namespace can be tricky. C programmers use a number of techniques to<br />
simplify this task, including header files and naming conventions. Header files group declarations so they<br />
can be used in a number of files without having to retype them, e.g. a header file file1.h for file1.c<br />
would normally contain:<br />
#ifndef FILE1_H<br />
#define FILE1_H<br />
extern void g(void); /* declaration of g */<br />
#endif<br />
Naming conventions are designed to avoid having two different symbols with the same name. For<br />
instance, types are often suffixed with t guaranteeing that a type and function won’t have the same name.<br />
Some libraries use a common prefix for all their symbols, e.g. Gtk and gtk for the GTK+ graphical<br />
toolkit. Such prefixes remind users that functions are related and avoid accidental name collisions with<br />
other libraries, but make programs more verbose.<br />
nesC’s components provide a more systematic approach for organizing a program’s elements. A component<br />
(module or configuration) groups related functionality (a timer, a sensor, system boot) into a single unit,<br />
in a way that is very similar to a class in an object-oriented language. For instance, <strong>TinyOS</strong> represents<br />
its system services as separate components such as LedsC (LED control, seen above), ActiveMessageC<br />
(sending and receiving radio messages), etc. Only the service (component) name is global, the service’s<br />
operations are named in a per-component scope: ActiveMessageC.SplitControl starts and stops the radio,<br />
ActiveMessageC.AMSend sends a radio message, etc.<br />
Interfaces bring further structure to components: components are normally specified in terms of the set<br />
of interfaces (Leds, Boot, SplitControl, AMSend) that they provide and use, rather than directly in terms<br />
of the actual operations. Interfaces simplify and clarify code because, in practice, interactions between<br />
components follow standard patterns: many components want to control LEDs or send radio messages,<br />
many services need to be started or stopped, etc. Encouraging programmers to express their components in<br />
terms of common interfaces also promotes code reuse: expressing your new network protocol in terms of<br />
the AMSend message transmission interface means it can be used with existing applications, using AMSend<br />
in your application means that it can be used with any existing or future network protocol.
13 2.3. Wiring and Callbacks<br />
Rather than connect declarations to definitions with the same name, nesC programs use wiring to specify<br />
how components interact: PowerupAppC wired PowerupC’s Leds interface to that provided by the LedsC<br />
component, but a two-line change could switch that wiring to the NoLedsC component (which just does<br />
nothing):<br />
components PowerupC, NoLedsC;<br />
PowerupC.LedsC -> NoLedsC.Leds;<br />
without affecting any other parts of the program that wish to use LedsC. In C, one could replace the “mote”<br />
library used by Powerup by a version where the LED functions did nothing, but that change would affect all<br />
LED users, not just Powerup.<br />
2.3 Wiring and Callbacks<br />
Leaving the component connection decisions to the programmer does more than just simplify switching<br />
between multiple service implementations. It also provides an efficient mechanism for supporting callbacks,<br />
as we show through the example of timers. <strong>TinyOS</strong> provides a variable number of periodic or deadline<br />
timers; associated with each timer is a callback to a function that is executed each time the timer fires. We<br />
first look at how such timers would be expressed in C, by modifying Powerup to blink LED 0 at 2Hz rather<br />
than turn it on once and for all:<br />
#include "mote.h"<br />
timer_t mytimer;<br />
void blink_timer_fired(void)<br />
{<br />
leds0_toggle();<br />
}<br />
int main()<br />
{<br />
mote_init();<br />
timer_start_periodic(&mytimer, 250, blink_timer_fired);<br />
sleep();<br />
}<br />
Listing 2.5: Powerup with blinking LED in C<br />
In this example, the Blink application declares a global mytimer variable to hold timer state, and calls<br />
timer start periodic to set up a periodic 250ms timer. Every time the timer fires, the timer implementation<br />
performs a callback to the blink timer fired function specified when the timer was set up. This function<br />
simply calls a library function that toggles LED 0 on or off.<br />
The nesC version of Blink is similar to the C version, but uses interfaces and wiring to specify the<br />
connection between the timer and the application:<br />
module BlinkC {<br />
uses interface Boot;<br />
uses interface Timer;<br />
uses interface Leds;<br />
}<br />
implementation {
2.4. Summary 14<br />
event void Boot.booted() {<br />
call Timer.startPeriodic(250);<br />
}<br />
}<br />
event void Timer.fired() {<br />
call Leds.led0Toggle();<br />
}<br />
Listing 2.6: Powerup with blinking LED in nesC (slightly simplified)<br />
The BlinkC module starts the periodic 250ms timer when it boots. The connection between the startPeriodic<br />
command that starts the timer and the fired event which blinks the LED is implicitly specified by having the<br />
command and event in the same interface:<br />
interface Timer {<br />
command void startPeriodic(uint32_t interval);<br />
event void fired();<br />
...<br />
}<br />
Finally, this Timer must be connected to a component that provides an actual timer. BlinkAppC wires<br />
BlinkC.Timer to a newly allocated timer MyTimer:<br />
configuration BlinkAppC { }<br />
implementation {<br />
components MainC, LedsC, new TimerC() as MyTimer, BlinkC;<br />
}<br />
BlinkC.Boot -> MainC.Boot;<br />
BlinkC.Leds -> LedsC.Leds;<br />
BlinkC.Timer -> MyTimer.Timer;<br />
Listing 2.7: Powerup with blinking LED configuration (slightly simplified)<br />
In the C version the callback from the timer to the application is a runtime argument to the timer start periodic<br />
function. The timer implementation stores this function pointer in the mytimer variable that holds the timer’s<br />
state, and performs an indirect function call each time the timer fires. Conversely, in the nesC version, the<br />
connection between the timer and the Blink application is specified at compile-time in BlinkAppC. This<br />
avoids the need to store a function pointer (saving precious RAM), and allows the nesC compiler to perform<br />
optimizations (in particular, inlining) across callbacks.<br />
2.4 Summary<br />
Table 2.1 summarises the difference in how programs are structured in C, C++ and nesC. In C, the typical<br />
high-level programming unit is the file, with an associated header file that specified and documents the file’s<br />
behavior. The linker builds applications out of files by matching global names; where this is not sufficient<br />
to express program structure (e.g. for callbacks), the programmer can use function pointers to delay the<br />
decision of which function is called at what point.<br />
C++ provides explicit language mechanisms for structuring programs: classes are typically used to<br />
group related functionality, and programs are built out of interacting objects (class instances). An abstract<br />
class can be used to define common class specification patterns (like sending a message); classes that wish to<br />
follow this pattern then inherit from the abstract class and implement its methods — Java’s interfaces provide
15 2.4. Summary<br />
structural element C C++ nesC<br />
program unit file class component<br />
unit specification header file class declaration component specification<br />
specification pattern — abstract class interface<br />
unit composition name matching name matching wiring<br />
delayed composition function pointer virtual method wiring<br />
Table 2.1: Program Structure in C, C++ and nesC<br />
similar functionality. Like in C, the linker builds applications by matching class and function names. Finally,<br />
virtual methods provide a more convenient and more structured way than function pointers for delaying<br />
beyond link-time decisions about what code to execute.<br />
In nesC, programs are built out of a set of cooperating components. Each component uses interfaces<br />
to specify the services it provides and uses; the programmer uses wiring to build an application out of<br />
components by writing wiring statements, each of which connects an interface used by one component to<br />
an interface provided by another. Making these wiring statements explicit instead of relying on implicit<br />
name matching eliminates the requirement to use dynamic mechanisms (function pointers, virtual methods)<br />
to express concepts such as callbacks from a service to a client.
2.4. Summary 16
Part II<br />
Basic <strong>Programming</strong><br />
17
Components and interfaces<br />
This chapter describes components, the building blocks of nesC programs. Every component has a signature,<br />
which describes the functions it needs to call as well as the functions that others can call on it. A component<br />
declares its signature with interfaces, which are sets of functions for a complete service or abstraction.<br />
Modules are components that implement and call functions in C-like code. Configurations connect components<br />
into larger abstractions. This chapter focuses on modules, and covers configurations only well enough to<br />
modify and extend existing applications: Chapter 4 covers writing new configurations from scratch.<br />
3.1 Component signatures<br />
A nesC program is a collection of components. Every component is in its own source file, and there is a<br />
1-to-1 mapping between component and source file names. For example, the file LedsC.nc contains the<br />
nesC code for the component LedsC, while the component PowerupC can be found in the file PowerupC.nc.<br />
Components in nesC reside in a global namespace: there is only one PowerupC definition, and so the nesC<br />
compiler loads only one file named PowerupC.nc.<br />
There are two kinds of components: modules and configurations. Modules and configurations can be<br />
used interchangeably when combining components into larger services or abstractions. The two types of<br />
components differ in their implementation sections. Module implementation sections consist of nesC code<br />
that looks like C. Module code declares variables and functions, calls functions, and compiles to assembly<br />
code. Configuration implementation sections consist of nesC wiring code, which connects components<br />
together. Configurations are the major difference between nesC and C (and other C derivatives).<br />
All components have two code blocks. The first block describes its signature, and the second block<br />
describes its implementation:<br />
module PowerupC { configuration LedsC {<br />
// signature // signature<br />
} }<br />
implementation { implementation {<br />
// implementation // implementation<br />
} }<br />
Listing 3.1: The signature and implementation blocks<br />
Signature blocks in modules and configurations have the same syntax. Component signatures contain<br />
zero or more interfaces. Interfaces define a set of related functions for a service or abstraction. For example,<br />
there is a Leds interface for controlling node LEDs, a Boot interface for being notified when a node has<br />
booted, and an Init interface for initializing a component’s state. A component signature declares whether it<br />
provides or uses an interface. For example, a component that needs to turn a node’s LEDs on and off uses<br />
the Leds interface, while the component that implements the functions that turns them on and off provides<br />
the Leds interface. Returning to the two examples, these are their signatures:<br />
19
3.1. Component signatures 20<br />
Leds<br />
Boot<br />
PowerupC<br />
LedsC<br />
MainC<br />
Boot<br />
Leds<br />
Init<br />
Figure 3.1: PowerupC, LedsC, and MainC. Triangles are interfaces. Triangles pointing out from a<br />
component are interfaces it uses, while triangles inside a component are interfaces it provides. A solid<br />
box is a module, while a dashed box is a configuration.<br />
module PowerupC { configuration LedsC {<br />
uses interface Boot;<br />
provides interface Leds;<br />
uses interface Leds; }<br />
}<br />
Listing 3.2: Signatures of PowerupC and LedsC<br />
PowerupC is a module that turns on a node LED when the system boots. As we saw in Chapter 2, it<br />
uses the Boot interface for notification of system boot and the Leds interface for turning on a LED. LedsC,<br />
meanwhile, is a configuration which provides the abstraction of three LEDs that can be controlled through<br />
the Leds interface. A single component can both provide and use interfaces. For example, this is the<br />
signature for the configuration MainC:<br />
configuration MainC {<br />
provides interface Boot;<br />
uses interface Init;<br />
}<br />
Listing 3.3: MainC’s signature<br />
MainC is a configuration which implements the boot sequence of a node. It provides the Boot interface<br />
so other components, such as PowerupC, can be notified when a node has fully booted. MainC uses the Init<br />
interface so it can initialize software as needed before finishing the boot sequence. If PowerupC had state<br />
that needed initialization before the system boots, it might provide the Init interface.<br />
3.1.1 Visualizing components<br />
Throughout this book, we’ll use a visual language to show components and their relationships. Figure 3.1<br />
shows the three components we’ve seen so far: MainC, PowerupC, and LedsC.<br />
3.1.2 The “as” keyword and clustering interfaces<br />
The as keyword lets a signature provide an alternative name for an interface. For example, MainC uses<br />
the as keyword to make its signature a bit clearer to the reader by using the name SoftwareInit for its Init<br />
interface:<br />
uses interface Init as SoftwareInit;
21 3.1. Component signatures<br />
Some signatures must use the keyword to distinguish multiple instances of the same interface. If a<br />
component provides or uses an interface more than once, its signature must use the as keyword to give them<br />
distinct names. For example, LedsC provides the abstraction of three LEDs through the Leds interface, but<br />
it is a configuration and not executable code. The LedsC configuration connects the LEDs module, LedsP,<br />
to components that provides the digital input-output lines which power the LEDs. The signature for LedsP<br />
is as follows:<br />
module LedsP {<br />
provides {<br />
interface Init;<br />
interface Leds;<br />
}<br />
uses {<br />
interface GeneralIO as Led0;<br />
interface GeneralIO as Led1;<br />
interface GeneralIO as Led2;<br />
}<br />
}<br />
Listing 3.4: The LedsP module<br />
A signature only needs to make sure that each interface instance has a unique name. For example, the<br />
LedsP example above could use as only twice, and leave one interface instance as GeneralIO, so the three<br />
would have the names Led0, Led1, and GeneralIO. However, in this case that would be confusing, so LedsP<br />
renames all three instances of GeneralIO. Technically, interface declarations have an implicit use of as. The<br />
statement<br />
uses interface Leds;<br />
is really shorthand for<br />
uses interface Leds as Leds;<br />
Generally, the keyword as is a useful tool for making components and their requirements clearer,<br />
similarly to how variable and function names greatly affect code readability.<br />
<strong>Programming</strong> Hint 1: USE THE “AS” KEYWORD LIBERALLY.<br />
3.1.3 Clustering interfaces<br />
The LedsP example shows one further detail about signatures: they can cluster used and provided interfaces<br />
together. For example, these two versions of PowerupC are equivalent:<br />
configuration PowerupC { configuration PowerupC {<br />
uses interface Boot; uses {<br />
uses interface Leds;<br />
interface Boot;<br />
} interface Leds;<br />
}<br />
}<br />
Listing 3.5: PowerupC and an alternative signature
3.2. Interfaces 22<br />
As these two are equivalent, there is no syntactical or code efficiency advantage to either approach: it is a<br />
matter of style and what is more legible to the reader. Often component signatures declare the interfaces they<br />
provide first, followed by the interfaces they use. This lets a reader clearly see the available functionality and<br />
dependencies. For very complex components that perform many functions, however, this approach breaks<br />
down, and signatures place related interfaces close to one another.<br />
<strong>TinyOS</strong> detail: The names of all of the components described above end in the letters C and P. This<br />
is not a requirement. It is a coding convention used in <strong>TinyOS</strong> code. Components whose names end in<br />
C are abstractions that other components can use freely: the C stands for “component.” Some component<br />
names end in P, which stands for “private.” In <strong>TinyOS</strong>, P components should not be used directly, as they<br />
are generally an internal part of a complex system. Components use these two letters in order to clearly<br />
distinguish them from interfaces.<br />
3.2 Interfaces<br />
Interfaces describe a functional relationship between two or more different components. The role a component<br />
plays in this relationship depends on whether it provides or uses the interface. Like components, interfaces<br />
have a 1-to-1 mapping between names and files: the file Leds.nc contains the interface Leds while the<br />
file Boot.nc contains the interface Boot. Just as with components, interfaces are in a global namespace.<br />
Syntactically, however, interfaces are quite different from components. They have a single block, the<br />
interface declaration:<br />
interface Boot { interface Leds {<br />
// functions // functions<br />
} }<br />
Listing 3.6: Interface declarations for Leds and Boot<br />
An interface declaration has one or more functions in it. Interfaces have two kinds of functions:<br />
commands and events. Init and Boot are two simple interfaces, each of which has a single function. Init has<br />
a single command, while Boot has a single event:<br />
interface Init { interface Boot {<br />
command error_t init();<br />
event void booted();<br />
} }<br />
Listing 3.7: The Init and Boot interfaces.<br />
<strong>TinyOS</strong> detail: The error t type returned by init is <strong>TinyOS</strong>’s normal way of reporting success or failure.<br />
A value of SUCCESS represents success and FAIL represents general failure. Specific Exxx constants,<br />
inspired in part by Unix’s errno, represent specific failures, e.g., EINVAL means “invalid value”.<br />
Whether a function is a command or event determines which side of an interface – a user or a provider<br />
– implements the function and which side can call it. Users can call commands and providers can signal<br />
events. Conversely, users must implement events and providers must implement commands. Figure 3.3<br />
shows this relationship in the visual language we use to describe nesC programs. For example, returning to<br />
MainC and PowerupC, PowerupC is a user of Boot, while MainC is a provider of Boot:<br />
configuration MainC { module PowerupC {<br />
provides interface Boot;<br />
uses interface Boot;
23 3.2. Interfaces<br />
User<br />
Interface<br />
Commands<br />
Events<br />
Provider<br />
Figure 3.2: Interfaces have commands and events. Users call commands, and providers signal events.<br />
User<br />
User<br />
Init init Boot booted<br />
Provider<br />
Provider<br />
Figure 3.3: The Init and Boot interfaces.<br />
uses interface Init as SoftwareInit;<br />
} }<br />
uses interface Leds;<br />
Listing 3.8: Signatures of MainC and PowerupC<br />
Boot has a single event, Boot.booted. MainC provides Boot, so it signals the event when a node has<br />
booted successfully. This signaling is a function call: the boot sequence calls Boot.booted on all of the<br />
components that want to know when the system has come up. If a component – such as PowerupC – wants<br />
to know when the node has booted, it uses the Boot interface.<br />
Commands have the opposite implementation direction as events. Users call commands and providers<br />
implement them. MainC uses Init so it can initialize software components before booting: it calls SoftwareInit.init<br />
on the components that need initialization. Similarly, as PowerupC uses Leds, it can call commands such as<br />
Leds.led0On. Conversely, a provider of Leds, such as LedsP, must implement the Leds commands.<br />
Figure 3.3 shows the Boot and Init interfaces graphically. Init has a single command, init. A user of the<br />
Init interface can call Init.init, while a provider of the Init interface must implement Init.init. Conversely,<br />
a user of the Boot interface must implement the booted event, while a provider of the interface can signal<br />
Boot.booted.
3.2. Interfaces 24<br />
At this point, the distinction between commands and events might seem pointless. After all, providing<br />
an interface with a command is the same as using an interface with an event. In the case of interfaces<br />
which only have commands or events but not both, this is true, and distinction is more for presentation<br />
and legibility. Providing an interface means providing a service, whether that be controlling the LEDs on<br />
a node or notifying components when the system has booted. Using an interface means using that service.<br />
However, as we’ll soon see, many interesting interfaces have both commands and events, representing a<br />
relationship between two components where both can call the other.<br />
3.2.1 Generic Interfaces<br />
The interfaces we’ve seen so far – Boot, Init, and Leds – are all type-free. The nesC language also supports<br />
generic interfaces, which take one or more types as a parameter. For example, the Queue interface takes a<br />
single parameter, which defines what it is a queue of:<br />
interface Queue {<br />
command bool empty();<br />
command uint8_t size();<br />
command uint8_t maxSize();<br />
command t head();<br />
command t dequeue();<br />
command error_t enqueue(t newVal);<br />
command t element(uint8_t idx);<br />
}<br />
Listing 3.9: The Queue interface<br />
The Queue statement says that the queue interface takes a single type, t. The interface definition<br />
can then refer to this type: enqueue takes a t as a parameter, while head, dequeue, and element return values<br />
of type t. Interfaces can have more than one type, in which case the types are comma-delimited: .<br />
When a component declares a generic interface, it must specify its parameters. For example, if a<br />
component needs to use a queue of 32-bit integers, its signature would include<br />
module QueueUserC {<br />
uses interface Queue;<br />
}<br />
Listing 3.10: Using a queue of 32–bit integers<br />
Finally, when connecting users to providers, interface types must match. For example, QueueUserC can<br />
be connected to Queue32C below, but not Queue16C:<br />
module Queue16C { module Queue32C {<br />
provides interface Queue; provides interface Queue;<br />
} }<br />
Listing 3.11: Providing a 16–bit or a 32–bt queue<br />
Generic interfaces prevent unnecessary code duplication. Without generic interfaces, for example, we’d<br />
either need a separate Queue interface for every possible type needed, or Queue would have to take a generic<br />
type that a program casts to/from, such as a void*. The former has the problem of code duplication (and
25 3.2. Interfaces<br />
Notify<br />
enable<br />
disable<br />
notify<br />
get<br />
Get<br />
UserButtonC<br />
Figure 3.4: Commands and events for UserButtonC.<br />
file bloat), while the latter depends on runtime checking, which is notably deficient in C. Having a generic<br />
queue enables compile-time checking for the values put in and out of a queue.<br />
3.2.2 Bidirectional Interfaces<br />
So far, we’ve only seen interfaces that have either commands or events, but not both. Bidirectional interfaces<br />
declare both commands from a user to a provider as well as events from a provider to a user. For example,<br />
this is the Notify interface, which allows a user to ask that it be notified of events, which can have data<br />
associated with them:<br />
interface Notify {<br />
command error_t enable();<br />
command error_t disable();<br />
event void notify(val_t val);<br />
}<br />
Listing 3.12: The Notify interface<br />
The Notify interface has two commands, for enabling and disabling notifications. If notifications are<br />
enabled, then the provider of the interface signals notify events. The Notify interface is generic, as depending<br />
on the service, it might need to provide different kinds of data. Bidirectional interfaces enable components<br />
to register callbacks without needing function pointers.<br />
For instance, some hardware platforms have a button on them. A button lends itself well to the Notify<br />
interface: a component can turn notifications of button pushes on and off. For example, UserButtonC is a<br />
component that provides this abstraction:<br />
configuration UserButtonC {<br />
provides interface Get;<br />
provides interface Notify;<br />
}<br />
Listing 3.13: UserButtonC<br />
In addition to the Notify interface, which tells a user when the button state has changed, UserButtonC<br />
provides the Get interface, which a component can use to actively query the state of the button. Figure 3.4<br />
shows the call directions of the commands and events of UserButtonC.<br />
A component that provides Notify must implement the commands enable and disable, and can signal the<br />
notify event. A component that uses Notify can call the enable and disable commands, and must implement
3.3. Component implementations 26<br />
the notify event. In the case of UserButtonC, button state t describes whether the button is up or down.<br />
Timer is another bidirectional interface. Timer is a generic interface, but it uses types in a slightly<br />
different way than Get or Notify. The type in a Timer interface is not used in any of its commands or events.<br />
Instead, the type represents a timer granularity. For example a Timer is a millisecond timer. 1<br />
while a Timer is a microsecond timer. Typing in this way enables nesC to check that the Timer<br />
a component uses is the right granularity while only having a single Timer interface: you cannot wire a<br />
microsecond timer to a component that needs a millisecond timer. This is a subset of the Timer interface; it<br />
has additional, advanced operations which are elided for simplicity:<br />
interface Timer {<br />
command void startPeriodic(uint32_t dt);<br />
command void startOneShot(uint32_t dt);<br />
command void stop();<br />
event void fired();<br />
// Advanced operations follow<br />
}<br />
Listing 3.14: Simplified Timer interface showing three commands and one event<br />
The fired event signals in response to the start commands, which differ in whether they cause a series<br />
of timer firings (startPeriodic) or a single fired event (startOneShot). The dt parameter specifies the timer<br />
interval.<br />
Timer differs from Notify in a subtle but significant way: the user controls the timing and number of<br />
events. Notify allows users to turn events on and off; Timer allows users to control which events are signaled<br />
and when. There is therefore a much tighter coupling between the commands and events. With Notify, it’s<br />
possible that no events will ever be signaled even if Notify is enabled. With Timer, one can describe exactly<br />
what events will be signaled based on what commands are called.<br />
3.3 Component implementations<br />
Modules and configurations differ in their implementation sections.<br />
3.3.1 Modules<br />
Module implementations are written in nesC’s dialect of the C language. At the level of single statements,<br />
nesC is almost identical to C. It differs mainly in how code calls functions and variable scoping. As a<br />
component must implement commands for interfaces it provides and events for interfaces it uses, a module’s<br />
code must define these functions. For example, this is the module code for the PowerupC module:<br />
module PowerupC {<br />
uses interface Boot;<br />
uses interface Leds;<br />
}<br />
implementation {<br />
event void Boot.booted() {<br />
call Leds.led0On();<br />
}<br />
1 Note that a TMilli timer fires 1024 times per second, not 1000. This is due to the fact that many microcontrollers do not have<br />
the ability to count at 1kHz accurately, but they can count at 1024Hz accurately.
27 3.3. Component implementations<br />
}<br />
Listing 3.15: PowerupC module code<br />
As PowerupC uses the Boot interface, and Boot has a single event, booted, PowerupC must provide an<br />
implementation: event void Boot.booted() { ...}. When the provider of Boot signals this event,<br />
PowerupC turns on LED 0 of the Leds interface. Modules invoke commands with the call keyword and<br />
invoke events with the signal keyword. For this reason, you’ll often see the terms “call commands” and<br />
“signal events.”<br />
The Leds interface has three LEDs, mostly for historical reasons. They are named led0, led1, and led2.<br />
In addition to turning LEDs on (e.g., led0On), the Leds interface allows you to turn them off (e.g., led0Off)<br />
and toggle them (e.g., led0Toggle). For example, this component will cause system boot to enter an infinite<br />
loop that toggles all three LEDs:<br />
module PowerupToggleC {<br />
uses interface Boot;<br />
uses interface Leds;<br />
}<br />
implementation {<br />
event void Boot.booted() {<br />
while (1) {<br />
call Leds.led0Toggle();<br />
call Leds.led1Toggle();<br />
call Leds.led2Toggle();<br />
}<br />
}<br />
}<br />
Listing 3.16: The module PowerupToggleC<br />
For PowerupToggleC to do anything, we must specify which components providing Boot and Leds we<br />
want to connect PowerupToggleC to. This is the role of the PowerupToggleAppC configuration which we<br />
will write next.<br />
3.3.2 A basic configuration<br />
Modules allocate state and implement executable logic. However, like all components, they can only name<br />
functions and variables within their local namespaces, i.e., those defined in their signature and implementation.<br />
For one module to be able to call another, we have to map a set of names (generally interfaces) in one<br />
component’s signature to a set of names in another component signature. In nesC, connecting two components<br />
in this way is called wiring. Configurations, nesC’s second kind of component, contain these wirings.<br />
Modules implement program logic, configurations connect components together into larger abstractions.<br />
Configurations look very similar to modules. They have a specification and an implementation. This<br />
is the PowerupToggleAppC configuration, which connects the PowerupToggleC module to the components<br />
that provide the Boot and Leds interfaces.<br />
configuration PowerupToggleAppC {}<br />
implementation {<br />
components MainC, LedsC, PowerupToggleC;<br />
PowerupToggleC.Boot -> MainC.Boot;
3.3. Component implementations 28<br />
}<br />
PowerupToggleC.Leds -> LedsC.Leds;<br />
Listing 3.17: The PowerupToggleAppC configuration<br />
A configuration must name which components it is wiring with the components keyword. Any number<br />
of component names can follow components, and their order does not matter. The keyword remains plural<br />
(components, not component) even if only a single component name follows. A configuration can have<br />
multiple components statements. A configuration must name a component before it wires it. For example,<br />
both of these are valid:<br />
components MainC, LedsC;<br />
components PowerupToggleC;<br />
PowerupToggleC.Boot -> MainC.Boot;<br />
PowerupToggleC.Leds -> LedsC.Leds;<br />
components PowerupToggleC;<br />
components MainC;<br />
PowerupToggleC.Boot -> MainC.Boot;<br />
components LedsC;<br />
PowerupToggleC.Leds -> LedsC.Leds;<br />
Listing 3.18: Example uses of the components keyword<br />
Syntactically, configurations are very simple. They have three operators: ->, MainC.Boot;<br />
MainC.Boot
29 3.3. Component implementations<br />
Listing 3.19: The Get interface<br />
Modules declare variables much like standard C. For example, this component implements a Get interface<br />
which returns the number of times get has been called (i.e., acts like a counter):<br />
module CountingGetC {<br />
provides interface Get;<br />
}<br />
implementation {<br />
uint8_t count;<br />
}<br />
command uint8_t Get.get() {<br />
return count++;<br />
}<br />
Listing 3.20: A Self–Incrementing Counter<br />
Module variable declarations can have initializers, just like C:<br />
uint8_t count = 1;<br />
message_t packet;<br />
message_t* packetPtr = &packet;<br />
3.3.4 Generic Components<br />
By default, components in <strong>TinyOS</strong> are singletons: only one exists. Every configuration that names a<br />
singleton component names the same component. For example, if two configurations wire to LedsC, they are<br />
wiring to the same code that accesses the same variables. A singleton component introduces a component<br />
name that any configuration can use into the global namespace.<br />
In addition to singleton components, nesC has generic components. Unlike singletons, a generic component<br />
can have multiple instances. For example, while a low-level software abstraction of a hardware resource<br />
is inherently a singleton – there is only one copy of a hardware register – software data structures are<br />
instantiable. Being instantiable makes them reusable across many different parts of an application. For<br />
example, the module BitVectorC provides the abstraction of a bit vector; rather than define macros or<br />
functions to manipulate a bit vector a module can just use the interface BitVector and assume that a corresponding<br />
configuration connects it to a BitVectorC of the proper width.<br />
Earlier versions of nesC (1.0 and 1.1) did not support generic components. Whenever a component<br />
requires a common data structure, a programmer had to make a copy of the data structure component<br />
and give it a new name, or separate functionality and allocation by locally allocating data structures and<br />
using library routines. For example, network protocols typically all implemented their own queue data<br />
structures, rather than relying on a standard implementation. This code copying prevented code reuse,<br />
forcing programmers to continually revisit common bugs and problems, rather than building on well-tested<br />
libraries.<br />
Generic components have the keyword generic before their signature:<br />
generic module SineSensorC() { generic configuration TimerMilliC() {<br />
provides interface Init;<br />
provides interface Timer;<br />
provides interface Read; }
3.4. Split-phase interfaces 30<br />
}<br />
Listing 3.21: Generic module SineSensorC and generic configuration TimerMilliC<br />
To use a generic component, a configuration must instantiate it with the new keyword. This is the<br />
beginning of the code for the configuration BlinkAppC, the top-level configuration for the Blink application,<br />
which displays a 3-bit counter on a mote’s LEDs using three timers:<br />
configuration BlinkAppC {}<br />
implementation {<br />
components MainC, BlinkC, LedsC;<br />
components new TimerMilliC() as Timer0;<br />
components new TimerMilliC() as Timer1;<br />
components new TimerMilliC() as Timer2;<br />
/* Wirings below */<br />
}<br />
Listing 3.22: Instantiating a generic component<br />
Generic components can take parameters, hence the parentheses in component signatures (generic<br />
configuration TimerMilliC()) and instantiations (components new TimerMilliC() as Timer0;).<br />
These parameters can be values of simple types, constant strings, or types. For example, BitVectorC takes a<br />
16-bit integer denoting how many bits there are:<br />
generic module BitVectorC(uint16_t maxBits) {<br />
provides interface Init;<br />
provides interface BitVector;<br />
}<br />
Listing 3.23: Signature of BitVectorC<br />
The typedef keyword denotes a parameter to a generic component that is a type. The generic module<br />
QueueC is a queue with a fixed maximum length. QueueC takes two parameters: the type that the queue<br />
stores and the maximum length. By convention, we suffix all type arguments with t:<br />
generic module QueueC(typedef queue_t, uint8_t queueSize) {<br />
provides interface Queue;<br />
}<br />
Listing 3.24: QueueC signature<br />
Chapter 8 goes into the details of writing new generic components.<br />
3.4 Split-phase interfaces<br />
Because sensor nodes have a broad range of hardware capabilities, one of the goals of <strong>TinyOS</strong> is to have a<br />
flexible hardware/software boundary. An application that encrypts packets should be able to interchangeably<br />
use hardware or software implementations. Hardware, however, is almost always split-phase rather than<br />
blocking. In a split-phase operation the request that initiates an operation completes immediately. Actual<br />
completion of the operation is signaled by a separate callback. For example, to acquire a sensor reading<br />
with an analog-to-digital converter (ADC), software writes to a few configuration registers to start a sample.
31 3.4. Split-phase interfaces<br />
When the ADC sample completes, the hardware issues an interrupt, and the software reads the value out of<br />
a data register.<br />
Now, let’s say that rather than directly sampling, the sensor implementation actually samples periodically<br />
and when queried gives a cached value. This may be necessary if the sensor needs to continually calibrate<br />
itself. Magnetometer drivers sometimes do this due to the effect of the Earth’s magnetic field, as two<br />
sensors oriented differently might have very different magnetometer floors. Drivers estimate the floor and<br />
essentially return a measure of recent change, rather than an absolute value. From a querying standpoint,<br />
the implementation of the sensor is entirely in software. This fact should not be apparent to the caller. For<br />
ease of composition, sampling a self-calibrating magnetometer should be the same as a simple photoresistor.<br />
But the magnetometer is a synchronous operation (it can return the result immediately) while the ADC is<br />
split-phase.<br />
The basic solution to this problem is to make one of the two look like the other: either give the<br />
magnetometer a split-phase interface, or make the ADC synchronous by blocking until the sampling completes.<br />
If the ADC interrupt is very fast, the ADC driver might be able to get away with a simple spin loop to wait<br />
until it fires. If the interrupt is slow, then this wastes a lot of CPU cycles and energy. The traditional solution<br />
for this latter case (e.g., in traditional operating systems) is to use multiple threads. When the code requests<br />
an ADC sample, the OS sets up the request, puts the calling thread on a wait queue, starts the operation, and<br />
then schedules another thread to run. When the interrupt comes in, the driver resumes the waiting thread<br />
and puts it on the OS ready queue.<br />
The problem with threads in embedded systems is that they require a good deal of RAM. Each thread<br />
has its own private stack which has to be stored when a thread is waiting or idle. E.g., when a thread samples<br />
a blocking ADC and is put on the wait queue, the memory of its entire call stack has to remain untouched<br />
so that when it resumes it can continue execution. RAM is a very tight resource on current sensor node<br />
platforms. Early versions of <strong>TinyOS</strong> ran in 512 bytes of RAM. When a thread is idle, its stack is wasted<br />
storage, and allocating the right sized stack for all of the threads in the system can be a tricky business.<br />
Additionally, while it is easy to layer threads on top of a split-phase interface, it is very difficult to do<br />
the opposite. Because it’s a one-way street, while increasing amounts of RAM might allow threads at an<br />
application level, the bottom levels of <strong>TinyOS</strong>— the core operating system — can’t require them, as they<br />
preclude chips with leaner RAM resources than high-end microcontrollers.<br />
<strong>TinyOS</strong> therefore takes the opposite approach. Rather than make everything synchronous through<br />
threads, operations that are split-phase in hardware are split-phase in software as well. This means that<br />
many common operations, such as sampling sensors and sending packets, are split-phase. An important<br />
characteristic of split-phase interfaces is that they are bidirectional: there is a command to start the operation,<br />
and an event that signifies the operation is complete. As a result, <strong>TinyOS</strong> programs only need a single stack,<br />
saving RAM.<br />
3.4.1 Read<br />
The Read interface is the basic <strong>TinyOS</strong> interface for split-phase data acquisition. Most sensor drivers provide<br />
Read, which is generic:<br />
interface Read {<br />
command error_t read();<br />
event void readDone(error_t err, val_t val);<br />
}<br />
Listing 3.25: The Read interface
3.5. Module memory allocation, avoiding recursion, and other details 32<br />
For example, a sensor driver that generates a 16-bit value provides Read. If the provider of<br />
Read returns SUCCESS to a call to read, then it will signal readDone in the future, passing the Read’s result<br />
back as the val parameter to the event handler.<br />
3.4.2 Send<br />
The basic <strong>TinyOS</strong> packet transmission interface, Send, is also a split-phase operation. However, it is slightly<br />
more complex, as it requires passing a pointer for a packet to transmit:<br />
interface Send {<br />
command error_t send(message_t* msg, uint8_t len);<br />
event void sendDone(message_t* msg, error_t error);<br />
}<br />
command error_t cancel(message_t* msg);<br />
command void* getPayload(message_t* msg);<br />
command uint8_t maxPayloadLength(message_t* msg);<br />
Listing 3.26: The split–phase Send interface<br />
A provider of Send defines the send and cancel functions and can signal the sendDone event. Conversely,<br />
a user of Send needs to define the sendDone event and can call the send and cancel commands. When a call<br />
to send returns SUCCESS, the msg parameter has been passed to the provider, which will try to send the<br />
packet. When the send completes, the provider signals sendDone, passing the pointer back to the user. This<br />
pointer passing approach is common in split-phase interfaces that need to pass larger data items. The next<br />
section discusses memory management in greater detail.<br />
3.5 Module memory allocation, avoiding recursion, and other details<br />
Besides power, the most valuable resource to mote systems is RAM. Power means that the radio and CPU<br />
have to be off almost all the time. Of course, there are situations which need a lot of CPU or a lot of<br />
bandwidth (e.g., cryptography or binary dissemination), but by necessity they have to be rare occurrences.<br />
In contrast, the entire point of RAM is that it’s always there. The sleep current of the microcontrollers most<br />
motes use today is, for the most part, determined by RAM.<br />
Modules allocate memory by declaring variables which, following nesC’s scoping rules, are completely<br />
private to the component. For example, the CountingGetC component (Listing 3.20, page 29) allocated<br />
count as an 8-bit module-level variable, for a cost of 1 byte of RAM. Because <strong>TinyOS</strong> uses split-phase<br />
operations and does not provide threads, there is no long-lived stack-allocated data. As a result, when a<br />
<strong>TinyOS</strong> system is quiescent, these module variables represent the entire software state of the system.<br />
Generally, nesC does not encourage dynamic memory allocation through malloc or other C library calls.<br />
You can call them, but the lack of memory protection on most embedded microcontrollers makes their use<br />
particularly risky. Figure 3.5 shows a typical memory layout on a microcontroller. The stack grows down<br />
and the heap grows up, and since there is no hardware memory protection the two can collide, at which point<br />
chaos is guaranteed.<br />
Instead, you should allocate memory as module variables. For example, if a module needs a buffer with<br />
which to hold sensor readings, it should allocate the buffer statically. In other cases, it is convenient to<br />
create reusable abstract data types by packaging up some state and operations in a generic component, as<br />
in BitVectorC (Listing 3.23, page 30) . Finally, components sometimes need to share a memory pool. A<br />
common example of this is a set of components that share a pool of packet buffers. A shared pool allows
33 3.5. Module memory allocation, avoiding recursion, and other details<br />
data heap stack<br />
0x0<br />
MAX<br />
Figure 3.5: Typical memory layout on a microcontroller. Because there is no memory protection, the stack<br />
can easily overflow onto the heap or data.<br />
multiple cooperating components to amortize their requirements, especially if it is unlikely all of them will<br />
need a lot of memory at the same time. By avoiding all use of the heap, the only cause of run-time memory<br />
failure is the stack.<br />
To avoid stack overflow, <strong>TinyOS</strong> programs should avoid recursion and not declare any large local<br />
variables (e.g. arrays). Avoiding recursion within a single module is easy, but in a component-based<br />
language like nesC it’s very easy to unintentionally create a recursive loop across component boundaries.<br />
For instance, let’s assume component A uses the Read interface to repeatedly sample a sensor provided<br />
by component B, i.e. the readDone event handler in A calls B’s read command. If B happens to be a<br />
simple sensor, it might choose to signal the readDone event directly within the implementation of the read<br />
command. However, this program now contains an unintended recursive loop: A calls B’s read command<br />
which signals A’s readDone event which calls B’s read command which . . .<br />
To avoid such recursive loops, <strong>TinyOS</strong> follows a couple of coding conventions. First, split-phase<br />
commands must never directly signal their callback — see Chapter 5.3.2 for more details. Second, the<br />
relation between most <strong>TinyOS</strong> components is hierarchical: application components use interfaces provided<br />
by system services, which themselves use interfaces provided by lower-level services, and so on down to<br />
the raw hardware — this structure is discussed in depth in Chapter 12.<br />
Finally, it’s worth noting that the stack may overflow because of extra stack usage caused by an interrupt<br />
handler (Chapter 5) interrupting your regular computation (or, even worse, another interrupt handler which<br />
is already using some of the stack space). You should always leave enough RAM free to handle the worst<br />
case usage of your regular compuation and all interrupt handlers that can execute simultaneously.<br />
<strong>Programming</strong> Hint 2: NEVER WRITE RECURSIVE FUNCTIONS WITHIN A MODULE. IN<br />
COMBINATION WITH THE TINYOS CODING CONVENTIONS, THIS GUARANTEES THAT<br />
ALL PROGRAMS HAVE BOUNDED STACK USAGE.<br />
<strong>Programming</strong> Hint 3: NEVER USE MALLOC AND FREE.<br />
COMPONENTS.<br />
ALLOCATE ALL STATE IN<br />
IF YOUR APPLICATION REQUIREMENTS NECESSITATE A DYNAMIC<br />
MEMORY POOL, ENCAPSULATE IT IN A COMPONENT AND TRY TO LIMIT THE SET OF<br />
USERS.<br />
3.5.1 Memory ownership and split-phase calls<br />
<strong>TinyOS</strong> programs contain many concurrent activities, e.g., even in a very simple program, radio message<br />
transmission, sensor sampling and application logic. Ensuring that these activities do not step on each other<br />
by accessing each other’s data out of turn is often a complex problem.<br />
The only way that components can interact is through function calls, which are normally part of interfaces.<br />
Just as in C, there are two basic ways that components can pass parameters: by value and by reference
3.5. Module memory allocation, avoiding recursion, and other details 34<br />
(pointer). In the first case, the data is copied onto the stack, so the callee can modify it or cache it freely. In<br />
the second case, the caller and callee share a pointer to the data, and so the two components need to carefully<br />
manage access to the data in order to prevent memory corruption.<br />
The simplest solution to preventing data-sharing problems is to never store pointer parameters in module<br />
variables. This is the approach used by some abstract data type components (see Chapter 10); it ensures that<br />
any data-sharing is transitory, restricted to the duration of the command or event with the pointer parameter.<br />
However, this approach is not practical for split-phase calls. Because the called component typically<br />
needs access to the pointer while the operation is executing, it has to store it in a module variable. For<br />
example, consider the basic Send interface:<br />
interface Send {<br />
command error_t send(message_t* msg, uint8_t len);<br />
event void sendDone(message_t* msg, error_t error);<br />
}<br />
command error_t cancel(message_t* msg);<br />
command void* getPayload(message_t* msg);<br />
command uint8_t maxPayloadLength(message_t* msg);<br />
Listing 3.27: The Send interface<br />
The important pair of functions in this example is send/sendDone. To send a packet, a component calls<br />
send. If send returns SUCCESS, then the caller has passed the packet to a communication stack to use, and<br />
must not modify the packet. The callee stores the pointer in a variable, enacts a state change, and returns<br />
immediately. If the interface user modifies the packet after passing it to the interface provider, the packet<br />
could be corrupted. For example, the radio stack might compute a checksum over the entire packet, then<br />
start sending it out. If the caller modifies the packet after the checksum has been calculated, then the data<br />
and checksum won’t match up and a receiver will reject the packet.<br />
To avoid these kinds of problems, <strong>TinyOS</strong> follows an ownership discipline: at any point in time, every<br />
“memory object” — a piece of memory, typically a whole variable or a single array element — should be<br />
owned by a single module. A command like send is said to pass ownership of its msg argument from caller<br />
to callee. When a split-phase interface has this kind of “pass” semantics, the completion event should have<br />
the passed pointer as one of its parameters, to show that the object is being returned to its original owner.<br />
<strong>Programming</strong> Hint 4: WHEN POSSIBLE, AVOID PASSING POINTERS ACROSS<br />
INTERFACES; WHEN THIS CANNOT BE AVOIDED ONLY ONE COMPONENT SHOULD BE<br />
ABLE TO MODIFY A POINTER’S DATA AT ANY TIME.<br />
One of the trickiest examples of this pass approach is the Receive interface. At first glance, the interface<br />
seems very simple:<br />
interface Receive {<br />
event message_t* receive(message_t* msg, void* payload, uint8_t len);<br />
}<br />
Listing 3.28: The Receive interface<br />
The receive event is rather different than most events: it has a message t* as both a parameter and a<br />
return value. When the communication layer receives a packet, it passes that packet to the higher layer<br />
as a parameter. However, it also expects the higher layer to return it a message t* back. The basic idea<br />
behind this is simple: if the communication layer doesn’t have a message t*, it can’t receive packets, as it
35 3.5. Module memory allocation, avoiding recursion, and other details<br />
has nowhere to put them. Therefore, the higher layer always has to return a message t*, which is the next<br />
buffer the radio stack will use to receive into. This return value can be the same as the parameter, but it does<br />
not have to be. For example, this is perfectly reasonable, if a bit feature-free, code:<br />
event message_t* Receive.receive(message_t* msg, void* payload, uint8_t len) {<br />
return msg;<br />
}<br />
A receive handler can always copy needed data out of the packet and just return the passed buffer. There<br />
are, however, situations when this is undesirable. One common example is a routing queue. If the node<br />
has to forward the packet it just received, then copying it into another buffer is wasteful. Instead, a queue<br />
allocates a bunch of packets, and in addition to a send queue, keeps a free list. When the routing layer<br />
receives a packet to forward, it sees if there are any packets left in the free list. If so, it puts the received<br />
packet into the send queue and returns a packet from the free list, giving the radio stack a buffer to receive<br />
the next packet into. If there are no packets left in the free list, then the queue can’t accept the packet and so<br />
just returns it back to the radio for re-use. The pseudocode looks something like this:<br />
receive (m):<br />
if I’m not the next hop, return m // Not for me<br />
if my free list is empty, return m // No space<br />
else<br />
put m on forwarding queue<br />
return entry from free list<br />
One of the most common mistakes early <strong>TinyOS</strong> programmers encounter is misusing the Receive<br />
interface. For example, imagine a protocol that does this:<br />
event message_t* LowerReceive.receive(message_t* m, void* payload, uint8_t len) {<br />
processPacket(m);<br />
if (amDestimation(m)) {<br />
signal UpperReceive.receive(m, payload, len);<br />
}<br />
return m;<br />
}<br />
The problem with this code is that it ignores the return value from the signal to UpperReceive.receive.<br />
If the component that handles this event performs a buffer swap — e.g., it has a forwarding queue — then<br />
the packet it returns is lost. Furthermore, the packet that it has put on the queue has also been returned to the<br />
radio for the next packet reception. This means that, when the packet reaches the end of the queue, the node<br />
may send something completely different than what it decided to forward (e.g., a packet for a completely<br />
different protocol).<br />
The buffer swap approach of the Receive interface provides isolation between different communication<br />
components. Imagine, for example, a more traditional approach, where the radio dynamically allocates a<br />
packet buffer when it needs one. It allocates buffers and passes them to components on packet reception.<br />
What happens if a component holds on to its buffers for a very long time? Ultimately, the radio stack will<br />
run out of memory to allocate from, and will cease being able to receive packets at all. By pushing the<br />
allocation policy up into the communication components, protocols that have no free memory left are forced<br />
to drop packets, while other protocols continue unaffected.<br />
This approach speaks more generally of how nesC components generally handle memory allocation. All<br />
state is allocated in one of two places: components, or the stack. A shared dynamic memory pool across<br />
components makes it much easier for one bad component to cause others to fail. That is not to say that<br />
dynamic allocation is never used. For example, the PoolC component provides a memory pool of a fixed<br />
number of a single type. Different components can share a pool, dynamically allocating and deallocating as
3.5. Module memory allocation, avoiding recursion, and other details 36<br />
needed:<br />
generic configuration PoolC(typedef pool_t, uint8_t POOL_SIZE) {<br />
provides interface Pool;<br />
}<br />
Listing 3.29: The signature of PoolC<br />
Bugs or resource exhaustion in components using a particular pool do not affect components using a<br />
different, or no, pool.<br />
3.5.2 Constants and saving memory<br />
Modules often need constants of one kind or another, such as a retransmit count or a threshold. Using a<br />
literal constant is problematic, as you’d like to be able to reuse a consistent value. This means that in C-like<br />
languages, you generally use something like this:<br />
const int MAX_RETRANSMIT = 5;<br />
if (txCount < MAX_RETRANSMIT) {<br />
...<br />
}<br />
The problem with doing this in nesC/<strong>TinyOS</strong> is that a const int might allocate RAM, depending on the<br />
compiler (good compilers will place it in program memory). You can get the exact same effect by defining<br />
an enum:<br />
enum {<br />
MAX_RETRANSMIT = 5<br />
};<br />
This allows the component to use a name to maintain a consistent value and does not store the value<br />
either in RAM or program memory. This can even improve performance, as rather than a memory load, the<br />
architecture can just load a constant. It’s also better than a #define, as it exists in the debugging symbol table<br />
and application metadata. However, enum can only declare integer constants, so you should still use #define<br />
for floating-point and string constants (but see Chapter 3.5.5 for a discussion of some of #define’s pitfalls).<br />
Note, however, that using enum types in variable declarations can waste memory, as enums default to<br />
integer width. For example, imagine this enum:<br />
typedef enum {<br />
STATE_OFF = 0,<br />
STATE_STARTING = 1,<br />
STATE_ON = 2,<br />
STATE_STOPPING = 3<br />
} state_t;<br />
Here are two different ways you might allocate the state variable in question:<br />
state_t state; // platform int size (e.g., 2-4 bytes)<br />
uint8_t state; // one byte<br />
Even though the valid range of values is 0-3, the former will allocate a native integer, which on a<br />
microcontroller is usually 2 bytes, but could be 4 bytes on low power microprocessors. The second will<br />
allocate a single byte. So you should use enums to declare constants, but avoid declaring variables of an<br />
enum type.
37 3.5. Module memory allocation, avoiding recursion, and other details<br />
<strong>Programming</strong> Hint 5: CONSERVE MEMORY BY USING ENUMS RATHER THAN CONST<br />
VARIABLES FOR INTEGER CONSTANTS, AND DON’T DECLARE VARIABLES WITH AN<br />
ENUM TYPE.<br />
3.5.3 Platform Independent Types<br />
To simplify networking code, <strong>TinyOS</strong> has traditionally used structs to define message formats and directly<br />
access messages — this avoids the programming complexity and overheads of using marshalling and unmarshalling<br />
functions to convert between host and network message representations. For example, the standard header<br />
of a packet for the CC2420 802.15.4 wireless radio chip 2 looks something like this:<br />
typedef struct cc2420_header_t {<br />
uint8_t length;<br />
uint16_t fcf;<br />
uint8_t dsn;<br />
uint16_t destpan;<br />
uint16_t dest;<br />
uint16_t src;<br />
uint8_t type;<br />
} cc2420_header_t;<br />
Listing 3.30: CC2420 packet header<br />
That is, it has a one byte length field, a two-byte frame control field, a one byte sequence number, a two<br />
byte group, a two byte destination, a two byte source, and one byte type fields. Defining this as a structure<br />
allows you to easily access the fields, allocate storage, etc. The problem, though, is that the layout and<br />
encoding of this structure depends on the chip you’re compiling for. For example, the CC2420 expects all of<br />
these fields to be little-endian. If your microcontroller is big-endian, then you won’t be able to easily access<br />
the bits of the frame control field. One commonly used solution to this problem is to explicitly call macros<br />
that convert between the microcontroller and the chip’s byte order, e.g. macros like Unix’s htons, ntohl, etc.<br />
However, this approach is error-prone, especially when code is initially developed on a processor with the<br />
same byte order as the chip.<br />
Another problem with this approach is due to differing alignment rules between processors. On an<br />
ATmega128, the structure fields will be aligned on one-byte boundaries, so the layout will work fine. On an<br />
MSP430, however, two-byte values have to be aligned on two-byte boundaries: you can’t load an unaligned<br />
word. So the MSP430 compiler will introduce a byte of padding after the length field, making the structure<br />
incompatible with the CC2420 and other platforms. There are a couple of other issues that arise, but the<br />
eventual point is the same: <strong>TinyOS</strong> programs need to be able to specify platform-independent data formats<br />
that can be easily accessed and used.<br />
In <strong>TinyOS</strong> 1.x, some programs attempted to solve this problem by using gcc’s packed attribute to<br />
make data structures platform independent. Packed tells gcc to ignore normal platform struct alignment<br />
requirements and instead pack a structure tightly:<br />
typedef struct RPEstEntry {<br />
uint16_t id;<br />
uint8_t receiveEst;<br />
} __attribute__ ((packed)) RPEstEntry;<br />
2 Standard in that IEEE 802.15.4 has several options, such as 0-byte, 2-byte, or 8-byte addressing, and so this is just the format<br />
<strong>TinyOS</strong> uses by default.
3.5. Module memory allocation, avoiding recursion, and other details 38<br />
Listing 3.31: The dreaded “packed” attribute in the 1.x MintRoute library<br />
Packed allowed code running on an ATmega128 and on an x86 to agree on data formats. However,<br />
packed has several problems. The version of gcc for the MSP430 family (used in Telos motes) doesn’t<br />
handle packed structures correctly. Furthermore, packed is a gcc-specific feature, so code that uses it is not<br />
very portable. And finally, while packed eliminates alignment differences, it does not change endianness:<br />
int16 t maybe be big-endian on one platform and little-endian on another, so you would still have to use<br />
conversion macros like htons.<br />
<strong>Programming</strong> Hint 6: NEVER, EVER USE THE “PACKED” ATTRIBUTE IN PORTABLE<br />
CODE.<br />
To keep the convenience of specifying packet layouts using C types while keeping code portable,<br />
nesC 1.2 introduced platform independent types. Simple platform independent types (integers) are either<br />
big-endian or little-endian, independently of the underlying chip hardware. Generally, an external type is<br />
the same as a normal type except that it has nx or nxle preceding it:<br />
nx_uint16_t val; // A big-endian 16-bit value<br />
nxle_uint32_t otherVal; // A little-endian 32-bit value<br />
In addition to simple types, there are also platform independent structs and unions, declared with<br />
nx struct and nx union. Every field of a platform independent struct or union must be a platform independent<br />
type. Non-bitfields are aligned on byte boundaries (bitfields are packed together on bit boundaries, as usual).<br />
For example, this is how <strong>TinyOS</strong> 2.0 declares the CC2420 header:<br />
typedef nx_struct cc2420_header_t {<br />
nxle_uint8_t length;<br />
nxle_uint16_t fcf;<br />
nxle_uint8_t dsn;<br />
nxle_uint16_t destpan;<br />
nxle_uint16_t dest;<br />
nxle_uint16_t src;<br />
nxle_uint8_t type;<br />
} cc2420_header_t;<br />
Listing 3.32: The CC2420 header<br />
Any hardware architecture that compiles this structure uses the same memory layout and the same<br />
endianness for all of the fields. This enables platform code to pack and unpack structures, without resorting<br />
to macros or utility functions such as UNIX socket htonl and ntohs.<br />
<strong>Programming</strong> Hint 7: USE PLATFORM INDEPENDENT TYPES WHEN DEFINING<br />
MESSAGE STRUCTURES.<br />
Under the covers, nesC translates network types into byte arrays, which it packs and unpacks on each<br />
access. For most nesC codes, this has a negligible runtime cost. For example, this code<br />
nx_uint16_t x = 5;<br />
uint16_t y = x;<br />
rearranges the bytes of x into a native chip layout for y, taking a few cycles. This means that if you need to<br />
perform significant computation on arrays of multibyte values (e.g., encryption), then you should copy them<br />
to a native format before doing so, then move them back to a platform independent format when done. A
39 3.5. Module memory allocation, avoiding recursion, and other details<br />
single access costs a few cycles, but thousands of accesses costs a few thousand cycles.<br />
<strong>Programming</strong> Hint 8: IF YOU HAVE TO PERFORM SIGNIFICANT COMPUTATION ON A<br />
PLATFORM INDEPENDENT TYPE OR ACCESS IT MANY (HUNDREDS OR MORE) TIMES,<br />
TEMPORARILY COPY IT TO A NATIVE TYPE.<br />
3.5.4 Global names<br />
Components encapsulate functions and state, and wiring connects functions defined in different components.<br />
However, nesC programs also need globally available types for common abstractions, such as error t (<strong>TinyOS</strong>’s<br />
error code abstraction) or message t (networking buffers). Furthermore, nesC programs sometimes call<br />
existing C library functions, either from the standard C library (e.g., mathematical functions like sin) or<br />
functions from a personal library of existing C code (see Chapter 3.5.6).<br />
In keeping with C, nesC uses .h header files and #include for this purpose. This has the added<br />
advantage that existing C header files can be directly reused. For instance, <strong>TinyOS</strong>’s error t type and error<br />
constants are defined in the TinyError.h file:<br />
#ifndef TINY_ERROR_H_INCLUDED<br />
#define TINY_ERROR_H_INCLUDED<br />
enum {<br />
SUCCESS = 0,<br />
FAIL = 1, // Generic condition: backwards compatible<br />
ESIZE = 2, // Parameter passed in was too big.<br />
ECANCEL = 3, // Operation cancelled by a call.<br />
EOFF = 4, // Subsystem is not active<br />
EBUSY = 5, // The underlying system is busy; retry later<br />
EINVAL = 6, // An invalid parameter was passed<br />
ERETRY = 7, // A rare and transient failure: can retry<br />
ERESERVE = 8, // Reservation required before usage<br />
EALREADY = 9, // The device state you are requesting is already set<br />
};<br />
typedef uint8_t error_t;<br />
#endif<br />
Listing 3.33: TinyError.h, a typical nesC header file<br />
Like a typical C header file, TinyError.h uses #ifndef/#define to avoid redeclaring the error constants<br />
and error t when the file is included multiple times. Including a header file in a component is straightforward:<br />
#include "TinyError.h"<br />
module BehaviorC { ... }<br />
implementation<br />
{<br />
error_t ok = FAIL;<br />
}<br />
Listing 3.34: Including a header file in a component<br />
Just as in C, #include just performs textual file inclusion. As a result it is important to use #include in<br />
the right place, i.e., before the interface, module or configuration keyword. If you don’t, you won’t get the
3.5. Module memory allocation, avoiding recursion, and other details 40<br />
behavior you expect. Similarly, in C, using #include in the middle of a function is not likely<br />
to work. . .<br />
Unlike C where each file is compiled separately, constants, types and functions included in one component<br />
or interface are visible in subsequently compiled components or interfaces. For instance, TinyError.h is<br />
included by interface Init, so the following module can use error t, SUCCESS, etc:<br />
module BadBehaviorC {<br />
provides interface Init;<br />
}<br />
implementation<br />
{<br />
command error_t Init.init() {<br />
return FAIL; // We’re bad, we always fail.<br />
}<br />
}<br />
Listing 3.35: Indirectly including a header file<br />
<strong>Programming</strong> Hint 9: INTERFACES SHOULD #INCLUDE THE HEADER FILES FOR THE<br />
TYPES THEY USE.<br />
Header files written for nesC occasionally include C function definitions, not just declarations. This<br />
is practical because the header file ends up being included exactly once in the whole program, unlike in<br />
C where it is included once per file (leading to multiple definitions of the same function). These uses are<br />
however rare, as they go against the goal of encapsulating all functionality within components.<br />
3.5.5 nesC and the C preprocessor<br />
Preprocessor symbols #defined before a nesC’s file module, configuration or interface keyword are available<br />
in subsequently loaded files, while those #defined later are “forgotten” at the end of the file:<br />
// Available in all subsequently loaded files<br />
#define GLOBAL_NAME "fancy"<br />
interface Fancy {<br />
// Forgotten at the end of this file<br />
#define LOCAL_NAME "soon_forgotten"<br />
command void fancyCommand();<br />
}<br />
Listing 3.36: Fancy.nc: C preprocessor example<br />
However, relying directly on this behavior is tricky, because the preprocessor is run (by definition) before<br />
a file is processed. Consider a module that uses the Fancy interface:<br />
module FancyModule {<br />
uses interface Fancy;<br />
}<br />
implementation {<br />
char *name = GLOBAL_NAME;<br />
}
41 3.5. Module memory allocation, avoiding recursion, and other details<br />
Listing 3.37: FancyModule.nc: C preprocessor pitfalls<br />
Compiling FancyModule will report that GLOBAL NAME is an unknown symbol. Why? The problem<br />
is that the first step in compiling FancyModule.nc is to preprocess it. At that point, the Fancy interface<br />
hasn’t been seen yet, therefore it hasn’t been loaded and the GLOBAL NAME #define is unknown. Later on,<br />
when FancyModule is analyzed, the Fancy interface is seen, the Fancy.nc file is loaded and GLOBAL NAME<br />
gets #defined. But this is too late to use it in FancyModule.nc.<br />
There are two lessons to be drawn from this: first, as we’ve already seen, it’s best to use enum<br />
rather than #define to define constants when possible. Second, if you must use #define, use it as you<br />
would in C: place your definitions in a header file protected with #ifndef/#define, and #include this header<br />
file in all components and interfaces that use the #define symbol. For instance, both Fancy.nc and<br />
FancyModule.nc should<br />
#include "Fancy.h"<br />
where Fancy.h contains:<br />
#ifndef FANCY_H<br />
#define GLOBAL_NAME "fancy"<br />
#endif<br />
Listing 3.38: Fancy.h: the reliable way to use C preprocessor symbols<br />
<strong>Programming</strong> Hint 10: ALWAYS #DEFINE A PREPROCESSOR SYMBOL IN A HEADER<br />
FILE. USE #INCLUDE TO LOAD THE HEADER FILE IN ALL COMPONENTS AND<br />
INTERFACES THAT USE THE SYMBOL.<br />
3.5.6 C Libraries<br />
Accessing a C library is easy. The implementation of the generic SineSensorC component uses the C<br />
library’s sin function, which is defined in the math.h header file:<br />
#include <br />
generic module SineSensorC() {<br />
provides interface Init;<br />
provides interface Read;<br />
}<br />
implementation {<br />
uint32_t counter;<br />
}<br />
void performRead() {<br />
float val = sin(counter++ / 20.0);<br />
signal Read.readDone(SUCCESS, val * 32768.0 + 32768.0);<br />
}<br />
...<br />
Listing 3.39: Using a C library function<br />
As with C, if you use a library, you also need to link with it. In this case, nesC programs using<br />
SineSensorC need to link with the math library by passing the -lm option to ncc, the nesC compiler driver.
3.6. Exercises 42<br />
3.6 Exercises<br />
1. The Send interface has a command send and an event sendDone. Should you be able to call send<br />
in the sendDone handler or should you have to wait until after the handler returns? Why? Write<br />
pseudocode for the provider of both versions, and write pseudocode for a user of each version that<br />
wants to send packets as quickly as possible.<br />
2. Extend the Blink application so it displays the bottom bits of a random number rather than a counter.<br />
Generate the random number from one of the random number generators in the <strong>TinyOS</strong> component<br />
libraries (RandomMlcgC or RandomLfsrC).<br />
3. Write an application that increments a 32-bit counter in an infinite loop. Every N increments, the<br />
application toggles LED 0. Choose an N so you can observe the toggling visually. Try making the<br />
counter a platform independent type. Does the toggling slow down? How much? Try a 16-bit value.<br />
4. Write a PingPong application that runs on two nodes. When a node boots, it sends a broadcast packet<br />
using the AMSend interface. When it receives a packet, it sends a packet. Toggle an LED whenever<br />
a node sends a packet. How long does it take for the LED to stop toggling? Try different distances.<br />
If it’s too fast to see, start a timer when the node receives a packet, and send a reply when the timer<br />
fires. You’ll want to use the AMSenderC and AMReceiverC components.
Configurations and wiring<br />
The previous chapter dealt predominantly with modules, which are the basic building blocks of a nesC<br />
program. Configurations are the second type of nesC component. They assemble components into larger<br />
abstractions.<br />
In a nesC program, there are usually more configurations than modules. Except for low-level hardware<br />
abstractions, any given component is built on top of other components, which are encapsulated in configurations.<br />
For example, Figure 4.1 shows a routing stack (CollectionC) which depends on a single-hop packet layer<br />
(ActiveMessageC), which is itself a configuration. This single-hop configuration wires the actual protocol<br />
implementation module (e.g., setting header fields) to a raw packet layer on top of the radio (Link Layer).<br />
This raw packet layer is a configuration that wires the module which sends bytes out to the bus over which<br />
it sends bytes. The bus, in turn, is a configuration. These layers of encapsulation generally reach very low<br />
in the system.<br />
Encapsulating an abstraction in a configuration means that it can be ready-to-use: all we need to do is<br />
wire to its provided interfaces. In contrast, if it were a module that uses and provides interfaces, then we’d<br />
need to wire up dependencies and requirements as well. For example, a radio stack can use a wide range of<br />
resources, including buses, timers, random number generators, cryptographic support, and hardware pins.<br />
This is the signature of just one module of the CC1000 (a wireless radio chip from TI used in the mica2<br />
family motes) radio stack:<br />
module CC1000CsmaP {<br />
provides {<br />
interface Init;<br />
interface SplitControl;<br />
interface CsmaControl;<br />
interface CsmaBackoff;<br />
interface LowPowerListening;<br />
}<br />
uses {<br />
interface Init as ByteRadioInit;<br />
interface StdControl as ByteRadioControl;<br />
interface ByteRadio;<br />
interface CC1000Control;<br />
interface CC1000Squelch;<br />
interface Random;<br />
interface Timer as WakeupTimer;<br />
interface BusyWait;<br />
interface ReadNow as RssiNoiseFloor;<br />
interface ReadNow as RssiCheckChannel;<br />
interface ReadNow as RssiPulseCheck;<br />
}<br />
Listing 4.1: Signature of part of the CC1000 radio stack<br />
43
4.1. Configurations 44<br />
CollectionC<br />
RootControl Send Receive Snoop Packet<br />
CtpP<br />
LinkEstimatorP<br />
CtpForwardingEngineP<br />
CtpRoutingEngineP<br />
TimerMilliC<br />
AMSend<br />
RandomC<br />
TimerMilliC<br />
AMSenderC<br />
ActiveMessageC<br />
Link Layer<br />
Figure 4.1: Some of the configurations in the CTP routing stack.<br />
Rather than expecting a programmer to connect the stack up to all of these things, the entire stack can be<br />
encapsulated in a single component (CC1000ActiveMessageC). This component connects all of the radio’s<br />
subcomponents so their dependencies are needs are met.<br />
Configurations also need to export interfaces. This kind of wiring, rather than connect a provider and a<br />
user, maps one name to another. Interface exports allow configurations to manage the namespace in a nesC<br />
program and act like modules in terms of providing or using interfaces. Managing the nesC namespace, and<br />
correspondingly, interface exports, is one of the most challenging aspects of nesC programming, and so this<br />
chapter goes over it in detail with many examples.<br />
4.1 Configurations<br />
Chapter 3 gave a brief introduction to configurations, showing examples of top-level configurations. Because<br />
top-level configurations wire components together into a completed application, they neither provide nor use<br />
interfaces. This lack of entries in the component signature is uncommon: most configurations are systems<br />
or abstractions that other components can use.<br />
Let’s revisit the syntax of a configuration. The first block of a configuration is its signature, which<br />
states that interfaces that the component uses or provides. The second block of a configuration is its<br />
implementation, which names components and wires them together. The implementation block of a configuration<br />
names the components it is wiring with the components keyword. Any number of component names<br />
besides zero can follow components, and their order does not matter. A configuration can have multiple<br />
components statements.<br />
A configuration wires component interfaces using the three wiring operators: ->, and
45 4.1. Configurations<br />
4.1.1 The -> and operators connect providers and users, binding callers and callees. Let’s return to the PowerupToggle<br />
application and step through how its wiring works. The module PowerupToggleC (Listing 3.16, page 27)<br />
uses the Leds interface. The configuration PowerupToggleAppC wires PowerupToggleC.Leds to LedsC.Leds:<br />
configuration PowerupToggleAppC {}<br />
implementation {<br />
components MainC, LedsC, PowerupToggleC;<br />
}<br />
PowerupToggleC.Boot -> MainC.Boot;<br />
PowerupToggleC.Leds -> LedsC.Leds;<br />
Listing 4.2: The PowerupToggleAppC configuration revisited<br />
In turn, LedsC maps LedsC.Leds to LedsP.Leds (see Chapter 4.1.2). The nesC wiring statements in<br />
PowerupToggleAppC and LedsC connect the Leds.led0Toggle (a name local to PowerupToggleC) command<br />
used in PowerupToggleC to LedsP’s identically-named Leds.led0Toggle command implementation. When<br />
PowerupToggleC calls its Leds.led0Toggle command, it actually calls LedsP’s Leds.led0Toggle command<br />
implementation. The same is true for other calls of the Leds interface, such as Leds.led1On. The PowerupToggleAppC<br />
and LedsC configurations provide a mapping between the local namespaces of the PowerupToggleC and<br />
LedsP modules. The C code generated (as an intermediate step) by the nesC compiler looks something like<br />
this:<br />
void LedsP__Leds__led0Toggle() { ... }<br />
void PowerupToggleC__Leds__led0Toggle() {<br />
LedsP__Leds__led0Toggle();<br />
}<br />
...<br />
void PowerupToggleC__Boot__booted() {<br />
while(1) {<br />
call PowerupToggleC__Leds__led0Toggle();<br />
call PowerupToggleC__Leds__led1Toggle();<br />
call PowerupToggleC__Leds__led2Toggle();<br />
}<br />
}<br />
Listing 4.3: C code generated from the PowerupToggleAppC configuration<br />
All of these levels of indirection could add significant overhead. Toggling an LED takes two function<br />
calls. In practice, however, the nesC compiler toolchain cuts out all of this overhead through extensive<br />
inlining. All of those function calls collapse and the LED toggling logic is embedded in the while loop.<br />
4.1.2 The = operator<br />
The -> and or
4.1. Configurations 46<br />
From the perspective of someone using a component, it shouldn’t be relevant whether the component is<br />
a module or a configuration. Just like modules, configurations can provide and use interfaces. But as they<br />
have no code, these interfaces must be defined in terms of other components. The only way a configuration<br />
can provide or use an interface is to do so by proxy: it renames another component’s implementation as its<br />
own. Configurations achieve this with the wiring operator, =. The = operator connects the interfaces in a<br />
configuration’s signature to interfaces in components named in its components statements.<br />
For example, this is the implementation of the configuration LedsC, which provides the Leds interface<br />
by exporting the interface provided by LedsP:<br />
configuration LedsC {<br />
provides interface Leds;<br />
}<br />
implementation {<br />
components LedsP, PlatformLedsC;<br />
Leds = LedsP.Leds;<br />
}<br />
LedsP.Init PlatformLedsC.Led0;<br />
LedsP.Led1 -> PlatformLedsC.Led1;<br />
LedsP.Led2 -> PlatformLedsC.Led2;<br />
Listing 4.4: The LedsC configuration<br />
LedsC is a simple example of a configuration that connects a few small building blocks into a larger,<br />
more useful abstraction. LedsP is a simple module whose code implements the Leds interface commands<br />
by manipulating underlying digital IO lines accessed by the GeneralIO interface. PlatformLedsC provides<br />
three such IO lines, and uses an Init interface which is wired to LedsP.Init to initialize LedsP at system boot<br />
time.<br />
From a programming standpoint, the configuration operators have two very different purposes. The -><br />
and
47 4.1. Configurations<br />
components MainC;<br />
is just shorthand for<br />
components MainC as MainC;<br />
Another example of using as to clarify a configuration is found in CC2420ReceiveC, the receive path of<br />
the CC2420 radio. This configuration wires packet logic to things like interrupts and status pins:<br />
configuration CC2420ReceiveC {...}<br />
implementation {<br />
components CC2420ReceiveP;<br />
components new CC2420SpiC() as Spi;<br />
}<br />
components HplCC2420PinsC as Pins;<br />
components HplCC2420InterruptsC as InterruptsC;<br />
// rest of the implementation elided<br />
Listing 4.5: CC2420ReceiveC’s use of the as keyword<br />
This example shows a common use of as: to name the result of instantiating a generic component<br />
(CC2420SpiC). In fact, the use of as is required if the same generic component is instantiated twice in the<br />
same configuration, as in the BlinkAppC example we saw earlier:<br />
configuration BlinkAppC {}<br />
implementation {<br />
components MainC, BlinkC, LedsC;<br />
components new TimerMilliC() as Timer0;<br />
components new TimerMilliC() as Timer1;<br />
components new TimerMilliC() as Timer2;<br />
}<br />
BlinkC.Timer0 -> Timer0.Timer;<br />
BlinkC.Timer1 -> Timer1.Timer;<br />
BlinkC.Timer2 -> Timer2.Timer;<br />
...<br />
Listing 4.6: Naming generic component instances<br />
Without as, there would be no way to distinguish the three timers.<br />
The as keyword makes configurations more readable and comprehensible. Because there is a flat<br />
component namespace, some components have long and complex names which can be easily summarized.<br />
Additionally, by using the as keyword, you create a level of indirection. E.g., if a configuration uses the<br />
as keyword to rename a component, then changing the component only requires changing that one line.<br />
Without the keyword, you have to change every place it’s named in the configuration.<br />
4.1.4 Wiring Rules<br />
If a component uses the as keyword to change the name of an interface, then wiring must use this name.<br />
Returning to MainC and LedsP as examples:<br />
configuration MainC { module LedsP {<br />
provides interface Boot; provides {
4.1. Configurations 48<br />
uses interface Init as SoftwareInit;<br />
interface Init;<br />
} interface Leds;<br />
}<br />
uses {<br />
interface GeneralIO as Led0;<br />
interface GeneralIO as Led1;<br />
interface GeneralIO as Led2;<br />
}<br />
This wiring is valid:<br />
but this is not:<br />
MainC.SoftwareInit -> LedsP.Init;<br />
MainC.Init -> LedsP.Init;<br />
Listing 4.7: MainC and LedsP<br />
Finally, a configuration must name a component before it wires it. For example, this is a valid rewriting<br />
of PowerupToggleAppC:<br />
configuration PowerupToggleAppC {}<br />
implementation {<br />
components MainC, PowerupToggleC;<br />
PowerupToggleC.Boot -> MainC.Boot;<br />
}<br />
component LedsC;<br />
PowerupToggleC.Leds -> LedsC.Leds;<br />
while this version is invalid:<br />
Listing 4.8: Valid alternate of PowerupToggleAppC<br />
configuration PowerupToggleAppC {}<br />
implementation {<br />
components PowerupToggleC;<br />
PowerupToggleC.Boot -> MainC.Boot; // Invalid: MainC not named yet<br />
}<br />
component LedsC, MainC;<br />
PowerupToggleC.Leds -> LedsC.Leds;<br />
Listing 4.9: Invalid alternate of PowerupToggleAppC<br />
4.1.5 Wiring Shortcuts<br />
All interfaces have a type: it is not possible to wire, e.g., a Leds interface to a Boot interface, or a<br />
Read to a Read. As a result, when wiring you can sometimes elide one of the interface<br />
names. For instance, you can change PowerupToggleAppC’s wiring section to:<br />
components MainC, LedsC, PowerupToggleC;<br />
PowerupToggleC.Boot -> MainC;<br />
PowerupToggleC -> LedsC.Leds;
49 4.1. Configurations<br />
On the left side, PowerupToggleC.Boot is an instance of the Boot interface. On the right side is MainC,<br />
without an interface name. Because MainC only provides one instance of the Boot interface, nesC assumes<br />
that this is the one you mean. Similarly, the wiring of component PowerupToggleC to interface Leds of<br />
LedsC must be specifying PowerupToggleC’s Leds interface. So the two wiring statements are equivalent<br />
to:<br />
PowerupToggleC.Boot -> MainC.Boot;<br />
PowerupToggleC.Leds -> LedsC.Leds;<br />
These shortcuts also apply to export wirings:<br />
configuration LedsC {<br />
provides interface Leds;<br />
}<br />
implementation {<br />
components LedsP;<br />
Leds = LedsP;<br />
...<br />
}<br />
Listing 4.10: LedsC revisited<br />
The Leds interface of LedsC is wired to component LedsP, which implicitly resolves to the Leds interface<br />
of LedsP. However, the following code is invalid, as you can’t omit the name of the exported interface:<br />
= LedsP.Init;<br />
Wiring shortcuts are based on interface types and whether the interface is provided or used, not names.<br />
The BlinkC module has the following signature:<br />
module BlinkC<br />
{<br />
uses interface Timer as Timer0;<br />
uses interface Timer as Timer1;<br />
uses interface Timer as Timer2;<br />
uses interface Leds;<br />
uses interface Boot;<br />
}<br />
If nesC sees the code<br />
components new TimerMilliC() as Timer0;<br />
BlinkC.Timer0 -> Timer0;<br />
Listing 4.11: BlinkC signature<br />
it knows that BlinkC.Timer0 is a used Timer interface. It searches the signature of Timer0 for a<br />
provided instance of the same interface, and finds an unambiguous match, so it can correctly wire the two<br />
even though a shortcut is used. If the wiring is ambiguous, then nesC cannot complete it, and it will report<br />
an error. For example,<br />
BlinkC -> Timer0.Timer;<br />
is ambiguous because there are three interfaces that BlinkC uses which could wire to Timer0.Timer.
4.2. Building abstractions 50<br />
4.2 Building abstractions<br />
RandomC defines the standard <strong>TinyOS</strong> random number generator, a simple and heavily used abstraction:<br />
configuration RandomC {<br />
provides interface Init;<br />
provides interface ParameterInit as SeedInit;<br />
provides interface Random;<br />
}<br />
implementation {<br />
components RandomMlcgC;<br />
}<br />
Init = RandomMlcgC;<br />
SeedInit = RandomMlcgC;<br />
Random = RandomMlcgC;<br />
Listing 4.12: The RandomC configuration<br />
Mlcg stands for “multiplicative linear congruential generator.” In the default case, RandomC is a<br />
wrapper around RandomMlcgC. There’s another implementation, RandomLfsrC, that is about twice as fast<br />
but whose random numbers are not as good. Platforms or applications that need to use RandomLfsrC can<br />
redefine RandomC to encapsulate RandomLfsrC instead.<br />
4.2.1 Component naming<br />
As we saw earlier, <strong>TinyOS</strong> makes the distinction between components that end in C (an externally usable<br />
abstraction) and P (an internal implementation). Once you have written the signature for an externally<br />
usable component, changing it is very hard: any number of other components might depend on it, and<br />
changing it will cause compilation errors. In contrast, because an internal implementation is only wired to<br />
by higher-level configurations within that software abstraction, their signatures are much more flexible. For<br />
instance, changing the signature of LedsC would break almost all <strong>TinyOS</strong> code, but an internal change to<br />
LedsP (and changing its wiring in LedsC) should not be apparent to the user.<br />
<strong>Programming</strong> Hint 11: IF A COMPONENT IS A USABLE ABSTRACTION BY ITSELF, ITS<br />
NAME SHOULD END WITH C. IF IT IS INTENDED TO BE AN INTERNAL AND PRIVATE<br />
PART OF A LARGER ABSTRACTION, ITS NAME SHOULD END WITH P. NEVER WIRE TO<br />
P COMPONENTS FROM OUTSIDE YOUR PACKAGE (DIRECTORY).<br />
Let’s look at a complete (but very simple) example of how all of these issues are resolved in RandomC.<br />
As shown above, RandomC maps to a specific implementation, RandomMlcgC. RandomMlcgC is a<br />
configuration whose main purpose is to expose the random number implementation (RandomMlcgP) and<br />
wire it to the boot sequence (we discuss component initialization further below):<br />
configuration RandomMlcgC {<br />
provides interface Init;<br />
provides interface ParameterInit as SeedInit;<br />
provides interface Random;<br />
}<br />
implementation {<br />
components RandomMlcgP, MainC;
51 4.2. Building abstractions<br />
MainC.SoftwareInit -> RandomMlcgP; // Auto-initialize<br />
Init = RandomMlcgP; // Allow for re-initialization<br />
}<br />
SeedInit = RandomMlcgP;<br />
Random = RandomMlcgP;<br />
Listing 4.13: The RandomMlcgC signature<br />
RandomMlcgP is a software implementation. A platform that has a hardware random number generator<br />
could have a different RandomMlcgP. Because this different implementation might have a different signature<br />
— e.g., it might require accessing registers through an abstraction layer — it might also require a different<br />
RandomMlcgC, to resolve these dependencies and present a complete abstraction.<br />
In short, the configuration RandomC maps the standard number generator to a specific algorithm,<br />
RandomMlcgC. The configuration RandomMlcgC encapsulates a specific implementation as a complete<br />
abstraction. RandomMlcgP is a software implementation of the multiplicative linear congruential generator.<br />
Similarly, there is also a RandomLfsrC, which is a linear feed shift register random number generator. Just<br />
like RandomMlcgC, RandomLfsrC is a configuration that exports the interfaces of RandomLfsrP and wires<br />
it to the boot sequence. This hierarchy of names means that a system can wire to a specific random number<br />
generator if it cares which one it uses, or wire to the general one that <strong>TinyOS</strong> provides (RandomC). An<br />
application can change what the default random number generator is by defining its own RandomC, which<br />
maps to a different algorithm. The <strong>TinyOS</strong> developers can change and improve RandomMlcgP without<br />
worrying about breaking application code. Finally, a platform implementer can replace RandomMlcgC with<br />
an optimized, platform-specific version as long as it has the same signature as RandomMlcgC.<br />
4.2.2 Component Initialization<br />
RandomMlcgP provides the Init interface to seed the random number generator with the node’s identifier<br />
(TOS NODE ID). TOS NODE ID is a global constant in the <strong>TinyOS</strong> program. The <strong>TinyOS</strong> tutorials<br />
describe how to set it when you install a program on a mote. SeedInit starts the generator with a specific<br />
seed:<br />
module RandomMlcgP {<br />
provides interface Init;<br />
provides interface ParameterInit as SeedInit;<br />
provides interface Random;<br />
}<br />
implementation {<br />
uint32_t seed;<br />
/* Initialize the seed from the ID of the node */<br />
command error_t Init.init() {<br />
seed = (uint32_t)(TOS_NODE_ID + 1);<br />
return SUCCESS;<br />
}<br />
}<br />
/* Initialize with 16-bit seed */<br />
command error_t SeedInit.init(uint16_t s) {<br />
seed = (uint32_t)(s + 1);<br />
return SUCCESS;<br />
}<br />
...
4.3. Component Layering 52<br />
Listing 4.14: Seed Initialization in RandomMlcgP<br />
RandomMlcgC wires RandomMlcgP.Init in two different ways:<br />
MainC.SoftwareInit -> RandomMlcgP; // Auto-initialize<br />
Init = RandomMlcgP; // Allow for re-initialization<br />
In the first wiring, RandomMlcgC wires RandomMlcgP.Init to the <strong>TinyOS</strong> boot sequence (MainC).<br />
When <strong>TinyOS</strong> boots, it calls MainC’s SoftwareInit.init, and so it calls RandomMlcgP’s Init.init. In the<br />
second, it equates its own RandomMlcgC.Init with RandomMlcgP.Init. If a component calls RandomMlcgC’s<br />
Init.init, it actually calls RandomMlcgP’s Init.init.<br />
The first wiring makes sure that RandomMlcgP has been properly seeded before an application starts. If<br />
the application reseeds it by calling RandomMlcgC.Init or RandomMlcgC.SeedInit, no harm is done. But<br />
by wiring to MainC, RandomMlcgC makes sure that an application (or protocol, or system) doesn’t have to<br />
remember to initialize RandomMlcgC.<br />
This technique — “auto-wiring” initialization — is used in many <strong>TinyOS</strong> abstractions. One very<br />
common bug in <strong>TinyOS</strong> 1.x was to forget to initialize. This usually happens because many components<br />
might be initializing the same component. This approach is wasteful, but since initialization only happens<br />
once, it’s not a huge issue. The bigger issue is that a component often relies on someone else initializing.<br />
For example, imagine two radio stacks, A and B. A initializes the timer system, B does not. A programmer<br />
writes an application using radio stack A and forgets to initialize the timer system. Because radio stack A<br />
does, everything works fine. The programmer then decides to switch to radio stack B, and nothing works:<br />
neither the application nor the stack initialize the timers, and so the system just hangs.<br />
The init commands of components using auto-wired initialization are called in an arbitrary order (see<br />
Chapter 4.4 below). For software initialization – setting fields, etc. – this generally doesn’t matter (Init is<br />
not supposed to call anything besides another Init). Hardware initialization is a much trickier problem, and<br />
is generally handled on a per-platform basis. Refer to TEP 107 [7] for more details.<br />
<strong>Programming</strong> Hint 12: AUTO-WIRE INIT TO MAINC IN THE TOP-LEVEL<br />
CONFIGURATION OF A SOFTWARE ABSTRACTION.<br />
4.3 Component Layering<br />
RandomC shows how even a simple abstraction, such as a random number generator, can have several layers<br />
within it. On one hand, this programming style makes components small and reusable: for people who<br />
know them well, it makes building new systems the simple matter of combining existing building blocks<br />
and maybe adding a bit of new logic. On the other hand, it means getting to the bottom of a component –<br />
figuring out what it actually does – can be really frustrating to someone unfamiliar with the code. RandomC<br />
is a good example of this layering. A programmer, wanting to find the implementation (module code) of the<br />
random number generator, has to look at three files. RandomC points to RandomMlcgC, which points to<br />
RandomMlcgP.<br />
4.3.1 Extensibility<br />
In practice, these layers of indirection are not particular to nesC: any system with complex libraries has<br />
them. The difference is how those layers are written. In C code, you might see a series of functions that are<br />
simple wrappers (e.g., printf as a call to fprintf passing stdout as the file stream): you traverse executable<br />
code. In nesC code you traverse namespace mappings through configurations. The first few times you try
53 4.3. Component Layering<br />
to get to the bottom of a function, this difference can be a bit confusing, but it doesn’t take very long to<br />
get used to it. You can also use the nesC’s nesdoc tool to navigate through an application’s wiring and find<br />
where an interface is ultimately implemented — see the <strong>TinyOS</strong> tutorials for more information.<br />
Just as in other languages, especially object-oriented ones, nesC software design has a tension between<br />
how simple the implementations are and how easy it is to use or reuse them. The C++ standard template<br />
library is infamous for this: it is amazingly powerful, general, and efficient, but understanding the implementations<br />
is non-trivial. Putting all of a system’s functionality in a single module means a user doesn’t need to track<br />
down call chains. But it means that modifying the system requires replacing or copying that entire file.<br />
This leads to code replication, which greatly increases the lifetime of software bugs (if there’s a bug in the<br />
copied code, you need to change all of the copies, and almost always forget one). Therefore, a lot of the core<br />
<strong>TinyOS</strong> abstractions, such as timers and communication, tend to be composed of many small components.<br />
This makes the systems more difficult to understand at a first read, but easy to tweak, replace, or modify<br />
once you do.<br />
4.3.2 Hardware specificity<br />
Furthermore, there’s a tension between high-level APIs that are hardware independent and APIs that enable<br />
a program to take advantage of all of the hardware capabilities. For example, some but not all radios have<br />
multiple channels (frequencies). Some systems may want to take advantage of this functionality, and are<br />
willing to assume they are using a particular radio chip in order to do so. Other systems may want to remain<br />
hardware independent.<br />
<strong>TinyOS</strong> uses component layering to make this possible. Let’s look at packet communication as an<br />
example. The top-level component a platform needs to provide is called ActiveMessageC and is hardware<br />
independent.<br />
1<br />
ActiveMessageC is almost always a configuration that layers on top of a chip-specific<br />
component that provides additional interfaces. For example, this is the implementation of ActiveMessageC<br />
for the micaz mote, which has a CC2420 radio chip:<br />
configuration ActiveMessageC {<br />
provides {<br />
interface SplitControl;<br />
interface AMSend[uint8_t id];<br />
interface Receive[uint8_t id];<br />
interface Receive as Snoop[uint8_t id];<br />
interface Packet;<br />
interface AMPacket;<br />
interface PacketAcknowledgements;<br />
}<br />
}<br />
implementation {<br />
components CC2420ActiveMessageC as AM;<br />
SplitControl = AM;<br />
AMSend = AM;<br />
Receive = AM.Receive;<br />
Snoop = AM.Snoop;<br />
Packet = AM;<br />
AMPacket = AM;<br />
PacketAcknowledgements = AM;<br />
1 <strong>TinyOS</strong> uses “active messages” [20], often abbreviated to AM, as its networking abstraction (see Chapter 6.3).
4.4. Multiple Wirings 54<br />
}<br />
Listing 4.15: ActiveMessageC for the CC2420<br />
Don’t worry about the interfaces with brackets ([ and ]); they’re called parameterized interfaces and are<br />
an advanced nesC topic covered in Chapter 9. ActiveMessageC merely exports a bunch of interfaces from<br />
CC2420ActiveMessageC: interfaces for sending packets, receiving packets, and accessing packet fields (the<br />
AMPacket and Packet interfaces). But if you look at the CC2420ActiveMessageC component, it provides<br />
several interfaces which the micaz’s ActiveMessageC does not export:<br />
configuration CC2420ActiveMessageC {<br />
provides {<br />
interface SplitControl;<br />
interface AMSend[am_id_t id];<br />
interface Receive[am_id_t id];<br />
interface Receive as Snoop[am_id_t id];<br />
interface AMPacket;<br />
interface Packet;<br />
interface CC2420Packet;<br />
interface PacketAcknowledgements;<br />
interface RadioBackoff[am_id_t amId];<br />
interface LowPowerListening;<br />
interface PacketLink;<br />
}<br />
}<br />
Listing 4.16: The signature of CC2420ActiveMessageC<br />
The hardware independent ActiveMessageC doesn’t export CC2420Packet, RadioBackoff, LowPowerListening,<br />
or PacketLink. What ActiveMessageC does is a very common use of configurations. ActiveMessageC<br />
adds no functionality: all it does is export CC2420ActiveMessageC’s interfaces and therefore give them<br />
different, alternative names in the global namespace. Calling CC2420ActiveMessageC’s AMSend.send is<br />
the same as calling ActiveMessageC’s AMSend.send. The difference lies in the kinds of assumptions the<br />
caller can make. For example, it’s possible that if you wired a component to ActiveMessageC.AMSend and<br />
CC2420ActiveMessageC.CC2420Packet, you might run into serious problems. It might be that a platform<br />
has two radios, one of which is a CC2420, but ActiveMessageC doesn’t refer to the CC2420. In this case,<br />
the component would access protocol fields that don’t exist, and chaos is guaranteed.<br />
<strong>Programming</strong> Hint 13: WHEN USING LAYERED ABSTRACTIONS, COMPONENTS<br />
SHOULD NOT WIRE ACROSS MULTIPLE ABSTRACTION LAYERS: THEY SHOULD WIRE<br />
TO A SINGLE LAYER.<br />
4.4 Multiple Wirings<br />
Not all wirings are one-to-one. For example, this is part of the component CC2420TransmitC, a configuration<br />
that encapsulates the transmit path of the CC2420 radio:<br />
configuration CC2420TransmitC {<br />
provides interface Init;<br />
provides interface AsyncControl;<br />
provides interface CC2420Transmit;
55 4.4. Multiple Wirings<br />
provides interface CsmaBackoff;<br />
provides interface RadioTimeStamping;<br />
}<br />
implementation {<br />
components CC2420TransmitP;<br />
components AlarmMultiplexC as Alarm;<br />
Init = Alarm;<br />
Init = CC2420TransmitP;<br />
// further wirings elided<br />
}<br />
Listing 4.17: Fan–out on CC2420TransmitC’s Init<br />
This wiring means that CC2420TransmitC.Init maps both to Alarm.Init and CC2420TransmitP.Init.<br />
What does that mean? There certainly isn’t any analogue in C-like languages. In nesC, a multiple-wiring<br />
like this means that when a component calls CC2420TransmitC’s Init.init, it calls both Alarm’s Init.init and<br />
CC2420TransmitP’s Init.init. The order of the two calls is not defined.<br />
4.4.1 Fan-in and Fan-out<br />
This ability to multiply wire might seem strange. In this case, you have a single call point, CC2420TransmitC’s<br />
Init.init, which fans-out to two callees. There are also fan-ins, which are really just a fancy name for<br />
“multiple people call the same function.” But the similarity of the names “fan-in” and “fan-out” is important,<br />
as nesC interfaces are bidirectional. For example, coming from C, wiring two components to RandomC.Random<br />
doesn’t seem strange: two different components might need to generate random numbers. In this case, as<br />
Random only has commands, all of the functions are fan-in. There are multiple callers for a single callee,<br />
just like a library function.<br />
But as nesC interfaces are bidirectional. if there is fan-in on the command of an interface, then when<br />
that component signals an event on the interface, there is fan-out (multiple callees). Take, for example, the<br />
power control interfaces, StdControl and SplitControl. StdControl is single-phase: it only has commands.<br />
SplitControl, as its name suggests, is split-phase: the commands have completion events:<br />
interface StdControl {<br />
command error_t start();<br />
command error_t stop();<br />
}<br />
interface SplitControl {<br />
command error_t start();<br />
event void startDone(error_t error);<br />
}<br />
command error_t stop();<br />
event void stopDone(error_t error);<br />
Listing 4.18: StdControl and SplitControl initialization interfaces<br />
With StdControl, the service is started (stopped) by the time start (stop) returns, while with SplitControl, the<br />
service is only guaranteed to have started when startDone is signaled.<br />
In this wiring, there is fan-in on StdControl:<br />
components A, B, C;<br />
A.StdControl -> C;<br />
B.StdControl -> C;
4.4. Multiple Wirings 56<br />
Then either A or B can call StdControl to start or stop C. However, in this wiring, there are also<br />
completion events, hence both fan-in and fan-out on SplitControl:<br />
components A, B, C;<br />
A.SplitControl -> C;<br />
B.SplitControl -> C;<br />
Either A or B can call SplitControl.start. When C issues the SplitControl.startDone event, though, both<br />
of them are wired to it, so both A’s SplitControl.startDone and B’s SplitControl.startDone are called. The<br />
implementation has no way of determining which called the start command. 2<br />
In summary, interfaces are not a one-to-one relationship. Instead, they are an n-to-k relationship, where<br />
n is the number of users and k is the number of providers. Any provider signaling will invoke the event<br />
handler on all n users, and any user calling a command will invoke the command on all k providers.<br />
4.4.2 Uses of Multiple Wiring<br />
In practice, multiple wirings allow an implementation to be independent of the number of components it<br />
depends on. Remember that MainC (Listing 3.8, page 22) abstracts the boot sequence as two interfaces,<br />
SoftwareInit and Boot. MainC calls SoftwareInit.init when booting so that software components can be<br />
initialized before execution begins. MainC then signals Boot.booted once the entire boot sequence is over.<br />
Many components need initialization. For example, in the very simple application RadioCountToLeds, there<br />
are ten components wired to MainC.SoftwareInit. Rather than use many Init interfaces and call them in some<br />
order, MainC just calls SoftwareInit once and this call fans-out to all of the components that have wired to<br />
it.<br />
Anecdote: Historically, multiple wirings come from the idea that <strong>TinyOS</strong> components can be thought<br />
of as hardware chips. In this model, an interface is a set of pins on the chip. The term wiring comes from<br />
this idea: connecting the pins on one chip to those of another. In hardware, though, you can easily connect N<br />
pins together. For example, a given general-purpose IO pin on a chip might have multiple possible triggers,<br />
or a bus have multiple end devices that are controlled with chip select pins. It turns out that taking this<br />
metaphor literally has several issues. When <strong>TinyOS</strong> moved to nesC, these problems were done away with.<br />
Specifically, consider this configuration:<br />
configuration A {<br />
uses interface StdControl;<br />
}<br />
configuration B {<br />
provides interface StdControl;<br />
uses interface StdControl as SubControl; // Called in StdControl<br />
}<br />
configuration C {<br />
provides interface StdControl;<br />
}<br />
A.StdControl -> B.StdControl;<br />
A.StdControl -> C.StdControl;<br />
B.SubControl -> C.StdControl;<br />
2 There are ways to disambiguate this, through parameterized interfaces, which are covered in Chapter 9.
57 4.4. Multiple Wirings<br />
Listing 4.19: Why the metaphor of “wires” is only a metaphor<br />
If you take the multiple wiring metaphor literally, then the wiring of B to C joins it with the wiring of<br />
A to B and C. That is, they all form a single “wire.” The problem is that under this interpretation, B’s call<br />
to C is the same wire as A’s call to B. B enters an infinite recursion loop, as it calls SubControl, which calls<br />
B.StdControl, which calls SubControl, and so on and so on. Therefore, nesC does not take the metaphor<br />
literally. Instead, the wirings from one interface to another are considered separately. So the code<br />
A.StdControl -> B.StdControl;<br />
A.StdControl -> C.StdControl;<br />
B.SubControl -> C.StdControl;<br />
makes A’s calls to StdControl.start call B and C, and B’s calls to SubControl.start call C only.<br />
4.4.3 Combine Functions<br />
Fan-out raises an interesting question: if<br />
call SoftwareInit.init()<br />
actually calls ten different functions, then what is its return value?<br />
nesC provides the mechanism of combine functions to specify the return value. A data type can have<br />
an associated combine function. Because a fan-out always involves calling N functions with identical<br />
signatures, the N results can be combined to a single value by N − 1 calls to a combine function, each<br />
taking a pair of values of the result type. When nesC compiles the application, it auto-generates a fan-out<br />
function which applies the combine function.<br />
For example, <strong>TinyOS</strong>’s error type, error t is a very common result type. Its combine function is<br />
ecombine:<br />
error_t ecombine(error_t e1, error_t e2) {<br />
return (e1 == e2) ? e1 : FAIL;<br />
}<br />
Listing 4.20: The combine function for error t<br />
If both calls return the same value, ecombine returns that value. Otherwise, it returns FAIL. Thus<br />
combining two SUCCESS values returns SUCCESS, combining two identical Exxx error codes returns that<br />
code, and all other combinations return FAIL. This combine function is bound to error t with a nesC attribute<br />
(attributes are covered in Chapter 8):<br />
typedef uint8_t error_t @combine("ecombine");<br />
When asked to compile the following configuration<br />
configuration InitExample {}<br />
implementation {<br />
components MainC;<br />
components AppA, AppB, AppC;<br />
MainC.SoftwareInit -> AppA;<br />
MainC.SoftwareInit -> AppB;
4.5. Generics versus Singletons 58<br />
}<br />
MainC.SoftwareInit -> AppC;<br />
Listing 4.21: Fan–out on SoftwareInit<br />
the nesC compiler will generate something like the following code 3 :<br />
error_t MainC__SoftwareInit__init() {<br />
error_t result;<br />
result = AppA__SoftwareInit__init();<br />
result = ecombine(result, AppB__SoftwareInit__init());<br />
result = ecombine(result, AppC__SoftwareInit__init());<br />
return result;<br />
}<br />
Listing 4.22: Resulting code from fan–out on SoftwareInit<br />
Combine functions should be associative and commutative, to ensure that the result of a fan-out call<br />
does not depend on the order in which the commands (or event) are executed (in the case of fan-out, this<br />
order is picked by the compiler).<br />
Some return values don’t have combine functions, either due to programmer oversight or the semantics<br />
of the data type. Examples of the latter include things like data pointers: if both calls return a pointer, say,<br />
to a packet, there isn’t a clear way to combine them into a single pointer. If your program has fan-out on a<br />
call whose return value can’t be combined, the nesC compiler will issue a warning along the lines of<br />
“calls to Receive.receive in CC2420ActiveMessageP are uncombined”<br />
or<br />
“calls to Receive.receive in CC2420ActiveMessageP fan out, but there is no combine function specified<br />
for the return value.”<br />
<strong>Programming</strong> Hint 14: NEVER IGNORE COMBINE WARNINGS.<br />
4.5 Generics versus Singletons<br />
Configurations can be generics, just as modules can. For example, the standard <strong>TinyOS</strong> abstraction for<br />
sending packets is the component AMSenderC, a generic that takes a single parameter, the AM (active<br />
message) type of packet to be sent:<br />
generic configuration AMSenderC(am_id_t AMId) {<br />
provides {<br />
interface AMSend;<br />
interface Packet;<br />
interface AMPacket;<br />
interface PacketAcknowledgements as Acks;<br />
}<br />
}<br />
Listing 4.23: AMSenderC signature<br />
3 The nesC compiler actually compiles to C, which it then passes to a native C compiler. Generally, it uses as the delimiter<br />
between component, interface, and function names. By not allowing in the middle of names, the nesC compiler enforces<br />
component encapsulation (there’s no way to call a function with a from within nesC and break the component boundaries).
59 4.5. Generics versus Singletons<br />
AM types allow <strong>TinyOS</strong> applications to send multiple types of packets: they are somewhat like ports in<br />
UDP/TCP sockets. AM types are 8 bits. There is also a generic receiving component, AMReceiverC, which<br />
takes an AM type as a parameter. AM types allow multiple components and subsystems to receive and send<br />
packets without having to figure out whose packets are whose, unless two try to use the same AM type.<br />
This raises the question: why aren’t all components generics? There are some low-level components that<br />
inherently can’t be generics, such as those that provide direct access to hardware. Because these components<br />
actually represent physical resources (registers, buses, pins, etc.), there can only be one. There are very few<br />
of these low-level components though. More commonly, singletons are used to provide a global name<br />
which many components can use. To provide better insight on why this is important, let’s step through what<br />
generics are and how they work.<br />
4.5.1 Generic components, revisited<br />
Generic components allow many systems to use independent copies of a single implementation. For example,<br />
a large application might include multiple network services, each of which uses one or more instances<br />
of AMSenderC to send packets. Because all share a common implementation, bugs can be fixed and<br />
optimizations can be applied in a single place, and over time they will all benefit from improvements.<br />
While a generic component has a global name, such as AMSenderC, each instance has a local name. Two<br />
separate references to new AMSenderC are two separate components. Take, for example, the application<br />
configuration RadioCountToLedsAppC:<br />
configuration RadioCountToLedsAppC {}<br />
implementation {<br />
components MainC, RadioCountToLedsC as App, LedsC;<br />
components new AMSenderC(AM_RADIO_COUNT_MSG);<br />
components new AMReceiverC(AM_RADIO_COUNT_MSG);<br />
components new TimerMilliC();<br />
components ActiveMessageC;<br />
App.Boot -> MainC.Boot;<br />
}<br />
App.Receive -> AMReceiverC;<br />
App.AMSend -> AMSenderC;<br />
App.AMControl -> ActiveMessageC;<br />
App.Leds -> LedsC;<br />
App.MilliTimer -> TimerMilliC;<br />
App.Packet -> AMSenderC;<br />
Listing 4.24: RadioCountToLedsAppC<br />
Because RadioCountToLedsAppC has to instantiate a new AMSenderC, that instance is private to<br />
RadioCountToLedsAppC. No other component can name that AMSenderC’s interfaces or access its functionality.<br />
For example, RadioCountToLedsAppC does not wire AMSenderC’s PacketAcknowledgements interface,<br />
either through direct wiring via -> or through an export via =. Since this AMSenderC is private to<br />
RadioCountToLedsAppC, that means no component can wire to its PacketAcknowledgements, because they<br />
cannot name it.<br />
While generics enable components to reuse implementations, sharing a generic among multiple components<br />
requires a little bit of work. For example, let’s say you want to share a pool of packet buffers between<br />
two components. <strong>TinyOS</strong> has a component, PoolC, which encapsulates a fixed-size pool of objects which<br />
components can dynamically allocate and free. PoolC is a generic configuration that takes two parameters,
4.6. Exercises 60<br />
the type of memory object in the pool and how many there are:<br />
generic configuration PoolC(typedef pool_t, uint8_t POOL_SIZE) {<br />
provides interface Pool;<br />
}<br />
Listing 4.25: PoolC<br />
How do we share this pool between two different components? One way would be to write a configuration<br />
that wires both of them to a new instance:<br />
components A, B, new PoolC(message_t, 8);<br />
A.Pool -> PoolC;<br />
B.Pool -> PoolC;<br />
But what if we don’t even know which two want to share it? For example, it might be that we just<br />
want to have a shared packet pool, which any number of components can use. Making a generic’s interfaces<br />
accessible across a program requires giving it a global name.<br />
4.5.2 Singleton components, revisited<br />
Unlike generics, singleton components introduce a global name for a component instance that any other<br />
component can reference. So, to follow the previous example, one easy way to have a pool that any<br />
component can use would be to write it as a singleton component, say PacketPoolC. But we’d like to be<br />
able to do this without copying all of the pool code. It turns out that doing so is very easy: you just give a<br />
generic instance a global name by wrapping it up in a singleton. For example, here’s the implementation of<br />
PacketPoolC, assuming you want an 8-packet pool:<br />
configuration PacketPoolC {<br />
provides interface Pool<br />
}<br />
implementation {<br />
components new PoolC(message_t, 8);<br />
Pool = PoolC;<br />
}<br />
Listing 4.26: Exposing a generic component instance as a singleton<br />
All PacketPoolC does is instantiate an instance of PoolC that has 8 message t structures, then exports<br />
the Pool interface as its own. Now, any component that wants to access this shared packet pool can just wire<br />
to PacketPoolC.<br />
While you can make singleton instances of generic components in this way, you can’t make generic<br />
versions of singleton components. Singletons inherently have only a single copy of their code. Every<br />
component that wires to PacketPoolC wires to the same PacketPoolC: there is no way to create multiple<br />
copies of it. If you needed two packet pools, you could just make another singleton with a different name.<br />
4.6 Exercises<br />
1. Take the <strong>TinyOS</strong> demo application RadioCountToLeds and trace through its components to figure out<br />
which components are auto-wired to SoftwareInit. There might be more than you expect: the Telos<br />
platform, for example, has 10. Hint: you can use the nesdoc tool to simplify your task.
61 4.6. Exercises<br />
2. If you want multiple components to handle a received packet, you must either not allow buffer-swapping<br />
or must make a copy for all but one of the handlers. Write a component library that lets an application<br />
create a component supporting a non-swapping reception interface. Hint: you’ll need to write a<br />
singleton wrapper.
4.6. Exercises 62
Execution model<br />
This chapter presents <strong>TinyOS</strong>’s execution model, which is based on split-phase operations, run-to-completion<br />
tasks and interrupt handlers. Chapter 3 introduced components and modules, Chapter 4 introduced how to<br />
connect components together through wiring. This chapter goes into how these components execute, and<br />
how you can manage the concurrency between them in order to keep a system responsive. This chapter<br />
focuses on tasks, the basic concurrency mechanism in nesC and <strong>TinyOS</strong>. We defer discussion of concurrency<br />
issues relating to interrupt handlers and resource sharing to Chapter 11, as these typically only arise in very<br />
high-performance applications and low-level drivers.<br />
5.1 Overview<br />
As we saw in Chapter 3.4, all <strong>TinyOS</strong> I/O (and long-running) operations are split-phase, avoiding the need<br />
for threads and allowing <strong>TinyOS</strong> programs to execute on a single stack. In place of threads, all code in a<br />
<strong>TinyOS</strong> program is executed either by a task or an interrupt handler. A task is in effect a lightweight deferred<br />
procedure call: a task can be posted at anytime and posted tasks are executed later, one-at-a-time, by the<br />
<strong>TinyOS</strong> scheduler. Interrupts, in contrast can occur at any time, interrupting tasks or other interrupt handlers<br />
(except when interrupts are disabled).<br />
While a task or interrupt handler is declared within a particular module, its execution may cross component<br />
boundaries when it calls a command or signals an event (Figure 5.1). As a result, it isn’t always immediately<br />
clear whether a piece of code is only executed by tasks or if it can also be executed from an interrupt handler.<br />
Because code that can be excuted by an interrupt handler has to be much more aware of concurrency issues<br />
(as it may be called at any time), nesC distinguishes between synchronous (sync) code that may only be<br />
executed by tasks and asynchronous (async) code that may be executed by both tasks and interrupt handlers,<br />
and requires that asynchronous commands or events be declared with the async keyword (both in interfaces<br />
and in the actual module implementation).<br />
Writing components that implement async functions requires a few advanced nesC features, and tasks<br />
and synchronous code are sufficient for many applications so we defer further discussion of asynchronous<br />
code and interrupt handlers to Chapter 11.<br />
5.2 Tasks<br />
A task is a simple deferred computation mechanism provided by nesC. Tasks have a return value of void,<br />
take no parameters (this keeps the task scheduler very simple) and are declared with the task keyword:<br />
task void setupTask() {<br />
// task code<br />
}<br />
Using the post keyword schedules a task for later execution:<br />
63
5.2. Tasks 64<br />
Application<br />
task<br />
command, event<br />
TimerMilliC<br />
RandomLfsrP<br />
interrupt handler<br />
H/W Timer<br />
task execution (sync)<br />
interrupt execution (async)<br />
Figure 5.1: <strong>TinyOS</strong> execution model: both tasks (full lines) and interrupt handlers (dotted lines) cross<br />
component boundaries.<br />
event void Boot.booted() {<br />
call Timer.startPeriodic(1024);<br />
post setupTask();<br />
}<br />
In the above example, once <strong>TinyOS</strong> completes the boot sequence (signals Boot.booted to all components),<br />
it will run setupTask.<br />
Tasks are like any other module code. They can access variables, call commands, signal events, and<br />
invoke internal or global C functions. The post operator is like calling a function: it has a return value of<br />
error t. Posting a task always returns SUCCESS unless the task is already pending. Put another way, a<br />
component cannot post multiple copies of the same task to run; however, once a task has started executing<br />
it may repost itself.<br />
This is the core <strong>TinyOS</strong> scheduler loop that runs after the system boots. This function never returns. It<br />
executes tasks until the task queue is empty, then puts the microcontroller to sleep:<br />
command void Scheduler.taskLoop() {<br />
for (;;) {<br />
uint8_t nextTask;<br />
atomic {<br />
while ((nextTask == popTask()) == NO_TASK) {<br />
call McuSleep.sleep();<br />
}<br />
signal TaskBasic.runTask[nextTask]();<br />
}<br />
}<br />
}<br />
Listing 5.1: The main <strong>TinyOS</strong> scheduling loop from SchedulerBasicP.nc<br />
is:<br />
Don’t worry about some of the advanced syntax in the loop (such as the []). In pseudocode, the function<br />
run forever:<br />
while there are no tasks:<br />
sleep<br />
run next task<br />
That’s it. <strong>TinyOS</strong> sleeps until an interrupt wakes up the processor. If the interrupt handler posted one or<br />
more tasks, <strong>TinyOS</strong> runs tasks until there are no more left, then goes back to sleep. Since tasks are run one
65 5.2. Tasks<br />
by one, they can’t preempt one another, and the next task doesn’t execute until the current one completes.<br />
This property greatly simplifies writing tasks, and hence all sync code, as you don’t need any locks or<br />
other mechanisms to protect shared variables. A sync routine can assume it has complete control over the<br />
processor until it completes.<br />
As an example, let’s look at the BaseStation application. BaseStation is a UART/radio bridge: it<br />
forwards all radio packets it receives to the UART, and forwards all UART packets it receives to the radio.<br />
Because the radio and UART might have different throughputs, BaseStation introduces a send queue in each<br />
direction. When it receives a radio packet, it puts the packet on the UART send queue. When it receives a<br />
UART packet, it puts the packet on the radio send queue.<br />
BaseStationP, the module that implements the BaseStation application, uses tasks to pull packets off<br />
the queues and send them. The receive handlers put packets on the queue and post the send task if the<br />
application is not already sending. Here is pseudocode of the logic:<br />
on receive packet:<br />
if queue not full:<br />
put packet on queue<br />
if no send pending:<br />
post send task<br />
Tasks cannot take parameters. If a component needs to pass data to a task, it has to do so by storing<br />
it in a component variable. For example, BaseStationP cannot pass a pointer to the message to send as a<br />
parameter to sendTask. Instead, sendTask must pull the packet off of the queue directly.<br />
5.2.1 Task timing<br />
<strong>TinyOS</strong> normally runs tasks in the same order they’re posted (FIFO). A posted task won’t run until all tasks<br />
posted before it complete. This means that tasks should be pretty short. If a component has a very long<br />
computation to do, it should break it up into multiple tasks. A task can post itself, as once it is running it is<br />
no longer on the queue.<br />
It takes about 80 microcontroller clock cycles to post and execute a task on current mote platforms.<br />
Generally, keeping task run times to at most a few milliseconds is a good idea. Because tasks are run to<br />
completion, then a long-running task or large number of not-so-long-running tasks can introduce significant<br />
latency (tens of milliseconds) between a task post and its execution. This usually isn’t a big deal with<br />
application-level components. But there are lower-level components, such as radio stacks, that use tasks. For<br />
example, if the packet reception rate is limited by how quickly the radio can post tasks to signal reception,<br />
then a latency of 10ms will limit the system to 100 packets per second.<br />
Consider these two cases. In both, there are five processing components and a radio stack. The mote<br />
processor runs at 8MHz. Each processing component needs to do a lot of CPU work. In the first case,<br />
the processing components post tasks that run for 5ms and repost themselves to continue the work. In the<br />
second case, the processing components post tasks that run for 500us and repost themselves to continue the<br />
work.<br />
In the first case, the task posting overhead is 0.02%: 80 cycles overhead on 40,000 cycles of execution.<br />
In the second case, the task posting overhead is 0.2%: 80 cycles overhead on 4,000 cycles of execution. So<br />
the time to complete the executions isn’t significantly different. However, consider the task queue latency.<br />
In the first case, when the radio stack posts a task to signal that a packet has been received, it expects to wait<br />
around 25ms (5 processing tasks x 5ms each), limiting the system to 40 packets per second. In the second<br />
case, when the radio stack posts the task, it expects to wait around 2.5ms (5 processing tasks x 500 us each),<br />
limiting the system to 400 packets per second. Because the task posting cost is so low, using lots of short<br />
running tasks improves the responsiveness of the system without introducing significant CPU overhead.<br />
Of course, there’s often a tradeoff between lots of short tasks and the amount of state you have to allocate
5.3. Tasks and split-phase calls 66<br />
in a component. For example, let’s say you want to encrypt a chunk of data. If the encryption operation<br />
takes a while (e.g., 10 milliseconds), then splitting it into multiple task executions would improve the overall<br />
system responsiveness. However, if you execute it in a single task, then you can allocate all of the state and<br />
scratch space you need on the stack. In contrast, splitting it across tasks would require keeping this state and<br />
scratch space in the component. There is no hard rule on this tradeoff. But generally, long running tasks can<br />
cause other parts of the OS to perform poorly, so should be avoided when possible.<br />
<strong>Programming</strong> Hint 15: KEEP TASKS SHORT.<br />
5.2.2 Timing and event handlers<br />
The need for tasks to be short directly affects how you implement components, in particular, event handlers.<br />
BaseStationP doesn’t directly send packets in its receive event handlers; instead, it posts tasks to send the<br />
packets. It does this because the lower-level radio stack is signaling receive from within a task, presumably<br />
after a bit of computation. If the call to send takes a lot of cycles, then the lower-level radio component will<br />
not get a new buffer from the application until send completes. More generally, if the receive handler has<br />
significant computation in it, then the radio has to wait for that to complete before it has a buffer into which<br />
to receive the next packet.<br />
While a single event handler may not be a big deal, an event handler may actually represent several<br />
software layers. For example, a networking component may handle a receive event, perform a small<br />
computation based on the packet, and then signal it to the next layer. Therefore, any given component<br />
may be just one part of a long chain of event handlers. For this reason, if a handler needs to perform<br />
significant computation, it is best to post a task. Doing so prevents a call chain from having multiple such<br />
handlers.<br />
<strong>Programming</strong> Hint 16: IF AN EVENT HANDLER NEEDS TO MAKE POSSIBLY<br />
LONG-EXECUTING COMMAND CALLS, POST A TASK TO MAKE THE CALLS.<br />
This is why BaseStationP uses tasks to send packets rather than do so directly in event handlers. While<br />
tasks may in theory have to wait a while before they run, in practice tasks tend to be very short, and so there<br />
is little latency between posting and execution.<br />
5.3 Tasks and split-phase calls<br />
Tasks do more than provide a way to maintain system responsiveness with a single stack. Tasks enable<br />
nesC programs to have a flexible hardware/software boundary: software components can behave similarly<br />
to hardware. Explaining why this is challenging requires a bit of a digression into how most peripherals,<br />
such as sensors and radios, work.<br />
5.3.1 Hardware versus software<br />
Split-phase calls represent how most peripherals work. Software issues commands to a device, and some<br />
time later the device indicates the operation is complete, typically with an interrupt. The device driver’s<br />
interrupt handler signals the operation’s completion event. While the device is busy, the processor can<br />
continue to issue instructions and do other useful work. Therefore, the command that starts the operation<br />
can return immediately and allow the program to continue.<br />
The key point is that, for hardware implementations, the interrupt handler invokes driver code. But what<br />
happens if the implementation is purely software? For example, SineSensorC, which we saw in Chapter 3,
67 5.3. Tasks and split-phase calls<br />
is a purely software sensor that computes a sine value. As we want SineSensorC to be interchangeable<br />
with hardware sensors, it provides the same split-phase interface, Read. When a component calls the read<br />
comment, SineSensorC needs to signal readDone with the next reading.<br />
5.3.2 Tasks and call loops<br />
Let’s return to Read, the interface most sensors provide for users to generate sensor readings. Read has<br />
a single command, read, and a single event, readDone. Let’s imagine we have a sensor that’s very noisy.<br />
To try to filter out some of that noise, an application needs a simple filter component that smooths the raw<br />
readings with an exponentially weighted moving average (EWMA):<br />
module FilterMagC {<br />
provides interface StdControl;<br />
provides interface Read;<br />
uses interface Timer;<br />
uses interface Read as RawRead;<br />
}<br />
implementation {<br />
uint16_t filterVal = 0;<br />
uint16_t lastVal = 0;<br />
error_t StdControl.start() {<br />
return call Timer.startPeriodic(10);<br />
}<br />
command error_t StdControl.stop() {<br />
return call Timer.stop();<br />
}<br />
event void Timer.fired() {<br />
call RawRead.read();<br />
}<br />
event void RawRead.readDone(error_t err, uint16_t val) {<br />
if (err == SUCCESS) {<br />
lastVal = val;<br />
filterVal *= 9;<br />
filterVal /= 10;<br />
filterVal += lastVal / 10;<br />
}<br />
}<br />
}<br />
command error_t Read.read() {<br />
signal Read.readDone(SUCCESS, filterVal);<br />
}<br />
Listing 5.2: A troublesome implementation of a magnetometer sensor<br />
The driver samples the magnetometer every 10 milliseconds and applies an EWMA to those values.<br />
When the application samples this filtered value by calling Read.read, FilterMagC just signals Read.readDone<br />
with the cached, filtered value.<br />
On one hand, this approach is very simple and fast. On the other, it can lead to significant problems with<br />
the stack. Imagine, for example, a component, FastSamplerC, that wants to sample a sensor many times<br />
quickly (acquire a high frequency signal). It does this by calling Read.read in its Read.readDone handler:
5.3. Tasks and split-phase calls 68<br />
event void Read.readDone(error_t err, uint16_t val) {<br />
buffer[index] = val;<br />
index++;<br />
if (index < BUFFER_SIZE) {<br />
call Read.read();<br />
}<br />
}<br />
Listing 5.3: Signal handler that can lead to an infinite loop<br />
If, for some reason, an application wired FastSamplerC to FilterMagC, then there would be a long call<br />
loop between read and readDone. If the compiler can’t optimize the function calls away, this will cause the<br />
stack to grow significantly. Given that motes often have limited RAM and no hardware memory protection,<br />
exploding the stack like this can corrupt data memory and cause the program to crash.<br />
<strong>Programming</strong> Hint 17: DON’T SIGNAL EVENTS FROM COMMANDS — THE COMMAND<br />
SHOULD POST A TASK THAT SIGNALS THE EVENT.<br />
Of course, acquiring a high-frequency signal from our example Read implementation is a bit silly. As<br />
the implementation is caching a value, sampling it more than once isn’t very helpful. But this call pattern<br />
— issuing a new request in an event signaling request completion — is a common one.<br />
The problems caused by this signaling raise the question of how FilterMagC is going to signal the<br />
readDone event. It needs a way to schedule a function to be called later (like an interrupt). The right way to<br />
do this is with a task. This is how our data filter component might look like implemented with a task:<br />
module FilterMagC {<br />
provides interface StdControl;<br />
provides interface Read;<br />
uses interface Timer;<br />
uses interface Read as RawRead;<br />
}<br />
implementation {<br />
uint16_t filterVal = 0;<br />
... unchanged ...<br />
task void readDoneTask() {<br />
signal Read.readDone(SUCCESS, filterVal);<br />
}<br />
}<br />
command error_t Read.read() {<br />
post readDoneTask();<br />
return SUCCESS;<br />
}<br />
Listing 5.4: An improved implementation of FilterMagC<br />
When FilterMagC’s Read.read is called, FilterMagC posts readDoneTask and returns immediately. At<br />
some point later, <strong>TinyOS</strong> runs the task, which signals Read.readDone with the filtered value.
69 5.4. Exercises<br />
5.4 Exercises<br />
1. Measure the CPU cycles it takes to post and run a task. You can do this by using a timer to measure<br />
how many times a self-posting task can run within a period of time.<br />
2. Sometimes, components introduce a spin loop by posting task that self-posts until a variable changes.<br />
Why is this a bad idea, and what’s a better solution?<br />
3. Write a singleton loopback interface, where a program can call Send and the component will signal<br />
Receive. Be sure to respect buffer-swapping, and be careful of call loops.
5.4. Exercises 70
Applications<br />
You have already seen several of the basic <strong>TinyOS</strong> components and interfaces, such as booting (MainC,<br />
Boot), LED control (LedsC, Leds) and timing (TimerMilliC, Timer). In this chapter, we’ll present these<br />
components in more detail, along with the other basic <strong>TinyOS</strong> subsystems (sensing, communication, storage).<br />
We introduce and motivate all these subsystems through a running example, a simple anti-theft demo<br />
application. By necessity, this anti-theft demo is somewhat platform-specific, as it uses specific light and<br />
movement sensors to detect theft. However, as we discuss below, the fact that <strong>TinyOS</strong> is built over reusable<br />
interfaces make the application trivial to port from the micaz with mts310 sensor board for which it was<br />
written to any platform with equivalent communication and sensing capabilities.<br />
Appendix A provides a more systematic overview of the major <strong>TinyOS</strong> services. Each service has a<br />
brief description, a list of the components that provide it, and pointers to relevant <strong>TinyOS</strong> Enhancement<br />
Proposals (TEPs) that provide a more detailed specification.<br />
The complete code for the applications in this chapter can be found in <strong>TinyOS</strong>’s contributed code<br />
directory (see Chapter 1.5).<br />
6.1 The basics: timing, LEDs and booting<br />
One of the simplest anti-theft device on sale is a simple blinking red light, designed to deter thieves by<br />
making them believe that more must be going on. . .<br />
Such a simple application is, unsurprisingly, trivial to build using <strong>TinyOS</strong>. We start with the application’s<br />
main module, AntiTheftC:<br />
module AntiTheftC {<br />
uses {<br />
interface Boot;<br />
interface Timer as WarningTimer;<br />
interface Leds;<br />
}<br />
}<br />
implementation {<br />
enum { WARN_INTERVAL = 4096, WARN_DURATION = 64 };<br />
event void WarningTimer.fired() {<br />
if (call Leds.get() & LEDS_LED0)<br />
{ // Red LED is on. Turn it off, will switch on again in 4096-64ms.<br />
call Leds.led0Off();<br />
call WarningTimer.startOneShot(WARN_INTERVAL - WARN_DURATION);<br />
}<br />
else<br />
{ // Red LED is off. Turn it on for 64ms.<br />
call Leds.led0On();<br />
71
6.1. The basics: timing, LEDs and booting 72<br />
}<br />
}<br />
call WarningTimer.startOneShot(WARN_DURATION);<br />
}<br />
event void Boot.booted() {<br />
// We just booted. Perform first LED transition.<br />
signal WarningTimer.fired();<br />
}<br />
Listing 6.1: Anti–theft: simple flashing LED<br />
Our application wants to show that it’s active and doing “something” using a red LED. However, a LED<br />
is relatively power hungry, so we don’t want to leave it on all the time. Instead, we will turn it on for 64ms<br />
every four seconds. We accomplish this by using a single timer: if the LED is off, we switch it on and ask<br />
to be woken again in 64ms; if the LED is on, we switch it off and ask to be woken in 3.936s. This logic is<br />
implemented by the WarningTimer.fired event, based on the commands and events provided by the Timer<br />
and Leds interfaces:<br />
interface Leds {<br />
async command void led0On();<br />
async command void led0Off();<br />
async command void led0Toggle();<br />
async command void led1On();<br />
async command void led1Off();<br />
async command void led1Toggle();<br />
async command void led2On();<br />
async command void led2Off();<br />
async command void led2Toggle();<br />
}<br />
async command uint8_t get();<br />
async command void set(uint8_t val);<br />
Listing 6.2: The Leds interface<br />
On a micaz, the red LED has number 0. 1 WarningTimer.fired checks the status of this LED using the<br />
Leds.get command, and turns it on or off as appropriate, using the led0On and led0Off commands. After<br />
turning the LED on or off, the code also schedules itself to run again after the appropriate interval by using<br />
WarningTimer.startOneShot to schedule a one-shot timer.<br />
AntiTheftC needs to start blinking the red LED at boot time, so contains a handler for the booted event<br />
from the Boot interface:<br />
interface Boot {<br />
event void booted();<br />
}<br />
Listing 6.3: The Boot interface<br />
1 The LEDs are numbered as LED colors are different on different platforms, e.g. the micaz has red, green and yellow LEDs<br />
while the Telos has red, green and blue LEDs.
73 6.1. The basics: timing, LEDs and booting<br />
As we saw earlier, the booted event of the Boot interface (provided by MainC) is signaled as soon as a<br />
node has finished booting. All we need to do is execute the logic in WarningTimer.fired to initiate the first<br />
LED transition. We could do this by replicating some of the code from WarningTimer.fired in the booted<br />
event, but this would be wasteful and, in more complex cases, error-prone. Instead, the simplest approach<br />
would be to pretend that the WarningTimer.fired event happened at boot-time. This kind of requirement is<br />
not uncommon, so nesC allows modules to signal their own events (and call their own commands), as we<br />
see in Boot.booted.<br />
6.1.1 Deadline-based timing<br />
As seen so far, AntiTheftC uses a simple “wake me up in n ms” one-shot timing interface to get periodic<br />
events — it cannot use the simpler startPeriodic command as it is interspersing two timing periods (64ms<br />
and 3936ms). However, such relative-time interfaces (the expiry time is specified as an offset from “now”)<br />
have a well-known drawback: if one timer event is delayed by some other activity in the system, then all<br />
subsequent activities are delayed. If these delays occur frequently, then the system “drifts”: instead of<br />
blinking the LED every 4s, it might blink it (on average) every 4.002s.<br />
This is clearly not a problem for our simple theft-deterrence system, but can be an issue in other contexts.<br />
So we show below how the <strong>TinyOS</strong> timing system allows you to avoid such problems. First, let’s see the<br />
full Timer interface:<br />
interface Timer {<br />
// basic interface<br />
command void startPeriodic(uint32_t dt);<br />
command void startOneShot(uint32_t dt);<br />
command void stop();<br />
event void fired();<br />
// status interface<br />
command bool isRunning();<br />
command bool isOneShot();<br />
command uint32_t gett0();<br />
command uint32_t getdt();<br />
}<br />
// extended interface<br />
command void startPeriodicAt(uint32_t t0, uint32_t dt);<br />
command void startOneShotAt(uint32_t t0, uint32_t dt);<br />
command uint32_t getNow();<br />
Listing 6.4: The full Timer interface<br />
We have already seen the commands and events from the basic interface, except for stop which simply<br />
cancels any outstanding fired events. The status interface simply returns a timer’s current settings. The<br />
extended interface is similar to the basic interface, except that timings are specified relative to a base time<br />
t0. Furthermore, the “current time” (in the timer’s units, since boot) can be obtained using the getNow<br />
command. The startOneShotAt command requests a fired event at time t0+dt, and startPeriodicAt requests<br />
fired events at times t0+dt, t0+2dt, t0+3dt, . . . . This may not seem like a very big change, but is sufficient to<br />
fix the drift problem as this revised version of WarningTimer.fired shows:<br />
uint32_t base; // Time at which WarningTimer.fired should’ve fired
6.1. The basics: timing, LEDs and booting 74<br />
event void WarningTimer.fired() {<br />
if (call Leds.get() & LEDS_LED0)<br />
{ // Red LED is on. Turn it off, will switch on again in 4096-64ms.<br />
call Leds.led0Off();<br />
call WarningTimer.startOneShotAt(base, WARN_INTERVAL - WARN_DURATION);<br />
base += WARN_INTERVAL - WARN_DURATION;<br />
}<br />
else<br />
{ // Red LED is off. Turn it on for 64ms.<br />
call Leds.led0On();<br />
call WarningTimer.startOneShotAt(base, WARN_DURATION);<br />
base += WARN_DURATION;<br />
}<br />
}<br />
Listing 6.5: WarningTimer.fired with drift problem fixed<br />
The base module variable contains the time at which WarningTimer.fired is expected to fire. By specifying<br />
the timer deadline as an offset from base, rather than relative to the current time, we avoid any drift due to<br />
WarningTimer.fired running late. We also update base every time we reschedule the timer, and initialise it<br />
to the current time in Boot.booted (before starting the first timer):<br />
base = call WarningTimer.getNow();<br />
The <strong>TinyOS</strong> timers use 32-bit numbers to represent time. As a result, the millisecond timers (TMilli)<br />
wrap around every ˜48.5 days, and a microsecond timer wraps around nearly every hour. These times are<br />
shorter than most expected sensor network deployments, so the timers are designed to work correctly when<br />
time wraps around. The main user-visible effect of this is that the t0 argument to startOneShotAt and<br />
startPeriodicAt is assumed to always represent a time in the past. As a result, values numerically greater<br />
than the current time actually represent a time from before the last wrap around.<br />
A final note: on typical sensor node platforms, the millisecond timer is based on a reasonably precise<br />
32768Hz crystal. However, this does not mean that timings are perfectly accurate. Different nodes will<br />
have slightly different crystal frequencies, which will drift due to temperature effects. If you need time to<br />
be really accurate and/or synchronized across nodes, you will need to provide some form of networked time<br />
synchronization.<br />
6.1.2 Wiring AntiTheftC<br />
The AntiTheftAppC configuration that wraps AntiTheftC up into a complete application contains no surprises.<br />
It instantiates a new timer using the TimerMilliC generic component, and wires AntiTheftC to the LedsC<br />
and MainC components that provide LED and booting support:<br />
configuration AntiTheftAppC { }<br />
implementation {<br />
components AntiTheftC, MainC, LedsC;<br />
components new TimerMilliC() as WTimer;<br />
}<br />
AntiTheftC.Boot -> MainC;<br />
AntiTheftC.Leds -> LedsC;<br />
AntiTheftC.WarningTimer -> WTimer;<br />
Listing 6.6: Anti–Theft: application–level configuration
75 6.2. Sensing<br />
6.2 Sensing<br />
Sensing is, of course, one of the primary activities of a sensor network. However, there are thousands of<br />
different sensors out there, measuring everything from light, sound and acceleration to magnetic fields and<br />
humidity. Some sensors are simple analog sensors, others have digital interfaces or look like a counter<br />
(e.g., wind velocity). Furthermore, the precision, sampling rate and jitter requirements vary greatly from<br />
application to application: a simple environmental monitoring application might sample a few sensors every<br />
5 minutes, while a seismic monitoring system might sample acceleration at a few kHz for several seconds,<br />
but only once per day.<br />
As a result, <strong>TinyOS</strong> does not offer a single unified way of accessing all sensors. Instead, it defines a set<br />
of common interfaces for sampling sensors, and a set of guidelines for building components that give access<br />
to particular sensors.<br />
6.2.1 Simple sampling<br />
The two main sampling interfaces are Read (which we saw in Chapter 3.4) and ReadStream, covering<br />
respectively the case of acquiring single samples and sampling at a fixed rate (with low jitter). As a reminder,<br />
Read provides a split-phase read command, that initiates sampling, and a readDone event that reports the<br />
sample value and any error that occurred, for an arbitrary type val t:<br />
interface Read {<br />
command error_t read();<br />
event void readDone(error_t result, val_t val);<br />
}<br />
Listing 6.7: The Read interface<br />
In common with most <strong>TinyOS</strong> split-phase interfaces, you can only start a single sample operation at a<br />
time, i.e., calling read again before readDone is signaled will fail (read will not return SUCCESS). However<br />
(again in common with other split-phase interfaces), it is legal to call read from the readDone event handler,<br />
making it easy to perform back-to-back reads.<br />
We can make our anti-theft application more realistic by detecting theft attempts. A first simplistic<br />
attempt is based on the observation that stolen items are often placed in bags, pockets, etc, i.e., dark<br />
locations. The DarkC module detects dark locations by periodically (every DARK INTERVAL) sampling<br />
a light sensor (using the Read interface) and checking whether the light value is below some threshold<br />
(DARK THRESHOLD). It then reports theft by turning the yellow LED (LED 2 on the micaz) on:<br />
module DarkC {<br />
uses {<br />
interface Boot;<br />
interface Leds;<br />
interface Timer as TheftTimer;<br />
interface Read as Light;<br />
}<br />
}<br />
implementation {<br />
enum { DARK_INTERVAL = 256, DARK_THRESHOLD = 200 };<br />
event void Boot.booted() {<br />
call TheftTimer.startPeriodic(DARK_INTERVAL);<br />
}
6.2. Sensing 76<br />
event void TheftTimer.fired() {<br />
call Light.read(); // Initiate split-phase light sampling<br />
}<br />
}<br />
/* Light sample completed. Check if it indicates theft */<br />
event void Light.readDone(error_t ok, uint16_t val) {<br />
if (ok == SUCCESS && val < DARK_THRESHOLD)<br />
call Leds.led2On(); /* ALERT! ALERT! */<br />
else<br />
call Leds.led2Off(); /* Don’t leave LED permanently on */<br />
}<br />
Listing 6.8: Anti–theft: detecting dark conditions<br />
We could have implemented dark-detection within the existing AntiTheftC module, and reused the<br />
existing WarningTimer. While this would slightly reduce CPU and storage requirements in the timer<br />
subsystem, it would increase code complexity in AntiTheftC by mixing code for two essentially unrelated<br />
activities. It is generally better to have a single module do one task (blinking a LED, detecting dark<br />
conditions) well rather than build a complex module which tries to handle many tasks, paying a significant<br />
price in increased complexity.<br />
As is, DarkC is very simple: it initiates periodic sampling in its booted event. Four times a second,<br />
TheftTimer.fired requests a new light sample using the split-phase Read interface representing the light<br />
sensor (Light). If the sampling succeeds (ok == SUCCESS), then the light is compared to the threshold<br />
indicating dark conditions and hence theft. DarkC does not check the error return from Light.read, as there<br />
is no useful recovery action when light sampling cannot be initiated — it will retry the detection in 1/4s<br />
anyway.<br />
6.2.2 Sensor components<br />
Sensors are represented in <strong>TinyOS</strong> by generic components offering the Read and/or ReadStream interfaces,<br />
and possibly other sensor-specific interfaces (e.g., for calibration). A single component normally represents<br />
a single sensor, e.g., PhotoC for the light sensor on the mts310 sensor board:<br />
generic configuration PhotoC() {<br />
provides interface Read;<br />
}<br />
If two sensors are closely related (e.g., the X and Y axis of an accelerometer) they may be offered by<br />
a single component. Similarly, if a sensor supports both single (Read) and stream (ReadStream) sampling,<br />
the interfaces may be offered by the same generic component. However, neither of these is required: for<br />
example, the mts300 sensor board has separate AccelXC, AccelXStreamC, AccelYC and AccelYStreamC<br />
components for sampling its two-axis accelerometer. A single component simplifies the namespace, but<br />
may lead to extra code and RAM usage in applications that don’t need, e.g., both axes or stream sampling.<br />
Adding DarkC to our existing anti-theft application just requires wiring it to the light sensor, and its<br />
other services:<br />
configuration AntiTheftAppC { }<br />
implementation {<br />
... /* the wiring for the blinking red LED */ ...<br />
components DarkC;<br />
components new TimerMilliC() as TTimer;
77 6.2. Sensing<br />
components new PhotoC();<br />
}<br />
DarkC.Boot -> MainC;<br />
DarkC.Leds -> LedsC;<br />
DarkC.TheftTimer -> TTimer;<br />
DarkC.Light -> PhotoC;<br />
Listing 6.9: Anti–Theft: wiring to light sensor<br />
6.2.3 Sensor values, calibration<br />
<strong>TinyOS</strong> 2.x specifies the general structure of sensor components such as PhotoC, but, because of the extreme<br />
diversity of sensors, does not attempt to specify much else. The type used to report sensor values (uint16 t<br />
for PhotoC), the meaning of the values reported by the sensor, the time taken to obtain a sample, the accuracy<br />
of sensor values, calibration opportunities and requirements are all left up to the particular sensor hardware<br />
and software. Thus, for example, the fact that 200 (DARK THRESHOLD) is a good value for detecting<br />
dark conditions is specific to the particular photo-resistor used on the mts300 board, and to the way it is<br />
connected to micaz motes (in series with a specific resistor, connected to the micaz’s microcontroller’s A/D<br />
converter).<br />
In some cases, e.g., temperature, it would be fairly easy to specify a standard interface, such as temperature<br />
in 1/10 ◦ K. However, forcing such an interface on temperature sensors might not always be appropriate: the<br />
sensor might be more precise than 1/10 ◦ K, or the code for doing the conversion to these units might take too<br />
much time or space on the mote, when the conversion could be done just as easily when the data is recovered<br />
from the sensor network. <strong>TinyOS</strong> leaves these decisions to individual sensor component designers.<br />
6.2.4 Stream sampling<br />
The ReadStream interface is more complex than Read, in part because it needs to support motes with limited<br />
RAM: some applications need to sample more data at once than actually fits in memory. However, simple<br />
uses of ReadStream remain quite simple, as we will see by building an alternate theft-detection mechanism<br />
to DarkC. First, let’s see ReadStream:<br />
interface ReadStream {<br />
command error_t postBuffer(val_t* buf, uint16_t count);<br />
command error_t read(uint32_t usPeriod);<br />
event void bufferDone(error_t result, val_t* buf, uint16_t count);<br />
event void readDone(error_t result, uint32_t usActualPeriod);<br />
}<br />
Listing 6.10: ReadStream Interface<br />
Like Read, ReadStream is a typed interface whose val t parameter specifies the type of individual<br />
samples. Before sampling starts, one or more buffers (arrays of val t) must be posted with the postBuffer<br />
command. Sampling starts once the read command is called (usPeriod is the sampling period in microseconds),<br />
and continues until all posted buffers are full or an error occurs, at which point readDone is signalled. It<br />
is also possible to post new buffers during sampling — this is often done in the bufferDone event which<br />
is signalled as each buffer is filled up. By using two (or more) buffers, and processing (e.g., computing<br />
statistics, or writing to flash) and reposting each buffer in bufferDone, a mote can sample continuously more<br />
data than can fit in RAM.
6.2. Sensing 78<br />
The simplest way to use ReadStream is to declare an array holding N sample values, post the buffer<br />
and call read. The samples are available once readDone is signalled. We use this approach in MovingC, an<br />
alternate component to DarkC that detects uses an accelerometer to detect movement — it’s hard to steal<br />
something without moving it. MovingC samples acceleration at 100Hz for 1/10s, and reports theft when<br />
the variance of the sample is above a small threshold (picked experimentally):<br />
module MovingC {<br />
uses {<br />
interface Boot;<br />
interface Leds;<br />
interface Timer as TheftTimer;<br />
interface ReadStream as Accel;<br />
}<br />
}<br />
implementation {<br />
enum { ACCEL_INTERVAL = 256, /* Checking interval */<br />
ACCEL_PERIOD = 10000, /* uS -> 100Hz */<br />
ACCEL_NSAMPLES = 10, /* 10 samples * 100Hz -> 0.1s */<br />
ACCEL_VARIANCE = 4 }; /* Determined experimentally */<br />
uint16_t accelSamples[ACCEL_NSAMPLES];<br />
task void checkAcceleration();<br />
event void Boot.booted() {<br />
call TheftTimer.startPeriodic(ACCEL_INTERVAL);<br />
}<br />
event void TheftTimer.fired() {<br />
// Get 10 samples at 100Hz<br />
call Accel.postBuffer(accelSamples, ACCEL_NSAMPLES);<br />
call Accel.read(ACCEL_INTERVAL);<br />
}<br />
/* The acceleration read completed. Post the task to check for theft */<br />
event void Accel.readDone(error_t ok, uint32_t usActualPeriod) {<br />
if (ok == SUCCESS)<br />
post checkAcceleration();<br />
}<br />
/* Check if acceleration variance above threshold */<br />
task void checkAcceleration() {<br />
uint8_t i;<br />
uint32_t avg, variance;<br />
for (avg = 0, i = 0; i < ACCEL_NSAMPLES; i++) avg += accelSamples[i];<br />
avg /= ACCEL_NSAMPLES;<br />
for (variance = 0, i = 0; i < ACCEL_NSAMPLES; i++)<br />
variance += (int16_t)(accelSamples[i] - avg) * (int16_t)(accelSamples[i] - avg);<br />
}<br />
if (variance > ACCEL_VARIANCE * ACCEL_NSAMPLES)<br />
call Leds.led2On(); /* ALERT! ALERT! */<br />
else<br />
call Leds.led2Off(); /* Don’t leave LED permanently on */<br />
event void Accel.bufferDone(error_t ok, uint16_t *buf, uint16_t count) { }
79 6.3. Single-hop networking<br />
}<br />
Listing 6.11: Anti–theft: detecting movement<br />
The basic structure of MovingC is identical to DarkC: sampling is initiated four times a second (TheftTimer.fired)<br />
and, if sampling is successful, the samples are checked to see if they indicate theft (Accel.readDone). The<br />
three main differences are:<br />
• postBuffer is called to register the acceleration buffer before sampling starts<br />
• MovingC must implement the bufferDone event, which is signalled when each posted buffer is full —<br />
here we do not need to do anything as we are sampling into a single buffer<br />
• the samples are checked in a separate task (checkAcceleration), to avoid making the execution of<br />
Accel.readDone take too long (Chapter 5.2.2)<br />
The wiring for MovingC is identical to DarkC, except that it wires to a streaming accelerometer sensor:<br />
components new AccelXStreamC();<br />
...<br />
MovingC.Accel -> AccelXStreamC;<br />
6.3 Single-hop networking<br />
<strong>TinyOS</strong> uses a typical layered network structure, as shown in Figure 6.1. The networking stack is composed<br />
of a set of layers, each of which defines a header and footer layout, and includes a variable-size payload<br />
space for the layer above; the highest layer (usually the application) just holds the application data. Each<br />
layer’s header typically includes a “type” field that specifies the meaning of that layer’s payload and hence<br />
the payload’s layout — this makes it easy to use multiple independent packets in a single application. For<br />
instance, in Figure 6.1 there are two kinds of packets: packets containing messages for application 1, built<br />
over layer2a, itself built over layer1 and packets containing messages for application 3, built over layer2b,<br />
itself built over layer1.<br />
The lowest networking layer exposed in <strong>TinyOS</strong> is called active messages (AM) [20]. AM is typically<br />
implemented directly over a mote’s radio, and provides unreliable, single-hop packet transmission and<br />
reception. Each packet is identified by an AM type, an 8-bit integer that identifies the packet type. The<br />
name “active messages” comes from the fact that the type is used to automatically dispatch received packets<br />
to an appropriate handler: in a sense, packets (messages) are active because they identify (via their type)<br />
code to be executed.<br />
A variable of type message t holds a single AM packet. Each packet can hold a user-specified payload<br />
of up to TOSH DATA LENGTH bytes — normally 28 bytes, but this can be changed at compile-time up to<br />
255 bytes. 2 Note that increasing TOSH DATA LENGTH increases the size of every message t variable so<br />
may cause substantial RAM usage increases.<br />
Some simple mote applications are built directly over AM, whilst more complex applications typically<br />
use higher-level protocols such as dissemination and collection which we discuss in the next section. These<br />
higher-level protocols are themselves built over AM. It is worth noting that the interfaces used to access AM<br />
(AMSend, Receive) are sometimes reused in some higher-level protocols (e.g. tree collection uses Receive)<br />
— this makes switching between protocols easier and encourages code reuse.<br />
2 Some radios may impose a lower limit.
6.3. Single-hop networking 80<br />
Application3<br />
application3 data<br />
Layer2b<br />
header2b payload2b footer2b<br />
Application1<br />
application1 data<br />
Layer2a<br />
header2a<br />
payload2a<br />
footer2a<br />
Layer1<br />
header1 payload1 footer1<br />
Figure 6.1: <strong>TinyOS</strong> packet layout<br />
6.3.1 Sending packets<br />
Our anti-theft application currently reports theft by lighting a LED, which is unlikely to be very effective.<br />
A much better approach would be to alert someone, e.g., by sending them a radio message. This message<br />
should contain as its payload the identity of the node being stolen. As discussed in Chapter 3.5.3, <strong>TinyOS</strong><br />
payloads are always defined using platform-independent types to ensure interoperability. So the definition<br />
of the theft report payload is a simple platform independent struct, declared in the antitheft.h header<br />
file:<br />
#ifndef ANTITHEFT_H<br />
#define ANTITHEFT_H<br />
typedef nx_struct theft {<br />
nx_uint16_t who;<br />
} theft_t;<br />
...<br />
#endif<br />
The AMSend (“active message send”) interface contains all the commands needed to fill-in and send<br />
packets:<br />
interface AMSend {<br />
command error_t send(am_addr_t addr, message_t* msg, uint8_t len);<br />
event void sendDone(message_t* msg, error_t error);<br />
command error_t cancel(message_t* msg);<br />
}<br />
command uint8_t maxPayloadLength();<br />
command void* getPayload(message_t* msg, uint8_t len);
81 6.3. Single-hop networking<br />
Listing 6.12: The AMSend interface<br />
The send command and sendDone event are used to perform split-phase transmission of an AM packet<br />
stored in a message t packet buffer; the addr parameter specifies the packet destination and may be TOS BCAST ADDR<br />
to request a broadcast. AM packets have source addresses, which can be retrieved with the AMPacket<br />
interface. A node’s AM address is usually – but not always – the same as its TOS NODE ID. Technically,<br />
TOS NODE ID is a unique identifier for a node, while the AM address is the address of its radio interface.<br />
A node with two radios, for example, could have different AM addresses on the two.<br />
Because the user-payload of a packet buffer may be at different offsets on different platforms (with<br />
different radios) or when using different communication layers, AMSend provides a getPayload command to<br />
obtain a pointer to the payload. The getPayload command requires that the user pass the size of their payload<br />
so that it can ensure that there is enough space in the buffer (it returns NULL if there isn’t enough space)<br />
— applications wishing to send variable-sized messages can call maxPayloadLength to find the maximum<br />
possible payload size.<br />
Putting all this together, the reportTheft function sends theft-report packets to any nearby listeners:<br />
uses interface AMSend as Theft;<br />
...<br />
message_t reportMsg; // The theft report message buffer<br />
bool sending; // Don’t try and send while a send is in progress<br />
void reportTheft() {<br />
theft_t *payload = call Theft.getPayload(&reportMsg, sizeof(theft_t));<br />
}<br />
if (payload && !sending)<br />
{ // We can send if we’re idle and the payload fits<br />
payload->who = TOS_NODE_ID; // Report that *we* are being stolen!<br />
// And send the report to everyone (TOS_BCAST_ADDR)<br />
if (call Theft.send(TOS_BCAST_ADDR, &reportMsg, sizeof(theft_t)) == SUCCESS)<br />
sending = TRUE;<br />
}<br />
event void Theft.sendDone(message_t *msg, error_t error) {<br />
sending = FALSE; // Our send completed<br />
}<br />
Listing 6.13: Anti–Theft: reporting theft over the radio<br />
The reportTheft function refuses to attempt a send if its payload doesn’t fit in reportMsg (payload ==<br />
NULL), or if a previous send is still in progress (sending is true): during transmission the packet buffer<br />
is “owned” (Chapter 3.5.1) by the communication stack, so should not be touched. The code checks for<br />
failure in transmission (so that it can update sending correctly), but doesn’t otherwise attempt to retry failed<br />
transmissions, or to check whether the theft report was received by anyone. It simply relies on the fact that<br />
MovingC will call reportTheft repeatedly when a “theft” is in progress, so one of the messages is likely to<br />
get through:<br />
if (variance > ACCEL_VARIANCE * ACCEL_NSAMPLES)<br />
{<br />
call Leds.led2On(); /* ALERT! ALERT! */<br />
reportTheft();<br />
}
6.3. Single-hop networking 82<br />
Most high-level <strong>TinyOS</strong> subsystems are started and stopped automatically, either when the system boots,<br />
or on-demand based on usage. This is however not true of the AM-based radio and serial communication<br />
stacks for two main reasons. First, communication is typically power-hungry (e.g., most radios use as much<br />
power as an active microcontroller even when not actively receiving or transmitting packets), so leaving a<br />
communication stack permanently on is not necessarily a good idea. Second, AM-based packet reception<br />
is inherently asynchronous: unlike, e.g., sampling which is application-driven, there is nothing in the code<br />
on a mote that specifies when packets are expected to be received. Thus, the communication stack cannot<br />
switch itself on and off on-demand. Instead, applications must use the split-phase SplitControl interface we<br />
saw earlier to start and stop the radio:<br />
interface SplitControl {<br />
command error_t start();<br />
event void startDone(error_t error);<br />
}<br />
command error_t stop();<br />
event void stopDone(error_t error);<br />
Listing 6.14: The SplitControl interface<br />
MovingC switches the radio on at boot-time, and waits until the radio starts before initiating sampling<br />
to avoid sending a message while the radio is off:<br />
uses interface SplitControl as CommControl;<br />
...<br />
event void Boot.booted() {<br />
call CommControl.start();<br />
}<br />
event void CommControl.startDone(error_t ok) {<br />
// Start checks once communication stack is ready<br />
call TheftTimer.startPeriodic(ACCEL_INTERVAL);<br />
}<br />
event void CommControl.stopDone(error_t ok) { }<br />
This code ignores the error code in startDone, as there’s not any obvious recovery step to take if the<br />
radio will not start.<br />
6.3.2 Receiving packets<br />
MovingC uses hard-wired constants for the check intervals and the acceleration-variance threshold. If these<br />
are inappropriate for some contexts (e.g., a moving vehicle may have some background vibration), then the<br />
code has to be changed and recompiled with new values, and then reinstalled in the sensor network. A better<br />
approach is to change the code once to allow remote configuration, using AM packets with the following<br />
payload (also declared in antitheft.h):<br />
typedef nx_struct settings {<br />
nx_uint16_t accelVariance;<br />
nx_uint16_t accelInterval;<br />
} settings_t;<br />
AM Packets reception is provided by the <strong>TinyOS</strong> Receive interface (also seen earlier):
83 6.3. Single-hop networking<br />
interface Receive {<br />
event message_t* receive(message_t* msg, void* payload, uint8_t len);<br />
}<br />
Listing 6.15: The Receive interface<br />
As discussed in Chapter 3.5.1, implementations of Receive.receive receive a packet buffer which they<br />
can either simply return, or hang onto as long as they return a different buffer. In the case of MovingC we<br />
choose the first option, as we are done with the settings once we have read them out of the packet:<br />
uses interface Receive as Settings;<br />
...<br />
uint16_t accelVariance = ACCEL_VARIANCE;<br />
event message_t *Settings.receive(message_t *msg, void *payload, uint8_t len) {<br />
if (len >= sizeof(settings_t)) // Check the packet seems valid<br />
{ // Read settings by casting payload to settings_t, reset check interval<br />
settings_t *settings = payload;<br />
}<br />
accelVariance = settings->accelVariance;<br />
call TheftTimer.startPeriodic(settings->accelInterval);<br />
}<br />
return msg;<br />
task void checkAcceleration() {<br />
...<br />
if (variance > accelVariance * ACCEL_NSAMPLES)<br />
{<br />
call Leds.led2On(); /* ALERT! ALERT! */<br />
reportTheft();<br />
}<br />
}<br />
Listing 6.16: Anti–Theft: changing settings<br />
6.3.3 Selecting a communication stack<br />
Nothing in the code seen so far specifies which communication stack is used for theft reports, or which<br />
AM types distinguish theft reports from settings updates. This information is specified in configurations, by<br />
wiring to the components representing the desired communication stack: these components have compatible<br />
signatures, making it easy to switch between stacks:<br />
configuration ActiveMessageC { configuration SerialActiveMessageC {<br />
provides interface SplitControl;<br />
provides interface SplitControl;<br />
... ...<br />
} }<br />
generic configuration AMSenderC(am_id_t id) { generic configuration SerialAMSenderC(...) {<br />
provides interface AMSend;<br />
provides interface AMSend;<br />
... ...<br />
} }<br />
generic configuration AMReceiverC(am_id_t id) { generic configuration SerialAMReceiverC(...) {<br />
provides interface Receive;<br />
provides interface Receive;
6.4. Multi-hop networking: collection, dissemination and base stations 84<br />
... ...<br />
} }<br />
Listing 6.17: Serial vs Radio–based AM components<br />
ActiveMessageC contains the SplitControl interface to start and stop the communication stack. Instantiating<br />
AMSenderC with a particular AM type creates a component that provides an AMSend interface that will<br />
queue a single packet for transmission, independently of all other AMSenderC instances. This makes life<br />
simpler for modules using AMSend: as long as they only send one packet at a time, they can be assured that<br />
they can always enqueue their packet. Finally, instantiating AMReceiverC with AM type k and wiring the<br />
Receive interface to your code automatically dispatches received packets of type k to your Receive.receive<br />
event handler.<br />
The anti-theft application uses radio-based communication (the mts300 sensor board physically interferes<br />
with serial connections):<br />
enum { AM_THEFT = 42, AM_SETTINGS = 43 };<br />
...<br />
components ActiveMessageC;<br />
components new AMSenderC(AM_THEFT) as SendTheft;<br />
components new AMReceiverC(AM_SETTINGS) as ReceiveSettings;<br />
MovingC.CommControl -> ActiveMessageC;<br />
MovingC.Theft -> SendTheft;<br />
MovingC.Settings -> ReceiveSettings;<br />
6.4 Multi-hop networking: collection, dissemination and base stations<br />
A mote network is typically more complex than a set of motes within direct radio range (often only 30m/100ft<br />
on current motes) of each other. Instead, multi-hop networks use motes to relay messages when the sender<br />
and receiver are not in direct radio range. Furthermore, one or more base station motes physically connected<br />
to a PC-class device, and usually line-powered, relay information to and from the wider world. Thus,<br />
considered as a whole, a sensor network application has three parts (Figure 6.2):<br />
• Mote code: the code running on the motes in the network. Interactions between motes take the form<br />
of sending and receiving radio messages.<br />
• Base Station code: the code running on the base station mote. It interacts with the other motes via<br />
radio messages, and exchanges packets with the PC over a serial connection.<br />
• PC code: the code running on the PC.<br />
<strong>TinyOS</strong> provides two basic multi-hop networking abstractions: tree collection, and dissemination. In<br />
tree collection, the motes organize themselves into a routing tree centered on a particular mote, the root,<br />
which is often a base station mote. All messages sent in the tree automatically flow to the root (e.g. following<br />
the links shown in Figure 6.2). Collection trees are typically used to collect information (e.g. sensor data)<br />
from a sensor network.<br />
Dissemination efficiently distributes a value (which can be a structure with several fields) across the<br />
whole mote network. Furthermore, any mote can update the value, and the whole network will eventually<br />
settle on the value from the most recent update. Dissemination is often used for runtime configuration of<br />
mote applications.<br />
In the rest of this section, we’ll adapt AntiTheft to use collection and dissemination rather than ActiveMessageC<br />
for its theft report and configuration. In particular, we show how the base station mote sets itself up as the
85 6.4. Multi-hop networking: collection, dissemination and base stations<br />
mote code<br />
(nesC)<br />
base station<br />
code (nesC)<br />
PC code<br />
(Java, C, ...)<br />
wireless connection<br />
serial connection<br />
Figure 6.2: A typical sensor network<br />
root of the collection tree to report theft settings to the PC, and how it disseminates new settings received<br />
from the PC. Chapter 7 presents the PC-side of the mote connection.<br />
6.4.1 Collection<br />
Sending a message via a collection tree is very similar to using AM, except that messages do not have a<br />
destination address (the tree root is the implicit destination). Thus collection trees use the Send interface,<br />
which is identical to AMSend except for the lack of an addr parameter to the send command:<br />
interface Send {<br />
command error_t send(message_t* msg, uint8_t len);<br />
event void sendDone(message_t* msg, error_t error);<br />
command error_t cancel(message_t* msg);<br />
}<br />
command uint8_t maxPayloadLength();<br />
command void* getPayload(message_t* msg, uint8_t len);<br />
Listing 6.18: The Send interface<br />
As a result, the code in MovingC for reporting a theft over a collection tree is nearly identical to that<br />
from Chapter 6.3.1:<br />
uses interface Send as Theft;<br />
...<br />
message_t reportMsg; // The theft report message buffer<br />
bool sending; // Don’t try and send while a send is in progress<br />
void reportTheft() {<br />
theft_t *payload = call Theft.getPayload(&reportMsg, sizeof(theft_t));<br />
if (payload && !sending)<br />
{ // We can send if we’re idle and the payload fits<br />
payload->who = TOS_NODE_ID; // Report that *we* are being stolen!<br />
// And send the report to the root<br />
if (call Theft.send(&reportMsg, sizeof(theft_t)) == SUCCESS)
6.4. Multi-hop networking: collection, dissemination and base stations 86<br />
}<br />
}<br />
sending = TRUE;<br />
event void Theft.sendDone(message_t *msg, error_t error) {<br />
sending = FALSE; // Our send completed<br />
}<br />
Listing 6.19: Anti–Theft: reporting theft over a collection tree<br />
6.4.2 Dissemination<br />
The dissemination service is accessed by an interface parameterized by the type of value being disseminated:<br />
interface DisseminationValue {<br />
command const t* get();<br />
command void set( const t* );<br />
event void changed();<br />
}<br />
Listing 6.20: DisseminationValue interface<br />
The dissemination values are sent across the network, so the type passed to DisseminationValue should<br />
be a platform-independent type (Chapter 3.5.3). In our case, we reuse the settings t type we defined in<br />
Chapter 6.3.2, which contains new acceleration variance and check intervals. The code in MovingC to<br />
receive and handle new settings is simple:<br />
uses interface DisseminationValue as Settings;<br />
...<br />
/* New settings received, update our local copy */<br />
event void Settings.changed() {<br />
const settings_t *newSettings = call Settings.get();<br />
}<br />
accelVariance = newSettings->accelVariance;<br />
call TheftTimer.startPeriodic(newSettings->accelInterval);<br />
Listing 6.21: Anti–Theft: settings via a dissemination tree<br />
6.4.3 Wiring collection and dissemination<br />
Like AM itself, the collection and dissemination services must be explicitly started, this time via the<br />
non-split-phase StdControl interface:<br />
interface StdControl {<br />
command error_t start();<br />
command error_t stop();<br />
}<br />
Listing 6.22: The StdControl interface
87 6.4. Multi-hop networking: collection, dissemination and base stations<br />
Furthermore, as they are built over AM, the radio must be started first. As a result, the AntiTheft boot<br />
sequence is now slightly more complex (as earlier, we don’t check error codes as there is no obvious recovery<br />
step):<br />
uses interface SplitControl as CommControl;<br />
uses interface StdControl as CollectionControl;<br />
uses interface StdControl as DisseminationControl;<br />
...<br />
event void Boot.booted() {<br />
call CommControl.start();<br />
}<br />
event void CommControl.startDone(error_t ok) {<br />
// Start multi-hop routing and dissemination<br />
call CollectionControl.start();<br />
call DisseminationControl.start();<br />
// Start checks once communication stack is ready<br />
call TheftTimer.startPeriodic(ACCEL_INTERVAL);<br />
}<br />
AM types identify different kinds of messages in a mote network. In a similar fashion, collection and<br />
dissemination use 8-bit identifiers to allow for multiple independent collection trees and for multiple values<br />
to be disseminated. As with AM, these identifiers are specified as arguments to the CollectionSenderC and<br />
DisseminatorC generic components that provide access to collection and dissemination:<br />
enum { COL_THEFT = 54, DIS_THEFT = 55 };<br />
...<br />
components ActiveMessageC, DisseminationC, CollectionC;<br />
MovingC.CommControl -> ActiveMessageC;<br />
MovingC.CollectionControl -> CollectionC;<br />
MovingC.DisseminationControl -> DisseminationC;<br />
/* Instantiate and wire our collection service for theft alerts */<br />
components new CollectionSenderC(COL_THEFT) as TheftSender;<br />
MovingC.Theft -> TheftSender;<br />
/* Instantiate and wire our dissemination service for theft settings */<br />
components new DisseminatorC(settings_t, DIS_THEFT);<br />
MovingC.Settings -> DisseminatorC;<br />
6.4.4 Base station for collection and dissemination<br />
For collection and dissemination to be useful, something must consume the messages sent up the collection<br />
tree, and produce new values to disseminate. In the case of AntiTheft, we assume a PC with a serial<br />
connection to a base station mote displays theft reports and allows the theft detection settings to be changed.<br />
Here we just show how the base station mote is setup to forward tree collection theft reports and disseminate<br />
theft settings; Chapter 7 presents the libraries and utilities that are used to write PC applications that<br />
communicate with mote networks.<br />
The base station for AntiTheft is a separate nesC program. In other applications, base stations and<br />
regular motes run the same nesC code but are distinguished using some other means (e.g. many applications<br />
specify that a mote with identifier 0 is a base station).<br />
A base station mote communicates with the PC via AM over the serial port, using SerialActiveMessageC.<br />
The mote and the PC exchange settings (PCSettings) and theft reports (PCTheft):<br />
configuration AntiTheftRootAppC { }
6.4. Multi-hop networking: collection, dissemination and base stations 88<br />
implementation {<br />
components AntiTheftRootC;<br />
components SerialActiveMessageC,<br />
new SerialAMReceiverC(AM_SETTINGS) as PCSettings,<br />
new SerialAMSenderC(AM_THEFT) as PCTheft;<br />
}<br />
AntiTheftRootC.SerialControl -> SerialActiveMessageC;<br />
AntiTheftRootC.RSettings -> PCSettings;<br />
AntiTheftRootC.STheft -> PCTheft;<br />
...<br />
When the base station receives new settings, it simply calls the change command in the DisseminationUpdate<br />
interface:<br />
interface DisseminationUpdate {<br />
command void change(t* newVal);<br />
}<br />
Listing 6.23: The DisseminationUpdate interface<br />
The call to change automatically triggers the dissemination process:<br />
module AntiTheftRootC {<br />
uses interface DisseminationUpdate as USettings;<br />
uses interface Receive as RSettings;<br />
...<br />
/* When we receive new settings from the serial port, we disseminate<br />
them by calling the change command */<br />
event message_t *RSettings.receive(message_t* msg, void* payload, uint8_t len)<br />
{<br />
if (len == sizeof(settings_t))<br />
call USettings.change((settings_t *)payload);<br />
return msg;<br />
}<br />
Listing 6.24: AntiTheft base station code: disseminating settings<br />
To receive theft reports, the base station mote must mark itself as the root of the collection tree using the<br />
RootControl interface:<br />
interface RootControl {<br />
command error_t setRoot();<br />
command error_t unsetRoot();<br />
command bool isRoot();<br />
}<br />
Listing 6.25: The RootControl interface<br />
Once a mote is the root of the collection tree, it receives the messages sent up the tree via a regular<br />
Receive interface. In the case of the AntiTheft base station mote, it simply forwards the payload of these<br />
messages (a theft t value) to the serial port via its STheft interface:
89 6.4. Multi-hop networking: collection, dissemination and base stations<br />
module AntiTheftRootC {<br />
uses interface RootControl;<br />
uses interface Receive as RTheft;<br />
uses interface AMSend as STheft;<br />
...<br />
event void CommControl.startDone(error_t error) {<br />
...<br />
// Set ourselves as the root of the collection tree<br />
call RootControl.setRoot();<br />
}<br />
message_t fwdMsg;<br />
bool fwdBusy;<br />
/* When we (as root of the collection tree) receive a new theft alert,<br />
we forward it to the PC via the serial port */<br />
event message_t *RTheft.receive(message_t* msg, void* payload, uint8_t len) {<br />
if (len == sizeof(theft_t) && !fwdBusy)<br />
{<br />
/* Copy payload from collection system to our serial message buffer<br />
(fwdTheft), then send our serial message */<br />
theft_t *fwdTheft = call STheft.getPayload(&fwdMsg, sizeof(theft_t));<br />
if (fwdTheft != NULL) {<br />
*fwdTheft = *(theft_t *)payload;<br />
if (call STheft.send(TOS_BCAST_ADDR, &fwdMsg, sizeof *fwdTheft) == SUCCESS)<br />
fwdBusy = TRUE;<br />
}<br />
}<br />
return msg;<br />
}<br />
}<br />
event void STheft.sendDone(message_t *msg, error_t error) {<br />
fwdBusy = FALSE;<br />
}<br />
Listing 6.26: AntiTheft base station code: reporting thefts<br />
The base station application must wire the serial port (already shown), and the collection and dissemination<br />
interfaces used in the code above. Reception of messages from a tree is specified by indexing a parameterized<br />
interface with the tree collection identifier; parameterized interfaces are presented in detail in Chapter 8. The<br />
resulting collection and dissemination wiring is:<br />
configuration AntiTheftRootAppC { }<br />
implementation {<br />
... boot, serial and radio wiring ...<br />
components DisseminationC, new DisseminatorC(settings_t, DIS_THEFT);<br />
AntiTheftRootC.DisseminationControl -> DisseminationC;<br />
AntiTheftRootC.USettings -> DisseminatorC;<br />
components CollectionC;<br />
AntiTheftRootC.CollectionControl -> CollectionC;<br />
AntiTheftRootC.RootControl -> CollectionC;<br />
AntiTheftRootC.RTheft -> CollectionC.Receive[COL_THEFT];
6.5. Storage 90<br />
configtest<br />
logtest<br />
0 4608<br />
131072<br />
393216<br />
524288<br />
<br />
<br />
<br />
<br />
Figure 6.3: Sample volume specification and resulting flash layout for a micaz mote<br />
}<br />
Listing 6.27: AntiTheft base station wiring<br />
6.5 Storage<br />
Many motes include some amount of flash-based non-volatile storage, e.g., 512kB on the micaz. <strong>TinyOS</strong><br />
divides this non-volatile storage into volumes. A volume is a contiguous region of storage with a certain<br />
format and that can be accessed with an associated interface. <strong>TinyOS</strong> defines three basic storage abstractions:<br />
Log, Block and Config. Log is for append-only writes and streaming reads, Block is for random-access reads<br />
and write, and Config is for small items of configuration data. Log and Config have the advantage that their<br />
more limited interface allows for atomic operations: when a write to a Log or Config volume completes, it<br />
is guaranteed to be written. In contrast, the Block interface has a separate commit operation.<br />
<strong>TinyOS</strong> uses this abstraction-on-a-volume approach rather than a more traditional filing system for two<br />
main reasons. First, it is simpler, reducing code and RAM requirements for applications using permanent<br />
storage. Second, sensor networks are normally dedicated to a single application, which should have a<br />
reasonable knowledge of its storage requirements. Thus, the full generality of a filing system is typically<br />
not required.<br />
6.5.1 Volumes<br />
The division of a mote’s flash chip into volumes is specified at compile-time, by a simple XML configuration<br />
file. Flash chips have different sizes, and different rules on how they can be divided, so the volume<br />
specification is necessarily chip-specific. By convention, the volume configuration for chip C is found<br />
in a file named volumes-C.xml. For instance Figure 6.3 shows a volumes-at45db.xml file specifying<br />
two volumes for the Atmel AT45DB chip found on the micaz (see TEP 103 [2] for a specification of the<br />
volume configuration format). The first volume is named LOGTEST, starts at an offset of 128kB and is<br />
256kB long. The second is named CONFIGTEST and is 4.5kB with no offset specified: some offset will be<br />
picked at compile-time.<br />
A storage abstraction is mapped to a specific volume by instantiating the component implementing the<br />
abstraction (LogStorageC, BlockStorageC, and ConfigStorageC) with the volume identifier (prefixed with<br />
VOLUME ) as argument, e.g.,:<br />
generic configuration ConfigStorageC(volume_id_t volid) {<br />
provides interface Mount;<br />
provides interface ConfigStorage;<br />
} ...
91 6.5. Storage<br />
components new ConfigStorageC(VOLUME_CONFIGTEST) as MyConfiguration;<br />
Listing 6.28: ConfigStorageC signature<br />
A volume can be associated with at most one instance of one storage abstraction. A storage abstraction<br />
instance has to be associated with a volume so that the underlying code can generate an absolute offset into<br />
the chip from a relative offset within a volume. For instance, address 16k on volume LOGTEST is address<br />
144k on the AT45DB.<br />
6.5.2 Configuration data<br />
As it currently stands, anti-theft motes lose their settings when they are switched off. We can fix this by<br />
storing the settings in a small configuration volume:<br />
<br />
<br />
<br />
configuration AntiTheftAppC { }<br />
implementation {<br />
...<br />
components new ConfigStorageC(VOLUME_AT_SETTINGS) as AtSettings;<br />
MovingC.Mount -> AtSettings;<br />
MovingC.ConfigStorage -> AtSettings;<br />
}<br />
Configuration volumes must be mounted before use, using the split-phase Mount interface:<br />
interface Mount {<br />
command error_t mount();<br />
event void mountDone(error_t error);<br />
}<br />
Listing 6.29: Mount interface for storage volumes<br />
Once mounted, the volume is accessed using the ConfigStorage interface:<br />
interface ConfigStorage {<br />
command error_t read(storage_addr_t addr, void* buf, storage_len_t len);<br />
event void readDone(storage_addr_t addr, void* buf, storage_len_t len,<br />
error_t error);<br />
command error_t write(storage_addr_t addr, void* buf, storage_len_t len);<br />
event void writeDone(storage_addr_t addr, void* buf, storage_len_t len,<br />
error_t error);<br />
command error_t commit();<br />
event void commitDone(error_t error);<br />
}<br />
command storage_len_t getSize();<br />
command bool valid();<br />
Listing 6.30: ConfigStorage interface
6.5. Storage 92<br />
0<br />
10<br />
ff 23 11 42 54 ab d2 aa ff ff<br />
pre-commit contents<br />
88 99<br />
write to bytes 2, 3<br />
ff 23 88 99 54 ab d2 aa ff ff<br />
post-commit contents<br />
0<br />
10<br />
Figure 6.4: ConfigStorage: Writes and Commits<br />
ConfigStorage volumes are somewhat unusual in that they effectively keep two copies of their contents:<br />
the contents as of the last commit and the new, as-yet-to-be-committed contents. The purpose here is to<br />
guarantee that configuration data is not lost: if a mote crashes during configuration updates, the data last<br />
committed is still present and uncorrupted. Reads always read the last-committed data, while writes update<br />
the new copy — you cannot see the data that has been written until after a successful commit. However,<br />
writes are still updates: if a configuration volume contains 10 bytes, and bytes 2 and 3 are updated with a<br />
write and the volume is then committed, the new contents are bytes 0-1 and 4-9 from before the write, and<br />
bytes 2-3 from the write, as shown in Figure 6.4. Because configuration volumes must store multiple copies<br />
of data to provide reliability, the actual available size is less than the space reserved for them in the volumes<br />
file. The actually available size is returned by the getSize command.<br />
While configuration volumes aim to prevent data loss, there are still two cases where they may not<br />
contain valid data: when the volume is first created, 3 or if the flash contents get corrupted by some external<br />
physical process (hopefully unlikely). The valid command can be used to find out whether a configuration<br />
volume contains valid data.<br />
Putting all this together, adapting MovingC to have permanent settings is not too hard: the configuration<br />
volume is mounted and read at boot time, and new settings are saved when they are received. The following<br />
simplified excerpts show the basic boot-time logic, with error-checking removed for simplicity:<br />
uses interface Mount;<br />
uses interface ConfigStorage;<br />
...<br />
settings_t settings;<br />
event void Boot.booted() {<br />
settings.accelVariance = ACCEL_VARIANCE; // default settings<br />
settings.accelInterval = ACCEL_INTERVAL;<br />
call Mount.mount();<br />
}<br />
event void Mount.mountDone(error_t ok) {<br />
if (call ConfigStorage.valid())<br />
call ConfigStorage.read(0, &settings, sizeof settings);<br />
else<br />
call CommControl.start();<br />
}<br />
event void ConfigStorage.readDone(storage_addr_t addr, void* buf, storage_len_t len,<br />
error_t error) {<br />
3 This really means: when this division of the flash is first used on this particular mote — there is no actual “format”-like<br />
operation.
93 6.5. Storage<br />
}<br />
call CommControl.start();<br />
Listing 6.31: Anti–Theft: reading settings at boot time<br />
The current settings are simply saved as a module-level settings t variable, which is read if the volume<br />
is valid and left with default values if not. Updating the settings simply involves calling write and commit<br />
(again with error-checking removed):<br />
event void Settings.changed() {<br />
settings = *call Settings.get();<br />
call ConfigStorage.write(0, &settings, sizeof settings);<br />
}<br />
event void ConfigStorage.writeDone(storage_addr_t addr, void* buf, storage_len_t len,<br />
error_t error) {<br />
call ConfigStorage.commit();<br />
}<br />
event void ConfigStorage.commitDone(error_t error) {<br />
call TheftTimer.startPeriodic(settings.accelInterval);<br />
}<br />
Listing 6.32: Anti–Theft: saving configuration data<br />
6.5.3 Block and Log storage<br />
Block and Log storage are two abstractions for storing large amounts of data. Log is intended for logging:<br />
it provides reliability (each write is a separate transaction), at the cost of limited random access: writes are<br />
append-only, reads can only seek to recorded positions. Block is a lower-level abstraction which allows<br />
random reads and writes, but provides no reliability guarantees. Also, Block only allows any given byte<br />
to be written once between two whole-volume erases. Block is often used to store large items, such as<br />
programs for Deluge, the network reprogramming system.<br />
In this section, we will use Block and Log to build FlashSampler, a two-level sampling application. The<br />
system will periodically collect 32k samples of an accelerometer, storing the data in a Block storage volume.<br />
It will then log a summary of this sample to a circular log. As a result, the system will at all times have the<br />
most recent measurement with full fidelity, and some number of older measurements with reduced fidelity.<br />
For the micaz with the same mts300 sensor board used for the anti-theft application, the following<br />
volumes file specifies FlashSampler’s log and block volumes – 64kB for the latest sample (SAMPLES) and<br />
the rest for the long-term log (SAMPLELOG):<br />
<br />
<br />
<br />
<br />
Like the other storage abstractions, block storage is accessed by instantiating the BlockStorageC component<br />
with the volume identifier and using its BlockRead and BlockWrite interfaces:<br />
generic configuration BlockStorageC(volume_id_t volid) {<br />
provides interface BlockWrite;<br />
provides interface BlockRead;
6.5. Storage 94<br />
}<br />
Listing 6.33: BlockStorageC signature<br />
To sample to flash, we use the the BlockWrite interface:<br />
interface BlockWrite {<br />
command error_t write(storage_addr_t addr, void* buf, storage_len_t len);<br />
event void writeDone(storage_addr_t addr, void* buf, storage_len_t len,<br />
error_t error);<br />
command error_t erase();<br />
event void eraseDone(error_t error);<br />
}<br />
command error_t sync();<br />
event void syncDone(error_t error);<br />
Listing 6.34: The BlockWrite interface<br />
All commands are split-phase: erase erases the flash before the first use, write writes some bytes, and<br />
sync ensures that all outstanding writes are physically present on the flash.<br />
FlashSampler uses BlockWrite and the ReadStream sampling interface we saw earlier to simultaneously<br />
sample and save results to the flash. For this to work, it needs to use two buffers: while one is being sampled,<br />
the other is written to the flash. The maximum sampling rate will thus be limited by both the sensor’s<br />
maximum sampling rate and the flash’s maximum write rate. This scheme is implemented in the following<br />
AccelSamplerC component, as a split-phase sample-to-flash command provided by a Sample interface (not<br />
shown):<br />
// in flashsampler.h:<br />
enum {<br />
SAMPLE_PERIOD = 1000,<br />
BUFFER_SIZE = 512, // samples per buffer<br />
TOTAL_SAMPLES = 32768, // must be multiple of BUFFER_SIZE<br />
};<br />
module AccelSamplerC<br />
{<br />
provides interface Sample;<br />
uses interface ReadStream as Accel;<br />
uses interface BlockWrite;<br />
}<br />
implementation<br />
{<br />
uint16_t buffer1[BUFFER_SIZE], buffer2[BUFFER_SIZE];<br />
int8_t nbuffers; // how many buffers have been filled<br />
command void Sample.sample() {<br />
// Sampling requested, start by erasing the block<br />
call BlockWrite.erase();<br />
}<br />
event void BlockWrite.eraseDone(error_t ok) {<br />
// Block erased. Post both buffers and initiate sampling<br />
call Accel.postBuffer(buffer1, BUFFER_SIZE);
95 6.5. Storage<br />
}<br />
call Accel.postBuffer(buffer2, BUFFER_SIZE);<br />
nbuffers = 0;<br />
call Accel.read(SAMPLE_PERIOD);<br />
event void Accel.bufferDone(error_t ok, uint16_t *buf, uint16_t count) {<br />
// A buffer is full. Write it to the block<br />
call BlockWrite.write(nbuffers * sizeof buffer1, buf, sizeof buffer1);<br />
}<br />
event void BlockWrite.writeDone(storage_addr_t addr, void* buf, storage_len_t len,<br />
error_t error) {<br />
// Buffer written. TOTAL_SAMPLES is a multiple of BUFFER_SIZE, so<br />
// once we’ve posted TOTAL_SAMPLES / BUFFER_SIZE buffers we’re done.<br />
// As we started by posting two buffers, the test below includes a -2<br />
if (++nbuffers
6.5. Storage 96<br />
both circular and linear logs, but the choice must be made on a per-volume basis at compile time:<br />
generic configuration LogStorageC(volume_id_t volid, bool circular) {<br />
provides interface LogWrite;<br />
provides interface LogRead;<br />
}<br />
Listing 6.37: LogStorageC signature<br />
The LogWrite interface provides split-phase erase, append and sync commands, and a command to<br />
obtain the current append offset:<br />
interface LogWrite {<br />
command error_t append(void* buf, storage_len_t len);<br />
event void appendDone(void* buf, storage_len_t len, bool recordsLost,<br />
error_t error);<br />
command storage_cookie_t currentOffset();<br />
command error_t erase();<br />
event void eraseDone(error_t error);<br />
}<br />
command error_t sync();<br />
event void syncDone(error_t error);<br />
Listing 6.38: The LogWrite interface<br />
However, many modules only need append: new logs start out empty, and logs are often intended to<br />
be persistent so are only rarely erased under programmer control, unlike an abstraction like block which is<br />
often erased before each use. Similarly, logs only really need to use sync either if the data is very important<br />
and must definitely not be lost, or if the mote is about to reboot, losing any cached data. For instance,<br />
FlashSampler’s sample summarization code uses only append:<br />
// in flashsampler.h:<br />
enum { SUMMARY_SAMPLES = 256, // total samples in summary<br />
// downsampling factor: real samples per summary sample<br />
DFACTOR = TOTAL_SAMPLES / SUMMARY_SAMPLES };<br />
module SummarizerC {<br />
provides interface Summary;<br />
uses interface BlockRead;<br />
uses interface LogWrite;<br />
}<br />
implementation<br />
{<br />
uint16_t summary[SUMMARY_SAMPLES], samples[DFACTOR];<br />
uint16_t index; // of next summary sample to compute<br />
void nextSummarySample();<br />
command void Summary.summarize() {<br />
// Summarize the current sample block<br />
index = 0;
97 6.5. Storage<br />
}<br />
nextSummarySample();<br />
void nextSummarySample() {<br />
// Read DFACTOR samples to compute the next summary sample<br />
call BlockRead.read(index * DFACTOR * sizeof(uint16_t), samples, sizeof samples);<br />
}<br />
event void BlockRead.readDone(storage_addr_t addr, void* buf, storage_len_t len,<br />
error_t error) {<br />
// Average the DFACTOR samples which will become one summary sample<br />
uint32_t sum = 0;<br />
uint16_t i;<br />
for (i = 0; i < DFACTOR; i++) sum += samples[i];<br />
summary[index++] = sum / DFACTOR;<br />
}<br />
// Move on to the next sample summary, or log the whole summary if we’re done<br />
if (index < SUMMARY_SAMPLES)<br />
nextSummarySample();<br />
else<br />
call LogWrite.append(summary, sizeof summary);<br />
event void LogWrite.appendDone(void* buf, storage_len_t len, bool recordsLost,<br />
error_t error) {<br />
// Summary saved!<br />
signal Summary.summarized(error);<br />
}<br />
}<br />
// Unused split-phase operations<br />
event void BlockRead.computeCrcDone(storage_addr_t addr, storage_len_t len,<br />
uint16_t crc, error_t error) { }<br />
event void LogWrite.eraseDone(error_t error) { }<br />
event void LogWrite.syncDone(error_t error) { }<br />
Listing 6.39: Logging a sample summary (error–checking ommitted)<br />
Logs are read sequentially using the split-phase read command of the LogRead interface:<br />
interface LogRead {<br />
command error_t read(void* buf, storage_len_t len);<br />
event void readDone(void* buf, storage_len_t len, error_t error);<br />
command storage_cookie_t currentOffset();<br />
command error_t seek(storage_cookie_t offset);<br />
event void seekDone(error_t error);<br />
}<br />
command storage_len_t getSize();<br />
Listing 6.40: The LogRead interface<br />
The log implementations guarantee that the data written by a single LogWrite.append operation will be<br />
either fully present, or fully absent, so we know that the log will not contain any partial summaries. So we
6.6. Exercises 98<br />
could for instance read the log from the beginning, in 512 byte chunks (the size of one summary) and know<br />
that we have read a valid summary sample.<br />
Log storage also provides limited seek support. The LogRead and LogWrite interfaces contain the<br />
following command<br />
command storage_cookie_t currentOffset();<br />
which returns a cookie that represents the position at which the next read or append will start. These<br />
cookies are not offsets in the log volume; they just contain enough information to allow the log storage<br />
implementation to find that position in the log. LogRead’s split-phase seek command can seek to such<br />
cookies.<br />
This would allow, e.g., the FlashSampler application to report the position of the samples to a PC, and<br />
then reread specific samples on demand.<br />
6.6 Exercises<br />
1. Port the anti-theft application to a different platform than the micaz, by writing new theft detection<br />
code tailored to the particular sensors you have available.<br />
2. Extend the anti-theft application so that motes notice the theft reports sent by neighboring motes and<br />
report them locally by blinking LED 1.<br />
3. Extend the anti-theft application so that the user can select between the light-level (DarkC) and<br />
acceleration (MovingC) theft detection methods, and switch the LED 0 blinking on or off.<br />
4. Add code to FlashSampler to transfer samples and sample summaries to the PC over the serial port.<br />
Allow the user to (re)request specific sample summaries or erase all the summaries.
Mote-PC communication<br />
This chapter shows how to build a PC application that talks to motes. As we saw in Chapter 6.4, a PC<br />
typically interacts with a mote network by exchanging packets with a distinguished base station mote<br />
(occasionally, several motes) over a serial connection (Figure 6.2, page 85). The PC code in this chapter is<br />
written in Java, using the Java libraries and tools distributed with <strong>TinyOS</strong>. <strong>TinyOS</strong> also includes libraries and<br />
tool support for other languages (e.g., C). Please refer to the <strong>TinyOS</strong> documentation for more information on<br />
these other languages. The <strong>TinyOS</strong> Java code for communicating with motes is found under the net.tinyos<br />
package.<br />
7.1 Basics<br />
At the most basic level, PCs and motes exchange packets that are simply sequences of bytes, using a protocol<br />
inspired by, but not identical to, RFC 1663 [15] (more details on the protocol can be found in TEP 113 [4]).<br />
This packet exchange is not fully reliable: the integrity of packets is ensured by the use of a CRC, but invalid<br />
packets are simply dropped. Furthermore:<br />
• Packets sent from a PC to a mote are acknowledged by the mote (but there is no retry if no acknowledge<br />
is received) - this prevents the PC from overloading the mote with packets.<br />
• Packets sent from a mote to a PC are not acknowledged.<br />
While it is possible to write mote communication code by reading and writing the raw bytes in packets,<br />
this approach is tedious and error-prone. Furthermore, any changes to the packet layout (e.g., adding a new<br />
field, changing the value of a constant used in the packets) requires corresponding changes throughout the<br />
code.<br />
These problems are avoided on motes by using nesC’s external types (Chapter 3.5.3) to specify packet<br />
layouts, and named constants to specify specific values. Two tools, mig and ncg, allow these packet layouts<br />
and constants to be used in PC programs: mig (for “message interface generator”) generates code to encode<br />
and decode a byte array whose layout is specified by a nesC external type, and ncg (for “nesC constant<br />
generator”) extracts named constants from a nesC program. Both tools generate code for multiple languages,<br />
including Java.<br />
7.1.1 Serial Communication Stack<br />
Like the radio stack (Chapter 6.3), the <strong>TinyOS</strong> serial stack follows a layered structure (Figure 6.1, page 80).<br />
The lowest level of the <strong>TinyOS</strong> serial communication stack is defined in TEP 113, and deals with the<br />
exchange of packets over an unreliable serial connection. Like radio packets, these are (in most cases)<br />
“active message” packets. In the rest of this chapter, we will use message to mean the payload of a serial<br />
AM packet, with different message types identifier by their AM type.<br />
The layout of serial AM packets is defined using external types:<br />
99
7.2. Using mig 100<br />
typedef nx_struct serial_header {<br />
nx_uint16_t dest; /* packet destination */<br />
nx_uint16_t src; /* packet sender */<br />
nx_uint8_t length; /* payload length, in bytes */<br />
nx_uint8_t group; /* identifies a specific sensor network */<br />
nx_uint8_t type; /* AM type */<br />
} serial_header_t;<br />
typedef nx_struct serial_packet {<br />
serial_header_t header;<br />
nx_uint8_t data[];<br />
} serial_packet_t;<br />
Listing 7.1: Serial AM Packet layout<br />
The type field is used to dispatch the payload (data[]). Serial AM packets have no footer. The dest<br />
(destination) and src (sender) fields are not directly relevant to packets exchanged over a serial connection,<br />
as the sender and destination are normally implicit. Similarly, group is not relevant: it is used to distinguish<br />
different motes participating in separate applications but sharing a physical connection. These fields are<br />
included for consistency with AM packets sent over a radio, and are used in some base station mote<br />
applications and ignored by others. For instance, in the BaseStation application that forwards radio AM<br />
packets to/from a PC (as serial AM packets):<br />
• From BaseStation to the PC: src, dest and group are as in the received radio AM packet.<br />
• From the PC to BaseStation: the transmitted radio AM packet has its destination set to dest, but sets<br />
its sender and group to those of the BaseStation mote.<br />
With these choices, a PC with a BaseStation mote behaves much like a PC with a directly-attached mote<br />
radio.<br />
Conversely, the TestSerial application (part of the standard <strong>TinyOS</strong> distribution) ignores these three<br />
fields. TestSerial is a application designed to test serial connectivity: the mote and the PC simply send<br />
each other messages containing consecutive numbers. The mote displays the low-order three bits of these<br />
numbers on its LEDs, while the PC simply prints these numbers. TestSerial uses the following simple<br />
external type to specify its message layout:<br />
typedef nx_struct test_serial_msg {<br />
nx_uint16_t counter;<br />
} test_serial_msg_t;<br />
Listing 7.2: TestSerial packet layout<br />
Serial AM packets containing a test serial msg t message are identified by an AM type field of 9.<br />
Figure 7.1 shows the resulting connection between serial packet t and test serial msg t external types (the<br />
figure does not show the lowest, packet-exchange layer as it is not specified using external types).<br />
7.2 Using mig<br />
The mig tool generates a class that represents a value of a given nesC nx struct M 1 . This class provides<br />
methods to read, write and report properties of the fields of M. Given a mig-generated class for M, the<br />
1 It is also possible to use mig with regular C structures, but the resulting code is mote-specific, as different motes have different<br />
endianness and different rules for laying out C structures.
101 7.2. Using mig<br />
test_serial_msg<br />
counter<br />
serial_packet_t<br />
dest src length group type=9<br />
data[]<br />
header<br />
Figure 7.1: TestSerial packet layout<br />
serial_packet_t *x;<br />
x->header.dest = 0xffff;<br />
x->header.src = 2;<br />
...<br />
x<br />
ff<br />
ff 00 02 02 42 09 00<br />
x->header<br />
03<br />
FF<br />
FF<br />
00<br />
02<br />
02<br />
42<br />
09<br />
00<br />
03<br />
ff<br />
mig-generated class<br />
for serial_header_t<br />
baseOffset = 0<br />
dataLength = 7<br />
data[] =<br />
ff 00 02 02 42 09<br />
00 03<br />
nesC code writing to<br />
serial_header_t header<br />
field of a serial_packet_t<br />
bytes on serial<br />
connection from<br />
mote to PC<br />
serial AM packet<br />
received on the PC<br />
Figure 7.2: Mig and External Types<br />
net.tinyos.message package provides classes and methods that allow you to send and receive serial AM<br />
packets whose payload is a value of type M.<br />
Mig-generated classes represent structure values using a backing array, a byte array that stores the<br />
structure value in the same representation as it has on the mote, and hence the same representation as in<br />
<strong>TinyOS</strong> packets. Figure 7.2 shows a typical situation, with a mote sending a serial AM packet to a PC. On<br />
the mote, the packet is represented by x, a pointer to a serial packet t. The representation of x is the same as<br />
the representation of the packet on the serial connection to the PC. On the PC itself, a mig-generated class<br />
uses a backing array containing the same bytes to represent a serial header t (the external type for serial AM<br />
packet headers) value.<br />
Mig-generated classes supports all features of C structures, including bitfields, arrays, unions, and nested<br />
structures. They allow you to perform all the operations (and more) that you can do on structures in nesC<br />
programs:<br />
• Create a new (all fields initialised to zero) structure value.<br />
• Cast part of one structure to another (e.g., cast the data[] field of serial packet t to test serial msg t).
7.2. Using mig 102<br />
• Read and write any field.<br />
• Obtain information on a field: its offset, size, signedness, etc.<br />
• Obtain the byte array representing a particular structure value.<br />
The classes generated by mig are subclasses of net.tinyos.message.Message, to simplify writing generic<br />
code that can handle multiple message layouts. The main public function of the Message class is to provide<br />
access to the backing array of a mig-generated class. The backing array is a slice of a Java byte[] array,<br />
specified by an offset and length. This array, offset and length are returned by the following three methods:<br />
public byte[] dataGet();<br />
public int baseOffset();<br />
public int dataLength();<br />
Listing 7.3: Backing array methods<br />
For instance, in Figure 7.2, the mig-generated class for serial header t takes a 7-byte slice starting at<br />
offset 0 of the 9-byte array representing the whole serial AM packet. The use of a slice of a byte[] array<br />
allows a mig-generated class to represent a value stored within another mig-generated class, supporting the<br />
“casting” of part of one structure to another.<br />
For test serial msg t, the basic constructor and methods of the mig-generated TestSerialMsg class are: 2<br />
• TestSerialMsg(): create a new (fields initialised to zero) test serial msg t value.<br />
• static int offset counter(): Return the offset (in bytes) of the counter field in a test serial msg t<br />
structure.<br />
• get counter(): Return the value of the counter field.<br />
• set counter(int value): Modify the value of the counter field.<br />
7.2.1 Sending and receiving mig-generated packets<br />
The net.tinyos.message package provides a class MoteIF (for “mote interface”) that makes it simple to<br />
transmit and receive messages specified by a mig-generated class.<br />
Before using MoteIF, you need to open a connection to your base station mote. This is done by<br />
calling the net.tinyos.packet.BuildSource.makePhoenix method, which takes as argument a packet source<br />
name. This packet source name specifies how you reach the base station mote (e.g., through a serial port)<br />
and all the relevant parameters (e.g., device name, baud rate, etc). In the rest of this section, we will<br />
use "serial@COM1:telosb" as our packet source, which denotes serial communication over serial port<br />
COM1: at the normal Telos mote baud rate (115200 baud). Most Java programs that use MoteIF take a<br />
command-line argument that specifies the actual packet source. Chapter 7.4 discusses packet sources, and<br />
their motivation, in more detail.<br />
Using MoteIF and mig, the code to transmit test serial msg t messages is quite simple, as this simplified<br />
excerpt from the TestSerial.java file shows. Transmission of consecutive packets is performed using<br />
MoteIF’s send method, which takes an object of a mig-generated class as argument:<br />
public class TestSerial ... {<br />
2 See the mig documentation for a complete description of the generated constructors and methods.
103 7.2. Using mig<br />
private MoteIF moteIF;<br />
...<br />
public void sendPackets() {<br />
int counter = 0;<br />
// Create uninitialized TestSerialMsg<br />
TestSerialMsg payload = new TestSerialMsg();<br />
}<br />
}<br />
try {<br />
while (true) {<br />
System.out.println("Sending packet " + counter);<br />
payload.set_counter(counter);<br />
moteIF.send(0, payload); // send payload to mote<br />
counter++;<br />
try {Thread.sleep(1000);}<br />
catch (InterruptedException exception) {}<br />
}<br />
}<br />
catch (IOException exception) {<br />
System.err.println("Exception thrown when sending packets. Exiting.");<br />
System.err.println(exception);<br />
}<br />
public static void main(String[] args) throws Exception {<br />
/* Open connection to the mote, and start sending packets */<br />
PhoenixSource phoenix = BuildSource.makePhoenix("serial@COM1:telosb", null);<br />
MoteIF mif = new MoteIF(phoenix);<br />
TestSerial serial = new TestSerial(mif);<br />
serial.sendPackets();<br />
}<br />
Listing 7.4: Sending packets with mig and MoteIF<br />
Received packets are handled following the AM “dispatch to a per-message handler” model. The<br />
registerListener method takes an object O of a mig-generated class and a handler as arguments. The object<br />
O specifies the AM type and layout, the handler must implement the net.tinyos.messages.MessageListener<br />
interface:<br />
public interface MessageListener {<br />
public void messageReceived(int to, Message m);<br />
}<br />
Listing 7.5: Interface for handling received packets<br />
When the handler is called, to is the destination address from the received packet, and m is a clone of O<br />
containing the payload of the received packet.<br />
The resulting additions to TestSerial.java are simply to declare a messageReceived method, and<br />
register it as the handler for test serial msg t in TestSerial’s constructor:<br />
public class TestSerial implements MessageListener {<br />
public TestSerial(MoteIF moteIF) {<br />
this.moteIF = moteIF;<br />
// Register this class as a handler for test_serial_msg_t AM packets<br />
this.moteIF.registerListener(new TestSerialMsg(), this);
7.3. Using ncg 104<br />
}<br />
}<br />
public void messageReceived(int to, Message message) {<br />
// The actual type of ’message’ is ’TestSerialMsg’<br />
TestSerialMsg msg = (TestSerialMsg)message;<br />
System.out.println("Received packet sequence number " + msg.get_counter());<br />
}<br />
Listing 7.6: Receiving packets with mig and MoteIF<br />
Note that the messageReceived method is called in a thread that is private to MoteIF. Your method must<br />
ensure that any accesses to shared data are appropriately synchronized with the rest of your program.<br />
Both message transmission and reception need to know the AM type used to identify a particular<br />
message — transmission needs to set the AM type field (type in serial packet t), and reception needs to<br />
know which messages correspond to which AM type so that it can dispatch packets correctly. To support<br />
this, mig-generated classes contain an AM type field, accessed by the amType and amTypeSet methods.<br />
When mig generates a message class for structure X, it sets a default value for amType by looking for an<br />
enum constant named AM X (with X in upper case). For instance, the default AM type for nx struct<br />
test serial msg is the value of AM TEST SERIAL MSG (defined in TestSerial.h).<br />
When there is no such constant in the source code, or when a message is used with several AM types,<br />
you must set the correct AM type using amTypeSet before calling the send or registerListener methods.<br />
7.3 Using ncg<br />
The ncg tool extracts enum constants from a nesC program or C header file, and generates a Java (or<br />
other language) file containing constants with the same name and value. This avoids specifying identical<br />
constants in two places (always a maintenance problem) when, e.g., your packets use “magic” values to<br />
represent commands, specify the size of arrays, etc.<br />
Consider for instance the <strong>TinyOS</strong> Oscilloscope demo application where each mote periodically reports<br />
groups of sensor readings. Oscilloscope has a header file (Oscilloscope.h) that defines its message and<br />
associated constants:<br />
enum {<br />
NREADINGS = 10, /* Number of readings per message. */<br />
DEFAULT_INTERVAL = 256, /* Default sampling period. */<br />
AM_OSCILLOSCOPE = 0x93<br />
};<br />
typedef nx_struct oscilloscope {<br />
nx_uint16_t version; /* Version of the interval. */<br />
nx_uint16_t interval; /* Sampling period. */<br />
nx_uint16_t id; /* Mote id of sending mote. */<br />
nx_uint16_t count; /* Readings start at count*NREADINGS */<br />
nx_uint16_t readings[NREADINGS];<br />
} oscilloscope_t;<br />
Listing 7.7: Constants and packet layout for Oscillscope application<br />
Oscilloscope’s Java GUI displays a graph of the sensor readings for each motes. To know the reading<br />
number (i.e., the position of readings on the graph X axis), it needs to know both the value of the count field
105 7.4. Packet Sources<br />
and the value of the NREADINGS constants. It therefore uses a mig-generated class to decode received<br />
oscilloscope t messages, and ncg to extract the NREADINGS value:<br />
public class Constants {<br />
public static final byte NREADINGS = 10;<br />
...<br />
}<br />
Listing 7.8: Class generated by ncg<br />
The handler for oscilloscope t messages can now fetch the readings array from the received message,<br />
and store its values in the Java data array at offset count * NREADINGS:<br />
public void messageReceived(int to, Message msg) {<br />
OscilloscopeMsg omsg = (OscilloscopeMsg)msg;<br />
int start = omsg.get_count() * Constants.NREADINGS;<br />
// get_readings returns a Java array with elements corresponding to<br />
// the values in the nesC array<br />
int readings[] = omsg.get_readings();<br />
}<br />
for (int i = 0; i < readings.length; i++)<br />
data[start + i] = readings[i];<br />
Listing 7.9: Simplified code to save received samples<br />
The implementation of ncg relies on running the nesC compiler in a special mode, and is thus able<br />
to extract the values of enum constants defined by expressions and uses of nesC’s special unique and<br />
uniqueCount functions (see Chapter 9), not just simple constants. However, as a result, ncg also has two<br />
limitations:<br />
• It cannot extract the values of #define constants, as these are handled by the C preprocessor and<br />
invisible to ncg.<br />
• If the header file or nesC program passed to ncg has compile errors, then ncg will not produce any<br />
output.<br />
7.4 Packet Sources<br />
The Java mote interface uses packet sources to abstract the different ways to talk to a mote. These include:<br />
• direct serial connections<br />
• remote (over Ethernet) serial connections<br />
• connections to simulated motes<br />
• connection via serial forwarders, which allow several programs to talk to the same mote<br />
A packet source has the form connection@arguments, where connection is a word that specifies the<br />
kind of connection (serial for direct serial connections, sf for serial forwarders, etc) and arguments is the
7.5. Example: Simple Reliable Transmission 106<br />
arguments needed by the connection (e.g., serial port device name and baud rate as in serial@COM1:115200).<br />
Executing<br />
java net.tinyos.packet.BuildSource<br />
prints a summary of all packet sources and their arguments. As mentioned above, most Java programs have<br />
some way of specifying the packet source that should be used to connect to the base station mote, e.g., an<br />
environment variable (usually MOTECOM), a command-line argument, or a field in a GUI.<br />
One of the more important packet sources is the serial forwarder. The serial forwarder is a Java program 3<br />
that connects to a mote and forwards packets to and from its (multiple) clients. These clients connect to the<br />
serial forwarder via TCP/IP. Using a serial forwarder serves multiple purposes:<br />
• Allow remote access to a base station mote, so that, e.g., a GUI can access a sensor network from a<br />
remote location.<br />
• Allow both a regular application and a debugging system to talk to the same base station mote. For<br />
instance, it’s often useful to simply display all packets received from a mote (using the net.tinyos.tools.Listen<br />
Java program) without having to change your code.<br />
• Split your application into multiple independent parts, each of which can talk to the mote. For<br />
instance, the TestSerial.java application could be split into separate receive and transmit applications<br />
which would talk independently to the mote via a serial forwarder.<br />
7.5 Example: Simple Reliable Transmission<br />
As we saw at the beginning of this chapter, the basic mote-PC communication infrastructure is unreliable:<br />
packets are checked for integrity but there is no retransmission in case of failure. In this section, we show<br />
how to build a simple reliable and reusable message transmission layer, and use it to build a reliable version<br />
of the TestSerial application. The focus of this section is on showing how to build a generic, reusable mote<br />
communication layer in Java.<br />
The code for this simple reliable transmission protocol can be found in the “<strong>TinyOS</strong> <strong>Programming</strong>”<br />
section of <strong>TinyOS</strong>’s contributed code directory (Chapter 1.5), under the name ReliableSerial. This directory<br />
contains the Java (ReliableMoteIF class) and nesC (ReliableSerialC component) implementations of this<br />
protocol, and ReliableTestSerial, a version of the nesC TestSerial application built over ReliableSerialC.<br />
7.5.1 Reliable Transmission Protocol<br />
The reliable message transmission protocol is very simple. Messages are sent with a “cookie” (changed on<br />
every transmission) and are repeatedly sent (after a timeout) until an acknowledgement with the same cookie<br />
is received. Transmissions are not overlapped: transmission of message2 does not start until message1 has<br />
been acknowledged.<br />
On the reception side, duplicates (detected by the presence of an identical cookie) are suppressed before<br />
passing the message on to the upper layer. However, even duplicate messages are acknowledged, as it is<br />
possible that the earlier acknowledgements were lost.<br />
In concrete terms, two kinds of packets are used by this protocol: a message transmission packet<br />
(reliable msg t) and an acknowledgment packet (ack msg t). These packets are shown in Figure 7.3, along<br />
with the TestSerial messages that are transmitted by the ReliableTestSerial application.<br />
3 There are also C and C++ implementations.
107 7.5. Example: Simple Reliable Transmission<br />
test_serial_msg_t<br />
counter<br />
reliable_msg_t<br />
cookie<br />
data[]<br />
serial_packet_t<br />
dest src length group type<br />
data[]<br />
ack_msg_t<br />
cookie<br />
typedef nx_struct {<br />
nx_uint8_t cookie;<br />
nx_uint8_t data[];<br />
} reliable_msg_t;<br />
typedef nx_struct {<br />
nx_uint8_t cookie;<br />
} ack_msg_t;<br />
Figure 7.3: Reliable Transmission Packet Layouts<br />
7.5.2 Reliable Transmission in Java<br />
The ReliableMoteIF class contains the Java implementation of the simple reliable message transmission<br />
protocol. It uses mig to generate AckMsg and ReliableMsg so that it can build and decode ack msg t<br />
and reliable msg t packets respectively. ReliableMoteIF uses ncg to access the retransmission timeout<br />
(ACK MSG TIMEOUT) specified in the nesC implementation (the ReliableSerialC component).<br />
This class is implementing a generic reusable layer, so should be capable of transmitting and receiving<br />
an arbitrary message whose layout is specified by a mig-generated class. As a result, the interface is so<br />
similar to that of of MoteIF that ReliableMoteIF we simply make it a subclass of MoteIF. We first show the<br />
transmission side:<br />
import net.tinyos.packet.*;<br />
import net.tinyos.message.*;<br />
import java.io.*;<br />
class ReliableMoteIF extends MoteIF {<br />
/* Build an object for performing reliable transmission via ’base’ */<br />
public ReliableMoteIF(PhoenixSource base) {<br />
super(base);<br />
/* Register handler (’ackMsgReceived’ method below) for receiving acks */<br />
super.registerListener<br />
(new AckMsg(), new MessageListener() {<br />
public void messageReceived(int to, Message m) {<br />
ackMsgReceived((AckMsg)m);<br />
}<br />
});<br />
}<br />
/* Send side */<br />
/* --------- */<br />
private Object ackLock = new Object(); /* For synchronization with ack handler */<br />
private short sendCookie = 1; /* Next cookie to use in transmission */<br />
private boolean acked; /* Set by ack handler when ack received */<br />
private final static int offsetUserData = ReliableMsg.offset_data(0);
7.5. Example: Simple Reliable Transmission 108<br />
/* Send message ’m’ reliably with destination ’to’ */<br />
public void send(int to, Message m) throws IOException {<br />
synchronized (ackLock) {<br />
/* Build a reliable_msg_t packet with the current cookie and the payload in m,<br />
* total packet size is ’m.dataLength() + offsetUserData’ */<br />
ReliableMsg rmsg = new ReliableMsg(m.dataLength() + offsetUserData);<br />
rmsg.set_cookie(sendCookie);<br />
System.arraycopy(m.dataGet(), m.baseOffset(),<br />
rmsg.dataGet(), offsetUserData,<br />
m.dataLength());<br />
}<br />
}<br />
/* Repeatedly transmit ’rmsg’ until the ack handler tells us an ack is received. */<br />
acked = false;<br />
for (;;) {<br />
super.send(to, rmsg);<br />
try {<br />
ackLock.wait(RelConstants.ACK_TIMEOUT);<br />
}<br />
catch (InterruptedException e) { }<br />
if (acked)<br />
break;<br />
System.err.printf("retry\n");<br />
}<br />
/* Pick a new cookie for the next transmission */<br />
sendCookie = (short)((sendCookie * 3) & 0xff);<br />
/* Handler for ack messages. If we see an ack for the current transmission,<br />
* notify the ’send’ method. */<br />
void ackMsgReceived(AckMsg m) {<br />
synchronized (ackLock) {<br />
if (m.get_cookie() == sendCookie) {<br />
acked = true;<br />
ackLock.notify();<br />
}<br />
}<br />
}<br />
}<br />
... receive side ...<br />
Listing 7.10: Reliable Transmission Protocol in Java –Transmission<br />
The send method is synchronized to enforce the rule that a message must be acknowledged before the<br />
next message is sent.<br />
This code relies on the fact that the ackMsgReceived handler executes in a different thread than send.<br />
After sending a message, the send thread goes to sleep for ACK MSG TIMEOUT ms. When an acknowledgment<br />
is received, ackMsgReceived checks the cookie against that of the message being transmitted. If it is<br />
equal, acked is set to true and the send thread is woken up. If no acknowledgement is received within<br />
ACK MSG TIMEOUT ms, send will resend the message and wait again. Note that acknowledgments<br />
received when send is not waiting are effectively ignored, as they should be.<br />
After transmission is successful, send picks a new cookie — we multiply the old value by three just to<br />
make it clear that these cookies are not sequence numbers. . .<br />
The embedding of the user’s message in a reliable msg t packet is simply done by using System.arrayCopy
109 7.5. Example: Simple Reliable Transmission<br />
to copying data between the backing arrays of the user’s and reliable msg t’s mig-generated classes. Note<br />
also how the mig-generated offset data method is used to find the payload offset in reliable msg t (see<br />
the offsetUserData constant). This code is very similar to MoteIF’s embedding of user messages in serial<br />
packets.<br />
Reliable reception is implemented by overriding MoteIF.registerListener. Note however that our reliable<br />
transmission protocol only knows about one message type (it has no equivalent to AM’s type field), so you<br />
can only actually register a listener for one message type:<br />
class ReliableMoteIF extends MoteIF {<br />
...<br />
/* Receive side */<br />
/* ------------ */<br />
private Message template;<br />
private MessageListener listener;<br />
/* Build a reliable receive handler for ’template’ messages */<br />
public void registerListener(Message m, MessageListener l) {<br />
template = m;<br />
listener = l;<br />
}<br />
/* Register handler (reliableMsgReceived method below) for receiving<br />
* reliable_msg_t messages */<br />
super.registerListener<br />
(new ReliableMsg(),<br />
new MessageListener() {<br />
public void messageReceived(int to, Message m) {<br />
reliableMsgReceived(to, (ReliableMsg)m);<br />
}<br />
});<br />
private short recvCookie; /* Cookie of last received message */<br />
void reliableMsgReceived(int to, ReliableMsg rmsg) {<br />
/* Acknowledge all received messages */<br />
AckMsg ack = new AckMsg();<br />
ack.set_cookie(rmsg.get_cookie());<br />
try {<br />
super.send(MoteIF.TOS_BCAST_ADDR, ack);<br />
}<br />
catch (IOException e) {<br />
/* The sender will retry and we’ll re-ack if the send failed */<br />
}<br />
/* Don’t notify user of duplicate messages */<br />
if (rmsg.get_cookie() != recvCookie) {<br />
recvCookie = rmsg.get_cookie();<br />
}<br />
/* Extract payload from ’rmsg’ and copy it into a copy of ’template’.<br />
* The payload is all the data in ’rmsg’ from ’offsetUserData’ on */<br />
Message userMsg = template.clone(rmsg.dataLength() - offsetUserData);<br />
System.arraycopy(rmsg.dataGet(), rmsg.baseOffset() + offsetUserData,<br />
userMsg.dataGet(), 0,<br />
rmsg.dataLength() - offsetUserData);<br />
listener.messageReceived(to, userMsg);
7.6. Exercises 110<br />
}<br />
}<br />
Listing 7.11: Reliable Transmission Protocol in Java –Reception<br />
The protocol implementation part of reliableMsgReceived is straightforward: it simply acknowledges<br />
all received messages, and ignores consecutive messages with the same cookie. Its main complexity is in<br />
extracting the payload from received reliable msg t packets and building a message that follows the users<br />
template object. This task is accomplished by using the clone(n) method of Message, which makes a<br />
copy of a message with a new backing array. The data from the payload portion of the backing array of the<br />
received reliable msg t packet is then simply copied over to this new backing array. Again, this code is very<br />
similar to that found in MoteIF to extract the payload from a received serial packet.<br />
7.5.3 Reimplementing TestSerial<br />
Switching TestSerial’s Java code to use the new reliable transmission layer is very straightforward because<br />
ReliableMoteIF is a subclass of MoteIF. We just construct a ReliableMoteIF object in main:<br />
public static void main(String[] args) throws Exception {<br />
/* Open connection to the mote, and start sending packets */<br />
PhoenixSource phoenix = BuildSource.makePhoenix("serial@COM1:telosb", null);<br />
MoteIF mif = new ReliableMoteIF(phoenix);<br />
TestSerial serial = new TestSerial(mif);<br />
serial.sendPackets();<br />
}<br />
Listing 7.12: A reliable TestSerial.java<br />
7.6 Exercises<br />
1. ReliableMoteIF is not a proper replacement for MoteIF because our reliable transmission protocol<br />
only supports a single message type. Extend reliable msg t, ReliableMoteIF and ReliableSerialC (the<br />
nesC reliable protocol implementation) with an AM-type-like dispatch field.<br />
2. Implement a simple PC application that talks to the AntiTheft base station mote of Chapter 6.4.4, to<br />
print theft report and allow the user to change theft-detection settings.<br />
3. Improve the performance of the reliable transmission protocol by allowing multiple outstanding un-acknowledged<br />
packets using, e.g., a windowed protocol.
Part III<br />
Advanced <strong>Programming</strong><br />
111
Advanced Components<br />
113
8. Advanced Components 114
Advanced Wiring<br />
115
9. Advanced Wiring 116
Design Patterns<br />
117
10. Design Patterns 118
Advanced Concurrency<br />
119
11. Advanced Concurrency 120
Device drivers and the hardware<br />
abstraction architecture (HAA)<br />
121
12. Device drivers and the hardware abstraction architecture (HAA) 122
Advanced Applications<br />
123
13. Advanced Applications 124
Part IV<br />
Appendix and References<br />
125
<strong>TinyOS</strong> APIs<br />
This chapter gives summaries of major <strong>TinyOS</strong> interfaces and the components that provide them. It only<br />
covers hardware-independent HIL interfaces and abstractions that are common across multiple hardware<br />
platforms. In almost all cases, <strong>TinyOS</strong> Enhancement Proposals (TEPs) describe the abstractions in greater<br />
depth, and we reference them as appropriate. Application-level abstractions with split-phase interfaces are<br />
typically generics, which a user must instantiate. For sake of brevity, this list shows the signatures of relevant<br />
components: you can read the interfaces in your <strong>TinyOS</strong> distribution.<br />
A.1 Booting<br />
The process of booting a mote is encapsulated in the MainC component, that signals the Boot.booted<br />
event once all system services are initialized. Components that require boot-time initialization should<br />
wire themselves to MainC’s SoftwareInit: MainC’s SoftwareInit.init command is called after hardware<br />
initialization but before booted is signaled.<br />
configuration MainC {<br />
provides interface Boot;<br />
uses interface Init as SoftwareInit;<br />
}<br />
We covered booting in Chapter 6.1. The <strong>TinyOS</strong> boot process is described in TEP 107: <strong>TinyOS</strong> 2.x<br />
Boot Sequence [7].<br />
A.2 Communication<br />
<strong>TinyOS</strong> provides four basic communication abstractions: active messages (AM, single-hop, unreliable<br />
communication), collection (multihop, unreliable delivery to a data sink) and dissemination (multihop,<br />
reliable delivery to every node in the network), and serial communication (unreliable delivery over a serial<br />
line). We covered communication in Chapters 6.3, 6.4 and 7.1.1.<br />
The message t type is used to declare packet buffers for <strong>TinyOS</strong> networking protocols, as explained in<br />
TEP 111: message t [8].<br />
A.2.1<br />
Single-hop<br />
<strong>TinyOS</strong> has four standard single-hop communication components, all of which take an AM type as a<br />
parameter, an 8-bit number that identifies different packet types. Active message addresses are 16 bits.<br />
<strong>TinyOS</strong> defines the macro TOS BCAST ADDR for the AM broadcast address, and a node can find its local<br />
address through the AMPacket interface.<br />
AMSenderC sends packets. AMReceiverC signals reception for packets addressed to the node, including<br />
the broadcast address; AMSnooperC signals reception for packets not addressed for the node; AMSnoopingReceiverC<br />
127
A.2. Communication 128<br />
signals reception for all packets, regardless of addressing. The AM interfaces automatically discard packets<br />
which do not pass a link-layer CRC check. The PacketAcknowledgements interface allows transmitters to<br />
request for a link layer acknowledgement and check if one was received after transmission: PacketAcknowledgements.wasAck<br />
can be called in Send.sendDone.<br />
generic configuration AMSenderC(am_id_t AMId) {<br />
provides {<br />
interface AMSend;<br />
interface Packet;<br />
interface AMPacket;<br />
interface PacketAcknowledgements as Acks;<br />
}<br />
}<br />
generic configuration AMReceiverC(am_id_t amId) {<br />
provides {<br />
interface Receive;<br />
interface Packet;<br />
interface AMPacket;<br />
}<br />
}<br />
generic configuration AMSnooperC(am_id_t AMId) {<br />
provides {<br />
interface Receive;<br />
interface Packet;<br />
interface AMPacket;<br />
}<br />
}<br />
generic configuration AMSnoopingReceiverC(am_id_t AMId) {<br />
provides {<br />
interface Receive;<br />
interface Packet;<br />
interface AMPacket;<br />
}<br />
}<br />
By default, the radio stack is powered off. You must turn it on in order to be able to send and receive<br />
packets. The simplest way to do so is to put it in full-power (always-on) mode via the SplitControl interface.<br />
The low power section below (page 135) shows how you can turn it on into a low-power state, where<br />
nodes periodically wake up to listen for packets. For full-power control, wire and call SplitControl.start on<br />
ActiveMessageC.<br />
configuration ActiveMessageC {<br />
provides {<br />
interface SplitControl;<br />
// interfaces elided here<br />
}<br />
}<br />
For more details on these components and their interfaces, refer to TEP 116: Packet Protocols [9]. The<br />
AM components are typically found in tos/system.<br />
The above components are all for radio communication: there are also versions of these components for<br />
motes that are connected via a serial port: SerialActiveMessageC, SerialAMSenderC and SerialAMReceiverC.<br />
These components are described in TEP 113: Serial Communication [4]. Note that the serial stack does not
129 A.2. Communication<br />
perform address filtering, so there is no snooping.<br />
A.2.2<br />
Multihop collection<br />
Collection protocols build routing trees to nodes that advertise themselves as data sinks. Typically, sink<br />
nodes are connected to a PC via a serial cable or other medium, although sometimes they log all data they<br />
receive to non-volatile storage. While in good conditions collection protocols can have 99.9% or better<br />
reliability, they do not promise reliability: a sender does not receive feedback on whether its packets have<br />
arrived.<br />
Collection implementations can be found in tos/lib/net. For example, the collection tree protocol<br />
(CTP) implementation can be found in tos/lib/net/ctp while the MultihopLQI implementation can be<br />
found in tos/lib/net/lqi.<br />
To send packets, a program instantiates a CollectionSenderC. To configure a node as a base station, it<br />
should wire to CollectionControlC to call RootControl.setRoot as well as instantiate relevant CollectionReceiverC<br />
services. Collection clients take a collection identifier, similar to an AM type.<br />
generic configuration CollectionSenderC(collection_id_t collectid) {<br />
provides {<br />
interface Send;<br />
interface Packet;<br />
}<br />
}<br />
generic configuration CollectionReceiverC(collection_id_t collectid) {<br />
provides {<br />
interface Receive;<br />
}<br />
}<br />
configuration CollectionControlC {<br />
provides {<br />
interface StdControl;<br />
interface Packet;<br />
interface CollectionPacket;<br />
interface RootControl;<br />
}<br />
}<br />
Note that you must start collection by calling CollectionControlC.StdControl. Further details on these<br />
components and collection can be found in TEP 119: Collection [1].<br />
A.2.3<br />
Multihop dissemination<br />
Collection pulls data out of a network: dissemination pushes it into a network. Dissemination protocols are<br />
reliable and deliver data to every node in a network: new nodes that join the network will receive updates.<br />
Achieving this reliability requires that a node statically allocate RAM for the data, so it can forward it at any<br />
time. Dissemination is typically used for controlling and configuring a network: a dissemination value can<br />
be a configuration constant, or a concise command. Dissemination only works for small values that can fit<br />
in a single packet (e.g., 20 bytes). Each dissemination value has a unique key, which a user must specify.<br />
Dissemination implementations can be found in tos/lib/net. Drip [18] in tos/lib/net/drip is<br />
the simpler of the two: it requires less RAM and code space but is less efficient. DIP, in tos/lib/net/dip<br />
is more efficient but more complex. The DisseminationValue interface notifies a node of updates, while the
A.3. Time 130<br />
DisseminationUpdate interface lets a node create an update. Configuring a network from a PC typically<br />
involves sending a packet to a base station over a serial port that tells the node to update a value.<br />
Both DIP and Drip use the Trickle algorithm [10]. Trickle values efficiency over speed: it can take a<br />
few seconds for a value to propagate one hop, and it might take up to a minute to disseminate to every node<br />
in a very large, many-hop network. It works slowly to avoid flooding the network with lots of packets and<br />
causing many collisions.<br />
generic configuration DisseminatorC(typedef t, uint16_t key) {<br />
provides interface DisseminationValue;<br />
provides interface DisseminationUpdate;<br />
}<br />
configuration DisseminationC {<br />
provides interface StdControl;<br />
}<br />
Note that you must start dissemination by calling DisseminationC.StdControl. Further details on dissemination<br />
can be found in TEP 118: Dissemination [11].<br />
A.2.4<br />
Binary Reprogramming<br />
The fourth common communication abstraction is binary reprogramming. This is not really a abstraction,<br />
in that an application doesn’t actively send packets using it. Instead, it is a service that automatically runs.<br />
It enables an administrator to install new binary images in a <strong>TinyOS</strong> network. These binaries are stored on<br />
flash, and can be installed. Note that if a new image doesn’t have binary reprogramming installed, then you<br />
can’t uninstall it!<br />
Deluge, found in tos/lib/net/Deluge, is the standard binary dissemination implementation [5]. It<br />
builds on top of basic dissemination to install large (many kB) data items. Rather than have <strong>TinyOS</strong> APIs<br />
for controlling its behavior, Deluge comes with command line tools that inject the necessary packets into a<br />
network. Please refer to the Deluge manual in the <strong>TinyOS</strong> documentation for more details.<br />
A.3 Time<br />
<strong>TinyOS</strong> has two timer interfaces: Timer, which is synchronous and operates in task context, and Alarm,<br />
which is asynchronous and involves directly handling a hardware interrupt. For the most part, applications<br />
use Timer. Some low-level systems (such as MAC protocols) or applications that require precise timing use<br />
Alarm. Additionally, nodes can access their local time with the LocalTime interface. A node’s local time<br />
starts when it boots, so different nodes typically do not have the same time.<br />
The basic Timer abstraction is TimerMilliC:<br />
generic configuration TimerMilliC() {<br />
provides interface Timer;<br />
}<br />
Local time can be obtained from LocalTimeMilliC:<br />
configuration LocalTimeMilliC {<br />
provides interface LocalTime;<br />
}<br />
Because Alarm is typically a HAL, rather than HIL, abstraction (Chapter 12), there is no standard<br />
component that provides Alarm. We covered timing in Chapters 6.1 and 13. Further details on timers<br />
and time can be found in TEP 102: Timers [16].
131 A.4. Sensing<br />
A.4 Sensing<br />
Sensors in <strong>TinyOS</strong> follow a naming convention described in TEP 109: Sensors and Sensor Boards [3].<br />
Typically, they are named after the actual sensor chip. Therefore, there are almost no “standard” sensor<br />
component names, as the set of a sensors a node might have depends on its hardware. However, TEP 109<br />
also describes what interfaces sensors should provide, so that it’s typically easy to write code independently<br />
of the exact sensor.<br />
Sensors normally provide one or more of the common sensing interfaces described in TEP 114: SIDs:<br />
Source and Sink Independent Drivers [19].<br />
<strong>TinyOS</strong> provides two “fake” sensors, which are completely software. The first, ConstantSensorC, takes<br />
a constant as a parameter and always returns that value. The second, SineSensorC, returns a value from a<br />
sine function whose input increments on each sample. Platforms also have a DemoSensorC, which either<br />
instantiates one of these software sensors or is a wrapper around a hardware-specific sensor.<br />
generic module ConstantSensorC(typedef width_t @integer(), uint32_t val) {<br />
provides interface Read;<br />
}<br />
generic module SineSensorC() {<br />
provides interface Read;<br />
}<br />
generic configuration DemoSensorC() {<br />
provides interface Read;<br />
}<br />
We covered sensors in Chapters 6.2 and 13.<br />
A.5 Storage<br />
<strong>TinyOS</strong> provides three basic storage abstractions. Config storage is for small, random-access variables, such<br />
as configuration constants. Log storage is for append-only writing and random-access, sequential reading.<br />
Block storage is for large, random-access data items. Chapter 6.5 has more details on their use and tradeoffs.<br />
<strong>TinyOS</strong> has scripts that generate a layout of named storage volumes from an XML specification. A<br />
layout is essentially the offset where each volume starts and its length. Storage clients take a volume ID<br />
as a parameter, which allows it to access these generated constants. For more details, refer to TEP 103:<br />
Permanent Data Storage (Flash) [2].<br />
generic configuration BlockStorageC( volume_id_t volume_id ) {<br />
provides interface BlockRead;<br />
provides interface BlockWrite;<br />
provides interface StorageMap;<br />
}<br />
generic configuration LogStorageC( volume_id_t volume_id, bool circular ) {<br />
provides interface LogRead;<br />
provides interface LogWrite;<br />
}<br />
generic configuration ConfigStorageC( volume_id_t volume_id ) {<br />
provides interface Mount;<br />
provides interface ConfigStorage;<br />
}
A.6. Data structures 132<br />
Because flash storage implementations are chip-specific, you usually find them in a tos/chips directory.<br />
For example, the mica family of nodes has an AT45DB-family flash chip: when you use one of the above<br />
abstractions on a mica, you use the components in tos/chips/at45db.<br />
A.6 Data structures<br />
<strong>TinyOS</strong> has component implementations of a few commonly used data structures. All of these can be found<br />
in tos/system.<br />
A.6.1<br />
BitVectorC<br />
BitVectorC provides the abstraction of a bit vector. It takes a single parameter, the width of the vector. The<br />
BitVector interface has commands for getting, setting, clearing, and toggling individual bits or all of the bits<br />
at once. Because of nesC’s heavy inlining, using BitVectorC is preferable to writing your own bit vector<br />
macros within a component. BitVectorC allocates ⌈ N 8<br />
⌉ bytes for an N-bit wide vector.<br />
generic module BitVectorC(uint16_t max_bits) {<br />
provides interface BitVector;<br />
}<br />
A.6.2<br />
QueueC<br />
QueueC provides the abstraction of a queue of items with a fixed maximum size. It takes two parameters:<br />
the type of the items it stores and the maximum size of the queue. The Queue interface has commands for<br />
enqueuing items on the end of the queue, dequeueing the head of the queue, and commands for checking<br />
the queue size. It also allows random-access lookup: you can scan the queue.<br />
generic module QueueC(typedef queue_t, uint8_t QUEUE_SIZE) {<br />
provides interface Queue;<br />
}<br />
QueueC is used heavily in networking protocols. A routing protocol, for example, often creates a<br />
QueueC of pointers to message buffers (message t*) for its forwarding queue, as well as a PoolC (see<br />
below) to allocate a number of buffers so it can receive packets to forward.<br />
A.6.3<br />
BigQueueC<br />
The uint8 t parameter to QueueC limits its maximum size to 255. For most uses, this is sufficient and<br />
so wasting extra bytes on its internal fields to support a larger size is not worth it. However, sometimes<br />
components need a larger queue. The printf library, for example (page 134), has a queue of bytes to send,<br />
which is usually longer than 255. <strong>TinyOS</strong> therefore also has BigQueueC, which is essentially identical to<br />
QueueC except that it has a 16-bit size parameter and provides the interface BigQueue:<br />
generic module BigQueueC(typedef queue_t, uint16_t QUEUE_SIZE) {<br />
provides interface BigQueue as Queue;<br />
}<br />
A.6.4<br />
PoolC<br />
PoolC is the closest thing <strong>TinyOS</strong> has to a dynamic memory allocator. It takes two parameters: the type of<br />
object to allocate, and how many. Components can then dynamically allocate and free these objects to the
133 A.7. Utilities<br />
pool. But as the maximum pool size is set at compile time, a memory leak will cause the pool to empty,<br />
rather than cause the heap and stack to collide.<br />
Because it does the allocation, you specify a type to PoolC, but its commands use pointers to that type.<br />
For example, if you allocate a pool of message t buffers, then calls to Pool pass message t*.<br />
generic configuration PoolC(typedef pool_t, uint8_t POOL_SIZE) {<br />
provides interface Pool;<br />
}<br />
You can swap data items between pools. For example, if you have two separate message t pools P 1<br />
and P 2 , it is OK to allocate M 1 from P 1 and M 2 from P 2 , yet free M 1 into P 2 and M 2 into P 1 . This behavior<br />
is critically important due to the buffer-swapping semantics of Receive. If a component receives a packet it<br />
wants to forward, it allocates a buffer from its pool and returns this new buffer to the link layer. The next<br />
packet – whose buffer came from the pool – might go to another component, which has its own pool. So the<br />
pseudocode for forwarding a packet looks something like this:<br />
receive(m):<br />
if (!forward(m)):<br />
return m<br />
setHeaders(m)<br />
queue.put(m)<br />
m2 = pool.get()<br />
return m2<br />
A.6.5<br />
StateC<br />
StateC provides an abstraction of a state machine. This is useful when multiple components need to share a<br />
global state (such as whether the subsystem is on or off).<br />
generic configuration StateC() {<br />
provides interface State;<br />
}<br />
A.7 Utilities<br />
<strong>TinyOS</strong> provides components for several commonly-used functions and abstractions.<br />
A.7.1<br />
Random numbers<br />
RandomC provide the interface Random, which components can use to generate random numbers. RandomC<br />
also provides the interfaces Init and ParameterInit, to enable a component re-initialize RandomC’s random<br />
seed. By default, RandomC’s seed is initialized to the node ID+1.<br />
<strong>TinyOS</strong> includes two random number generators: RandomMlcgC (a multiplicative linear congruential<br />
generator) and RandomLfsrC (a linear feed shift register generator). RandomLfsrC is faster, but RandomMlcgC<br />
produces better random numbers. By default, RandomC refers to RandomMlcgC.<br />
configuration RandomC {<br />
provides interface Init;<br />
provides interface ParameterInit as SeedInit;<br />
provides interface Random as Random;<br />
}
A.7. Utilities 134<br />
configuration RandomMlcgC {<br />
provides interface Init;<br />
provides interface ParameterInit as SeedInit;<br />
provides interface Random as Random;<br />
}<br />
configuration RandomLfsrC {<br />
provides interface Init;<br />
provides interface ParameterInit as SeedInit;<br />
provides interface Random as Random;<br />
}<br />
A.7.2<br />
Leds<br />
LedsC provides an abstraction of 3 LEDs. While some platforms have more or fewer than 3, the Leds<br />
interface has 3 for historical reasons. Also, breaking up the LEDs into 3 instances of the same interface<br />
would be a lot of extra wiring. In addition to LedsC, there is also a NoLedsC, which can be dropped in as a<br />
null replacement: calls to NoLedsC do nothing.<br />
configuration LedsC {<br />
provides interface Leds;<br />
}<br />
configuration NoLedsC {<br />
provides interface Leds;<br />
}<br />
A.7.3<br />
Cyclic redundancy checks<br />
Cyclic redundancy checks (CRCs) are a simple way to check whether a piece of data has been corrupted.<br />
After the data, you append a CRC. Someone reading the data can recompute the CRC over the data and<br />
check that it matches the appended CRC. If the two do not match, there is a bit error either in the data or<br />
the CRC itself. Since the CRC is usually much shorter than the data, the assumption is the data has been<br />
corrupted. CRCs are heavily used in networking, to check the validity of a packet. Of course, since CRCs<br />
are shorter than the data itself, it’s possible, but unlikely, for a corrupted packet to pass a CRC check.<br />
CRC values are distinct from cryptographic hashes. CRCs are intended to detect bursts of bit errors.<br />
Typically, an n-bit CRC can always detect a single error burst that is shorter than n bits. In contrast,<br />
cryptographically strong hashes have entropy properties that make detecting (or failing to detect) any kind<br />
of error uniformly likely.<br />
module CrcC {<br />
provides interface Crc;<br />
}<br />
The module CrcC can be found in tos/system.<br />
A.7.4<br />
Printf<br />
Sometimes, when debugging, it can very useful to have a mote send simple text messages. <strong>TinyOS</strong> has a<br />
printf – like the C standard library function – library for this purpose. You can use printf in your components,<br />
and the printf library will send appropriate packets over the serial port. You must start the printf library via<br />
PrintfC’s SplitControl.start.
135 A.8. Low Power<br />
configuration PrintfC {<br />
provides {<br />
interface SplitControl as PrintfControl;<br />
interface PrintfFlush;<br />
}<br />
}<br />
For more details on using the printf library, refer to the tutorial on the <strong>TinyOS</strong> website.<br />
A.8 Low Power<br />
For the most part, <strong>TinyOS</strong> will automatically put systems and hardware into the lowest power state possible.<br />
For peripherals, this typically works through power locks (Chapter 11). For example, when an application<br />
writes or reads from a flash chip, <strong>TinyOS</strong> will automatically power it on, perform the operation, then power<br />
it down when done.<br />
Communication is the major exception to this behavior. Because communication subsystems, such as<br />
the radio and serial port, need to be able to receive as well as transmit, <strong>TinyOS</strong> needs an application to<br />
explicitly tell it when it can safely turn them on and off via SplitControl interfaces.<br />
In the case of the radio, however, there are many techniques one can use to save power. For example,<br />
rather than always keep the radio on, <strong>TinyOS</strong> can keep it off most of the time, periodically turning it on just<br />
long enough to hear if there’s a packet. A transmitter sends a packet multiple times, until the receiver wakes<br />
up, hears it, and acknowledges it, or a timeout occurs.<br />
A complete discussion of how to set these intervals is beyond the scope of the book. The important<br />
interface is LowPowerListening, which some (but not all) radios provide. LowPowerListening allows an<br />
application to set a radio’s check interval and also the check interval it expects of a receiver. <strong>TinyOS</strong> has<br />
a tutorial for how to use this interface when writing a low-power application, and Chapter 12 has a brief<br />
example of its use.
A.8. Low Power 136
Bibliography<br />
[1] R. Fonseca, O. Gnawali, K. Jamieson, and P. Levis. TEP 119: Collection.<br />
http://www.tinyos.net/tinyos-2.x/doc/.<br />
[2] D. Gay and J. Hui. TEP 103: Permanent Data Storage (Flash). http://www.tinyos.net/tinyos-2.x/doc/.<br />
[3] D. Gay, P. Levis, W. Hong, J. Polastre, and G. Tolle. TEP 109: Sensors and Sensor Boards.<br />
http://www.tinyos.net/tinyos-2.x/doc/.<br />
[4] B. Greenstein and P. Levis. TEP 113: Serial Communication. http://www.tinyos.net/tinyos-2.x/doc/.<br />
[5] J. W. Hui and D. Culler. The dynamic behavior of a data dissemination protocol for network<br />
programming at scale. In Proceedings of the Second ACM Conference On Embedded Networked<br />
Sensor <strong>Systems</strong> (SenSys), pages 81–94, New York, NY, USA, 2004. ACM Press.<br />
[6] S. Kim, S. Pakzad, D. Culler, J. Demmel, G. Fenves, S. Glaser, and M. Turon. Health monitoring of<br />
civil infrastructures using wireless sensor networks. In IPSN ’07: Proceedings of the 6th international<br />
conference on Information processing in sensor networks, 2007.<br />
[7] P. Levis. TEP 107: <strong>TinyOS</strong> 2.x Boot Sequence. http://www.tinyos.net/tinyos-2.x/doc/.<br />
[8] P. Levis. TEP 111: message t. http://www.tinyos.net/tinyos-2.x/doc/.<br />
[9] P. Levis. TEP 116: Packet Protocols. http://www.tinyos.net/tinyos-2.x/doc/.<br />
[10] P. Levis, N. Patel, D. Culler, and S. Shenker. Trickle: A self-regulating algorithm for code maintenance<br />
and propagation in wireless sensor networks. In First USENIX/ACM Symposium on Network <strong>Systems</strong><br />
Design and Implementation (NSDI), 2004.<br />
[11] P. Levis and G. Tolle. TEP 118: Dissemination. http://www.tinyos.net/tinyos-2.x/doc/.<br />
[12] J. Liu, N. Priyantha, F. Zhao, C.-J. M. Liang, and Q. Wang. Towards discovering data center genome<br />
using sensor nets. In Proceedings of the Fifth Workshop on Embedded Networked Sensors (EmNets),<br />
2008.<br />
[13] A. Mainwaring, J. Polastre, R. Szewczyk, D. Culler, and J. Anderson. Wireless Sensor Networks for<br />
Habitat Monitoring. In Proceedings of the ACM International Workshop on Wireless Sensor Networks<br />
and Applications, Sept. 2002.<br />
[14] J. Polastre, J. Hill, and D. Culler. Versatile low power media access for wireless sensor networks.<br />
In Proceedings of the Second ACM Conferences on Embedded Networked Sensor <strong>Systems</strong> (SenSys),<br />
2004.<br />
[15] D. Rand. PPP Reliable Transmission. Internet Network Working Group RFC1663, July 1994.<br />
137
BIBLIOGRAPHY 138<br />
[16] C. Sharp, M. Turon, and D. Gay. TEP 102: Timers. http://www.tinyos.net/tinyos-2.x/doc/.<br />
[17] R. Szewczyk, J. Polastre, A. Mainwaring, and D. Culler. An analysis of a large scale habitat monitoring<br />
application. In Proceedings of the Second ACM Conference on Embedded Networked Sensor <strong>Systems</strong><br />
(SenSys 2004), 2004.<br />
[18] G. Tolle and D. Culler. Design of an application-cooperative management system for wireless sensor<br />
networks. In Proceedings of Second European Workshop on Wireless Sensor Networks(EWSN 2005),<br />
2005.<br />
[19] G. Tolle, P. Levis, and D. Gay. TEP 114: SIDs: Source and Sink Independent Drivers.<br />
http://www.tinyos.net/tinyos-2.x/doc/.<br />
[20] T. von Eicken, D. E. Culler, S. C. Goldstein, and K. E. Schauser. Active Messages: A Mechanism<br />
for Integrated Communication and Computation. In Proceedings of the International Symposium on<br />
<strong>Computer</strong> Architecture, pages 256–266, 1992.<br />
[21] G. Werner-Allen, K. Lorincz, J. Johnson, J. Leess, and M. Welsh. Fidelity and yield in a<br />
volcano monitoring sensor network. In 7th USENIX Symposium on Operating <strong>Systems</strong> Design and<br />
Implementation (OSDI), 2006.
Index<br />
wiring operator, 28, 45<br />
= wiring operator, 28, 45<br />
@combine attribute, 57<br />
#define, 36, 39<br />
pitfalls, 40<br />
#include, usage of, 39<br />
802.15.4, 5<br />
abstract data type<br />
predefined in <strong>TinyOS</strong>, 132<br />
active message type, 79, 83, 84, 87, 99, 127<br />
Active messages (AM)<br />
address and TOS NODE ID, difference, 81<br />
active messages (AM), 79, 99, 127<br />
AM, see active messages (AM)<br />
AM type, see active message type<br />
AMSend interface, 80<br />
AntiTheft (application), 71<br />
application source code, 8<br />
as<br />
naming components, 46<br />
naming interfaces, 20<br />
asynchronous (async)<br />
code, 63<br />
commands and events, 63<br />
auto-wiring (for initialization), 52<br />
backing array (for packets), 101, 102, 108, 110<br />
base station, 84, 87<br />
bidirectional interface, 25<br />
big-endian, 38<br />
binary reprogramming, 130<br />
BlockRead interface, 95<br />
BlockWrite interface, 94<br />
Boot interface, 72<br />
C libraries, using, 41<br />
callback, 10, 13<br />
CC1000 (radio chip), 43<br />
CC2420 (radio chip), 5<br />
collection (network protocol), 84, 85, 87, 127<br />
combine function, 57<br />
associative and commutative, 58<br />
warning (when missing), 58<br />
command, 10, 22<br />
component, 6, 10, 12, 19<br />
generic, see generic component<br />
implementation, 19, 26<br />
initialization, 51<br />
layering, 52<br />
naming using as, 46<br />
signature, 19<br />
singleton, 29, 60<br />
switching between similar, 83<br />
concurrency model, 63<br />
ConfigStorage interface, 91<br />
configuration, 10, 27, 44<br />
exporting interfaces, 46<br />
generic, 58<br />
constants, 36<br />
CRC (cyclic redundancy check), 134<br />
deadline-based timing, 73<br />
Deluge (binary reprogramming), 130<br />
dissemination (network protocol), 84, 86, 87, 127<br />
DisseminationUpdate interface, 88<br />
DisseminationValue interface, 86<br />
dynamic memory allocation, 32, 132<br />
enum<br />
use and abuse, 36<br />
event, 10, 22<br />
execution model, 63<br />
exporting (an interface), 46<br />
fan-in, 55<br />
fan-out, 55<br />
FlashSampler (application), 93<br />
generic component, 29, 58<br />
generic interface, 24<br />
139
INDEX 140<br />
global declarations, 39<br />
hardware interface layer (HIL), 127<br />
header files, 39<br />
IEEE 802.15.4, 5<br />
interface, 10, 12, 22<br />
bidirectional, 25<br />
generic, 24<br />
naming using as, 20<br />
provider, 10, 19<br />
split-phase, 31, 75<br />
type, 48<br />
type parameter, 24, 26<br />
user, 10, 19<br />
interrupt, 63<br />
interrupt handler, 63<br />
and stack usage, 33<br />
Leds interface, 72<br />
little-endian, 38<br />
low power listening (radio), 135<br />
LowPowerListening interface, 135<br />
malloc, problems with, 32<br />
memory<br />
allocation, 32, 132<br />
buffer swap in Receive, 34<br />
conserving with enum, 36<br />
ownership, 34, 81, 83<br />
sharing across components, 34, 35<br />
Message (Java class), 102<br />
message t, 79<br />
micaz mote, 5<br />
mig (PC tool), 100<br />
and AM types, 104<br />
generated methods, 102<br />
receiving packets, 103<br />
sending packets, 102<br />
module, 9, 26<br />
generic, 29<br />
variable initializers, 29<br />
mote, 4<br />
micaz, 5<br />
power budget, 6<br />
Telos, 5<br />
MoteIF (Java class), 102, 107<br />
and AM types, 104<br />
receiving packets, 103<br />
sending packets, 102<br />
Mount interface, 91<br />
multi-hop networking, 84<br />
collection, see collection (network protocol)<br />
dissemination, see dissemination (network protocol)<br />
multiple wiring, 54<br />
order of calls, 55<br />
naming convention<br />
for components, 50<br />
ncg (PC tool), 104<br />
and #define, 105<br />
nesC<br />
comparison with C and C++, 14<br />
compilation model, 11<br />
nesC reference manual, 6<br />
nesdoc, 10, 52<br />
net.tinyos.message<br />
Message class, see Message (Java class)<br />
MoteIF class, see MoteIF (Java class)<br />
networking<br />
multi-hop, 84<br />
serial-port, see serial-port networking<br />
single-hop, 79<br />
nx , nxle type prefixes, 38<br />
ownership (of memory), see memory<br />
packet<br />
reception, 82<br />
sending, 80<br />
size, 79<br />
specified with platform-independent types, 80,<br />
99<br />
structure, 79<br />
structure (serial), 99<br />
unreliable delivery (radio), 79<br />
unreliable delivery (serial), 99<br />
packet source (PC), 102, 105<br />
PC tools, 99<br />
Java, 99<br />
mig, 100<br />
MoteIF, see MoteIF (Java class)<br />
ncg, 104<br />
other languages, 99<br />
packet source, see packet source (PC)<br />
platform-independent types, 99<br />
serial forwarder, 106<br />
permanent storage, 90
141 INDEX<br />
block data, 93<br />
configuration data, 91<br />
log data, 95<br />
reliability, 90, 92, 97<br />
sampling to, 94<br />
volume configuration file, 90<br />
volumes, 90<br />
platform independent types, 38<br />
platform-independent types<br />
accessed using mig, 100<br />
PC tools, 99<br />
use in networking, 80, 86, 99<br />
posting a task, 63<br />
power management, 135<br />
in the radio, 135<br />
printf, 134<br />
random number generation, 133<br />
Read interface, 75<br />
ReadStream interface, 77<br />
Receive interface, 82<br />
recursion<br />
avoiding, 33<br />
due to events signaled in commands, 67<br />
use tasks to avoid, 68<br />
reliable transmission (serial), 106<br />
RootControl interface, 88<br />
sampling sensors, 75<br />
sampling to permanent storage, 94<br />
Send interface, 85<br />
sending packets, 80<br />
sensor, 75<br />
components, 76<br />
stream sampling, 77<br />
values, calibration, 77<br />
sensor networks, 3<br />
structure (typical), 84<br />
sensor node, 4<br />
serial forwarder (PC tool), 106<br />
serial-port networking, 99, 127<br />
service<br />
starting and stopping, 82, 86<br />
signature (of component), 19<br />
single stack, 31, 32<br />
single-hop networking, 79<br />
singleton (component), 29, 60<br />
source code, for example applications, 8<br />
split-phase, 6, 30, 75<br />
SplitControl interface, 82<br />
stack usage, 33<br />
StdControl interface, 86<br />
synchronous (sync) code, 63<br />
task, 6, 63, 63<br />
for avoiding recursion, 68<br />
posting overhead, 65<br />
split-phase operations, 66<br />
timing, effects on latency and throughput, 65<br />
Telos mote, 5<br />
TEP, see <strong>TinyOS</strong> enhancement proposal (TEP)<br />
Timer interface, 73<br />
<strong>TinyOS</strong><br />
1.x, xiii<br />
API, 6, 127<br />
compiling, 7<br />
enhancement proposal (TEP), xiii, 127<br />
installing, 7<br />
overview, 5<br />
stack, 31, 32<br />
task scheduler, 64<br />
<strong>TinyOS</strong> component<br />
ActiveMessageC, 83, 128<br />
AMReceiverC, 83, 127<br />
AMSenderC, 83, 127<br />
AMSnooperC, 127<br />
AMSnoopingReceiverC, 127<br />
BigQueueC, 132<br />
BitVectorC, 132<br />
BlockStorageC, 93, 131<br />
CollectionC, 89<br />
CollectionControlC, 129<br />
CollectionReceiverC, 129<br />
CollectionSenderC, 87, 129<br />
ConfigStorageC, 90, 131<br />
ConstantSensorC, 131<br />
CrcC, 134<br />
DemoSensorC, 131<br />
DisseminationC, 89, 130<br />
DisseminatorC, 87, 89, 130<br />
LedsC, 74, 134<br />
LocalTimeMilliC, 130<br />
LogStorageC, 96, 131<br />
MainC, 74, 127<br />
NoLedsC, 134<br />
PoolC, 59, 133
INDEX 142<br />
PrintfC, 134<br />
QueueC, 132<br />
RandomC, 133<br />
RandomLfsrC, 134<br />
RandomMlcgC, 133<br />
sensors, 76, 131<br />
SerialActiveMessageC, 83, 128<br />
SerialAMReceiverC, 83, 128<br />
SerialAMSenderC, 83, 128<br />
SineSensorC, 131<br />
StateC, 133<br />
TimerMilliC, 74, 130<br />
<strong>TinyOS</strong> interface<br />
AMSend, 80<br />
BlockRead, 95<br />
BlockWrite, 94<br />
Boot, 72<br />
ConfigStorage, 91<br />
DisseminationUpdate, 88<br />
DisseminationValue, 86<br />
Leds, 72<br />
LowPowerListening, 135<br />
Mount, 91<br />
Read, 75<br />
ReadStream, 77<br />
Receive, 82<br />
RootControl, 88<br />
Send, 85<br />
SplitControl, 82<br />
StdControl, 86<br />
Timer, 73<br />
TOS NODE ID, 51, 81<br />
TOSH DATA LENGTH, 79<br />
tree collection, see collection<br />
type<br />
big-endian, 38<br />
little-endian, 38<br />
of interfaces, 48<br />
volume configuration file (for storage), 90<br />
wiring, 10, 12, 27<br />
code generated for, 45<br />
fan-in, 55<br />
fan-out, 55<br />
multiple, 54<br />
omitting interfaces in, 48<br />
only a metaphor, 56