Create successful ePaper yourself
Turn your PDF publications into a flip-book with our unique Google optimized e-Paper software.
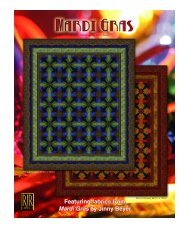
y <strong>Jinny</strong> <strong>Beyer</strong><br />
Block 1<br />
Block 2<br />
Block 3<br />
42 1 /4 " x 45"<br />
Featuring fabrics from the <strong>Jinny</strong> <strong>Beyer</strong> Palette
Third Dimension<br />
Designed <strong>by</strong> <strong>Jinny</strong> <strong>Beyer</strong><br />
Finished Quilt: 42 1 /4" x 45"<br />
Instructions <strong>by</strong> Shannon Murray<br />
Please read the pattern carefully before you begin.<br />
All seams are 1 /4".<br />
Skill Level: Intermediate to Advanced<br />
An original design <strong>by</strong> <strong>Jinny</strong> <strong>Beyer</strong>, Third Dimension is visually impressive. The finished quilt has four completely different<br />
visual effects when viewed from different perspectives, whether right side up, upside down, rotated left or rotated right. The<br />
three dimensional aspect is wonderfully unique from each viewpoint.<br />
This quilt was designed with hand piecing in mind in order to master the Y-seam technique, but it is not exclusive to hand<br />
piecing. One rule of thumb is constant for accurate piecing – DO NOT sew through the seam allowances for any Y-seam.<br />
The quilt is made up <strong>by</strong> three alternating blocks and the edges are filled in <strong>by</strong> partials of those same blocks. Be sure to<br />
accurately label all pieces when cutting to ensure proper block organization.<br />
Fabric Requirements and Cutting Directions<br />
Fabric Fabric Fabric No. Cutting Block<br />
Key Swatch Palette 9 No. Directions & Value<br />
Yardage<br />
1<br />
2<br />
3<br />
4<br />
9412-4<br />
#93<br />
9412-11a<br />
#137<br />
9410-3<br />
#120<br />
5747-8<br />
#140<br />
Cut 9 from Template A. 1 Light 1/8 Yard<br />
Cut 9 from Template A. 1 Medium 1/8 Yard<br />
Cut 9 from Template A. 1 Dark 1/8 Yard<br />
Cut 18 from Template B. 1 Dark 1/4 Yard<br />
5<br />
3300-4 Cut 18 from Template B.<br />
#39 Cut 1 each from Template C & C(r).<br />
1 Light 1/4 Yard<br />
6<br />
6740-8<br />
#95<br />
Cut 18 from Template B.<br />
1 Medium 1/4 Yard<br />
7<br />
4730-3 Cut 6 from Template A.<br />
#43 Cut 3 from Template D.<br />
2 Light 1/8 Yard<br />
8<br />
5746-10<br />
#141<br />
Cut 9 from Template A. 2 Medium 1/8 Yard<br />
9<br />
9812-8<br />
#87<br />
Cut 6 from Template A.<br />
For Borders, cut lengthwise strips:<br />
For Border # 1 – 4 of 1 1/2" x 46"<br />
For Border # 3 – 4 of 5" x 52"<br />
For Binding – 4 of 2 1 /4" x 52"<br />
2 Dark,<br />
Border & 1 1 /4 Yards<br />
Binding<br />
10<br />
2770-2<br />
#97<br />
Cut 18 from Template B. 2 Dark 1/4 Yard<br />
11<br />
6740-07 Cut 15 from Template B.<br />
#133 Cut 2 from Template C & C(r)<br />
2 Light 1/4 Yard<br />
1
Fabric Requirements and Cutting Directions (continued)<br />
Fabric Fabric Fabric No. Cutting Block<br />
Key Swatch Palette 9 No. Directions & Value<br />
Yardage<br />
12<br />
3303-2<br />
#136<br />
Cut 12 from Template B. 2 Medium 1/4 Yard<br />
13<br />
9812-18 Cut 6 from Template A.<br />
#134 Cut 3 from Template D.<br />
3 Light 1/8 Yard<br />
14<br />
15<br />
16<br />
17<br />
4730-11<br />
#138<br />
4731-11<br />
#96<br />
4732-1<br />
#35<br />
4731-4<br />
#44<br />
Cut 6 from Template A. 3 Medium 1/8 Yard<br />
Cut 9 from Template A. 3 Dark 1/8 Yard<br />
Cut 12 from Template B. 3 Dark 1/4 Yard<br />
Cut 15 from Template B.<br />
Cut 1 from Template C & 2 from 3 Light 1/4 Yard<br />
Template C(r).<br />
18<br />
Cut 18 of Template B.<br />
5866-72 For Borders, cut lengthwise strips:<br />
#37 For Border # 2<br />
4 of each 1 1/8" x 43"<br />
3 Medium<br />
& Border<br />
Binding<br />
3/8 Yard<br />
Backing Any coordinating fabric 3 Yards<br />
Piecing the Block<br />
Each block has a Light, Medium and Dark value on the<br />
interior and a Light, Medium and Dark value section on the<br />
exterior. For all three blocks, the order of the values is the<br />
same. Refer to Figure #1 for placement of the values. This<br />
will help when laying out the fabrics for each block.<br />
1. Lay the block out on a table as it should be sewn<br />
together. Reference the three blocks on the pattern cover.<br />
2. The hexagon shape of the block is made up <strong>by</strong> three<br />
diamonds. Each large diamond is made up from one<br />
small diamond cut from Template A and two trapezoids<br />
cut from Template B. See Figure #2 for a block break<br />
down.<br />
3. Refer to Figure #3 to follow the steps in piecing the large<br />
diamond together. It is very important to pay attention to<br />
the stitching lines (seam lines). The dots in Figure #3<br />
indicate where the 1 /4" seam allowance is. DO NOT sew<br />
beyond the dots. This allows for your Y-seam to press flat.<br />
Only on the y-seam stop 1/4" from edge.<br />
Step 3<br />
Add your second<br />
Trapezoid to<br />
your large<br />
diamond<br />
unit.<br />
Step 1<br />
A<br />
Figure #3<br />
A<br />
Step 2<br />
Right Sides Together<br />
Matching up seam<br />
allowances<br />
Step 4<br />
Right Sides Together<br />
Matching up seam<br />
.<br />
allowances<br />
A<br />
A<br />
Medium<br />
Medium<br />
Dark<br />
Figure #1<br />
Figure #2<br />
Step 5<br />
Two Template B’s<br />
before seaming.<br />
Fold and put<br />
the right sides<br />
together and<br />
align seam<br />
allowances.<br />
Seam.<br />
A<br />
Finish large diamond unit.<br />
2
4. Complete the other 2 large diamonds for the block<br />
follow ing Step 3 above.<br />
5. Put the three large diamonds together in a Y-seam to<br />
complete the hexagon block. Double check the placement<br />
of fabrics before stitching.<br />
NOTE: For more detailed information on Y-seams and their<br />
construction, refer to <strong>Jinny</strong> <strong>Beyer</strong>’s book, Quiltmaking <strong>by</strong><br />
Hand pp. 107-110.<br />
Refer to Figure #4 to complete piecing the full and partial<br />
blocks together. Full color pictures of each block are on the<br />
front cover of of the pattern.<br />
Assembling the Quilt<br />
Follow Figure #5 to assemble the quilt top. Do not sew<br />
through the seam allowances when piecing the blocks<br />
together in Y-seams.<br />
Block 2<br />
Block 1<br />
Block 2 Block 3 Block 1<br />
Block 3 Block 1 Block 2<br />
Block 3<br />
Block 1<br />
Block 2 Block 3 Block 1<br />
Block 1<br />
Block 2<br />
Block 2<br />
Block 3 Block 1 Block 2<br />
Block 3<br />
Make 9<br />
Make 6<br />
Block 1<br />
Block 2 Block 3 Block 1<br />
Block 2<br />
Block 3 Block 1 Block 2<br />
Block 3<br />
Block 3<br />
Block 2 Block 3<br />
Figure #5<br />
Make 6<br />
Make 3 Make 3<br />
Make 1<br />
Block 1<br />
Make 1<br />
Block 2<br />
Make 1<br />
Block 3<br />
Figure #4<br />
3
Bordering the Quilt<br />
1. Fold each border strip in half and finger press a crease at<br />
the center point. Sew together the three border strips<br />
aligning the finger pressed seams. Make 4. See<br />
Figure #6.<br />
Finger Pressed Seam to align centers:<br />
Figure #6<br />
2. For the top and bottom borders, place the inner border<br />
strip horizontally across the middle of the quilt, centering<br />
your finger pressed seam along the midline of the quilt.<br />
Use a 45˚ triangle to mark the miter along one end of the<br />
strip, positioning the triangle at the edge of the quilt as<br />
indicated in Figure #7 (see arrow). Cutting where the arrow<br />
indicates, at the exact edge of the quilt top, allows for the<br />
seam allowance. Mark, then cut the miter.<br />
3. Cut the miter on the opposite end of the same border strip<br />
in the same fashion.<br />
4. Using the first mitered strip as a pattern, place it on the<br />
remaining 3 border strip sets. Cut these border sets<br />
identical in size to the first border set, with perfect 45<br />
degree miters .<br />
5. For the left and right side borders, place the inner border<br />
strip across the middle of the quilt lengthwise, centering<br />
your finger pressed seam at the exact center of the quilt.<br />
Use a 45˚ triangle to mark the miter along one end of the<br />
strip, positioning the triangle at the edge of the quilt as<br />
previously done for the top and bottom borders. Mark,<br />
then cut the miter.<br />
6. Cut the miter on the opposite end of the same border strip<br />
in the same fashion.<br />
7. Using the first mitered strip as a pattern, place it on the<br />
remaining side border. Cut this strip identical in size to the<br />
first strip.<br />
8. Begin <strong>by</strong> pinning the finger pressed seam (the mid-point)<br />
of one of the border pieces to the middle of one of the<br />
edges of the quilt. Pin the corners next, then ease any<br />
fullness, carefully pinning all along the edge.<br />
9. Sew one of the border strips to the quilt stopping short of<br />
the 1/4" seam allowance at each corner.<br />
10. Repeat steps 5 and 6 to the remaining 3 sides of the<br />
quilt<br />
11. Sew the miters in all four corners remembering not to<br />
sew through your seam allowances.<br />
12. Layer the backing, batting and quilt top; baste.<br />
13. Quilt, bind and finish as desired.<br />
45˚<br />
Figure #7<br />
4
Templates<br />
(Shown at 100%, DO NOT<br />
scale when printing)<br />
A<br />
C<br />
3<br />
C(r)<br />
See “Cutting Directions” for number of<br />
templates to be cut from each fabric.<br />
5<br />
0 1" 2" 3"<br />
Use this 3" scale to insure the accuracy of your printout.