Bistro Baby Highchair - Mamas & Papas
Bistro Baby Highchair - Mamas & Papas
Bistro Baby Highchair - Mamas & Papas

You also want an ePaper? Increase the reach of your titles
YUMPU automatically turns print PDFs into web optimized ePapers that Google loves.
instructions<br />
bistro baby highchair<br />
IMPORTANT : Please read instructions carefully<br />
and keep for future reference<br />
– 1 –
BISTRO BABY HIGHCHAIR<br />
THESE INSTRUCTIONS ARE IMPORTANT. PLEASE READ CAREFULLY<br />
AND RETAIN FOR FUTURE REFERENCE.<br />
The correct use and maintenance of your highchair will ensure it gives long<br />
and trouble-free use. When somebody else is using your highchair ensure<br />
they also know how to use it, especially the way to fold/unfold it and the use<br />
of the safety locks. The safety of your child is your responsibility.<br />
AFTER SALES SERVICE: If you need assistance, spare parts or you are unhappy with any aspect<br />
of the goods please contact Customer Services on: 0870 8307700,<br />
or e-mail us at: customer.services@mamasandpapas.com<br />
Visit our website at www.mamasandpapas.com for the latest product information.<br />
READ BEFORE ASSEMBLY<br />
• Unpack all the components and identify them against the list below.<br />
• Do not discard any packaging until you are sure you have all the components.<br />
• Read the instructions thoroughly before attempting to assemble and operate<br />
the highchair.<br />
• Follow each stage of the construction step-by-step.<br />
– 2 –
COMPONENTS<br />
<strong>Highchair</strong><br />
Foot<br />
screws x 4<br />
Front<br />
feet x 2<br />
Rear<br />
feet x 2<br />
PVC<br />
cover<br />
Shelf<br />
Shelf<br />
screws x 2<br />
Tray<br />
Harness<br />
TOOLS<br />
Cross-head screwdriver.<br />
– 3 –
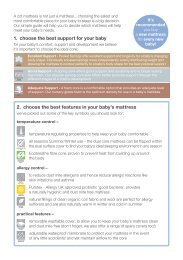
ATTACHING THE FEET<br />
Each highchair foot is<br />
different to the others.<br />
They are designed to fit<br />
in only one of the four<br />
feet positions. Use the<br />
diagram opposite to<br />
help identify the front<br />
and rear feet.<br />
Each foot has a plastic<br />
lug and screw hole<br />
whose position makes it<br />
impossible to fit a rear<br />
foot to the front leg<br />
and vice versa.<br />
When fitted ensure that<br />
the underside of the<br />
feet are flat on the<br />
floor.<br />
Rear foot<br />
Screw holes<br />
Front foot<br />
Plastic lugs<br />
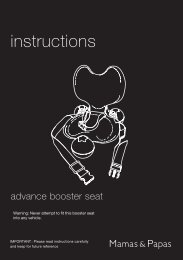
Select one of the<br />
highchair feet and align<br />
the screw hole and the<br />
plastic lug with the<br />
corresponding holes in<br />
the bottom of the<br />
highchair leg. Slot the<br />
foot into position on<br />
the leg.<br />
Fix the foot to the leg<br />
by screwing a foot<br />
screw into the hole in<br />
the underside of the<br />
foot and tighten it into<br />
the frame using a crosshead<br />
screwdriver, see<br />
diagram.<br />
Repeat to attach the<br />
remaining three feet.<br />
Plastic lug<br />
– 4 –
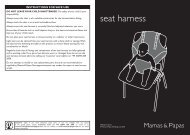
ATTACHING THE SHELF<br />
Before you can attach<br />
the shelf you will need<br />
to open the highchair.<br />
Working from the back<br />
of the highchair, grip<br />
the backrest and lift it<br />
upwards and the legs<br />
will begin to unfold.<br />
Pull the rear legs<br />
backwards until the<br />
frame is fully open.<br />
– 5 –
ATTACHING THE SHELF<br />
Working from the rear<br />
of the highchair position<br />
the front of the shelf<br />
between the rear legs.<br />
Align one of the slots in<br />
the side of the shelf<br />
with one of the metal<br />
pins fixed to the inside<br />
of the rear legs. Slot the<br />
shelf onto the metal<br />
pin, see diagram.<br />
Repeat the above<br />
procedure to attach the<br />
remaining side of the<br />
shelf to the frame.<br />
Slide the shelf forwards<br />
on the metal pins.<br />
Position the front of the<br />
shelf between the front<br />
legs. Align the holes in<br />
the front legs with the<br />
holes in the front of the<br />
shelf. Screw in the two<br />
self-tapping shelf<br />
screws through the<br />
holes in the front legs<br />
and into the shelf.<br />
Tighten them using a<br />
cross-head screwdriver.<br />
– 6 –
FITTING THE PVC COVER<br />
Lower the PVC cover<br />
over the backrest and<br />
onto the front of the<br />
seat, see diagram.<br />
Ensure the pocket on<br />
the back of the PVC<br />
cover slots over the top<br />
of the backrest.<br />
– 7 –
FITTING THE HARNESS<br />
Working from the front<br />
of the chair, locate the<br />
D-rings attached to the<br />
backrest. You will need<br />
to pull the PVC cover<br />
towards the middle of<br />
the seat to access the<br />
D-rings, see diagram.<br />
Attach the two clips on<br />
the ends of the harness<br />
to the two D-rings.<br />
Before placing your<br />
child in the highchair<br />
always check that the<br />
clips are properly<br />
connected and the<br />
harness straps are<br />
correctly adjusted. See<br />
‘Operating the Harness’,<br />
on page 6.<br />
Slot the buckle on the<br />
end of the crotch strap<br />
through the hole in the<br />
PVC cover then through<br />
the hole in the seat.<br />
Before placing your<br />
child in the highchair<br />
always ensure that the<br />
crotch strap is secure<br />
with the buckle<br />
correctly inserted by<br />
pulling on the strap.<br />
– 8 –
OPERATING THE HARNESS<br />
Locking the harness:<br />
Push the tongues on the<br />
ends of the waist strap<br />
into the buckle.<br />
The harness will<br />
automatically lock when<br />
the tongues have been<br />
fully pushed in.<br />
Tongue<br />
Waist<br />
strap<br />
Adjusting the length<br />
of the harness:<br />
Slide the buckles on the<br />
waist strap and<br />
shoulder straps<br />
forwards or backwards<br />
until the desired length<br />
is reached.<br />
Unlocking the harness:<br />
Squeeze the tongues<br />
together on one end of<br />
the waist strap 1 and<br />
then slide them out of<br />
the buckle 2. Your child<br />
can now be removed<br />
from the highchair.<br />
– 9 –
FITTING THE TRAY<br />
Working from the front<br />
of the highchair, align<br />
the slots in the back of<br />
the tray with the<br />
armrests and slide the<br />
tray backwards. Keep<br />
one foot on the front<br />
feet of the highchair<br />
and slide the tray into<br />
position.<br />
The tray can be set in<br />
three positions.<br />
To adjust the position<br />
of the tray, locate the<br />
two adjustment handles<br />
on the underside of the<br />
tray and pull them to<br />
disengage the locks.<br />
Adjustment<br />
handles<br />
With the adjustment<br />
handles open, slide the<br />
tray into the desired<br />
position.<br />
To remove the tray pull<br />
the two adjustment<br />
handles into the open<br />
position and slide the<br />
tray from the armrests.<br />
– 10 –
ADJUSTING THE BACKREST<br />
The backrest can be<br />
adjusted to three<br />
different positions.<br />
To adjust the angle of<br />
the backrest, stand<br />
behind the highchair<br />
and locate the two<br />
backrest adjustment<br />
buttons under the<br />
armrests.<br />
Grip the back sections<br />
of the armrests and<br />
depress the backrest<br />
adjustment buttons 1.<br />
Move the backrest to<br />
the desired position 2.<br />
Always check that the<br />
backrest is locked in<br />
position before placing<br />
your child in the<br />
highchair.<br />
– 11 –
ADJUSTING THE FOOTREST<br />
The footrest can be<br />
adjusted to three<br />
different positions.<br />
To raise the footrest,<br />
grip the front edge and<br />
lift it upwards 1.<br />
Slot the footrest<br />
adjustment bar into one<br />
of the two sets of<br />
catches 2 on the back<br />
of the footrest.<br />
Footrest<br />
adjustment bar<br />
To lower the footrest,<br />
grip the front edge and<br />
lift it upwards to<br />
disengage the footrest<br />
adjustment bar 1. Then<br />
lower the footrest 2.<br />
– 12 –
OPENING THE HIGHCHAIR<br />
Working from the back<br />
of the highchair, lift the<br />
shelf upwards 1, and<br />
the legs will begin to<br />
unfold. Balance the<br />
highchair on the rear<br />
legs and lift the<br />
backrest upwards 2, to<br />
unfold the frame.<br />
Lock the highchair in<br />
the open position by<br />
pulling the rear legs<br />
backwards until the two<br />
locking catches on the<br />
shelf engage with the<br />
legs. The frame will<br />
‘click’ into place when<br />
locked.<br />
Ensure the locks are<br />
fully engaged before<br />
placing your child in<br />
the highchair.<br />
– 13 –
Ensure that the<br />
backrest is in the<br />
upright position.<br />
Locate the two locking<br />
catches on the shelf and<br />
lift them upwards to<br />
disengage the locks 1.<br />
Place one foot on the<br />
rear feet and with the<br />
locking catches open,<br />
pull the shelf towards<br />
you 2, and the frame<br />
will begin to fold.<br />
FOLDING THE HIGHCHAIR<br />
With locking catches<br />
disengaged, balance the<br />
highchair on the rear<br />
feet and push down on<br />
the backrest to fold the<br />
frame.<br />
Fold the footrest so<br />
that it is in line with the<br />
frame.<br />
The highchair can be<br />
folded with or without<br />
the tray attached.<br />
– 14 –
INSTRUCTIONS FOR SAFE USE<br />
• WARNING: A CHILD’S SAFETY IS YOUR RESPONSIBILITY.<br />
• DO NOT LEAVE YOUR CHILD UNATTENDED.<br />
• Suitable for children aged between 6 months to 3 years old.<br />
• Always use a safety harness. Ensure the waist strap is snugly tightened around<br />
the child.<br />
• Ensure that all hazards such as small objects, sharp or hot items, or electrical<br />
flexes are kept out of your child’s reach.<br />
• Always ensure the highchair is on a level stable surface before use.<br />
• Always ensure your child is clear of moving parts before making adjustments.<br />
• Exposed edges of PVC covers are often the first to wear. Remember this as you<br />
transport, handle and store your highchair.<br />
• Check your highchair regularly, particularly safety locks, harness and ‘D’ rings for<br />
wear, security and performance. No lubrication is necessary.<br />
• Do not use if components or fittings are worn, damaged or missing. Do not use<br />
replacement parts that are not recommended or supplied by <strong>Mamas</strong> & <strong>Papas</strong>.<br />
Non-approved parts may render the repair or highchair unsafe.<br />
CLEANING:<br />
Clean your highchair with a damp cloth or sponge and mild detergent. Do not use<br />
abrasives or bleach.<br />
AFTER SALES SERVICE: If you need assistance, spare parts or you are unhappy with any aspect<br />
of the goods please contact Customer Services on: 0870 8307700,<br />
or e-mail us at: customer.services@mamasandpapas.com<br />
Visit our website at www.mamasandpapas.com for the latest product information.<br />
I0316:V2/03/05<br />
ALL OUR PRODUCTS ARE MADE FROM THE FINEST QUALITY MATERIALS<br />
AND ARE MANUFACTURED UNDER THE STRICTEST QUALITY CONTROLS<br />
We guarantee all our products or part thereof, for a period of six months from the date of delivery to the<br />
consumer against faulty manufacture. This guarantee is not effective against damage caused as a result of<br />
incorrect usage of the product or accidental damage. This in no way affects your statutory rights.<br />
GUARANTEE<br />
To validate this guarantee, fill in this coupon and return to: <strong>Mamas</strong> & <strong>Papas</strong>, Colne Bridge Rd, Huddersfield, HD5 0RH<br />
Alternatively, call our Guarantee Registration Line on: 01484 438225 or visit our website: www.mamasandpapas.com<br />
Title (Mr/Mrs/Miss/Ms)................... First name ............................................................ Surname .......................................<br />
Address .............................................................................................................................................................................<br />
................................................................................................................................... Postcode .......................................<br />
Daytime Tel. No............................................................... Email.........................................................................................<br />
<strong>Baby</strong>’s due date/date of birth .............................................................................................................................................<br />
Product purchased <strong>Bistro</strong> <strong>Baby</strong> <strong>Highchair</strong>...................... Purchase date ........................... Price .......................................<br />
If you would like to receive further information regarding new products, promotions and special offers from <strong>Mamas</strong> & <strong>Papas</strong> please tick the<br />
boxes indicating your preferred method(s) of contact. Post ; Email .<br />
If you would like to receive information from carefully selected 3rd parties please tick the boxes indicating your preferred method(s) of<br />
contact. Post ; Email .<br />
– 15 –
www.mamasandpapas.com<br />
<strong>Mamas</strong> & <strong>Papas</strong><br />
Colne Bridge Road<br />
Huddersfield HD5 0RH<br />
customer services: 0870 8307700<br />
customer services e-mail: customer.services@mamasandpapas.com<br />
– 16 –