manuale VERVE 2012.cdr - FBT
manuale VERVE 2012.cdr - FBT
manuale VERVE 2012.cdr - FBT

Create successful ePaper yourself
Turn your PDF publications into a flip-book with our unique Google optimized e-Paper software.
MODALITÀ DI INSTALLAZIONE<br />
MODALITÉS D'INSTALLATION<br />
INSTALLATION MODES<br />
INSTALLATIONSART<br />
SOSPENSIONE MEDIANTE<br />
STAFFA A MURO<br />
SUSPENSION BY WALL<br />
BRACKET<br />
SUSPENSION PAR ÉTRIER<br />
MURAL<br />
AUFHÄNGUNG DURCH<br />
WANDBÜGEL<br />
> Selezionare con cura l'area<br />
dove installare i diffusori;<br />
assicurarsi che la struttura sia<br />
adeguata a sopportare il peso<br />
del box.<br />
> Fissare la base della staffa al<br />
muro utilizzando appropriate<br />
viti su tutti i fori di fissaggio<br />
della staffa.<br />
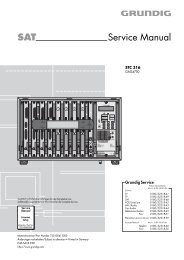
> Rimuovere i quattro piedini (A)<br />
e l'adattatore per stativo (B).<br />
> Fissare, al posto dello stativo,<br />
la flangia (C).<br />
> Posizionare il diffusore tra i due<br />
bracci della staffa (D)<br />
fissandolo utilizzando gli<br />
inserti filettati M10 (E).<br />
> Orientare il diffusore nella<br />
p o s i z i o n e d e s i d e r a t a<br />
utilizzando il perno M6 (F).<br />
> Take care when selecting the<br />
place of speaker installation;<br />
ensure the structure is<br />
adequate to with stand the<br />
weight of the box.<br />
> Fix the base of the bracket to<br />
the wall using suitable screws<br />
in all bracket fixing holes.<br />
> Remove the 4 feet (A) and the<br />
stand adapter (B).<br />
> Fix the flange (C).<br />
> Position the speaker between<br />
the two bracket arms (D)<br />
and fasten it with the two bolts<br />
M10 (E).<br />
> Turn the speaker the way you<br />
want and secure it with the<br />
specific pins M6 (F).<br />
> Sélectionner avec soin la zone<br />
où installer les diffuseurs et<br />
vérifier que la structure soti<br />
adéquate à soutenir le poids<br />
du box.<br />
> Fixer l'étrier au mur en utilisant<br />
des vis adéquates sur tous ses<br />
trous de fixage.<br />
> Détachez les 4 broches (A) et<br />
l'adaptateur pour statif (B).<br />
> Fixez la bride (C).<br />
> Placer le diffuseur entre les<br />
deux bras de l'étrier (D)<br />
et le fixer en utilisant les deux<br />
pièces filetées (E).<br />
> Orienter le diffuseur vers la<br />
position souhaitée et le<br />
bloquer par le pivot M6 (F).<br />
> Den Installationsbereich mit<br />
Sorgfalt auswählen und<br />
sichergehen, dass die Struktur<br />
angemessen ist, um das<br />
Gewicht des Kastens zu<br />
tragen.<br />
> Den Bügel mittels geeigneter<br />
S c h r a u b e n i n a l l e n<br />
B e f e s t i g u n g s l ö c h e r n<br />
festschrauben.<br />
> Entfernen Sie Sockelstifte (A)<br />
und den Stativadapter (B).<br />
> Befestigen Sie den Flansch<br />
(C).<br />
> Den Lautsprecher zwischen<br />
den zwei Armen (D) des<br />
Bügels positionieren und<br />
m i t t e l s d e r z w e i<br />
G e w i n d e e i n s ä t z e M 1 0<br />
befestigen (E).<br />
> Den Lautsprecher in die<br />
gewünschte Position bringen<br />
und mit dem M6 Zapfen<br />
festmachen (F).<br />
A<br />
B<br />
C<br />
E<br />
F<br />
D<br />
27