sedona side burner accessory care & use/installation - Lynx ...
sedona side burner accessory care & use/installation - Lynx ...
sedona side burner accessory care & use/installation - Lynx ...

You also want an ePaper? Increase the reach of your titles
YUMPU automatically turns print PDFs into web optimized ePapers that Google loves.
MAKE THE MOST OF YOUR<br />
SEDONA SIDE BURNER ACCESSORY<br />
CARE & USE/INSTALLATION
WARNINGS<br />
WARNING<br />
Read this manual <strong>care</strong>fully and completely before using your grill to reduce the risk of:<br />
1. Fire<br />
2. Burn hazard, personal injury or property damage<br />
3. Ruined steaks or other unpleasant cooking experiences<br />
4. Unapproved <strong>installation</strong> or servicing.<br />
This product is designed for outdoor <strong>use</strong> only. Improper <strong>installation</strong>, adjustment, alteration, service<br />
or maintenance can ca<strong>use</strong> property damage, injury or death.<br />
Read this manual thoroughly before <strong>installation</strong>, <strong>use</strong>, or servicing of this product.<br />
DANGER<br />
If you smell gas:<br />
1. Shut off all gas supply lines to the grill.<br />
2. Extinguish any open flames.<br />
3. Carefully open the lid. Remember, it may be<br />
extremely hot!<br />
If odor continues, keep everyone away from the<br />
grill and immediately call your gas supplier or your<br />
fire department.<br />
DANGER<br />
S’il y a une odeur de gaz:<br />
1. Coupez l’admission de gaz de l’appariel.<br />
2. Éteindre toute flamme nue.<br />
3. Ouvrir le couvercle.<br />
Si l’odeur persiste, éloignez-vous de l’appareil et<br />
appelez immédiatement le fournisseur de gaz ou<br />
le service d’incendie.<br />
WARNING<br />
1. DO NOT store or <strong>use</strong> gasoline or other flammable<br />
vapors and liquids in the vicinity of this<br />
or any other appliance.<br />
2. An LP cylinder not connected for <strong>use</strong> shall<br />
not be stored in the vicinity of this or any<br />
other appliance.<br />
Avertissment<br />
• Ne pas entreposer ni utiliser de l’essence ni<br />
d’autres vapeurs ou liquides inflammables dans le<br />
voisinage de l’appareil, ni de tout autre appareil.<br />
• Une bouteille de propane qui n’est pas raccordée<br />
en vue de son utilisation, ne doit pas être entreposée<br />
dans le voisinage de cet appareil ou de<br />
tout autre appareil.<br />
warning! california proposition 65<br />
1. The burning of gas cooking fuel generates some by-products which are on the list of substances which are<br />
known by the State of California to ca<strong>use</strong> cancer or reproductive harm.<br />
2. California law requires businesses to warn customers of potential exposure to such substances. To minimize<br />
exposure to the substances, always operate this unit according to the <strong>use</strong> and <strong>care</strong> instructions found in this<br />
manual. Be certain to provide adequate ventilation when cooking.<br />
3. California Proposition 65 lists “Silica, crystalline” which is <strong>use</strong>d in one of the components of the IR <strong>burner</strong>, as<br />
an agent known to the state of California to ca<strong>use</strong> cancer.<br />
2 | SEDONA <strong>side</strong> <strong>burner</strong> <strong>accessory</strong> <strong>care</strong> & <strong>use</strong>/<strong>installation</strong><br />
Part # 34172<br />
Rev. A 2/13
HOW TO LIGHT YOUR GRILL <strong>accessory</strong><br />
1. Before each <strong>use</strong>, complete the checklist below.<br />
2. Make sure all <strong>burner</strong> control knobs are in the “OFF” position.<br />
3. Push and hold the control knob for 2 - 5 seconds while listening for and visually<br />
verifying the ignition spark is present.<br />
4. Turn the knob to the “LITE” position.<br />
5. After ignition set the knob to the desired setting.<br />
Checklist before each <strong>use</strong> (for your safety)<br />
• Do you smell gas? If yes, shut off everything and call the<br />
gas company or a qualified plumber to check for leaks, if<br />
not please continue<br />
• Are you prepared to stay with the <strong>side</strong> <strong>burner</strong> during the<br />
entire cooking process? If not, gather what you need before<br />
starting the lighting process. If yes, please continue.<br />
• Is your cooking area free and clear of any combustibles,<br />
be<strong>side</strong>s your food, that might ignite? If no, clear the area<br />
before starting the lighting process, If yes, please continue<br />
• Do all control knobs turn freely? If not, call for service; if<br />
yes, please continue.<br />
• If you are using a portable propane cylinder, is it connected<br />
and leak tested? If not, check the connection before<br />
continuing. If yes please continue.<br />
• Do you know where your <strong>side</strong> <strong>burner</strong>’s main gas supply<br />
shut-off valve is located? If not, locate it before continuing.<br />
If yes, please continue.<br />
• Are all <strong>burner</strong>s properly seated in the <strong>side</strong> <strong>burner</strong>? If not,<br />
seat the <strong>burner</strong>s properly before continuing. If yes please<br />
continue.<br />
• Is the wind blowing just lightly and not blowing on the<br />
<strong>side</strong> <strong>burner</strong>? If not, wait until the wind sub<strong>side</strong>s or turn<br />
your free-standing grill so the wind goes into the front of<br />
the grill. If yes, please continue with the lighting process.<br />
SEDONA <strong>side</strong> <strong>burner</strong> <strong>accessory</strong> <strong>care</strong> & <strong>use</strong>/<strong>installation</strong> | 3
WARNINGS<br />
WARNING<br />
• Never <strong>use</strong> dented, rusty or damaged propane cylinders. Never store additional or empty propane cylinders<br />
in the cabinet or in the vicinity of this or any other appliance. Do not store propane cylinders indoors or on<br />
their <strong>side</strong>s.<br />
• Children should never be left alone or unattended in an area where an <strong>accessory</strong> is located. Place your<br />
<strong>accessory</strong> well away from areas where children play. Do not store items that may interest children in or<br />
around the area of your <strong>accessory</strong>, in your <strong>accessory</strong> cart, or in the masonry enclosure.<br />
• Never move the <strong>accessory</strong> when hot. When in <strong>use</strong>, portions of the <strong>accessory</strong> are hot enough to ca<strong>use</strong><br />
severe burns.<br />
• Always maintain the required clearances from combustibles as detailed. Accessories are designed for outdoor<br />
<strong>use</strong> only. Never <strong>use</strong> in a garage, building, shed, breezeway, or other enclosed area. Do not <strong>use</strong> this<br />
equipment under any overhead combustible construction.<br />
• Grill accessories are not designed or certified for and are not to be installed in or on recreational vehicles,<br />
portable trailers, boats or any other moving <strong>installation</strong>.<br />
• Always have an ABC Fire Extinguisher accessible — never attempt to extinguish a grease fire with water or<br />
other liquids.<br />
• storing your <strong>accessory</strong>: Store your <strong>accessory</strong> in a well-ventilated area. If stored indoors, detach and leave<br />
LP cylinder outdoors in a well-ventilated area away from heat and away from where children may tamper<br />
with it.<br />
• Keep any electrical supply cord and the fuel supply hose away from any heated surfaces. Electrical cords<br />
should be placed away from walkways to avoid tripping hazard.<br />
• Gardez tout cordon d’alimentation électrique et tuyau d’alimentation en combustible à<br />
• l’écart des surfaces chauffées.<br />
• Do not repair or replace any part of the <strong>accessory</strong> unless specifically recommended in this manual. Other<br />
service should be performed by a qualified technician.<br />
• If the <strong>accessory</strong> is installed by a professional installer or technician, be sure that he/she shows you where<br />
your gas supply shut-off is located. All gas lines must have a shut-off that is readily and easily accessible.<br />
If you smell gas, check for gas leaks immediately. Check only with a soap and water solution. (See INDEX:<br />
“Leak Testing” for further details.) Never check for gas leaks with an open flame.<br />
• Inspect the LP gas supply hose prior to each <strong>use</strong> of the <strong>accessory</strong>. If there is evidence of excessive abrasion<br />
or wear, or the hose is cut, it must be replaced before using the <strong>accessory</strong>.<br />
• Never remove the grounding prong from the plug or <strong>use</strong> this product with an ungrounded, 2-prong<br />
adapter.<br />
This manual must remain with the product owner for future reference.<br />
This product complies with ANSI standard Z21.58/CSA<br />
1.6 latest edition and has been tested and approved by<br />
Intertek.<br />
To obtain replacement parts or service contact:<br />
<strong>Lynx</strong> Professional Grills<br />
5895 Rickenbacker<br />
Commerce, CA 90040<br />
888-289-5969<br />
4 | SEDONA <strong>side</strong> <strong>burner</strong> <strong>accessory</strong> <strong>care</strong> & <strong>use</strong>/<strong>installation</strong>
a message to our customers<br />
You’ve just joined the world of <strong>Lynx</strong> cooks … a discriminating collection of<br />
amateur and professional chefs that take outdoor cooking to a new level.<br />
<strong>Lynx</strong> manufactures many <strong>accessory</strong> cooking appliances to compliment your<br />
<strong>Lynx</strong> grill and your desire for truly superior cooking results.<br />
Your appliance has been designed and built with meticulous attention to<br />
detail and it offers some unique and powerful features. You can achieve<br />
maximum performance and enjoyment of these features only by <strong>care</strong>fully<br />
reading this manual ... before your first cook-out.<br />
This manual includes important safety tips and great hints for better grilling.<br />
You should keep it handy for easy reference.<br />
Also, at <strong>Lynx</strong>, we enjoy hearing from our customers. We like to hear about<br />
your successes but also about any difficulties you are having. Please feel<br />
free to contact us with any questions or problems, or just to share a new<br />
recipe. Please include the model number of your appliance in your correspondence.<br />
With the proper <strong>use</strong> and <strong>care</strong> this product will provide years of trouble-free<br />
service.<br />
Should your <strong>Lynx</strong> appliance change ownership, please make sure that the<br />
new owner receives this manual.<br />
Thanks again for your purchase. Enjoy!<br />
SEDONA <strong>side</strong> <strong>burner</strong> <strong>accessory</strong> <strong>care</strong> & <strong>use</strong>/<strong>installation</strong> | 5
WARNINGS<br />
WARNING<br />
1. The outdoor cooking gas appliance and its individual shutoff valve must be disconnected from the gas supply<br />
piping system during any pressure testing of that system at test pressures in excess of 0.5 psi (3.5 kPa).<br />
2. The outdoor cooking gas appliance must be isolated from the gas supply piping system by closing its individual<br />
manual shutoff valve during any pressure testing of the gas supply piping system at test pressures equal<br />
to or less than 1/2 psi (3.5 kPa).<br />
STATE OF MASSACHUSETTS<br />
1. Massach<strong>use</strong>tts requires all gas be installed using a plumber or gas fitter carrying the appropriate Massach<strong>use</strong>tts<br />
license.<br />
2. All permanently-installed natural gas or propane <strong>installation</strong>s require a “T” handle type manual gas valve be<br />
installed in the gas supply line to this appliance.<br />
3. This does not apply to portable propane <strong>installation</strong>s using a 20 pound cylinder.<br />
WARNING - ELECTRICAL GROUNDING<br />
• Product <strong>installation</strong> must meet local electric codes or, in the absence of local codes, the latest edition of the<br />
National Electrical Code ANSI/NFPA No. 70 or the Canadian Electrical Code CGA 1.6b2005.<br />
• Use only a Ground Fault Interrupter (GFI) protected circuit with this outdoor cooking gas appliance.<br />
• This <strong>accessory</strong> is equipped with a three prong (grounding) electric plug for your protection against shock hazard<br />
and must be plugged directly into a properly grounded three prong outlet. Never cut or remove the grounding<br />
prong from this plug.<br />
• Use only extension cords with a 3 prong grounding plug, rated for the power of the equipment, and approved<br />
for outdoor <strong>use</strong> with a “W-A” marking.<br />
• To protect against electric shock, do not immerse any part of the power cord, an extension cord or any plugs in<br />
water or other liquid.<br />
• Unplug the product from the outlet when not in <strong>use</strong> and before cleaning. Allow it to cool before putting on or<br />
taking off parts.<br />
• Do not let the cord hang over the edge of a table or touch hot surfaces.<br />
• Do not operate any outdoor cooking gas appliance with a damaged cord, plug, or after the appliance malfunctions<br />
or has been damaged in any manner. Contact the manufacturer for repair.<br />
6 | SEDONA <strong>side</strong> <strong>burner</strong> <strong>accessory</strong> <strong>care</strong> & <strong>use</strong>/<strong>installation</strong>
important safety precautions<br />
Please review these important safety precautions before you <strong>use</strong> your<br />
grill <strong>accessory</strong>.<br />
1. NEVER LEAVE THE GRILL ACCESSORY UNATTENDED<br />
WHILE COOKING.<br />
2. Ensure all tie-down wires have been removed from the<br />
<strong>burner</strong>s.<br />
3. Always <strong>use</strong> caution when operating the grill <strong>accessory</strong><br />
in a windy area. (See INDEX: “Grilling in Windy Conditions”<br />
for further details.)<br />
4. Avoid wearing loose-fitting garments or long sleeves<br />
while grilling. They could ignite.<br />
5. Never touch the grill <strong>accessory</strong> racks or immediate<br />
surrounding metal surfaces with your bare hands while<br />
grilling.<br />
6. Use an insulated glove or mitt when opening and operating<br />
the grill <strong>accessory</strong>.<br />
7. The grill <strong>accessory</strong> covers must be fully removed or<br />
opened while lighting the grill <strong>accessory</strong>. Releasing<br />
fuel into a closed grill <strong>accessory</strong> before lighting will not<br />
make it light sooner or more efficiently. It will only risk<br />
explosion and personal injury or death. Never lean over<br />
hot grill <strong>accessory</strong> surface or look directly into the grill<br />
<strong>accessory</strong> when attempting to light.<br />
8. Do not heat unopened food containers as pressure<br />
build-up will ca<strong>use</strong> the container to explode.<br />
9. Do not <strong>use</strong> aluminum foil to line grill <strong>accessory</strong> racks<br />
or drip pans. This will alter the airflow or trap excessive<br />
heat in the control area and can melt knobs and<br />
ignition modules. Such damage is specifically excluded<br />
from your warranty.<br />
10. Never <strong>use</strong> charcoal or any other solid fuel in the grill<br />
<strong>accessory</strong>.<br />
11. Cooking excessively fatty meats and oils will ca<strong>use</strong> flare<br />
ups. Internal fires or damage ca<strong>use</strong>d by them or by<br />
the grill <strong>accessory</strong> being left unattended while cooking<br />
are not covered under the terms and conditions of our<br />
warranty.<br />
12. Never grill without a drip pan in place if your <strong>accessory</strong><br />
utilizes a built-in drip pan. Always ensure the drip pan<br />
is pushed all the way to the back of the grill <strong>accessory</strong>.<br />
When not correctly in place, hot grease can leak downward<br />
and produce a fire or explosion.<br />
13. Grease is extremely flammable. Let hot grease cool<br />
down before attempting to handle or dispose of it.<br />
The drip tray should be cleaned of grease on a regular<br />
basis.<br />
14. Do not <strong>use</strong> the grill <strong>accessory</strong> unless a leak check has<br />
been performed on all gas connections. (See INDEX:<br />
“Leak Testing” for further details.)<br />
15. Never operate the grill <strong>accessory</strong> while under the influence<br />
of alcohol or drugs.<br />
16. Do not lean on <strong>side</strong> shelves and never place a load<br />
weighing more than 25 pounds on a <strong>side</strong> shelf.<br />
17. If any <strong>burner</strong> does not light or goes out during operation,<br />
turn off all gas control knobs and wait five (5)<br />
minutes before attempting to re-light.<br />
SEDONA <strong>side</strong> <strong>burner</strong> <strong>accessory</strong> <strong>care</strong> & <strong>use</strong>/<strong>installation</strong> | 7
table of contents<br />
A Message to our Customers 5<br />
Important Safety Precautions 7<br />
Using your Accessory 9<br />
Accessories Covered in this Manual 9<br />
Lighting Instructions for All Accessories 10<br />
Safety Practices and Precautions 10<br />
At Each New Season 10<br />
Purging the Gas Lines 10<br />
Match Lighting 11<br />
Low Heat Flame Adjustment 11<br />
contacting lynx customer <strong>care</strong> 12<br />
Before You Start 13<br />
If Shipment Arrives Damaged 13<br />
Important Notes 13<br />
Where’s the Wind? 13<br />
How Long is Your Run? 13<br />
Are You “On-the-Level”? 13<br />
Built-in Installations 14<br />
Clearance to Combustible Materials 14<br />
Gas & electric Connections 15<br />
Gas Plumbing 15<br />
Natural Gas 15<br />
LP Gas 16<br />
Converting for Fuel Type 16<br />
LP Connections 16<br />
Propane Hook Up 17<br />
Natural Gas Hook Up 17<br />
Maximum Runs for all appliances on supply line 17<br />
Electrical Connections 18<br />
Optional Electrical Kits 18<br />
Connecting the Wiring 18<br />
Testing the Installation 19<br />
Leak Testing 19<br />
Fixing a Gas Leak 19<br />
Side Burner Schematics 20<br />
Cut-out Dimensions for Built-in Grills & Accessories 22<br />
<strong>Lynx</strong> Limited Warranty 23<br />
SIDE BURNER EXPLODED PARTS VIEW 24<br />
LSB501 24<br />
LSB502 25<br />
SIDE BURNER EXPLODED PARTS VIEW PARTS LIST 26<br />
Index 27<br />
8 | SEDONA <strong>side</strong> <strong>burner</strong> <strong>accessory</strong> <strong>care</strong> & <strong>use</strong>/<strong>installation</strong>
using your <strong>accessory</strong><br />
This manual covers several <strong>accessory</strong> appliances and optional accessories for those appliances.<br />
Accessories Covered in this Manual<br />
The LSB501 and LSB502 (Side Burner 1 & 2) feature either one or two 12,500 BTU/Hr <strong>burner</strong>s for cooking smaller<br />
food items. The LSB501 and LSB502 are designed for <strong>installation</strong> in a non-combustible, built-in enclosure.<br />
SINGLE SIDE BURNER<br />
LSB501<br />
DOUBLE SIDE BURNER<br />
LSB502<br />
SEDONA <strong>side</strong> <strong>burner</strong> <strong>accessory</strong> <strong>care</strong> & <strong>use</strong>/<strong>installation</strong> | 9
Lighting Instructions for All Accessories<br />
Safety Practices and Precautions<br />
WARNING<br />
1. DO NOT store or <strong>use</strong> gasoline or other flammable<br />
vapors and liquids in the vicinity of this<br />
or any other appliance.<br />
2. An LP cylinder not connected for <strong>use</strong> shall<br />
not be stored in the vicinity of this or any<br />
other appliance.<br />
Ensure that <strong>burner</strong> ties and all packing materials are removed<br />
before lighting any new <strong>accessory</strong>.<br />
At Each New Season<br />
At the start of each new grilling season you should remove<br />
the cooking grates and check the <strong>burner</strong>s, venturis, orifices<br />
and valves for obstructions.<br />
Spiders and insects often nest in these areas of the <strong>accessory</strong><br />
and can disrupt air flow, causing damage to the <strong>accessory</strong><br />
and personal injury.<br />
Also, check all hoses and fittings for damage, abrasion,<br />
wear and tear and repair, if necessary, before turning the<br />
gas on.<br />
The 4/11 gas pressure regulator, <strong>Lynx</strong> part number 30781<br />
supplied with the unit must be <strong>use</strong>d for natural gas, or<br />
LP supplied from a bulk storage system. The regulator is<br />
factory preset, and convertible for either natural or LP gas.<br />
(See INDEX: “Converting for Fuel Type” for further details.)<br />
If connection to a Type 1, 20 lb LP cylinder is required, a LP<br />
gas pressure regulator and hose assembly is required and<br />
it must be the type specified by <strong>Lynx</strong>. (See INDEX: “Contacting<br />
<strong>Lynx</strong>”.) When a LP gas pressure regulator and hose<br />
assembly is <strong>use</strong>d, the 4/11 regulator must be removed to<br />
prevent over-regulation.<br />
LIGHTING INSTRUCTIONS<br />
1. Remove <strong>burner</strong> cover completely. Do not attempt to<br />
light any <strong>burner</strong> with the cover in place<br />
2. Ensure all knobs are in the OFF position. Test the ignition<br />
system by pressing in the <strong>burner</strong> control knob<br />
and looking and listening for the clicking sound of<br />
the igniter. If no spark is visible and no clicking sound<br />
is heard, proceed with match-lighting or refer to the<br />
trouble shooting section.<br />
3. Turn on the main gas supply and purge if needed.<br />
4. Push in and turn the <strong>burner</strong> control knob to the LITE<br />
position and hold for 5 seconds.<br />
5. If <strong>burner</strong> does not light, turn knob to OFF, wait 5 minutes<br />
to allow gas to dissipate and repeat step 4 above<br />
Purging the Gas Lines<br />
You should purge the gas line of air before attempting to<br />
light the grill <strong>accessory</strong>.<br />
1. Make sure all grill controls are in the “OFF” position.<br />
2. Slowly turn on the main gas supply.<br />
3. Push in the control knob for the <strong>burner</strong> furthest from<br />
the fuel source. Using the <strong>burner</strong> furthest from the fuel<br />
source will completely purge the lines. It will take several<br />
seconds for the <strong>burner</strong> to light.<br />
4. Hold the knob ON for about 20 seconds to allow the<br />
air in the system to purge and the <strong>burner</strong> to light<br />
5. Wait at least 5 minutes after shutting off the control<br />
before attempting to light the <strong>burner</strong>s.<br />
Leak check all connections with a soap and water solution<br />
before operating the <strong>burner</strong>s. Turn all knobs to OFF and<br />
SLOWLY turn on the gas supply valve. (See INDEX: “Leak<br />
Testing” for further details.)<br />
Do not <strong>use</strong> any grill or <strong>side</strong> <strong>burner</strong> if you smell gas.<br />
10 | SEDONA <strong>side</strong> <strong>burner</strong> <strong>accessory</strong> <strong>care</strong> & <strong>use</strong>/<strong>installation</strong>
Lighting Instructions for All Accessories ...continued<br />
Match Lighting<br />
Using a paper match or a utility lighter, hold a flame over<br />
the <strong>burner</strong> ports while you push and turn the control knob<br />
of the corresponding <strong>burner</strong> to the “lite” position. Keep<br />
your face as far away from the <strong>burner</strong> as possible.<br />
If the <strong>burner</strong> does not light in 5 seconds, turn the knob off<br />
and wait 5 minutes before attempting again.<br />
Read the ‘User Manual/Installation Instructions’ <strong>care</strong>fully<br />
and completely before using your <strong>accessory</strong> to reduce the<br />
risk of fire, burn hazard or other injury.<br />
Low Heat Flame Adjustment<br />
The <strong>burner</strong>s on your <strong>Lynx</strong> <strong>accessory</strong> feature an adjustable<br />
low setting.<br />
Fluctuations in gas pressure, gas conversion and even in the<br />
quality of the gas itself may affect <strong>burner</strong> performance at<br />
the “LOW” setting. It could be either too high or too low.<br />
To adjust the <strong>burner</strong> for low setting:<br />
1. Make sure the grill <strong>accessory</strong> is cool.<br />
2. Remove the grates so that you can see the flame while<br />
adjusting the <strong>burner</strong>.<br />
3. Light the <strong>burner</strong> and set it to “LOW”. (all the way counter-<br />
clockwise).<br />
4. Pull off the control knob.<br />
5. While holding the valve shaft with pliers, insert a thin<br />
flat-blade screwdriver into the shaft and, while watching<br />
the flame, adjust it to a minimum stable setting.<br />
Use a small screwdriver for low<br />
setting <strong>burner</strong> adjustment.<br />
SEDONA <strong>side</strong> <strong>burner</strong> <strong>accessory</strong> <strong>care</strong> & <strong>use</strong>/<strong>installation</strong> | 11
CONTACTING LYNX CUTOMER CARE<br />
Before calling <strong>Lynx</strong> Customer Care, please make sure you<br />
have the following information:<br />
• Model number<br />
• Date of purchase<br />
• Proof of purchase by the original owner<br />
• Serial number<br />
The serial number can be located on the rating plate which<br />
is located either on the under<strong>side</strong> of the drip tray, on the<br />
heat shield behind the front panel).<br />
Your satisfaction is of the utmost importance to us. If a<br />
problem cannot be resolved to your satisfaction, please<br />
write, fax or email us:<br />
<strong>Lynx</strong> Professional Grills<br />
5895 Rickenbacker<br />
Commerce, CA 90040<br />
<strong>Lynx</strong> Customer Care: (888) 289-5969<br />
Tel: (323) 838-1770<br />
Fax: (323) 838-1778<br />
www.lynxgrills.com<br />
Contact <strong>Lynx</strong> for replacement parts. Parts are shipped<br />
F.O.B. Commerce, CA.<br />
For warranty service, contact the <strong>Lynx</strong> Customer Care<br />
Department for an authorized service agent near you at:<br />
(888) 289-5969<br />
www.lynxgrills.com<br />
12 | SEDONA <strong>side</strong> <strong>burner</strong> <strong>accessory</strong> <strong>care</strong> & <strong>use</strong>/<strong>installation</strong>
BEFORE YOU START<br />
WARNING<br />
• Never install this product into a combustible enclosure. Doing so could result in fire, property damage and personal<br />
injury.<br />
• Never locate the <strong>accessory</strong> under a roof or overhang, in a building, garage, shed or other such enclosed area.<br />
• Always maintain the required clearances from combustibles as detailed. Accessories are designed for outdoor<br />
<strong>use</strong> only. Never <strong>use</strong> in a garage, building, shed, breezeway, or other enclosed area. Do not <strong>use</strong> this equipment<br />
under any overhead combustible construction.<br />
• Installation must conform with local codes or, in the absence of local codes, with either the National Fuel Gas<br />
Code, ANSI Z223.1/NFPA 54, or Natural Gas and propane Installation Code, CSA B149.1, or Propane Storage<br />
and Handling Code, B149.2, in Canada.<br />
IF SHIPMENT ARRIVES DAMAGED<br />
VISIBLE LOSS OR DAMAGE<br />
Be certain any visible damage to the carton is noted on<br />
freight bill or express receipt and signed by the person<br />
making delivery.<br />
FILE CLAIM FOR DAMAGES IMMEDIATELY, regardless of<br />
extent of damage.<br />
CONCEALED LOSS OR DAMAGE<br />
If damage is unnoticed until the <strong>accessory</strong> is unpacked, notify<br />
the transportation company or carrier immediately and<br />
file a “concealed damage” claim with them. This should<br />
be done within (15) days of the date delivery is made to<br />
you. Be sure to hold on to the container for inspection. We<br />
cannot assume responsibility for damage or loss incurred in<br />
transit. (See INDEX: “Contacting <strong>Lynx</strong> Customer Care” for<br />
further details.)<br />
important notes<br />
Where’s the Wind?<br />
When selecting a suitable location, con<strong>side</strong>r important factors<br />
such as exposure to the wind and foot-traffic patterns.<br />
Built-in accessories located in areas with prevailing winds<br />
should be protected by a wind barrier.<br />
Are You “On-the-Level”?<br />
Proper leveling during <strong>installation</strong> is critical. An <strong>accessory</strong><br />
that is out of level will ca<strong>use</strong> erratic <strong>burner</strong> combustion and<br />
inefficient, uneven heating. A carpenter’s spirit level should<br />
be <strong>use</strong>d to level the <strong>accessory</strong> both front-to-back and <strong>side</strong>to-<strong>side</strong>.<br />
How Long is Your Run?<br />
Keep all gas supply lines as short as possible beca<strong>use</strong> gas<br />
lines lose pressure over distance and with each elbow and<br />
tee that is added. This drop in pressure affects <strong>accessory</strong><br />
performance. (See INDEX: “Gas Supply Line Runs” for<br />
further details.)<br />
SEDONA <strong>side</strong> <strong>burner</strong> <strong>accessory</strong> <strong>care</strong> & <strong>use</strong>/<strong>installation</strong> | 13
efore you start...continued<br />
Built-In Installations<br />
<strong>Lynx</strong> built-in accessories are intended for <strong>installation</strong> in a<br />
built-in enclosure constructed of non-combustible materials.<br />
The <strong>accessory</strong> drops into the opening shown in the cutout<br />
detail drawing and hangs from its counter-top trim. A deck<br />
is not required to support it from the bottom.<br />
Pay special attention to the provisions shown for gas line<br />
hook-up. (See INDEX: “Cut-out Dimensions for Built-in<br />
Grills & Accessories”.)<br />
The enclosure should have ventilation holes to prevent gas<br />
build-up in the event of a leak. The deck ledges and counter<br />
should be flat and level. (Refer to ANSI Z21.58 Standard<br />
for Outdoor Cooking Gas Appliances, Section 1.7 Enclosures<br />
For Self Contained LP-Gas Supply Systems or local<br />
codes for additional information.)<br />
The <strong>accessory</strong> may be powered directly from your Sedona<br />
grill’s transformer’s power supply. (See INDEX: “Electrical<br />
Connections”).<br />
When a grill is not available or if the grill is not located<br />
close enough to the <strong>accessory</strong> a LASK Switch Kit is available<br />
from the manufacturer as an optional purchase.<br />
Clearance to Combustible Materials<br />
Minimum clearance from the <strong>side</strong>s and back of the <strong>accessory</strong><br />
to adjacent combustible construction below the top of<br />
unit are 12” from the <strong>side</strong>s and back.<br />
Dégagement minimal entre les parois latérales et l’arrière<br />
de l’appariel et la construction combustible au-dessous du<br />
panneau supérieur de l’appareil (30 cm à partir des parois<br />
latérales et 30 cm à partir de l’arrière).<br />
Minimum clearance from <strong>side</strong>s and back of unit to adjacent<br />
combustible construction extending above the unit is 18”<br />
from the <strong>side</strong>s and back.<br />
Dégagement horizontal minimal entre les parois latérales et<br />
l’arrière de l’appariel et la construction verticale combustible<br />
au-dessus de l’appareil (45.7 cm à partir des parois latérales<br />
et 45.7 cm à partir de l’arrière).<br />
Do not <strong>use</strong> this appliance under overhead combustible<br />
surfaces.<br />
Ne pas utiliser cet appareil sous une surface combustible.<br />
14 | SEDONA <strong>side</strong> <strong>burner</strong> <strong>accessory</strong> <strong>care</strong> & <strong>use</strong>/<strong>installation</strong>
Gas & electric connections<br />
Gas Plumbing<br />
WARNING<br />
Never connect a gas line directly to the <strong>side</strong> <strong>burner</strong>. A pressure regulator must be installed on all gas equipment.<br />
All local codes require it and THE MANUFACTURER supplies the correct regulator with your <strong>accessory</strong>. Removing<br />
or failing to install the pressure regulator can result in fire and serious personal injury and will void the warranty.<br />
The <strong>accessory</strong> is factory set to <strong>use</strong> either propane (LP) or<br />
natural gas (NAT). It is critical that the gas you <strong>use</strong> matches<br />
that which the <strong>accessory</strong> was set up for. You can verify that<br />
by checking the rating plate.<br />
Natural Gas<br />
The manufacturer recommends that only qualified professionals<br />
perform the required plumbing on this product.<br />
The gas supply line must be sized to accommodate the<br />
total BTU requirements of all the gas-fired equipment that<br />
will be connected to that line.<br />
In no case should pipe less than 3/4” in<strong>side</strong> diameter or 1”<br />
out<strong>side</strong> diameter be <strong>use</strong>d.<br />
The rating plate is located on the sheet metal body of the<br />
appliance.<br />
Ensure that the gas supplied meets with the minimum pressure<br />
requirements.<br />
Do not operate the <strong>accessory</strong> on any gas other than that for<br />
which the <strong>accessory</strong> has been set.<br />
Fuel WC Max Inlet WC Min Under Full<br />
Load<br />
Nat Gas 7 in 4 in<br />
LP 14 in 10 in<br />
Water Column Requirements<br />
Both the regulator and the <strong>burner</strong> orifices have been factory<br />
preset for the type of gas specified on the rating plate.<br />
Converting to a different type of gas requires a conversion<br />
kit which is available from the manufacturer, and<br />
must be installed by a qualified technician. (See INDEX:<br />
“Contacting <strong>Lynx</strong>”.)<br />
All <strong>installation</strong> and all <strong>installation</strong> parts must conform to<br />
local codes with the National Electrical Code, ANSI/NFPA<br />
70-1990 and the National Fuel Gas Code, ANSI Z223.1/<br />
NFPA 54 in the U.S. and CGA-B149.1/.2 in Canada.<br />
Canadian <strong>installation</strong>s must conform to CGA-B149.1/.2<br />
natural gas/propane <strong>installation</strong> code. (Canada)<br />
• Calculate the total BTU output of all equipment and<br />
refer to “INDEX: Gas Supply Line Runs” for allowable run<br />
distances. Failure to meet these minimum requirements<br />
may reduce performance of the <strong>accessory</strong> and any other<br />
appliances running on that supply line.<br />
• Always keep supply line runs as short as possible. (See<br />
INDEX: “Gas Supply line runs”.)<br />
• A gas shut-off valve must be installed in an easily accessible<br />
location by a qualified plumber.<br />
• Keep any threading compound off of the first two pipe<br />
threads to avoid having any small pieces of compound<br />
break loose and clog a <strong>burner</strong> valve or orifice. Do not put<br />
sealant on any male end of flare fittings.<br />
Keep last two<br />
threads clean<br />
It is recommended that any flexible pipe <strong>use</strong>d be kept as<br />
short as possible. (See INDEX: “Gas Connections” for typical<br />
permanent hook up.)<br />
SEDONA <strong>side</strong> <strong>burner</strong> <strong>accessory</strong> <strong>care</strong> & <strong>use</strong>/<strong>installation</strong> | 15
Gas & electric connections ...continued<br />
LP Gas<br />
The <strong>side</strong> <strong>burner</strong>s that are factory preset for <strong>use</strong> with LP gas<br />
come equipped with a 4/11 regulator, <strong>Lynx</strong> part number<br />
30781. The regulator is <strong>use</strong>d for permanently plumbed,<br />
hard piped LP connections, such as those in line with a<br />
bulk cylinder. If connection to a Type 1, 20 lb LP cylinder<br />
is required a LP gas pressure regulator and hose assembly<br />
is required and must be the type specified by <strong>Lynx</strong>. (See<br />
INDEX: “Contacting <strong>Lynx</strong>”.)<br />
When a LP gas pressure regulator and hose is <strong>use</strong>d, the<br />
4/11 regulator must be removed to prevent over-regulation.<br />
Converting for Fuel Type<br />
After changing the orifices the service technician must make<br />
sure the correct regulator setting is <strong>use</strong>d. If you are using the<br />
4/11 convertible regulator, ensure that it is set for the correct<br />
fuel. The correct fuel type will be abbreviated at the end of<br />
the plunger. The service technician must remove the cap and<br />
check the plunger. If needed, pull the plunger from the cap,<br />
flip it over and re-attach it to the cap. Then re-attach the cap<br />
into the regulator and tighten with a 7/8 inch wrench.<br />
Never connect an unregulated gas line to the grill <strong>accessory</strong>.<br />
Never <strong>use</strong> a cylinder with a damaged valve.<br />
A dented or rusty LP cylinder may be hazardous and should<br />
be avoided. If in doubt, have it checked by your LP supplier.<br />
Always check for leaks after every LP cylinder change. (See<br />
INDEX: “Leak Testing” for further details.)<br />
Always shut off the LP-gas supply at the cylinder when the<br />
<strong>accessory</strong> is not in <strong>use</strong>.<br />
Cylinders must be stored outdoors in a well-ventilated area<br />
out of the reach of children. If your <strong>accessory</strong> is stored indoors,<br />
the LP cylinder must be stored out<strong>side</strong>.<br />
Place a dust cap on the cylinder valve outlet whenever the<br />
cylinder is not in <strong>use</strong>. Only install the type of dust cap on<br />
the cylinder valve outlet that is provided with the cylinder<br />
valve. Other types of caps or plugs may result in leakage of<br />
propane.<br />
Mettre un bouchon antipoussière sur la sortie du robinet<br />
d’une bouteille qui n’est pas utilisée. Utiliser uniquement<br />
le type de bouchon antipoussière fourni avec le robinet de<br />
la bouteille. D’autres types de bouchons pourraient ne pas<br />
être étanches et permettre des fuites de propane.<br />
LP Connections<br />
Make sure the LP cylinder valve is fully closed. It is possible for<br />
the valve to be open without releasing gas but, as soon as you<br />
start connecting the regulator, gas will leak from the connection.<br />
Insert the regulator inlet into the cylinder valve and turn the<br />
black coupler clockwise until the coupler is hand tight. Do<br />
not over-tighten this connection.<br />
When exchanging your cylinder for a refill, exchange only<br />
for a Type 1 20 lb. cylinder with an over-fill protection device.<br />
To disconnect the coupler, first make sure the main cylinder<br />
valve is turned off. Grasp the coupler and turn counter clockwise.<br />
Always leak-test the connection after refilling or exchanging<br />
LP cylinders. (See INDEX: “Leak Testing” for further<br />
details.)<br />
LP cylinder with type 1 valve connection<br />
16 | SEDONA <strong>side</strong> <strong>burner</strong> <strong>accessory</strong> <strong>care</strong> & <strong>use</strong>/<strong>installation</strong>
Gas & electric connections ...continued<br />
LP GAS Hook Up<br />
Natural Gas/LP BULK-TANK Hook Up<br />
L.P. GAS HOOK-UP<br />
NATURAL GAS HOOK-UP<br />
LP BULK-TANK HOOK-UP<br />
WARNING<br />
COLD WEATHER WARNING: PROPANE<br />
Extremely cold temperatures may ca<strong>use</strong> your <strong>burner</strong><br />
to light in<strong>side</strong> the <strong>burner</strong> instead of out<strong>side</strong>. Once<br />
lit, if you hear a ‘whooshing’ sound, immediately<br />
turn the <strong>burner</strong> knob off to extinguish the flame and<br />
then immediately re-light the <strong>burner</strong>.<br />
Maximum Runs for all<br />
appliances on supply line<br />
Run Length<br />
3/4” Pipe (in feet)<br />
Max BTU for all<br />
Appliances on line<br />
10 360,000<br />
20 245,000<br />
30 198,000<br />
40 169,000<br />
50 150,000<br />
60 135.000<br />
70 123,000<br />
80 115,000<br />
SEDONA <strong>side</strong> <strong>burner</strong> <strong>accessory</strong> <strong>care</strong> & <strong>use</strong>/<strong>installation</strong> | 17
electric connections<br />
Optional Electrical Kits<br />
In addition to the <strong>accessory</strong> <strong>burner</strong> kits, <strong>Lynx</strong> also manufactures 3 specialized electrical kits that you may purchase for your<br />
<strong>accessory</strong>, depending upon how it will be installed. Each electrical kit ships with an instructional sheet for assembly. Assembly<br />
instructions and schematics/drawings can also be found on our website at www.lynxgrills.com.<br />
• LASK <strong>Lynx</strong> Accessory Switch Kit<br />
This switch and transformer kit allows independent control of a <strong>Lynx</strong> <strong>accessory</strong><br />
<strong>burner</strong> without connection to a grill. The kit contains a transformer and mounting<br />
bracket as well as a switch assembly with a mounting plate<br />
• LPEK <strong>Lynx</strong> Power Extension Kit<br />
The <strong>Lynx</strong> Power Extension Kit provides 12 feet of additional wire between your<br />
<strong>Lynx</strong> Grill and <strong>accessory</strong> <strong>burner</strong>.<br />
Installation requires an outdoor 120VAC 15A GFI (Ground<br />
Fault Interrupter) electrical outlet adjacent to the <strong>accessory</strong>.<br />
The GFI outlet features an internal breaker that reduces<br />
shock hazard. This type of outlet should be installed in<strong>side</strong><br />
the enclosure by a qualified electrician.<br />
The built in <strong>side</strong> <strong>burner</strong>s are designed for connection to an<br />
adjacent <strong>Lynx</strong> grill, 12-volt transformer during <strong>installation</strong> to<br />
provide power for lighting and ignition (See INDEX: “Side<br />
Burner Schematics”.) A <strong>Lynx</strong> LASK switch kit may be <strong>use</strong>d<br />
if no grill is available for connection. The <strong>side</strong> <strong>burner</strong>s <strong>use</strong><br />
a standard 9-Volt battery as a back- up for the electronic<br />
ignition system only. To install or replace the battery, follow<br />
this procedure:<br />
1. Locate the battery compartment<br />
2. Using a small screwdriver, or a coin or similar object,<br />
pry open the battery compartment and pull out the<br />
holder<br />
3. Remove the battery, and replace it with a fresh 9-volt<br />
battery being <strong>care</strong>ful to install the battery with the terminals<br />
facing inward.<br />
4. Insert the battery holder back into the battery compartment<br />
and snap it into place<br />
Connecting the Wiring<br />
The <strong>accessory</strong> electrical harnesses are designed to provide<br />
power for both ignition and lighting. While ignition is controlled<br />
at the <strong>accessory</strong>, lighting is controlled at the grill.<br />
You can control lighting at the <strong>accessory</strong> by installing the<br />
<strong>Lynx</strong> Accessory Light Switch (LASK).<br />
Disconnect the 4-pin connector on the grill and connect<br />
those plugs to the mating plugs on your <strong>accessory</strong>. (See<br />
INDEX: “Electrical Connections”.)<br />
Important note: If using multiple <strong>Lynx</strong> accessories with the<br />
Control Illumination/Blue LED’S, a connector for this purpose<br />
is built into the <strong>accessory</strong> wiring. This will allow you to<br />
<strong>use</strong> the light switch on your <strong>Lynx</strong> grill to actuate the power<br />
on more than one <strong>accessory</strong>.<br />
If the electrical system fails to operate, a connection may<br />
have come loose in shipping or the GFI may have tripped,<br />
requiring a reset. See the Troubleshooting section for<br />
more details.<br />
18 | SEDONA <strong>side</strong> <strong>burner</strong> <strong>accessory</strong> <strong>care</strong> & <strong>use</strong>/<strong>installation</strong>
testing the <strong>installation</strong><br />
Before turning the gas supply on, check for proper <strong>installation</strong><br />
using the following test:<br />
1. Plug the transformer back into the receptacle.<br />
2. Push in the gas control knob on your <strong>accessory</strong> and<br />
watch the igniter spark.<br />
3. Turn on the light switch on the grill. Both the grill and<br />
the grill <strong>accessory</strong> lights should operate together. This<br />
indicates a proper assembly.<br />
4. Turn the gas on to all appliances.<br />
5. Perform a leak test if you have not done so since<br />
plumbing the unit.<br />
6. Check all <strong>burner</strong>s for proper ignition. Refer to the Lighting<br />
Instructions for Side Burners.<br />
Fixing a Gas Leak<br />
1. Shut off the gas supply<br />
2. Turn all grill controls to the “ON” position to purge the<br />
grill of any gas build-up, then turn the controls back<br />
“OFF”.<br />
3. Wash off the soapy solution with cold water and dry.<br />
4. Tighten the loose joint, or replace the faulty part with<br />
manufacturer-recommended replacement parts.<br />
5. DO NOT attempt to repair the LP cylinder valve if it is<br />
damaged. The only way to safely resolve a damaged<br />
cylinder is to REPLACE IT.<br />
6. Repeat the leak test to ensure that no leaks are present.<br />
Leak Testing<br />
DANGER!<br />
To prevent fire or explosion hazard, DO NOT smoke<br />
or allow any potential source of ignition (sparks,<br />
electrical arcing, etc) in the area while performing a<br />
leak test. Leak tests should be conducted outdoors<br />
only. Never conduct a leak test using fire or flame.<br />
Leak Test Procedure:<br />
1. Create a soapy solution of 1 part soap and 3 parts<br />
water.<br />
2. Confirm that all control knobs are in the off position.<br />
3. Turn on the fuel supply. For natural gas, turn the valve<br />
handle 1/4 turn to align with the gas flow.<br />
4. For LP, turn the cylinder valve knob counter clockwise<br />
one full rotation.<br />
5. Apply the soap solution generously by paint brush or<br />
squirt bottle on all connections and fittings.<br />
6. If bubbles appear to “grow” on any of the connections,<br />
you have a gas leak. IMMEDIATELY turn off the gas<br />
supply.<br />
SEDONA <strong>side</strong> <strong>burner</strong> <strong>accessory</strong> <strong>care</strong> & <strong>use</strong>/<strong>installation</strong> | 19
SIDE BURNER SCHEMATICS<br />
LSB501 Side Burner<br />
LSB501 Side Burner<br />
LED<br />
Light<br />
Molex Male<br />
Female Pins<br />
MM<br />
MF<br />
Green<br />
Varistor<br />
LEAD WITH PIN<br />
Molex<br />
Female<br />
Male pins<br />
DEAD LEAD (NO PIN)<br />
MF<br />
Molex<br />
Female<br />
Male pins<br />
MM<br />
Molex Male<br />
Female Pins<br />
BURNER<br />
LSB502 Side Burner<br />
LSB502 Side Burner<br />
LED<br />
Light<br />
LED<br />
Light<br />
Molex Male<br />
Female Pins<br />
MM<br />
MF<br />
Green<br />
Varistor<br />
LEAD WITH PIN<br />
Molex<br />
Female<br />
Male pins<br />
DEAD LEAD (NO PIN)<br />
MF<br />
MM<br />
Molex<br />
Female<br />
Male pins<br />
Molex Male<br />
Female Pins<br />
LEFT<br />
BURNER<br />
RIGHT<br />
BURNER<br />
20 | SEDONA <strong>side</strong> <strong>burner</strong> <strong>accessory</strong> <strong>care</strong> & <strong>use</strong>/<strong>installation</strong>
SIDE BURNER SCHEMATICS ...continued<br />
Side Burner Connector<br />
SEDONA <strong>side</strong> <strong>burner</strong> <strong>accessory</strong> <strong>care</strong> & <strong>use</strong>/<strong>installation</strong> | 21
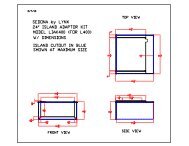
cut-out dimensions for <strong>sedona</strong> built-in grills & accessories<br />
Note: Side <strong>burner</strong>s may be rotated 90 degrees.<br />
Note: For Natural Gas grills, the manufacturer<br />
recommends using 3/4” gas supply lines.<br />
cutOut NOt<br />
rEQuirED<br />
With liJs<br />
0.56”<br />
Countertop Notch Detail<br />
Only required if island countertop<br />
overhangs the face of the island<br />
Locate a 110 V 15Amp<br />
GFI outlet for rotisserie<br />
models.<br />
12.00”<br />
A<br />
A<br />
2.25”<br />
c<br />
3.50”<br />
2.00” 34.00”<br />
Single &<br />
Double Side<br />
<strong>burner</strong> (lSb)*<br />
b<br />
3.50”<br />
21.50”<br />
Outdoor<br />
refrigerator<br />
(l500rEf)<br />
Insulating Jacket<br />
Note: Insulating jacket required for all grills<br />
installed into a combustible enclosure.<br />
A<br />
5”<br />
c<br />
b<br />
A<br />
Door & Drawer Options<br />
(lDr, lSA or ltA)<br />
4.5”<br />
3”<br />
Double<br />
Drawers<br />
(luD)<br />
A<br />
* When installing the LSB <strong>side</strong> <strong>burner</strong>s<br />
over the refrigerator, the counter top<br />
must be at least 37-1/2” above the floor.<br />
b<br />
BUILT-IN GRILL<br />
Model A B C<br />
L400 23.00 10.00 21.25<br />
L500 29.00 10.00 21.25<br />
L600 35.00 10.00 21.25<br />
BUILT-IN GRILL W/ INSULATING JACKET<br />
Model A B C<br />
LIJ400 30.00 11.62 23.25<br />
LIJ500 36.00 11.62 23.25<br />
LIJ600 42.00 11.62 23.25<br />
COMPLEMENTARY PRODUCTS<br />
Model A B C<br />
LSB501* 11.00 4.00 16.00<br />
LSB502* 21.00 4.00 16.00<br />
LDR424 22.00 19.00 –<br />
LDR530 28.25 19.00 –<br />
LDR636 33.75 19.00 –<br />
LSA530 28.25 19.00 20.00<br />
LSA636 33.75 19.00 20.00<br />
LUD517 17.25 12.75 20.00<br />
L500REF 21.50 34.00 24.50<br />
An enclosure for an LP-gas cylinder shall be ventilated by openings at<br />
both the upper and lower levels of the enclosure. The effectiveness of the<br />
opening(s) for purposes of ventilation shall be determined with the LP-gas<br />
supply cylinder in place. This shall be accompanied by one of the following:<br />
a) One <strong>side</strong> of the enclosure shall be completely open; or<br />
b) For an enclosure having four <strong>side</strong>s, a top and a bottom:<br />
1. At least two ventilation openings shall be provided in the <strong>side</strong> walls of the<br />
enclosure, located within 5 in (217 mm) of the top of the enclosure, equally<br />
sized, spaced at a minimum of 90 degrees (1.57 rad), and unobstructed. The<br />
opening(s) shall have a total free area of not less than 1 in 2/ lb (14.2 cm2/<br />
kg) of stored fuel capacity.<br />
2. Ventilation opening(s) shall be provided at floor level of the enclosure and<br />
shall have a total free area of not less than 1/2 in2/lb (7.1 cm2/kg) of stored<br />
fuel capacity. If ventilation openings at floor level are in a <strong>side</strong> wall, there<br />
shall be at least two openings. The bottom of the openings shall be 1 in<br />
(25.4 mm) or less from the floor level and the upper edge no more than 5 in<br />
(127 mm) above the floor level. The openings shall be equally sized, spaced<br />
at a minimum of 90 degrees (1.57 rad) and unobstructed.<br />
3. Every opening shall have minimum dimensions so as to permit the entrance<br />
of a 1/8 in (3.2 mm) diameter rod.<br />
4. Ventilation openings in <strong>side</strong> walls shall not communicate directly with other<br />
enclosures of the outdoor cooking gas appliance.<br />
Keep the ventilation openings of the cylinder enclosure free and clear from<br />
debris.<br />
Measurements in inches.<br />
22 | SEDONA <strong>side</strong> <strong>burner</strong> <strong>accessory</strong> <strong>care</strong> & <strong>use</strong>/<strong>installation</strong>
lynx limited warranty<br />
I. Limited Lifetime Warranty<br />
The stainless steel grill body, ProSear <strong>burner</strong> and rotisserie<br />
infrared <strong>burner</strong> are warranted to be free from defects in material<br />
and workmanship when subjected to normal domestic<br />
<strong>use</strong> and service for the lifetime of the original purchaser. The<br />
tubular stainless steel main <strong>burner</strong>s carry a limited twelve<br />
(12) year warranty. This warranty excludes surface corrosion,<br />
scratches, and discoloration which may occur during normal<br />
<strong>use</strong>. This warranty is limited to the replacement of the defective<br />
parts, with the owner paying all other cost including<br />
labor, shipping and handling.<br />
II. Limited Five-Year Warranty<br />
The following grill parts are warranted to be free from defects<br />
in material and workmanship, when subjected to normal<br />
domestic <strong>use</strong> and service, for a period of five (5) years from<br />
the original date of purchase; cooking grates, warming racks,<br />
spit rods, briquette trays, manifolds and gas valves. This<br />
warranty is limited to the replacement of the defective parts,<br />
with the owner paying all other costs including labor, shipping,<br />
and handling.<br />
III. Limited Two-Year Warranty<br />
All other grill components are warranted to be free from defects<br />
in material and workmanship, when subjected to normal<br />
domestic <strong>use</strong> and service, for a period of two (2) years from<br />
the original date of purchase. This warranty is limited to the<br />
replacement of the defective parts, with the owner paying all<br />
other costs including labor, shipping and handling.<br />
IV. Limited One-Year Warranty.<br />
For a period of one (1) year from the original date of purchase,<br />
<strong>Lynx</strong> will replace or repair parts found to be defective<br />
at no cost to the original purchaser. This includes the cost of<br />
shipping replacement parts and, where necessary, service<br />
labor at prevailing local rates by a <strong>Lynx</strong> authorized service<br />
person. Service will be provided during normal business<br />
hours and must be authorized in advance by <strong>Lynx</strong>.<br />
V. Limitations & Exclusions<br />
1) This Warranty shall apply to products purchased and<br />
located in the United States and Canada. Products must<br />
be purchased in the country where service is requested.<br />
2) Warranty applies only to the original purchaser and may<br />
not be transferred.<br />
3) Warranty is in lieu of all other warranties expressed or<br />
implied and all other obligations or liabilities related to<br />
the sale or <strong>use</strong> of its grill products.<br />
4) Warranty shall not apply and <strong>Lynx</strong> is not responsible<br />
for damage resulting from mis<strong>use</strong>, ab<strong>use</strong>, alteration of or<br />
tampering with the appliance, accident, hostile environ-<br />
ment, flare-up fires, improper <strong>installation</strong>, or <strong>installation</strong><br />
not in accordance with the instructions contained in<br />
this manual, or the local codes.<br />
5) <strong>Lynx</strong> shall not be liable for incidental, consequential,<br />
special or contingent damages resulting from its breach<br />
of this written warranty or any implied warranty.<br />
6) Some states do not allow limitations on how long an<br />
implied warranty lasts, or the exclusions of or limitations<br />
on consequential damages. This warranty gives you<br />
specific legal rights and you may have other rights which<br />
vary from state to state.<br />
7) No one has the authority to add to or vary <strong>Lynx</strong>’s<br />
warranty, or to create for <strong>Lynx</strong> any other obligation or<br />
liability in connection with the sale or <strong>use</strong> of its products.<br />
8) Limited to the replacement of defective parts with the<br />
owner paying all other costs including labor.<br />
VI. What is not covered: <strong>Lynx</strong> shall not be responsible for<br />
and shall not pay for the following<br />
1) Installation or start-up, damages or problems ca<strong>use</strong>d by<br />
improper <strong>installation</strong> or <strong>use</strong>;<br />
2) Service by an unauthorized service provider;<br />
3) Damage or repair due to service by an unauthorized<br />
service provider or <strong>use</strong> of unauthorized parts;<br />
4) Warranty does not apply to products installed in any<br />
commercial or non-re<strong>side</strong>ntial application. Examples<br />
of excluded applications include, but are not limited to<br />
day <strong>care</strong> centers, schools, bed and breakfast centers,<br />
churches, private clubs, fire stations, club ho<strong>use</strong>s,<br />
common areas in multi-family dwellings, restaurants,<br />
hotels, nursing homes, food service locations and<br />
institutional food service locations.<br />
5) To correct normal adjustments or settings, due to<br />
improper <strong>installation</strong>, commissioning or local gas supply<br />
properties.<br />
6) Shipping and handling costs, export duties, <strong>installation</strong>,<br />
removal, or re-<strong>installation</strong> cost.<br />
7) Display models are sold “as is”. If you have purchased a<br />
display model, please be advised that it is sold “as is”<br />
and that it is subject to the following warranty exclusions:<br />
any exterior or cosmetic damage is nonwarrantable; any<br />
missing components will be replaced at consumers<br />
expense; major handling damage to manifold, valve and<br />
ignition system will be serviced at consumer’s expense; all<br />
other warranty’s (standard warranty) will remain in effect.<br />
8) The cost of a service call to diagnose trouble.<br />
SEDONA <strong>side</strong> <strong>burner</strong> <strong>accessory</strong> <strong>care</strong> & <strong>use</strong>/<strong>installation</strong> | 23
SIDE BURNER EXPLODED PARTS VIEW<br />
LSB501 Side Burner<br />
2<br />
14<br />
16<br />
7<br />
18<br />
17<br />
8<br />
9<br />
11<br />
4<br />
24<br />
10<br />
5 6<br />
12<br />
13<br />
23<br />
3<br />
1<br />
15<br />
25<br />
21 22 19 20<br />
24 | SEDONA <strong>side</strong> <strong>burner</strong> <strong>accessory</strong> <strong>care</strong> & <strong>use</strong>/<strong>installation</strong>
SIDE BURNER EXPLODED PARTS VIEW...continued<br />
LSB502 Side Burner<br />
2<br />
8<br />
14<br />
9<br />
7<br />
16<br />
18<br />
11<br />
17<br />
4<br />
1<br />
12<br />
3<br />
13<br />
19<br />
25<br />
24<br />
15<br />
21 23 22<br />
20<br />
10<br />
5 6<br />
SEDONA <strong>side</strong> <strong>burner</strong> <strong>accessory</strong> <strong>care</strong> & <strong>use</strong>/<strong>installation</strong> | 25
SIDE BURNER EXPLODED PARTS LIST<br />
ITEM NO. MODEL PART NUMBER DESCRIPTION QTY.<br />
1 LSB501 N/A PAN / BODY WELDMENT 1<br />
LSB502 N/A PAN / BODY WELDMENT 1<br />
2 LSB501 33921 COVER 1<br />
LSB502 33916 COVER 1<br />
3 LSB501/2 33827 BATTERY/TRANSFORMER MTG BRACKET 1<br />
4 LSB501/2 80693 MANIFOLD WELDMENT 1<br />
5 LSB501 33952 ORIFICE, N.G. 1<br />
LSB502 33952 ORIFICE, N.G. 2<br />
6 LSB501 33945 ORIFICE, L.P. 1<br />
LSB502 33945 ORIFICE, L.P. 2<br />
7 LSB501 33946 CAP, INNER 1<br />
LSB502 33946 CAP, INNER 2<br />
8 LSB501 33947 CAP, OUTER 1<br />
LSB502 33947 CAP, OUTER 2<br />
9 LSB501 33948 PORT RING, BURNER 1<br />
LSB502 33948 PORT RING, BURNER 2<br />
10 LSB501 33949 BASE, BURNER 1<br />
LSB502 33949 BASE, BURNER 2<br />
11 LSB501 33950 IGNITOR, BURNER 1<br />
LSB502 33950 IGNITOR, BURNER 2<br />
12 LSB501 33955 WASHER, LARGE 1<br />
LSB502 33955 WASHER, LARGE 2<br />
13 LSB501 33340 VALVE, SIDE BURNER W/SPRING 1<br />
LSB502 33340 VALVE, SIDE BURNER W/SPRING 2<br />
14 LSB501 33922 BAR GRATE 1<br />
LSB502 33866 BAR GRATE 1<br />
15 LSB501/2 31162 SPARK MODULE 1<br />
16 LSB501 33932 KNOB, BURNER 1<br />
LSB502 33932 KNOB, BURNER 2<br />
17 LSB501 10001 BEZEL 1<br />
LSB502 10001 BEZEL 2<br />
18 LSB501 31929 SCREW, #6-32 x 1/8” LG., S/S 2<br />
LSB502 31929 SCREW, #6-32 x 1/8” LG., S/S 4<br />
19 LSB501 34038 FITTING, ELBOW, VALVE TO TUBING 1<br />
LSB502 34038 FITTING, ELBOW, VALVE TO TUBING 2<br />
20 LSB501 34040 TUBING, FLEX W/ COMP. FITTINGS 1<br />
LSB502 34040 TUBING, FLEX W/ COMP. FITTINGS 2<br />
21 LSB501/2 31930 SCREW, 1/4-20 x 3/8” LG. HEX. 2<br />
22 LSB501/2 14026 LOCK WASHER, 1/4 SPLIT 2<br />
23 LSB501/2 14044 WASHER, 1-1/4” O.D., S/S 2<br />
24 LSB501 34039 ADAPTER FITTING 1<br />
LSB502 34039 ADAPTER FITTING 2<br />
25 LSB501/2 30781 PRESSURE REGULATOR 4/11 1<br />
---- LSB501 70052 WIRE HARNESS, LED 1<br />
LSB502 70053 WIRE HARNESS, LED 1<br />
---- LSB501 70121 WIRE HARNESS, IGNITION 1<br />
LSB502 70067 WIRE HARNESS, IGNITION 1<br />
---- LSB501/2 70040 WIRE HARNESS, POWER 1<br />
---- LSB501 80694 MANIFOLD COMPLETE ASSY. 1<br />
LSB502 80695 MANIFOLD COMPLETE ASSY. 1<br />
---- LSB501/2 31879 BATTERY HOLDER ASSY WITH DIODE 1<br />
26 | SEDONA <strong>side</strong> <strong>burner</strong> <strong>accessory</strong> <strong>care</strong> & <strong>use</strong>/<strong>installation</strong>
INDEX<br />
A<br />
Adjustment, Low Heat ................................................... 11<br />
B<br />
Built-in Cut-out Dimensions........................................... 22<br />
C<br />
Code Requirements........................................................ 13<br />
Cold Weather Use...........................................................17<br />
Connections:<br />
Electrical......................................................................... 18<br />
Gas ..............................................................................15<br />
Optional Electrical Kits .................................................. 18<br />
Contacting LYNX Customer Care................................... 12<br />
Converting Fuel Type..................................................... 16<br />
Cut-out Dimensions for Built-in<br />
Grills & Accessories ....................................................... 22<br />
D<br />
Damage, Shipment ........................................................ 13<br />
Dimensions, Cut-out ...................................................... 22<br />
E<br />
Electrical Connections ................................................... 18<br />
Exploded Parts View,<br />
Side Burners ............................................................ 24, 25<br />
M<br />
Manual Lighting ............................................................. 11<br />
Maximum Supply Line Runs........................................... 17<br />
N<br />
Natural Gas Conversion................................................. 16<br />
Natural Gas Hookup ...................................................... 17<br />
O<br />
Optional Electrical Kits................................................... 18<br />
P<br />
Parts List, Exploded View............................................... 26<br />
Propane Hook up........................................................... 17<br />
Purging the Gas Lines.................................................... 10<br />
S<br />
Side Burner Schematics ........................................... 20, 21<br />
Serial Number, Location................................................. 12<br />
Service, Contacting <strong>Lynx</strong>................................................ 12<br />
Specifications:<br />
Code Requirements........................................................ 13<br />
Gas Pressure................................................................... 15<br />
Natural Gas Hook Up..................................................... 17<br />
Propane Hook Up........................................................... 17<br />
Supply Line Runs............................................................ 17<br />
G<br />
Gas Connections............................................................ 15<br />
Gas Leaks, Testing for .................................................... 19<br />
Gas Pressure Specs........................................................ 15<br />
Gas Requirements.......................................................... 15<br />
Gas Supply Line Runs..................................................... 17<br />
Gas to LP Conversion..................................................... 16<br />
Grilling in Windy Conditions............................................ 7<br />
L<br />
T<br />
Technical Support .......................................................... 12<br />
Testing:<br />
Leak Testing.................................................................... 19<br />
The Installation .............................................................. 19<br />
W<br />
Warranty, Limited ........................................................... 23<br />
Leak testing.................................................................... 19<br />
Lighting the Burner ....................................................... 10<br />
Lighting with a Match..................................................... 11<br />
Locating Serial Number.................................................. 12<br />
LP Conversion ................................................................ 16<br />
LP to Gas Conversion..................................................... 16<br />
SEDONA <strong>side</strong> <strong>burner</strong> <strong>accessory</strong> <strong>care</strong> & <strong>use</strong>/<strong>installation</strong> | 27
<strong>Lynx</strong> Professional Grills<br />
5859 Rickenbacker Rd.<br />
Commerce, CA 90040<br />
<strong>Lynx</strong> Customer Care: 888.289.5969<br />
Fax: 323.838.1778<br />
www.lynxgrills.com