
Create successful ePaper yourself
Turn your PDF publications into a flip-book with our unique Google optimized e-Paper software.
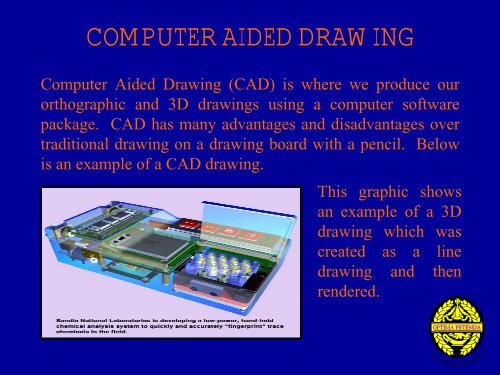
<strong>COMPUTER</strong> <strong>AIDED</strong> <strong>DRAWING</strong><br />
Computer Aided Drawing (CAD) is where we produce our<br />
orthographic and 3D drawings using a computer software<br />
package. CAD has many advantages and disadvantages over<br />
traditional drawing on a drawing board with a pencil. Below<br />
is an example of a CAD drawing.<br />
This graphic shows<br />
an example of a 3D<br />
drawing which was<br />
created as a line<br />
drawing and then<br />
rendered.
<strong>COMPUTER</strong> <strong>AIDED</strong> <strong>DRAWING</strong>
<strong>COMPUTER</strong> <strong>AIDED</strong> <strong>DRAWING</strong>
<strong>COMPUTER</strong> <strong>AIDED</strong> <strong>DRAWING</strong><br />
In the final examination, you may be asked<br />
how to create an object using a CAD package.<br />
You may be given a blank box for example and<br />
asked how to create the finished item. Below is<br />
an example of a typical exam question.<br />
Using appropriate<br />
terminology explain<br />
how we could turn<br />
the blank box on<br />
the left into the<br />
remote control on<br />
the right.<br />
SONY
<strong>COMPUTER</strong> <strong>AIDED</strong> <strong>DRAWING</strong><br />
TEXT Select the ‘draw’ menu and select text editor.<br />
Click roughly where you want the text to be and<br />
the text box will appear. Type in SONY and<br />
select bold. Click OK and the text will appear.<br />
BUTTONS Select the ‘draw’ menu and click on draw<br />
box, draw a box the suitable size. Select<br />
the modify menu and click on box array.<br />
Select 4 rows and 4 columns to make your<br />
buttons. Click OK and your buttons will<br />
be there.<br />
SONY
<strong>COMPUTER</strong> <strong>AIDED</strong> <strong>DRAWING</strong><br />
CIRCLE Select the ‘draw’ menu and click on the draw<br />
circle icon. Click on where you want the circle<br />
to be. Either move your mouse to determine the<br />
radius or type in your radius.<br />
CORNERS Select the modify menu from the tool bar<br />
and click on fillet. Select each individual<br />
side to fillet and it should automatically<br />
curve for you. Double click and alter the<br />
fillet radius if it is not suitable.<br />
SONY
<strong>COMPUTER</strong> <strong>AIDED</strong> <strong>DRAWING</strong><br />
The FILLET tool allows<br />
you to curve or put a<br />
rounded corner on a<br />
drawing. You can change<br />
the radius of the FILLET<br />
to suit the drawing.
<strong>COMPUTER</strong> <strong>AIDED</strong> <strong>DRAWING</strong><br />
The GRID on a CAD drawing is an imaginary network of dots on<br />
the sheet which you are working on. The spacing of the dots can be<br />
set to various sizes depending on your requirements. When you<br />
SNAP to the grid this means you can only work on the predetermined<br />
grid of dots you specified hence, improved speed and<br />
accuracy. This allows all lines to be perfectly horizontal and<br />
vertical if this is what you need.<br />
The GRID and the SNAP function can be switched on and off as<br />
required at any time.
<strong>COMPUTER</strong> <strong>AIDED</strong> <strong>DRAWING</strong><br />
The COPY and PASTE<br />
functions can save you a<br />
lot of time. If you have<br />
many buttons to draw on<br />
a calculator for instance,<br />
you can simply draw one<br />
button then COPY and<br />
PASTE it repeatedly,<br />
hence only drawing the<br />
button once as opposed to<br />
twenty or thirty times.
<strong>COMPUTER</strong> <strong>AIDED</strong> <strong>DRAWING</strong><br />
The ZOOM icon allows you to take a very close look<br />
at minute detail on your CAD drawing. Very often the<br />
screen may be set to allow you to see the whole page.<br />
This does not allow you to work precisely and you<br />
would have to use the ZOOM tool to take a very close<br />
look at an area to work on.<br />
You would then be able to add much more detail to<br />
your drawing. You can ZOOM in and out of the<br />
drawing at any time.<br />
USEFUL PRESENTATIONS<br />
Behind every orange box on this page is a presentation which you should watch. They<br />
will help you in a couple of ways.<br />
They could be used to confirm that your understanding of a topic is correct.<br />
They could also be used to guide you in the topics which you found difficult in class<br />
the first time round. They are designed as self help. Go through them slowly and if you<br />
still don’t get it, go back to your teacher as soon as possible.<br />
CAD CAG Hardware Software Processes 3D Models<br />
Isometric Intro Iso Info Iso Circles<br />
Cylinders & Cones<br />
Oblique Intro<br />
Oblique Projection<br />
Sectional Views<br />
Planometric Intro Plano - Method<br />
Exploded Views<br />
Orthographics<br />
Assemblies<br />
One Point Perspective<br />
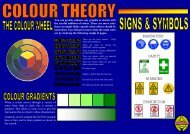
Signs & Symbols<br />
Two Point - Intro Examples Method<br />
Line Types<br />
Square Pyramids<br />
Graphs & Charts<br />
Colour Theory<br />
Click on a square . . .<br />
back to menu