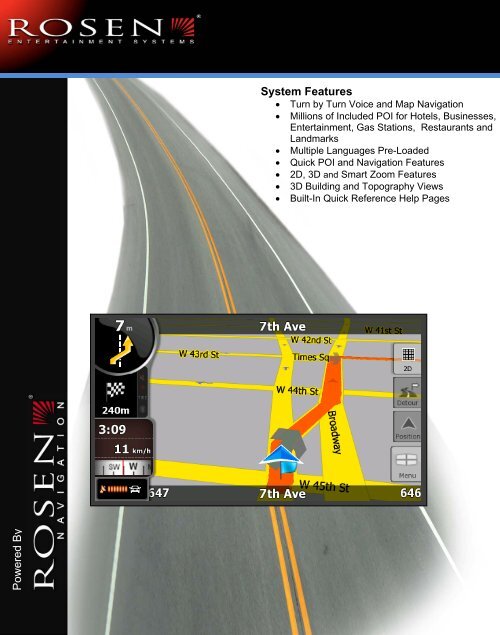
Navigation User's Manual - Rosen
Navigation User's Manual - Rosen
Navigation User's Manual - Rosen

Create successful ePaper yourself
Turn your PDF publications into a flip-book with our unique Google optimized e-Paper software.
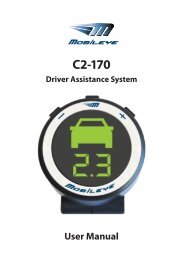
<strong>Navigation</strong> User’s Owner’s <strong>Manual</strong><br />
System Features<br />
• Turn by Turn Voice and Map <strong>Navigation</strong><br />
• Millions of Included POI for Hotels, Businesses,<br />
Entertainment, Gas Stations, Restaurants and<br />
Landmarks<br />
• Multiple Languages Pre-Loaded<br />
• Quick POI and <strong>Navigation</strong> Features<br />
• 2D, 3D and Smart Zoom Features<br />
• 3D Building and Topography Views<br />
• Built-In Quick Reference Help Pages<br />
Powered By<br />
Copyright 2008 <strong>Rosen</strong> Entertainment Systems, all rights reserved<br />
DP-1003 Rev B
Copyright note<br />
The product and the information contained herein is subject to change without prior<br />
notification.<br />
This manual may not, in whole or in part, be reproduced or transmitted in any form either<br />
electronically or mechanically, including photocopying and recording, without the express<br />
written consent of Nav N Go Kft..<br />
© 2008 - Nav N Go Kft.<br />
Whereis® map data is © 2006 Telstra Corporation Limited and its licensors<br />
Data Source © 2006 Tele Atlas N.V.<br />
Austria: © BEV, GZ 1368/2003<br />
Denmark: © DAV<br />
France: © IGN France<br />
Great Britain: Ordnance Survey data with permission of Her Majesty’s Stationery Office ©<br />
Crown Copyright<br />
Italy:<br />
© Geonext/DeAgostini<br />
Northern © Ordnance Survey of Northern Ireland<br />
Ireland:<br />
Norway: © Norwegian Mapping Authority, Public Roads Administration / Mapsolutions<br />
Switzerland: © Swisstopo<br />
The<br />
Topografische ondergrond<br />
Netherlands:<br />
Copyright © dienst voor het kadaster en de openbare registers, Apeldorn<br />
All rights reserved.<br />
2
Thank you for choosing <strong>Rosen</strong> Navi as your door-to-door in-car navigator. Read the Quick<br />
Start Guide first and start using <strong>Rosen</strong> Navi right away. This document is the detailed<br />
description of the software. You can easily discover <strong>Rosen</strong> Navi while you are using it;<br />
however, we still recommend that you read this manual to understand the screens and the<br />
features of <strong>Rosen</strong> Navi.<br />
3
Table of contents<br />
1 Warnings and Safety information .................................................................................. 7<br />
2 Getting started with <strong>Rosen</strong> Navi ..................................................................................... 8<br />
2.1 Simple and Advanced modes ................................................................................................... 10<br />
2.2 Hardware buttons ................................................................................................................... 11<br />
2.3 Buttons and other controls on the screen ................................................................................ 11<br />
2.3.1 Using keyboards ............................................................................................................................... 12<br />
2.4 Using the map ......................................................................................................................... 13<br />
2.4.1 Checking the details of a map location ............................................................................................ 13<br />
2.4.2 Manipulating the map ....................................................................................................................... 14<br />
2.4.3 Status information and hidden controls on the map......................................................................... 16<br />
2.4.4 Using the Cursor (the selected map location) .................................................................................. 19<br />
2.5 <strong>Rosen</strong> Navi concepts ............................................................................................................... 20<br />
2.5.1 Smart Zoom ...................................................................................................................................... 20<br />
2.5.2 Position markers ............................................................................................................................... 20<br />
2.5.2.1 Current GPS position and Lock-on-Road .................................................................................................. 20<br />
2.5.2.2 Returning to normal navigation ................................................................................................................. 21<br />
2.5.2.3 Selected location (Cursor) ......................................................................................................................... 21<br />
2.5.2.4 Original position in the Cursor menu ........................................................................................................ 22<br />
2.5.3 Daytime and night color schemes .................................................................................................... 22<br />
2.5.4 Color scheme in tunnels ................................................................................................................... 22<br />
2.5.5 Route calculation and recalculation ................................................................................................. 22<br />
2.5.6 Itinerary ............................................................................................................................................. 23<br />
2.5.7 Track Logs ........................................................................................................................................ 24<br />
2.5.8 Route demonstration ......................................................................................................................... 24<br />
2.5.9 POI (Points of Interest) ..................................................................................................................... 25<br />
2.5.10 Road Safety Cameras ...................................................................................................................... 25<br />
2.5.10.1 Camera types ............................................................................................................................................ 26<br />
2.5.10.2 Camera directions .................................................................................................................................... 27<br />
2.5.11 Speed limit warning ........................................................................................................................ 27<br />
2.5.12 TMC (Traffic Message Channel) ................................................................................................... 28<br />
3 Navigating with <strong>Rosen</strong> Navi .......................................................................................... 29<br />
3.1 Selecting the destination of a route ......................................................................................... 29<br />
3.1.1 Selecting the Cursor as the destination ............................................................................................ 29<br />
3.1.2 Entering an address or part of an address ......................................................................................... 30<br />
3.1.2.1 Entering an address (Europe).................................................................................................................... 30<br />
3.1.2.2 Entering an address (North America, Australia) ...................................................................................... 31<br />
3.1.2.3 Entering an address if house numbering is restarted ................................................................................ 33<br />
3.1.2.4 Entering an address without knowing the dictrict/suburb ........................................................................ 34<br />
3.1.2.5 Selecting an intersection as the destination ............................................................................................... 35<br />
4
3.1.2.6 Selecting a city center as the destination ................................................................................................... 36<br />
3.1.2.7 Entering an address with a postal code ..................................................................................................... 37<br />
3.1.2.8 Tips on entering addresses quickly ............................................................................................................ 38<br />
3.1.3 Selecting the destination from your Favorites ................................................................................. 38<br />
3.1.4 Selecting the destination from the POIs ........................................................................................... 39<br />
3.1.5 Selecting the destination with a saved POI search criteria .............................................................. 40<br />
3.1.6 Selecting the destination from the History ....................................................................................... 40<br />
3.1.7 Selecting the destination by entering its coordinate ........................................................................ 41<br />
3.2 Creating a multi-point route (inserting a via point) ............................................................... 41<br />
3.3 Creating a multi-point route (appending a new destination) .................................................. 42<br />
3.4 Editing the route ..................................................................................................................... 42<br />
3.5 Viewing the whole route on the map (Fit-to-Screen) .............................................................. 43<br />
3.6 Watching the simulation of the route ...................................................................................... 43<br />
3.7 Enabling Safety Mode ............................................................................................................. 44<br />
3.8 Pausing the active route .......................................................................................................... 44<br />
3.9 Deleting the next via point from the route .............................................................................. 44<br />
3.10 Deleting the active route ....................................................................................................... 45<br />
3.11 Using Track Logs .................................................................................................................. 45<br />
3.12 Saving a route ....................................................................................................................... 46<br />
3.13 Loading a saved route ........................................................................................................... 46<br />
4 Reference book (Advanced mode) ................................................................................ 48<br />
4.1 Map screen .............................................................................................................................. 48<br />
4.1.1 Icons on the map ............................................................................................................................... 51<br />
4.1.1.1 Battery, GPS position quality and Vehicle type indicator ......................................................................... 51<br />
4.1.1.2 Status indicator strip .................................................................................................................................. 52<br />
4.1.1.3 Next two route events (Turn Preview fields) .............................................................................................. 52<br />
4.1.2 Objects on the map ........................................................................................................................... 53<br />
4.1.2.1 Streets and roads ........................................................................................................................................ 53<br />
4.1.2.2 3D object types ........................................................................................................................................... 54<br />
4.1.2.3 Elements of the active route ....................................................................................................................... 54<br />
4.1.3 Detour menu ..................................................................................................................................... 55<br />
4.1.4 Cursor menu ...................................................................................................................................... 56<br />
4.1.5 Position menu ................................................................................................................................... 57<br />
4.1.6 Route Information screen ................................................................................................................. 57<br />
4.1.7 Trip Information screen .................................................................................................................... 59<br />
4.1.7.1 Trip Computer screen ................................................................................................................................ 61<br />
4.1.8 Quick menu ....................................................................................................................................... 61<br />
4.1.9 GPS data screen ................................................................................................................................ 62<br />
4.2 Find menu ............................................................................................................................... 63<br />
4.3 Route menu .............................................................................................................................. 64<br />
4.4 Manage menu .......................................................................................................................... 65<br />
5
4.4.1 Manage Saved Routes ...................................................................................................................... 65<br />
4.4.2 Manage History ................................................................................................................................. 65<br />
4.4.3 Manage Track Logs .......................................................................................................................... 66<br />
4.4.4 Manage Favorites .............................................................................................................................. 67<br />
4.4.5 Manage POIs ..................................................................................................................................... 67<br />
4.4.6 Manage Saved Search Criteria ......................................................................................................... 68<br />
4.4.7 User Data Management .................................................................................................................... 69<br />
4.5 Settings menu .......................................................................................................................... 69<br />
4.5.1 Map Screen settings .......................................................................................................................... 70<br />
4.5.2 Sound settings ................................................................................................................................... 71<br />
4.5.3 Route Planning options ..................................................................................................................... 72<br />
4.5.4 Regional settings ............................................................................................................................... 74<br />
4.5.5 <strong>Navigation</strong> settings ........................................................................................................................... 75<br />
4.5.6 Warning settings ............................................................................................................................... 76<br />
4.5.7 GPS settings ...................................................................................................................................... 77<br />
4.5.8 TMC settings ..................................................................................................................................... 77<br />
4.5.9 Menu settings .................................................................................................................................... 78<br />
4.5.10 Device settings ................................................................................................................................ 78<br />
4.5.11 Track Log settings .......................................................................................................................... 79<br />
5 Glossary ........................................................................................................................... 80<br />
6 End User Licence Agreement ........................................................................................ 82<br />
6
1 Warnings and Safety information<br />
<strong>Rosen</strong> Navi is a navigation system that helps you find your way to your destination with a<br />
connected GPS receiver. <strong>Rosen</strong> Navi does not transmit your GPS position; others cannot<br />
track you.<br />
It is important that you look at the display only when it is safe to do so. If you are the driver of<br />
the vehicle, we recommend that you operate <strong>Rosen</strong> Navi before you start your journey. Plan<br />
the route before your departure and stop if you need to change something in the route.<br />
<strong>Rosen</strong> Navi has a Safety Mode: if you turn on Safety Mode, you cannot change anything in<br />
<strong>Rosen</strong> Navi while the vehicle is moving at a speed of 10 km/h (6 mph) or higher. Unless only<br />
passengers operate <strong>Rosen</strong> Navi, we strongly encourage you to turn on Safety Mode.<br />
You must obey the traffic signs and follow the road geometry. If you deviate from the route<br />
that <strong>Rosen</strong> Navi recommended, <strong>Rosen</strong> Navi changes the instructions accordingly.<br />
For more information, consult the End User License Agreement (page 82).<br />
7
2 Getting started with <strong>Rosen</strong> Navi<br />
<strong>Rosen</strong> Navi is optimized for in-car use. You can use it easily by tapping the screen buttons<br />
and the map with your fingertips.<br />
<strong>Rosen</strong> Navi can plan routes throughout the whole installed map set; you do not need to<br />
change maps or switch to a poorly detailed general map to navigate between map segments<br />
or countries.<br />
Tasks<br />
Using the retractable<br />
stylus<br />
Double tapping the<br />
screen<br />
Tapping and holding<br />
the screen<br />
Instructions<br />
You do not need a stylus to use <strong>Rosen</strong> Navi. Tap the buttons and the<br />
map with your fingertips.<br />
You do not need to tap the screen twice for any action. With buttons<br />
and controls, a single tap is enough.<br />
You do not need this to access the basic navigation functions. Tap<br />
and keep pressing the following buttons to reach extra functions:<br />
• Tap and hold on the Map screen: you can set the<br />
minimum and maximum zoom level of Smart Zoom.<br />
• Tap and hold any of the buttons on<br />
the Map screen: you can set or reset the zoom value of the<br />
button (2D map).<br />
• Tap and hold any of the buttons on<br />
the Map screen: you can set or reset the tilt and zoom values of<br />
the button (3D map).<br />
• Tap and hold on list and menu screens: the<br />
<strong>Navigation</strong> menu appears.<br />
• Tap and hold any of the<br />
buttons on the Map screen: you can rotate, tilt or scale<br />
the map continuously.<br />
• Tap and hold on keyboard screens: you can delete<br />
several characters quickly.<br />
• Tap and hold or in long lists: you can turn the<br />
page continuously.<br />
• Tap and hold the buttons in the Quick menu to open screens<br />
from the Manage menu or the Settings menu related with the<br />
function of the button.<br />
Gestures<br />
(drag&drop)<br />
You do not need gestures to access the basic navigation features.<br />
You need to drag and drop the screen only in cases like:<br />
• Moving the handle on a slider.<br />
• Moving the map: grab the map, and move it in the desired<br />
direction.<br />
8
Tasks<br />
Instructions<br />
• Shortcut to open the Map screen: slide your finger from the<br />
bottom right corner to the bottom left corner on any screen.<br />
• Shortcut to open the <strong>Navigation</strong> menu: slide your finger from<br />
the top left corner to the bottom left corner on any screen.<br />
Start using <strong>Rosen</strong> Navi<br />
When <strong>Rosen</strong> Navi is started the first time, you need to do the following:<br />
1. Select the written language of the application. Later you can change it in Settings<br />
(page 74).<br />
2. Select the language and speaker used for voice guidance messages. Later you can<br />
change it in Settings (page 74).<br />
3. Select whether to start the program in Simple mode or in Advanced mode. Later you<br />
can switch between the two operating modes in Settings.<br />
After this, the <strong>Navigation</strong> menu appears and you can start using <strong>Rosen</strong> Navi.<br />
The <strong>Navigation</strong> menu in Simple mode:<br />
The <strong>Navigation</strong> menu in Advanced mode:<br />
The typical way of using <strong>Rosen</strong> Navi is to select a destination, and start navigating. You can<br />
select your destination in the following ways (not all of them are available in Simple mode):<br />
• Use the selected location on the map (the Cursor) (page 29).<br />
• Enter a full address or a part of an address, for example a street name without a house<br />
number or the names of two intersecting streets (page 30).<br />
• Enter an address with ZIP code (page 37). This way you do not need to select the<br />
name of the city and the search for street names might be faster as well.<br />
• Use a coordinate (page 41)<br />
• Use a saved location:<br />
• a Favorite (page 38)<br />
• a POI (page 39)<br />
• the History of previously set destinations and waypoints (page 40)<br />
9
2.1 Simple and Advanced modes<br />
The two operating modes of <strong>Rosen</strong> Navi mainly differ in the menu structure and the number<br />
of available features. The controls and screen layouts are the same.<br />
• Simple mode: you have easy access to the most important navigation functions and<br />
the basic settings only. The rest of the settings are set to values that are optimal for<br />
typical use.<br />
• Advanced mode: you have access to the full functionality of <strong>Rosen</strong> Navi.<br />
To switch from Simple mode to Advanced mode: on the startup screen (<strong>Navigation</strong> Menu),<br />
tap , .<br />
To switch from Advanced mode to Simple mode: on the startup screen (<strong>Navigation</strong> Menu),<br />
tap , .<br />
The features and settings available in each mode are as follows:<br />
Type of action<br />
Available in<br />
Simple mode<br />
Available in<br />
Explanation<br />
Advanced<br />
mode<br />
Navigating to a selected map point Yes Yes See page<br />
29<br />
Navigating to a street address Yes Yes See page<br />
30<br />
Navigating to an incomplete address Yes Yes See page<br />
30<br />
Navigating to an intersection Yes Yes See page<br />
35<br />
Navigating to recent destinations (History) Yes Yes See page<br />
40<br />
Navigating to Favorites Yes Yes See page<br />
38<br />
Navigating to a POI Yes Yes See page<br />
39<br />
Navigating to coordinates No Yes See page<br />
41<br />
Creating a multi-point route No Yes See page<br />
41<br />
Saving a map point as a Favorite<br />
destination<br />
Yes Yes See page<br />
56<br />
Saving a map point as a POI No Yes See page<br />
56<br />
Saving a map point as a location of a<br />
Road Safety Camera<br />
No Yes See page<br />
56<br />
Mark a map point with a Pin No Yes See page<br />
56<br />
Saving the active route No Yes See page<br />
46<br />
Saving Track Logs No Yes See page<br />
24<br />
Map Screen settings No Yes See page<br />
70<br />
10
Type of action<br />
Menu settings<br />
Sound settings<br />
Available in<br />
Simple mode<br />
Only background<br />
picture<br />
Only Master<br />
volume<br />
Available in<br />
Yes<br />
Yes<br />
Advanced<br />
mode<br />
Explanation<br />
See page<br />
78<br />
See page<br />
71<br />
Route Planning options Yes Yes See page<br />
72<br />
Regional settings<br />
Only language<br />
selection<br />
Yes<br />
See page<br />
74<br />
Warnings No Yes See page<br />
76<br />
2.2 Hardware buttons<br />
You can use <strong>Rosen</strong> Navi mostly by tapping the touch screen. The device has only a few<br />
hardware buttons.<br />
You can turn mobile devices on or off at any time. When mobile devices is switched off,<br />
<strong>Rosen</strong> Navi does not calculate your GPS position and it does not update the route or the<br />
driving instructions.<br />
When you turn the device on again, <strong>Rosen</strong> Navi continues navigating as soon as the GPS<br />
receiver has determined your position.<br />
2.3 Buttons and other controls on the screen<br />
When you are using <strong>Rosen</strong> Navi, you usually tap buttons on the touch screen.<br />
You only need to confirm selections or changes in <strong>Rosen</strong> Navi if the application needs to<br />
restart, it needs to perform a major reconfiguration, or you are about to lose some of your<br />
data or settings. Otherwise, <strong>Rosen</strong> Navi saves your selections and applies the new settings<br />
without confirmation as soon as you use the controls.<br />
Type Example Description How to use it<br />
Button<br />
Icon<br />
List<br />
Tap it to initiate a function,<br />
to open a new screen, or to<br />
set a parameter.<br />
Shows status information.<br />
When you need to select<br />
from several options, they<br />
appear in a list.<br />
Tap it once.<br />
Some icons also<br />
function as a button.<br />
Tap them once.<br />
Turn the page with<br />
the and<br />
buttons and tap the<br />
11
Type Example Description How to use it<br />
value that you want.<br />
Slider<br />
When a feature has several<br />
different unnamed values,<br />
<strong>Rosen</strong> Navi shows an<br />
indicator on a gauge that<br />
displays and sets a value<br />
from a range.<br />
• Drag the<br />
handle to<br />
move the<br />
slider to its<br />
new position.<br />
• Tap the slider<br />
where you<br />
want the<br />
handle to<br />
appear; the<br />
thumb jumps<br />
there.<br />
Switch<br />
Virtual<br />
keyboard<br />
When there are only two<br />
choices, a checkmark<br />
shows whether the feature<br />
is enabled.<br />
Alphabetic and<br />
alphanumeric keyboards to<br />
enter text and numbers.<br />
Tap it to turn the<br />
switch on or off.<br />
Each key is a touch<br />
screen button.<br />
2.3.1 Using keyboards<br />
You only need to enter letters or numbers in <strong>Rosen</strong> Navi when you cannot avoid it. You can<br />
type with your fingertips on the full-screen keyboards and you can switch between various<br />
keyboard layouts, for example ABC, QWERTY, or numerical.<br />
Task<br />
Switching to another keyboard<br />
layout, for example from a Latin<br />
QWERTY keyboard to a Greek<br />
keyboard<br />
Correcting your entry on the<br />
keyboard<br />
Tap<br />
keyboard types.<br />
Details<br />
, and select from the list of available<br />
<strong>Rosen</strong> Navi remembers your last keyboard choice and<br />
offers it the next time you need to enter data.<br />
Remove the unneeded character(s): tap .<br />
Tap and hold the button to delete the entire input string.<br />
12
Task<br />
Entering a space, for example<br />
between a first name and a family<br />
name or in multi-word street<br />
names<br />
Entering small or capital letters<br />
Tap .<br />
Details<br />
Entering symbols<br />
Tap to cycle through entering lower case letters,<br />
capital initials or all capitals.<br />
Finalising the keyboard entry<br />
Tap<br />
to switch to a keyboard of symbol characters.<br />
Tap .<br />
2.4 Using the map<br />
The map screen is the most frequently used screen of <strong>Rosen</strong> Navi. It can be accessed from<br />
the <strong>Navigation</strong> menu by tapping .<br />
For further information about the map screen, see page 48.<br />
2.4.1 Checking the details of a map location<br />
• If you are interested in the details of your current position during navigation:<br />
1. Check the bottom line of the map. It shows the current street and house number<br />
information.<br />
2. For further details, tap to open the Position menu.<br />
3. Tap . The address, the coordinate and the list of nearby POIs will<br />
be displayed.<br />
• You can check the details of any other location by selecting it on the map:<br />
1. Tap the map anywhere to open the map control buttons.<br />
13
2. Tap the desired location on the map. The Cursor ( ) appears there. The<br />
address of the location is displayed at the bottom of the map.<br />
3. For further details, tap to open the Cursor menu.<br />
4. Tap . The address, the coordinate and the list of nearby POIs will<br />
be displayed.<br />
• It is even easier if you select the desired point in the Find menu. Then the Cursor menu<br />
opens automatically. You only need to tap the<br />
button.<br />
2.4.2 Manipulating the map<br />
Position markers on the map:<br />
• Current GPS position: (page 20)<br />
• Selected location (Cursor): (page 21)<br />
The following controls help you modify the map view to best suit your actual needs. Most of<br />
these controls appear only if you tap the map once, and disappear after a few seconds of<br />
inactivity.<br />
Action Button(s) Description<br />
Moving the No buttons<br />
You can move the map into any direction: tap and hold the<br />
map with<br />
map, and move your finger to the direction in which you<br />
drag&drop<br />
want to move the map.<br />
If GPS position is available and you have moved the map,<br />
Opening/clo<br />
sing map<br />
control<br />
buttons<br />
Zooming in<br />
and out<br />
the button appears. Tap this button to return to the<br />
GPS position.<br />
Tap this button to show or hide the following map control<br />
buttons:<br />
• Zoom in/out<br />
• Rotate left/right (3D map only)<br />
• Tilt up/down (3D map only)<br />
• Zoom preset buttons (2D map only)<br />
• Tilt and zoom preset buttons (3D map only)<br />
• Return to GPS position button<br />
• Smart Zoom button<br />
Changes how much of the map is displayed on the screen.<br />
<strong>Rosen</strong> Navi uses high-quality vector maps that let you see<br />
the map at various zoom levels, always with optimized<br />
14
Action Button(s) Description<br />
content. It always displays street names and other text with<br />
the same font size, never upside-down, and you only see<br />
the streets and objects that you need.<br />
Map scaling has different limits in 2D and in 3D map view<br />
modes.<br />
Tilting up<br />
and down<br />
Rotating left<br />
and right<br />
Changes the vertical view angle of the map in 3D mode.<br />
Changes the horizontal view angle of the map in 3D mode.<br />
When GPS position is available, <strong>Rosen</strong> Navi always rotates<br />
the map so its top faces your direction of travel (Track-Up<br />
orientation). You can turn away from Track-Up with these<br />
buttons.<br />
If GPS position is available and you have rotated the map,<br />
Viewing<br />
modes<br />
Smart Zoom<br />
Returning to<br />
normal<br />
navigation<br />
(back to the<br />
GPS<br />
position with<br />
automatic<br />
map<br />
rotation)<br />
Zoom<br />
preset<br />
buttons<br />
(available in<br />
Advanced<br />
mode only)<br />
the button appears. Tap this button to re-enable the<br />
automatic map rotation.<br />
Gives you the following map perspectives in <strong>Rosen</strong> Navi:<br />
• classic top-down view (2D)<br />
• perspective view (3D)<br />
The value always shows the mode the button switches to: If<br />
you are in 2D mode, you can see the<br />
need to tap it to switch to 3D mode.<br />
button and you<br />
<strong>Rosen</strong> Navi can automatically rotate, scale and tilt the map<br />
and give you the optimal view:<br />
• When you are approaching a turn, <strong>Rosen</strong> Navi<br />
zooms in and raises the view angle to let you easily<br />
recognize your maneuver at the next junction.<br />
• If the next turn is at a distance, <strong>Rosen</strong> Navi zooms<br />
out and lowers the view angle to show you the road<br />
in front of you.<br />
Tap this button once to enable Smart Zoom.<br />
Tap&hold the button to set the zoom limits of Smart Zoom.<br />
Tap this button to move the map back to the current GPS<br />
position. If the map has been rotated in 3D mode,<br />
automatic map rotation is also re-enabled.<br />
Tap one of the preset buttons to set the zoom level to a fix,<br />
predefined value. Smart Zoom is disabled. These buttons<br />
are available in 2D mode.<br />
Tap&hold any of the buttons to set its value to the current<br />
15
Action Button(s) Description<br />
zoom level, or to reset it to its original value.<br />
Tilt and<br />
zoom preset<br />
buttons<br />
(available in<br />
Advanced<br />
mode only)<br />
Map scale<br />
Tap one of the preset buttons to set the tilt and zoom levels<br />
to fix, predefined values. Smart Zoom is disabled. These<br />
buttons are available in 3D mode.<br />
Tap&hold any of the buttons to set its value to the current<br />
tilt and zoom levels, or to reset it to its original value.<br />
<strong>Rosen</strong> Navi shows the scale of the map in 2D mode.<br />
Fit-toscreen<br />
This button does not appear on the Map screen. It is<br />
available on the following screens:<br />
• Plan on Map screen: When you have an active<br />
route, you can display it in its full length on the map.<br />
• Track Information screen: A track log can be<br />
displayed in its full length on the map.<br />
2.4.3 Status information and hidden controls on the map<br />
The following information appears in the rounded field in the top left corner, the Turn Preview<br />
field. When tapping this area, the result depends on the information currently shown.<br />
Icon Information Details Action<br />
There is no active<br />
route in Simple<br />
mode<br />
If there is no route to<br />
be navigated in Simple<br />
mode, this icon<br />
appears in the Turn<br />
Preview field.<br />
Tap this area to open Find Address.<br />
There is no active<br />
route in Advanced<br />
mode<br />
If there is no route to<br />
be navigated in<br />
Advanced mode, this<br />
icon appears in the<br />
Turn Preview field.<br />
Tap this area to open Find.<br />
,<br />
There is no valid<br />
GPS position.<br />
If an active route<br />
exists, and there is no<br />
valid GPS position, the<br />
view of the sky above<br />
you is shown with<br />
colored dots for each<br />
satellite. Some dots<br />
need to turn green to<br />
be able to navigate.<br />
Tap this area to open the Route<br />
Information screen.<br />
If the icon is a<br />
static picture, route<br />
calculation is<br />
needed<br />
GPS position and an<br />
active route are<br />
available, but<br />
automatic off-route<br />
recalculation is<br />
switched off, and you<br />
deviated from the<br />
route.<br />
Tap this area to make <strong>Rosen</strong> Navi<br />
recalculate the recommended route.<br />
16
Icon Information Details Action<br />
,<br />
If the icon is<br />
animated, route<br />
calculation is in<br />
progress<br />
Next route event<br />
(next maneuver)<br />
<strong>Rosen</strong> Navi is<br />
calculating or<br />
recalculating the route.<br />
GPS position and an<br />
active route are<br />
available, and you<br />
navigate the<br />
recommended route.<br />
This area gives you<br />
information about the<br />
type and distance of<br />
the next route event.<br />
Nothing happens if you tap this area<br />
of the screen.<br />
Tap this area to open the Route<br />
Information screen.<br />
The following area appears next to the above described rounded area. When tapping this<br />
area, the result depends on the information currently shown.<br />
Icon Information Details<br />
There is no<br />
valid GPS<br />
position<br />
If there is no valid GPS<br />
position, this symbol<br />
appears here.<br />
Action<br />
Tap this area to open the GPS Data<br />
screen to check the signal status or<br />
the connection settings.<br />
Traffic<br />
restriction<br />
When GPS position is<br />
available, but there is no<br />
route to be navigated, the<br />
traffic restriction of the<br />
upcoming intersection is<br />
shown here if there is any.<br />
Nothing happens if you tap this area<br />
of the screen.<br />
,<br />
Second route<br />
event<br />
(maneuver<br />
after the next<br />
maneuver)<br />
When GPS position and an<br />
active route are both<br />
available, this field shows<br />
the route event that follows<br />
the next route event shown<br />
in the above described area.<br />
Tap this area to open the Itinerary<br />
screen with the turn by turn guidance<br />
instructions.<br />
Approaching a<br />
Road Safety<br />
Camera<br />
This icon appears when you<br />
are approaching a Road<br />
Safety Camera, and the<br />
warning for cameras is<br />
enabled in Settings.<br />
Tap this area to suppress the<br />
audible camera warning.<br />
Stops the<br />
running<br />
simulation<br />
This icon appears during<br />
Route Fly Over, Route<br />
Simulation, and Track Log<br />
playback.<br />
Tap this area to stop the simulation.<br />
Route<br />
recalculation<br />
progress<br />
During route recalculation,<br />
this field shows the<br />
recalculation progress<br />
between 0% and 100%.<br />
Nothing happens if you tap this area<br />
of the screen.<br />
17
Icon Information Details<br />
Indicator strip - sounds muted/enabled<br />
- Track Log recording<br />
Action<br />
Nothing happens if you tap this area<br />
of the screen.<br />
- TMC status<br />
- Bluetooth status<br />
The following symbols appear in the Indicator strip:<br />
Icon<br />
Description<br />
The sound output of <strong>Rosen</strong> Navi is muted.<br />
The sound output of <strong>Rosen</strong> Navi is enabled.<br />
<strong>Rosen</strong> Navi records a Track log when GPS position is available.<br />
Track log recording is disabled.<br />
No TMC receiver is connected or TMC is turned off.<br />
TMC receiver is connected and a radio station with TMC broadcast is received.<br />
There are new, unread TMC events.<br />
A part of the route is bypassed based on TMC events.<br />
A part of the route is mentioned in TMC events but could not be bypassed (for<br />
example, the destination is on a congested street).<br />
The following information can be seen in the three data fields shown on the map screen. Tap<br />
this area to open the Trip Information screen where you can select which values to be shown<br />
in these three fields.<br />
When there is no active route, these fields show the following information: current speed,<br />
compass and the current time of day.<br />
Icon Type More information<br />
Compass<br />
Shows the direction of your heading both when the map is<br />
automatically rotated (3D) and when the map is always<br />
facing North (2D).<br />
Speed<br />
information<br />
There are speed values that can be shown:<br />
• Current speed<br />
• Speed limit on the current road<br />
Time<br />
information<br />
There are time values that can be shown:<br />
• Current GPS time<br />
• Time remaining to reach the destination<br />
18
Icon Type More information<br />
• Time remaining to reach the next via point<br />
• Estimated arrival time at the destination<br />
• Estimated arrival time at the next via point<br />
Distance<br />
information<br />
There are distance type values that can be shown:<br />
• Distance remaining to reach the destination<br />
• Distance remaining to reach the next via point<br />
• Current altitude<br />
The next area is a combined status field. Tap this area to open the Quick menu (page 61).<br />
Icon Status for More information<br />
GPS position<br />
quality<br />
The more lit bars, the better is the GPS position.<br />
Vehicle type<br />
The symbol displays the vehicle type used for route calculation.<br />
2.4.4 Using the Cursor (the selected map location)<br />
First, place the Cursor at the desired map location with one of the following options:<br />
• Use the Find menu to select a location. The map returns with the selected point (the<br />
Cursor) in the middle, and the Cursor menu appears with the available options.<br />
• Tap the screen and tap again to place the Cursor at the desired location. Now tap<br />
to open the Cursor menu.<br />
You can perform the following actions:<br />
Button<br />
Action<br />
In the active route, uses the Cursor as the start point by replacing the<br />
current GPS position (available in Advanced mode only)<br />
In the active route, uses the Cursor as the destination by replacing the<br />
previous destination<br />
In the active route, uses the Cursor as a via point (an intermediate<br />
destination) preceding the destination (available in Advanced mode only)<br />
In the active route, uses the Cursor as the destination while keeping the<br />
previous destination as a via point (available in Advanced mode only)<br />
Shows the different routes calculated by the available routing methods.<br />
Choose the one that suits your needs the best.(available in Advanced<br />
mode only)<br />
Saves the Cursor as a POI(available in Advanced mode only)<br />
Saves the Cursor as a Favorite location<br />
Saves the Cursor as a Road Safety Camera location (available in<br />
Advanced mode only)<br />
19
Button<br />
Action<br />
Marks the map with a Pin at the Cursor (available in Advanced mode<br />
only)<br />
Opens a screen with the name, address and coordinate information of<br />
the Cursor, and the list of POIs near it<br />
2.5 <strong>Rosen</strong> Navi concepts<br />
2.5.1 Smart Zoom<br />
Smart Zoom is a lot more than just a usual automatic zoom:<br />
• While following a route calculated by <strong>Rosen</strong> Navi: when approaching a turn, it will<br />
zoom in and raise the view angle to let you easily recognize your maneuver at the next<br />
junction. If the next turn is at a distance, it will zoom out and lower the view angle to be<br />
flat so you can see the road in front of you.<br />
• While driving without an active route in <strong>Rosen</strong> Navi: Smart Zoom will zoom in if<br />
you drive slowly and zoom out to the limit set here when you drive at high speed.<br />
Enabling Smart Zoom<br />
Tap the map to let the map control buttons appear, and then tap<br />
Zoom.<br />
to enable Smart<br />
Fine-tuning Smart Zoom<br />
Tap the map to let the map control buttons appear, and then tap and hold to open the<br />
Smart Zoom Settings window. Modify the zoom limits of Smart Zoom if necessary.<br />
2.5.2 Position markers<br />
2.5.2.1 Current GPS position and Lock-on-Road<br />
When your GPS position is available, <strong>Rosen</strong> Navi marks your current position with the<br />
icon on the map. The exact location of the position marker depends on the vehicle type used<br />
for route calculation.<br />
The vehicle type can be selected in Route settings (page 72) or in the Quick Menu (page 61).<br />
20
• If you choose pedestrian: The icon is at your exact GPS position. The direction<br />
of the icon shows your actual heading.<br />
• If you choose any of the vehicles: The icon is aligned to the nearest road to<br />
suppress GPS position errors. The direction of the icon is one of the directions of the<br />
route.<br />
To use the current GPS position, tap<br />
the GPS position as one of the following:<br />
• a Favorite<br />
• a Road Safety Camera<br />
• a POI<br />
• a map marker Pin<br />
. The Position menu appears and you can save<br />
2.5.2.2 Returning to normal navigation<br />
When GPS position is available, and you have moved the map (the<br />
icon is moving or is<br />
not even visible), or you have rotated the map in 3D mode, the button appears. Tap it<br />
to move the map back to the GPS position and re-enable Track-up map orientation (automatic<br />
map rotation).<br />
Note!<br />
Even if you move the map while you are driving, <strong>Rosen</strong> Navi continues<br />
navigating if there is an active route: it plays the voice instructions and displays<br />
the turn preview icons according to your current GPS position.<br />
2.5.2.3 Selected location (Cursor)<br />
If you select a location in the Find menu, or you tap the map when the map control buttons<br />
are visible, the Cursor appears at the selected point on the map. <strong>Rosen</strong> Navi displays the<br />
Cursor with a radiating red dot (<br />
the background of a 3D map view.<br />
) to make it visible at all zoom levels, even when it is in<br />
When the Cursor is set, tap . The Cursor menu appears and you can use the Cursor as<br />
one of the following:<br />
• the start point of a route<br />
• a via point in a route<br />
• the destination of a route<br />
You can also search for POIs around the Cursor.<br />
Or you can save the location of the Cursor as:<br />
• a Favorite<br />
• a Road Safety Camera<br />
• a POI<br />
21
• a map marker Pin<br />
2.5.2.4 Original position in the Cursor menu<br />
When the Cursor menu is open, a special icon ( ) shows the Cursor position the menu<br />
was opened with.<br />
You can move and zoom the map, and you can set the Cursor to a different place. The usual<br />
Cursor (<br />
location.<br />
) appears, and the buttons of the Cursor menu initiate actions for this new<br />
To return to the original Cursor position, tap<br />
which the Cursor menu was opened, and the<br />
. The map jumps back to the position with<br />
icon appears again.<br />
2.5.3 Daytime and night color schemes<br />
<strong>Rosen</strong> Navi uses different color schemes during the day and during the night.<br />
• Daytime colors are similar to paper road maps.<br />
• The night color schemes use dark colors for large objects to keep the average<br />
brightness of the screen low.<br />
<strong>Rosen</strong> Navi offers different daytime and night color schemes. It can also switch automatically<br />
between the daytime and the night scheme based on the current time and GPS position a few<br />
minutes before sunrise, when the sky has already turned bright, and a few minutes after<br />
sunset, before it becomes dark.<br />
2.5.4 Color scheme in tunnels<br />
When entering a tunnel, the colors of the map change. All buildings disappear, the large<br />
objects (such as surface waters or forests) and the empty areas between roads become<br />
black.<br />
However roads and streets keep their original colors from the daytime or night color scheme<br />
currently used.<br />
After leaving the tunnel, the original colors return.<br />
2.5.5 Route calculation and recalculation<br />
<strong>Rosen</strong> Navi calculates the route based on your preferences:<br />
• Route calculation method:<br />
• Fast<br />
• Short<br />
• Economical<br />
22
• Easy<br />
• Vehicle types :<br />
• Car<br />
• Taxi<br />
• Bus<br />
• Emergency vehicles<br />
• Bicycle<br />
• Pedestrian<br />
• Road types<br />
• Unpaved Roads<br />
• Permit Needed<br />
• Highways<br />
• Toll Roads<br />
• Charge Roads<br />
• Ferries<br />
• Cross-border Planning<br />
• Carpool Lanes (appears only when used in the USA)<br />
<strong>Rosen</strong> Navi automatically recalculates the route if you deviate from the proposed itinerary.<br />
Depending on the type of the TMC event, <strong>Rosen</strong> Navi also recalculates the route if a TMC<br />
event concerns a part of the recommended route.<br />
For further information about Route Planning options, see page 72.<br />
2.5.6 Itinerary<br />
The Itinerary is the list of the route events, that is, the driving instructions.<br />
When you are on the Map screen, you can display the Itinerary in one of the following ways:<br />
• Tap the area between the Turn preview and the Travel data fields where the symbol of<br />
the second next maneuver is displayed (for example ).<br />
• In Advanced mode, tap the following buttons: , , .<br />
You have the following options on the Itinerary screen:<br />
Button<br />
Description<br />
23
Button<br />
Any of the list items<br />
Description<br />
Opens the map with the selected maneuver in the middle.<br />
Changes the detail level of the Itinerary. The levels are as<br />
follows:<br />
• Detailed Instructions: all intersections are listed<br />
• Itinerary: only significant intersections (the ones<br />
announced in voice guidance) are listed<br />
• Road list: the list of the roads used while navigating the<br />
route<br />
,<br />
Turns the page for additional list items.<br />
When the map is open with a maneuver in the middle:<br />
Button<br />
Zooms in the map.<br />
Description<br />
Zooms out the map.<br />
,<br />
Moves the map to show the previous or next maneuver.<br />
Opens a screen where you can avoid a part of the route starting<br />
from the selected maneuver.<br />
2.5.7 Track Logs<br />
<strong>Rosen</strong> Navi can log the track that you drive (page 45).<br />
A Track Log is a recording of how your GPS position changed and it is independent of the<br />
route <strong>Rosen</strong> Navi calculated.<br />
Track Logs can be recorded, renamed, replayed, shown on the map, exported to a memory<br />
card in GPX format, and deleted. See page 66.<br />
Independently of the normal track log, you can instruct <strong>Rosen</strong> Navi to record the native GPS<br />
data received from the GPS device. These logs are saved as separate text files on the<br />
memory card, and they cannot be shown or replayed in <strong>Rosen</strong> Navi.<br />
To turn on NMEA/SIRF log saving, tap the following buttons: , , ,<br />
.<br />
2.5.8 Route demonstration<br />
A simulation drives you through the route, following the driving instructions (page 43). You<br />
can choose from a simulation at high speed or at normal driving speed.<br />
24
You can use it, for example, to see which bridge <strong>Rosen</strong> Navi planned for the route; if you do<br />
not want to take that bridge, you can avoid it.<br />
Route demonstrations can be started from the Route menu by tapping the<br />
(high speed simulation) or the<br />
(simulation at normal speed) button.<br />
2.5.9 POI (Points of Interest)<br />
A point of interest (POI) is a location that someone might find useful or interesting. <strong>Rosen</strong><br />
Navi is delivered with thousands of POIs and you can also create your own POIs in the<br />
application.<br />
POI locations are marked on the map with special icons. POI icons are quite large so you can<br />
easily recognize the symbol. The icons are also semi-transparent: they do not cover the<br />
streets and intersections behind them.<br />
POIs are grouped into several levels of categories and subcategories. The icon of a POI that<br />
comes with the map shows the symbol of the POI category. If you save your own POI, you<br />
can select an icon for it independently of the POI category you have put it in.<br />
Saving POI<br />
To save a POI, place the Cursor (<br />
) at the desired location, then tap the following<br />
buttons: , , .<br />
Managing POI<br />
You can select which POI groups to show and which ones to hide on the map, and from<br />
which zoom levels POI icons are visible. At the same place you can manage your saved<br />
POIs. A saved POI can be renamed, moved to a different POI group, its icon can be changed,<br />
or a phone number and additional information can be added to it. Tap the following buttons:<br />
, , .<br />
2.5.10 Road Safety Cameras<br />
The location of a Road Safety Camera is a special POI. They cannot be searched like other<br />
POIs, and there is a special proximity warning only for cameras.<br />
Is the device shipped with a built-in database of Road Safety Cameras?<br />
No<br />
Can you upload Road Safety Camera locations from POI Warner?<br />
Can Road Safety Camera locations be uploaded in a text file?<br />
Can you save the Cursor as the location of a Road Safety Camera?<br />
Yes<br />
Yes<br />
Yes<br />
25
You can use the POI Warner update tool that is on the enclosed DVD. The first update of<br />
fixed Road Safety Cameras is free of charge.<br />
Saving Road Safety Cameras<br />
To save the location of a Road Safety Camera, place the Cursor (<br />
) at the desired<br />
location, then tap the following buttons: , , .<br />
Camera warning<br />
The warning for Road Safety Cameras can be turned on in Warning Settings. Tap the<br />
following buttons: , , , .<br />
When you approach a Road Safety Camera with the warning enabled, the following happens:<br />
• Visible Warning: The type of the camera is displayed in the secondary Turn Preview<br />
field (for example ).<br />
• Audible Warning: If there is no speed limit given for the camera, or your speed is under<br />
the given speed limit, single beeps warn you about the camera.<br />
• If you exceed the speed limit of the camera, the following also happens:<br />
• Visible Warning: A symbol with the speed limit appears in the corner of the map<br />
(for example: ),<br />
• Audible Warning: A special alert sound is played.<br />
2.5.10.1 Camera types<br />
There are different types of Road Safety Cameras.<br />
Symbol Type<br />
Fixed<br />
Mobile<br />
Built-in<br />
Section<br />
control<br />
Description<br />
Some speed cameras stand by the roadside, looking in one direction,<br />
measuring one or both directions of the traffic. They measure your<br />
current speed. For these speed cameras you can specify the controlled<br />
traffic direction and the speed limit. <strong>Rosen</strong> Navi warns you when you<br />
approach these speed cameras in the measured direction. If your speed<br />
exceeds the speed limit near the speed camera, <strong>Rosen</strong> Navi plays a<br />
special warning sound.<br />
Some speed cameras are operated from vehicles. They do not always<br />
work and they are not set to check a preset speed limit. The warning is<br />
similar to fixed speed cameras, but as there is no speed limit given, only<br />
the proximity is announced.<br />
Some speed cameras are built into traffic lights. They work like fixed<br />
speed cameras, but they are difficult to spot. The warning for proximity<br />
and speeding is the same as for the fixed speed cameras.<br />
These speed cameras work in pairs, and do not measure your current<br />
speed but your average speed between the two speed cameras. Both<br />
26
Symbol Type<br />
Red<br />
light<br />
Description<br />
identify your car and record the exact time you pass them. They use the<br />
difference between the two points in time to calculate your average<br />
speed.<br />
<strong>Rosen</strong> Navi warns you when you approach one of these speed<br />
cameras, but as you pass by, the warning stays on, and your average<br />
speed is measured until you reach another speed camera of this type. If<br />
your average speed exceeds the speed limit between the two speed<br />
cameras, you receive the same special warning sound as with the other<br />
speed camera types.<br />
In the rare case <strong>Rosen</strong> Navi cannot register the moment you pass the<br />
second speed camera (for example, it is placed at the exit of a tunnel<br />
where GPS position is not yet available) the warning continues. Just tap<br />
the speed camera symbol displayed on the screen to stop the warning.<br />
These cameras check if you obey traffic lights. The warning is similar to<br />
mobile speed cameras: as there is no speed limit given, only the<br />
proximity is announced.<br />
2.5.10.2 Camera directions<br />
A speed camera can measure the speed of one direction of the traffic, both directions, or<br />
even several directions in an intersection, when they are mounted on a rotating base. The<br />
same directions apply to red light cameras. <strong>Rosen</strong> Navi warns you only if you drive in a<br />
measured or possibly measured direction. The measured direction of the camera appears<br />
with the following symbols:<br />
Symbol<br />
Description<br />
The camera checks the speed of the direction into which you are driving.<br />
The camera checks the speed of the opposite driving direction.<br />
The camera checks the speed in both directions on the road.<br />
The camera can check the speed in any direction.<br />
2.5.11 Speed limit warning<br />
Maps sometimes contain information about the speed limits of the road segments. This<br />
information may not be available for your region (ask your local dealer) or may not be fully<br />
correct for all roads on the map.<br />
You can configure <strong>Rosen</strong> Navi to warn you if you exceed the current limit. Tap the following<br />
buttons: , , , .<br />
When you exceed the speed limit, the following happens:<br />
• Visible Warning: A symbol with the speed limit appears in the corner of the map (for<br />
example: ).<br />
27
• Audible Warning: A voice message is played using the selected voice guidance profile.<br />
2.5.12 TMC (Traffic Message Channel)<br />
<strong>Rosen</strong> Navi can provide you with even better routes if Traffic Message Channel (TMC)<br />
information is available. The TMC is a specific application of the FM Radio Data System<br />
(RDS) used for broadcasting real-time traffic and weather information.<br />
TMC is enabled by default in <strong>Rosen</strong> Navi.<br />
Note!<br />
TMC is not a global service. It may not be available in your country or region.<br />
Ask your local dealer for coverage details.<br />
If public TMC data is broadcast at your location, <strong>Rosen</strong> Navi automatically takes into account<br />
the TMC data received. You do not need to set anything in the program. The receiver will<br />
automatically search the FM radio stations for TMC data, and the decoded information will<br />
immediately be used in route planning. The moment <strong>Rosen</strong> Navi receives traffic information<br />
that may affect your route, the program will warn you that it is recalculating the route, and<br />
navigation will continue with a new route that is optimal considering the most up-to-date traffic<br />
conditions.<br />
If necessary, you can change the settings related to TMC, or select a specific radio station to<br />
receive. Tap the following buttons: , , .<br />
28
3 Navigating with <strong>Rosen</strong> Navi<br />
You can set up your route in <strong>Rosen</strong> Navi in several ways:<br />
• if you need a simple route (a route with only one destination, without any intermediate<br />
via points), you can select the destination and start navigating to it right away<br />
• you can plan a multi-point route (available in Advanced mode only)<br />
• you can also plan a route independently of your current GPS position or even without<br />
GPS reception (available in Advanced mode only)<br />
3.1 Selecting the destination of a route<br />
<strong>Rosen</strong> Navi offers you several ways of choosing your destination and via points (intermediate<br />
destinations):<br />
• Use the selected location on the map (the Cursor) (page 29).<br />
• Enter a full address or a part of an address, for example a street name without a house<br />
number or the names of two intersecting streets (page 30).<br />
• Enter an address with ZIP code (page 37). This way you do not need to select the<br />
name of the city and the search for street names might be faster as well.<br />
• Use a coordinate (page 41)<br />
• Use a saved location:<br />
• a Favorite (page 38)<br />
• a POI (page 39)<br />
• the History of previously set destinations and waypoints (page 40)<br />
Tip!<br />
If you are going to use a route later, save it before you start navigating. Tap<br />
the following buttons: , , .<br />
3.1.1 Selecting the Cursor as the destination<br />
1. Locate your destination on the map: move and scale the map as needed (page 14).<br />
2. Tap the location that you want to select as your destination. The Cursor ( )<br />
appears.<br />
3. Tap to open the Cursor menu.<br />
4. The map appears with the selected point in the middle. Tap<br />
(Simple mode) or<br />
(Advanced mode) from the Cursor menu. The<br />
route is then automatically calculated, and you can start navigating.<br />
Tip!<br />
If you know that you will use a destination later, when the Cursor menu<br />
29
appears, save it as a POI, or put it on the list of your Favorites first. The<br />
Cursor menu returns automatically with the same point. Now you can use it as<br />
a route point.<br />
3.1.2 Entering an address or part of an address<br />
If you know at least a part of the address, it is the quickest way to select the destination of the<br />
route.<br />
Using the same screen, you can find an address by entering:<br />
• the exact address, including house number<br />
• the center of a city<br />
• an intersection<br />
• the midpoint of a street<br />
• any of the above, starting the search with the ZIP code (page 37)<br />
3.1.2.1 Entering an address (Europe)<br />
In some countries, states are not used in addressing. After selecting the country, the next<br />
step is to define the city. There are four lines on the screen:<br />
The procedure is explained starting from the <strong>Navigation</strong> menu.<br />
1. Tap the following buttons: (Simple mode), or , (Advanced<br />
mode).<br />
2. By default, <strong>Rosen</strong> Navi proposes the country and city where you are. If needed, tap the<br />
button with the name of the country, and select a different one from the list.<br />
3. If needed, change the city:<br />
• To select the city from the list of recently used ones, tap the button.<br />
• To enter a new city:<br />
1. Tap the button with the name of the city, or if you have changed the<br />
country/state, tap .<br />
2. Start entering the city name on the keyboard.<br />
3. Get to the list of search results:<br />
• After entering a couple of characters, the names that match the<br />
string appear in a list.<br />
30
• Tap to open the list of results before it appears<br />
automatically.<br />
4. Pick the city from the list.<br />
4. Enter the street name:<br />
1. Tap .<br />
2. Start entering the street name on the keyboard.<br />
3. Get to the list of results:<br />
• After entering a couple of characters, the names that match the string<br />
appear in a list.<br />
• Tap to open the list of results before it appears<br />
automatically.<br />
4. Pick the street from the list.<br />
5. Enter the house number:<br />
1. Tap .<br />
2. Enter the house number on the keyboard.<br />
3. Tap to finish entering the address.<br />
6. The map appears with the selected point in the middle. Tap<br />
(Simple mode) or<br />
(Advanced mode) from the Cursor menu. The<br />
route is then automatically calculated, and you can start navigating.<br />
3.1.2.2 Entering an address (North America, Australia)<br />
In some countries, the state is also used in addresses. If you are in one of these countries, or<br />
choose any of them from the list of countries, five lines appear on the screen:<br />
The procedure is explained starting from the <strong>Navigation</strong> menu.<br />
1. Tap the following buttons: (Simple mode), or , (Advanced<br />
mode).<br />
2. By default, <strong>Rosen</strong> Navi proposes the country, state and city where you are. If needed,<br />
tap the button with the name of the country, and select a different one from the list. If<br />
31
you select a new country, you also need to select the state, or tap<br />
to<br />
search for a city regardless of the state it is in.<br />
3. If you have not changed the country, you still have the possibility to change the state.<br />
Tap the button with the name of the state, and select from the list.<br />
4. If needed, change the city:<br />
• To select the city from the list of recently used ones, tap the button.<br />
• To enter a new city:<br />
1. Tap the button with the name of the city, or if you have changed the<br />
country/state, tap .<br />
2. Start entering the city name on the keyboard.<br />
3. Get to the list of search results:<br />
• After entering a couple of characters, the names that match the<br />
string appear in a list.<br />
• Tap to open the list of results before it appears<br />
automatically.<br />
4. Pick the city from the list.<br />
5. Enter the street name:<br />
1. Tap .<br />
2. Start entering the street name on the keyboard.<br />
3. Get to the list of results:<br />
• After entering a couple of characters, the names that match the string<br />
appear in a list.<br />
• Tap to open the list of results before it appears<br />
automatically.<br />
4. Pick the street from the list.<br />
6. Enter the house number:<br />
1. Tap .<br />
2. Enter the house number on the keyboard.<br />
3. Tap to finish entering the address.<br />
7. The map appears with the selected point in the middle. Tap<br />
(Simple mode) or<br />
(Advanced mode) from the Cursor menu. The<br />
route is then automatically calculated, and you can start navigating.<br />
32
3.1.2.3 Entering an address if house numbering is restarted<br />
There are long roads where the house numbering is restarted at some point. This way the<br />
same house number can appear twice or even more times on the same road. If this is the<br />
case, after giving the house number, you need to select the appropriate address by the<br />
district/suburb information.<br />
The procedure is explained starting from the <strong>Navigation</strong> menu.<br />
1. Tap the following buttons: (Simple mode), or , (Advanced<br />
mode).<br />
2. By default, <strong>Rosen</strong> Navi proposes the country/state and city where you are. If needed,<br />
tap the button with the name of the country/state, and select a different one from the<br />
list.<br />
3. If needed, change the city:<br />
• To select the city from the list of recently used ones, tap the button.<br />
• To enter a new city:<br />
1. Tap the button with the name of the city, or if you have changed the<br />
country/state, tap .<br />
2. Start entering the city name on the keyboard.<br />
3. Get to the list of search results:<br />
• After entering a couple of characters, the names that match the<br />
string appear in a list.<br />
• Tap to open the list of results before it appears<br />
automatically.<br />
4. Pick the city from the list.<br />
4. Enter the street name:<br />
1. Tap .<br />
2. Start entering the street name on the keyboard.<br />
3. Get to the list of results:<br />
• After entering a couple of characters, the names that match the string<br />
appear in a list.<br />
• Tap to open the list of results before it appears<br />
automatically.<br />
4. Pick the street from the list.<br />
5. Enter the house number:<br />
1. Tap .<br />
2. Enter the house number on the keyboard.<br />
3. Tap to finish entering the address.<br />
33
6. A list appears with the matching addresses. Tap the desired one.<br />
7. The map appears with the selected point in the middle. Tap<br />
(Simple mode) or<br />
(Advanced mode) from the Cursor menu. The<br />
route is then automatically calculated, and you can start navigating.<br />
3.1.2.4 Entering an address without knowing the dictrict/suburb<br />
Long roads can run across several districts or suburbs. You may not know if a particular<br />
house number is in which of them. In this case, follow the instructions below:<br />
The procedure is explained starting from the <strong>Navigation</strong> menu.<br />
1. Tap the following buttons: (Simple mode), or , (Advanced<br />
mode).<br />
2. By default, <strong>Rosen</strong> Navi proposes the country/state and city where you are. If needed,<br />
tap the button with the name of the country/state, and select a different one from the<br />
list.<br />
3. If needed, change the city:<br />
• To select the city from the list of recently used ones, tap the button.<br />
• To enter a new city:<br />
1. Tap the button with the name of the city, or if you have changed the<br />
country/state, tap .<br />
2. Start entering the city name on the keyboard.<br />
3. Get to the list of search results:<br />
• After entering a couple of characters, the names that match the<br />
string appear in a list.<br />
• Tap to open the list of results before it appears<br />
automatically.<br />
4. Pick the city from the list.<br />
4. Enter the street name:<br />
1. Tap .<br />
2. Start entering the street name on the keyboard.<br />
3. Get to the list of results:<br />
• After entering a couple of characters, the names that match the string<br />
appear in a list.<br />
• Tap to open the list of results before it appears<br />
automatically.<br />
34
4. Instead of picking one of the streets, tap .<br />
5. Enter the house number:<br />
1. Tap .<br />
2. Enter the house number on the keyboard.<br />
3. Tap to finish entering the address.<br />
6. A list appears with the matching addresses. Tap the desired one.<br />
7. The map appears with the selected point in the middle. Tap<br />
(Simple mode) or<br />
(Advanced mode) from the Cursor menu. The<br />
route is then automatically calculated, and you can start navigating.<br />
3.1.2.5 Selecting an intersection as the destination<br />
The procedure is explained starting from the <strong>Navigation</strong> menu.<br />
1. Tap the following buttons: (Simple mode), or , (Advanced<br />
mode).<br />
2. By default, <strong>Rosen</strong> Navi proposes the country/state and city where you are. If needed,<br />
tap the button with the name of the country/state, and select a different one from the<br />
list.<br />
3. If needed, change the city:<br />
• To select the city from the list of recently used ones, tap the button.<br />
• To enter a new city:<br />
1. Tap the button with the name of the city, or if you have changed the<br />
country/state, tap .<br />
2. Start entering the city name on the keyboard.<br />
3. Get to the list of search results:<br />
• After entering a couple of characters, the names that match the<br />
string appear in a list.<br />
• Tap to open the list of results before it appears<br />
automatically.<br />
4. Pick the city from the list.<br />
4. Enter the street name:<br />
1. Tap .<br />
2. Start entering the street name on the keyboard.<br />
35
3. Get to the list of results:<br />
• After entering a couple of characters, the names that match the string<br />
appear in a list.<br />
• Tap to open the list of results before it appears<br />
automatically.<br />
4. Pick the street from the list.<br />
5. Tap the button.<br />
• If only a few intersecting streets exist, their list appears immediately.<br />
• In case of a longer street, a keyboard screen appears. Start entering the name<br />
of the intersecting street on the keyboard. As you type, if the matching streets<br />
can be shown on one screen, their list appears automatically.<br />
6. Tap the desired intersecting street in the list.<br />
7. The map appears with the selected point in the middle. Tap<br />
(Simple mode) or<br />
(Advanced mode) from the Cursor menu. The<br />
route is then automatically calculated, and you can start navigating.<br />
3.1.2.6 Selecting a city center as the destination<br />
The City Center is not the geometric center of the city but an arbitrary point the map creators<br />
have chosen. In towns and villages, it is usually the most important intersection; in larger<br />
cities, it is an important intersection.<br />
The procedure is explained starting from the <strong>Navigation</strong> menu.<br />
1. Tap the following buttons: (Simple mode), or , (Advanced<br />
mode).<br />
2. By default, <strong>Rosen</strong> Navi proposes the country/state and city where you are. If needed,<br />
tap the button with the name of the country/state, and select a different one from the<br />
list.<br />
3. If needed, change the city:<br />
• To select the city from the list of recently used ones, tap the button.<br />
• To enter a new city:<br />
1. Tap the button with the name of the city, or if you have changed the<br />
country/state, tap .<br />
2. Start entering the city name on the keyboard.<br />
3. Get to the list of search results:<br />
• After entering a couple of characters, the names that match the<br />
string appear in a list.<br />
36
• Tap to open the list of results before it appears<br />
automatically.<br />
4. Pick the city from the list.<br />
4. Tap the button.<br />
5. The map appears with the selected point in the middle. Tap<br />
(Simple mode) or<br />
(Advanced mode) from the Cursor menu. The<br />
route is then automatically calculated, and you can start navigating.<br />
3.1.2.7 Entering an address with a ZIP code<br />
All of the above address searching possibilities can be performed with entering the ZIP code<br />
instead of the city name. Find below an example with a full address:<br />
The procedure is explained starting from the <strong>Navigation</strong> menu.<br />
1. Tap the following buttons: (Simple mode), or , (Advanced<br />
mode).<br />
2. By default, <strong>Rosen</strong> Navi proposes the country/state and city where you are. If needed,<br />
tap the button with the name of the country/state, and select a different one from the<br />
list.<br />
3. Tap the button with the name of the city, and enter the ZIP code:<br />
1. Start entering the ZIP code on the keyboard.<br />
2. Get to the list of results:<br />
• After entering a couple of numbers, the ones that are a match appear in a<br />
list.<br />
• Tap to open the list of results before it appears<br />
automatically.<br />
3. Pick the city from the list.<br />
4. Enter the street name:<br />
1. Tap .<br />
2. Start entering the street name on the keyboard.<br />
3. Get to the list of results:<br />
• After entering a couple of characters, the names that match the string<br />
appear in a list.<br />
• Tap to open the list of results before it appears<br />
automatically.<br />
4. Pick the street from the list.<br />
5. Enter the house number:<br />
37
1. Tap .<br />
2. Enter the house number on the keyboard.<br />
3. Tap to finish entering the address.<br />
6. The map appears with the selected point in the middle. Tap<br />
(Simple mode) or<br />
(Advanced mode) from the Cursor menu. The<br />
route is then automatically calculated, and you can start navigating.<br />
3.1.2.8 Tips on entering addresses quickly<br />
• When you are entering the name of a city or a street, <strong>Rosen</strong> Navi only displays those<br />
characters that appear in possible search results. The other characters are greyed out.<br />
• When entering the city name or the street name, tap the button after a<br />
couple of letters; <strong>Rosen</strong> Navi lists the items that contain the character set.<br />
• You can speed up finding an intersection:<br />
• Search first for the street with a less common or less usual name; fewer letters<br />
are enough to find it.<br />
• If one of the streets is shorter, search for that one first. You can then find the<br />
second one faster.<br />
• You can search for both the type and the name of a road. If the same word appears in<br />
several names, for example in the name of streets, roads and avenues, you can obtain<br />
the result faster if you enter the first letter of the street type: For example, enter Pi A to<br />
obtain Pine Avenue and skip all Pine Streets and Pickwick Roads.<br />
• You can also search in ZIP codes. This is useful when a street name is common and it<br />
is used in several districts of a city.<br />
3.1.3 Selecting the destination from your Favorites<br />
You can select a location that you have already saved as a Favorite to be your destination.<br />
The procedure is explained starting from the <strong>Navigation</strong> menu.<br />
1. Tap the following buttons: (Simple mode) or ,<br />
(Advanced mode).<br />
2. Tap the Favorite that you want to set as your destination.<br />
3. The map appears with the selected point in the middle. Tap<br />
(Simple mode) or<br />
(Advanced mode) from the Cursor menu. The<br />
route is then automatically calculated, and you can start navigating.<br />
38
3.1.4 Selecting the destination from the POIs<br />
You can select your destination from the POIs included with <strong>Rosen</strong> Navi or from the ones you<br />
have previously created.<br />
The procedure is explained starting from the <strong>Navigation</strong> menu.<br />
1. Tap the following buttons: (Simple mode), or , (Advanced<br />
mode).<br />
2. Select the area around which the POI should be searched:<br />
• : The POI will be searched around a given address.<br />
• : The map appears with the Cursor in the middle. Modify the location of<br />
the Cursor if necessary, then tap<br />
the given location.<br />
. The POI will be searched around<br />
• : The POI will be searched around the current GPS position.<br />
• : The POI will be searched around the destination of the active<br />
route.<br />
• : The POI will be searched not around a given point but by the<br />
size of the detour it means from the active route. This can be useful if you<br />
search for a later stopover that causes only a minimal detour. For example<br />
upcoming petrol stations or restaurants.<br />
3. You can narrow the search with the following:<br />
• Select the POI group (e.g. Accomodation), and after that, if needed, select the<br />
POI subgroup (e.g. Hotel or Motel).<br />
• To find the POI by its name, tap , and use the keyboard to enter a<br />
part of the name.<br />
• To list all POIs in a given POI group, tap .<br />
4. [optional] When finally the list of results appear, you can sort the list:<br />
• : sort the list alphabetically (available when you search around a<br />
single location)<br />
• : sort the list by the distance from your current position in a straight<br />
line (available when you search around a single location)<br />
• : sort the list by the distance to drive on route from your current position<br />
(available when you search along the active route)<br />
39
• : sort the list by the size of the needed detour (available when you<br />
search along the active route)<br />
5. Tap the desired POI in the list.<br />
6. The map appears with the selected point in the middle. Tap<br />
(Simple mode) or<br />
(Advanced mode) from the Cursor menu. The<br />
route is then automatically calculated, and you can start navigating.<br />
3.1.5 Selecting the destination with a saved POI search criteria<br />
POI search criteria can be saved in the POI section of the Manage menu, but <strong>Rosen</strong> Navi is<br />
already shipped with some saved criteria you can use instantly when searching for a POI.<br />
The procedure is explained starting from the <strong>Navigation</strong> menu.<br />
1. Tap the following buttons: (Simple mode), or , (Advanced<br />
mode).<br />
2. Tap .<br />
3. Select one of the saved criteria, and the list of matching POIs appear.<br />
4. Tap the desired POI in the list.<br />
5. The map appears with the selected point in the middle. Tap<br />
(Simple mode) or<br />
(Advanced mode) from the Cursor menu. The<br />
route is then automatically calculated, and you can start navigating.<br />
3.1.6 Selecting the destination from the History<br />
The destinations that you have set earlier appear in the History.<br />
The procedure is explained starting from the <strong>Navigation</strong> menu.<br />
1. Tap the following buttons: (Simple mode), or ,<br />
(Advanced mode).<br />
2. If necessary, turn the page with to see earlier destinations.<br />
3. Tap the desired item.<br />
40
4. The map appears with the selected point in the middle. Tap<br />
(Simple mode) or<br />
(Advanced mode) from the Cursor menu. The<br />
route is then automatically calculated, and you can start navigating.<br />
3.1.7 Selecting the destination by entering its coordinate<br />
This feature is available in Advanced mode only.<br />
The procedure is explained starting from the <strong>Navigation</strong> menu.<br />
1. Tap the following buttons: , .<br />
2. [optional] Tap to change the format of the displayed<br />
coordinates.<br />
3. Tap the latitude or longitude value to change the coordinate.<br />
4. Enter the coordinate values in WGS84 format on the keyboard: the latitude (N or S)<br />
and the longitude (E or W).<br />
5. Tap .<br />
6. The map appears with the selected point in the middle. Tap<br />
(Simple mode) or<br />
(Advanced mode) from the Cursor menu. The<br />
route is then automatically calculated, and you can start navigating.<br />
3.2 Creating a multi-point route (inserting a via point)<br />
Multi-point routes are created from simple routes, so a route must be active first. One of the<br />
ways of expanding the route is to keep the destination, and to add via points (intermediate<br />
destinations).<br />
This feature is available in Advanced mode only.<br />
1. Select a new location as you did in the previous sections. This will be the additional<br />
destination in the route.<br />
2. The map appears with the selected point in the middle, and the Cursor menu opens<br />
automatically.<br />
3. Tap to add the point as an intermediate destination preceding the<br />
final destination of the route.<br />
4. [optional] To add more points to the route, repeat the above steps as many times as<br />
you like.<br />
If you insert a via point in a route that is already a multi-point route, you will automatically be<br />
taken to the Edit Route screen where you can determine the position of the intermediate route<br />
41
point. When you enter the screen, the new via point is placed as the last via point before the<br />
final destination. The new point is the selected point in the list.<br />
You have the following options:<br />
Button<br />
Action<br />
The selected point moves up in the list (becomes a via point to be reached<br />
earlier). Tap this button repeatedly, and the point becomes the start point of the<br />
route.<br />
The selected point moves down in the list (becomes a via point to be reached<br />
later). Tap this button repeatedly, and the point becomes the final destination of<br />
the route.<br />
The route is reversed. The start point becomes the destination, the destination<br />
becomes the start point, and all via points are to be reached in the opposite order<br />
than before.<br />
The route is optimized. The start point and the destination remain at their<br />
position, but the via points are reordered to make the shortest possible route.<br />
The selected point is removed from the route. The route remains as it was before<br />
adding the new point.<br />
Every time a new point is added, the route is recalculated automatically, and you can start<br />
navigating right away.<br />
3.3 Creating a multi-point route (appending a new destination)<br />
Multi-point routes are created from simple routes, so a route must be active first. One of the<br />
ways of expanding the route is to add a new destination. The previous destination becomes<br />
the last via point of the route.<br />
This feature is available in Advanced mode only.<br />
1. Select a new location as you did in the previous sections. This will be the additional<br />
destination in the route.<br />
2. The map appears with the selected point in the middle, and the Cursor menu opens<br />
automatically.<br />
3. Tap to open the full Cursor menu with the additional functions.<br />
4. Tap to add the point as a new final destination demoting the<br />
previous one to the last intermediate destination.<br />
5. [optional] To add more points to the route, repeat the above steps as many times as<br />
you like.<br />
Every time a new point is added, the route is recalculated automatically, and you can start<br />
navigating right away.<br />
3.4 Editing the route<br />
This feature is available in Advanced mode only.<br />
42
Tap the following buttons: , , .<br />
The list of route points appear with the start point at the top of the list and the final destination<br />
at the bottom. If several via points exist, you might need to turn the page.<br />
Tap one of the route points in the list. You have the following options:<br />
Button<br />
Action<br />
The selected point moves up in the list (becomes a via point to be reached<br />
earlier). Tap this button repeatedly, and the point becomes the start point of the<br />
route.<br />
The selected point moves down in the list (becomes a via point to be reached<br />
later). Tap this button repeatedly, and the point becomes the final destination of<br />
the route.<br />
The route is reversed. The start point becomes the destination, the destination<br />
becomes the start point, and all via points are to be reached in the opposite order<br />
than before.<br />
The route is optimized. The start point and the destination remain at their<br />
position, but the via points are reordered to make the shortest possible route.<br />
The selected point is removed from the route.<br />
As soon as you leave this screen, the route is recalculated automatically, and you can start<br />
navigating right away.<br />
3.5 Viewing the whole route on the map (Fit-to-Screen)<br />
The map can be moved and scaled to show the whole line of the route. You do not need to<br />
manipulate the map manually. The Plan on Map feature does it for you.<br />
In Advanced mode you have the following options to enter Plan on Map:<br />
• Via the Find menu: tap , , .<br />
• Via the Route Information screen: tap , , , .<br />
• Via the Route Information screen using a shortcut: tap , .<br />
In Simple mode the last option is available only.<br />
3.6 Watching the simulation of the route<br />
This feature is available in Advanced mode only.<br />
The procedure is explained starting from the Map screen.<br />
1. Tap the following buttons: , .<br />
2. The Route menu appears. There are two ways of running the route simulation:<br />
43
• Tap to run the simulation at high speed to give you a quick<br />
overview of the route.<br />
• Tap to run the simulation at normal speed and with voice<br />
guidance instructions announced. This option is for demonstration purposes, or<br />
for checking difficult parts of the route in advance.<br />
3. The simulation can be aborted any time by tapping .<br />
3.7 Enabling Safety Mode<br />
This feature is available in Advanced mode only.<br />
Safety Mode disables the touch screen above 10 km/h (6 mph) to keep your attention on the<br />
road. While driving, you will not be able to set a new destination or to change settings. The<br />
only screen control that remains enabled is the gesture that puts you back on the Map screen.<br />
The procedure is explained starting from the Map screen.<br />
Tap the following buttons: , , , .<br />
3.8 Pausing the active route<br />
You do not need to pause the active route: when you start driving again, <strong>Rosen</strong> Navi restarts<br />
the voice instructions from your position.<br />
3.9 Deleting the next via point from the route<br />
The easiest way to delete the upcoming route point (the next via point) in both Simple mode<br />
and Advanced mode is to open the Route Information screen by tapping the Turn Preview<br />
field ( ) on the Map screen, and then tapping .<br />
In Advanced mode, you have another option. Tap the following buttons: , ,<br />
, .<br />
44
3.10 Deleting the active route<br />
The easiest way to delete the active route in both Simple mode and Advanced mode is to<br />
open the Route Information screen by tapping the Turn Preview field (<br />
) on the Map<br />
screen, and then tapping .<br />
In Advanced mode, you have another option. Tap the following buttons: , ,<br />
.<br />
Note!<br />
If via points exist in the active route, you cannot delete the route immediately<br />
on the Route Information screen. Tap<br />
points disappear and the<br />
whole route.<br />
repeatedly until all via<br />
button appears. Tap it to cancel the<br />
3.11 Using Track Logs<br />
<strong>Rosen</strong> Navi can record the track (how your GPS position changed) that you drive.<br />
Tip!<br />
You do not need to select a destination and create a route for this; you can<br />
also record your driving path while cruising.<br />
This feature is available in Advanced mode only.<br />
The procedure is explained starting from the Map screen.<br />
Recording the travelled path (creating a Track Log)<br />
1. Start driving.<br />
2. Tap the following buttons: , , .<br />
3. Start the recording: tap the button.<br />
You return to the map and you can continue driving.<br />
4. Repeat the above steps, then tap later to stop the recording. <strong>Rosen</strong><br />
Navi labels the Track Log with a time stamp.<br />
(As an alternative, you can tap the<br />
the Track Log recording.)<br />
button in the Quick menu to start, and later to stop<br />
45
Simulating a Track Log on the map<br />
1. Tap the following buttons: , , .<br />
2. Locate the desired Track Log, and then tap the button next to it.<br />
3. The map returns, and the Track Log simulation (a life-like replay) begins.<br />
4. You can stop the replay any time by tapping the button.<br />
Changing the color of a Track Log<br />
1. Tap the following buttons: , , .<br />
2. Tap the desired Track Log and then tap one of the color buttons.<br />
3.12 Saving a route<br />
This feature is available in Advanced mode only.<br />
The procedure is explained starting from the Map screen.<br />
1. Tap the following buttons: , , .<br />
2. Enter a name for the saved route, and then tap .<br />
When you save a route, <strong>Rosen</strong> Navi not only saves the route points but the whole itinerary:<br />
• The saved route might have been influenced by TMC information. When you later use<br />
the route, it appears as it was saved, but if it needs to be recalculated, the current TMC<br />
information will be used in the new route.<br />
• If you updated your map since you first saved the route, <strong>Rosen</strong> Navi recognizes the<br />
change, and recalculates the driving instructions according to the latest available map<br />
information.<br />
• <strong>Rosen</strong> Navi deletes from the route the via points that you already left behind during<br />
navigation together with the road segments used to reach it. To avoid this, if you want<br />
to save the route, you need to save it before you start navigating.<br />
3.13 Loading a saved route<br />
This feature is available in Advanced mode only.<br />
The procedure is explained starting from the Map screen.<br />
46
1. Tap the following buttons: , , .<br />
2. Tap the route you wish to navigate.<br />
3. In the very likely case when the start position of the saved route is different from the<br />
current GPS position, you need to confirm whether you want to stop navigating from<br />
the current GPS position to use the start point of the loaded route.<br />
• If you choose this option, the automatic off-route recalculation will be disabled.<br />
• If you choose to keep the current GPS position as the start point, the route will<br />
be recalculated starting from your current position.<br />
4. The map appears, and you can start navigating.<br />
47
4 Reference book (Advanced mode)<br />
On the following pages you will find the description of the different menu screens of <strong>Rosen</strong><br />
Navi in Advanced mode. In Simple mode, these functions work the same way, but only a few<br />
of them are available.<br />
The <strong>Navigation</strong> menu:<br />
<strong>Rosen</strong> Navi starts with the <strong>Navigation</strong> menu. From there you can access the following<br />
screens:<br />
Screen Button Description<br />
Map<br />
The Map screen.<br />
Find<br />
Route<br />
Manage<br />
Settings<br />
Selecting the destination (for example an address or a POI) or<br />
using the search engine of <strong>Rosen</strong> Navi for any other reason<br />
(for example to look for the phone number of a POI).<br />
Managing the active route (obtaining information about it,<br />
changing or deleting it or parts of it) or planning a route<br />
without GPS reception.<br />
Managing user data, such as saved locations (POIs,<br />
Favorites, Pins, and History items), Saved Routes, and Track<br />
Logs.<br />
Managing the behaviour of <strong>Rosen</strong> Navi, for example the map<br />
layout during navigation, the used languages or the warnings.<br />
4.1 Map screen<br />
<strong>Rosen</strong> Navi is primarily intended for land navigation. That is why maps in <strong>Rosen</strong> Navi look<br />
similar to paper road maps. However, <strong>Rosen</strong> Navi provides much more than regular paper<br />
maps: you can customize the look and the content of the map.<br />
The most important and most often used screen of <strong>Rosen</strong> Navi is the Map screen.<br />
-<br />
During navigation, the screen shows route information and trip data (left screenshot), but<br />
when you tap the map, additional buttons and controls appear for a few seconds (right<br />
screenshot). Most parts of the screen behave as buttons.<br />
Symbol Name Action<br />
Turn Preview, that is, the next<br />
route event<br />
Opens the Route Information<br />
screen<br />
48
Symbol Name Action<br />
Second upcoming route event<br />
Opens the Itinerary<br />
Trip data<br />
Opens the Trip Information screen<br />
GPS position quality<br />
Opens the Quick menu<br />
Vehicle used in route<br />
calculation<br />
Opens the Quick menu<br />
Top row Next street n/a<br />
Bottom row Current street and house<br />
numbers on left and right<br />
n/a<br />
,<br />
Map view modes<br />
Menu<br />
Switches between 2D and 3D map<br />
modes<br />
Opens the <strong>Navigation</strong> menu<br />
Detour<br />
Opens the Detour screen, two<br />
ways of modifying the route:<br />
• the list of Saved Search<br />
Criteria<br />
• a button to avoid parts of the<br />
route<br />
Position menu (appears when<br />
navigating a route)<br />
Cursor menu (appears when<br />
there is no GPS position or the<br />
Cursor is not at the current<br />
GPS position)<br />
Opens the Position menu<br />
Opens the Cursor menu<br />
Open/Close Map control<br />
buttons<br />
Tap this button to show or hide the<br />
following map control buttons:<br />
• Zoom in/out<br />
• Rotate left/right (3D map<br />
only)<br />
• Tilt up/down (3D map only)<br />
• Zoom preset buttons (2D<br />
map only)<br />
• Tilt and zoom preset buttons<br />
(3D map only)<br />
• Return to GPS position<br />
49
Symbol Name Action<br />
button<br />
• Smart Zoom button<br />
,<br />
,<br />
Rotate left, rotate right<br />
Tilt up, tilt down<br />
Rotates the 3D map left or right<br />
Tilts the 3D map<br />
,<br />
Zoom in, zoom out<br />
Return to GPS position<br />
(appears when GPS position is<br />
available and you have moved<br />
the map)<br />
Enable Smart Zoom (replaces<br />
the previous button if there is<br />
no GPS position or the map has<br />
not been moved)<br />
Zoom preset buttons (available<br />
in Advanced mode only)<br />
Tilt preset buttons (available in<br />
Advanced mode only)<br />
Current GPS position (on<br />
nearest road)<br />
Scales the map<br />
Tap this button to move the map<br />
back to the current GPS position. If<br />
the map has been rotated in 3D<br />
mode, automatic map rotation is<br />
also re-enabled.<br />
Tap this button once to enable<br />
Smart Zoom.<br />
Tap&hold the button to set the<br />
zoom limits of Smart Zoom.<br />
Tap one of the preset buttons to<br />
set the zoom level to a fix,<br />
predefined value. Smart Zoom is<br />
disabled. These buttons are<br />
available in 2D mode.<br />
Tap&hold any of the buttons to set<br />
its value to the current zoom level,<br />
or to reset it to its original value.<br />
Tap one of the preset buttons to<br />
set the tilt and zoom levels to fix,<br />
predefined values. Smart Zoom is<br />
disabled. These buttons are<br />
available in 3D mode.<br />
Tap&hold any of the buttons to set<br />
its value to the current tilt and<br />
zoom levels, or to reset it to its<br />
original value.<br />
n/a<br />
Cursor (selected map location)<br />
n/a<br />
Lane information<br />
n/a<br />
Orange line Active route n/a<br />
50
Symbol Name Action<br />
Map scale (2D map only)<br />
n/a<br />
4.1.1 Icons on the map<br />
There are several status icons on the map. Most of them also function as a button. The<br />
information they provide is as follows:<br />
• GPS position quality<br />
• Battery status<br />
• Vehicle type used for route calculation<br />
• Sound status (muted or enabled)<br />
• Track log recording status<br />
• TMC reception and processing status<br />
• Bluetooth connection and communication status<br />
4.1.1.1 GPS position quality and Vehicle type indicator<br />
This is a complex indicator, and a button that opens the Quick menu.<br />
The GPS reception quality shows the current accuracy of the position information.<br />
Icon<br />
Description<br />
<strong>Rosen</strong> Navi has no connection to the GPS receiver: GPS navigation is not<br />
possible.<br />
Devices with a built-in GPS receiver are permanently connected. On such<br />
devices, the icon does not appear in normal circumstances.<br />
<strong>Rosen</strong> Navi is connected to the GPS receiver, but the signal is too weak<br />
and the receiver cannot determine the GPS position.<br />
GPS navigation is not possible.<br />
Only a few satellites are received. Position information is available, but<br />
elevation (altitude) cannot be calculated.<br />
GPS navigation is possible, but the position error may be significant.<br />
Altitude information is available, the position is a 3D position.<br />
GPS navigation is possible.<br />
The remaining part of the field shows the vehicle type used for route calculation.<br />
Icon<br />
Vehicle type<br />
Car<br />
Taxi<br />
51
Icon<br />
Bus<br />
Vehicle type<br />
Emergency vehicles<br />
Bicycle<br />
Pedestrian<br />
4.1.1.2 Status indicator strip<br />
This is a complex indicator. In one strip it indicates the following status information:<br />
Icon<br />
Description<br />
The sound output of <strong>Rosen</strong> Navi is muted.<br />
The sound output of <strong>Rosen</strong> Navi is enabled.<br />
<strong>Rosen</strong> Navi records a Track log when GPS position is available.<br />
Track log recording is disabled.<br />
No TMC receiver is connected or TMC is turned off.<br />
TMC receiver is connected and a radio station with TMC broadcast is received.<br />
There are new, unread TMC events.<br />
A part of the route is bypassed based on TMC events.<br />
A part of the route is mentioned in TMC events but could not be bypassed (for<br />
example, the destination is on a congested street).<br />
4.1.1.3 Next two route events (Turn Preview fields)<br />
There are two fields reserved on the Map screen to display the next two maneuvers (route<br />
events that are listed in the Itinerary). Both the type of the event (turn, traffic circle, exiting<br />
highway, etc.) and its distance from the current GPS position is displayed.<br />
Most of these icons are very intuitive and you also know them as road signs. The following<br />
table lists some of the frequently shown route events. The same symbols are used in both<br />
fields:<br />
,<br />
,<br />
Icon<br />
Turn left.<br />
Turn right.<br />
Description<br />
52
,<br />
,<br />
,<br />
,<br />
,<br />
,<br />
,<br />
,<br />
,<br />
,<br />
,<br />
,<br />
Icon<br />
Turn back.<br />
Bear right.<br />
Turn sharp left.<br />
Keep left.<br />
Continue straight in the intersection.<br />
Description<br />
Enter traffic circle. The number of the exit is shown in the circle, but only<br />
for the next turn.<br />
Enter highway.<br />
Exit highway.<br />
Board ferry.<br />
Leave ferry.<br />
Approaching the next via point.<br />
Approaching the destination.<br />
In certain situations when route events are not important, these fields show other useful<br />
pieces of information. They are described here: page 16.<br />
4.1.2 Objects on the map<br />
4.1.2.1 Streets and roads<br />
<strong>Rosen</strong> Navi shows the streets in a way that is similar to how the paper road maps show them.<br />
Their width and colors correspond to their importance: you can easily tell a highway from a<br />
small street.<br />
Tip!<br />
If you prefer not to see street names during navigation, turn them off (page<br />
70).<br />
53
4.1.2.2 3D object types<br />
To enable or disable 3D visualization on the map, tap the following buttons: , ,<br />
, .<br />
<strong>Rosen</strong> Navi supports the following 3D object types:<br />
Type<br />
3D landmarks<br />
Description<br />
Landmarks are 3D artistic or block representations of prominent or wellknown<br />
objects. 3D landmarks are only available in selected cities and<br />
countries.<br />
Elevation model Hills and mountains are shown in the background of the 3D map view, and<br />
illustrated by color on the 2D map.<br />
Elevated roads<br />
3D buildings<br />
3D terrain<br />
Complex intersections and vertically isolated roads (such as overpasses or<br />
underground tunnels) are displayed in 3D.<br />
Full 3D city building data that represents actual building size and position on<br />
the map. Building data is limited to the city center of major cities in the US<br />
and Europe.<br />
3D terrain map data shows changes in terrain, elevations or depressions in<br />
the land when you view the map, and use it to plot the route map in 3D<br />
when you navigate.<br />
4.1.2.3 Elements of the active route<br />
<strong>Rosen</strong> Navi shows the route in the following way:<br />
Symbol Name Description<br />
Current GPS position<br />
Your current position displayed on the map.<br />
• In pedestrian mode it is the exact GPS<br />
position.<br />
• If a vehicle is selected for route calculation,<br />
the arrow is put on the nearest road.<br />
Cursor (selected map<br />
location)<br />
The location selected in the Find menu, or a map<br />
point selected by tapping the map.<br />
Start point<br />
The first point of the route.<br />
Normally, if GPS position is available, it is the<br />
start point of the route. If there is no valid GPS<br />
position, <strong>Rosen</strong> Navi uses the last known GPS<br />
position as the start point.<br />
When you are using a saved route, <strong>Rosen</strong> Navi<br />
asks you if you want to use your GPS position or<br />
the first point in the saved route as the start point.<br />
You can also modify the start point in the Cursor<br />
menu. If you do so, the automatic off-route<br />
recalculation needs to be turned off to keep the<br />
selected point as the start point.<br />
If the automatic off-route recalculation is disabled<br />
54
Symbol Name Description<br />
Via point<br />
Destination (end point)<br />
Route color<br />
Active leg of the route<br />
Inactive legs of the route<br />
Streets and roads that are<br />
excluded from the navigation<br />
for any of the above, tapping the icon in the<br />
Turn Preview field not only initiates a route<br />
recalculation from the current GPS position, but it<br />
will re-enable the automatic off-route recalculation<br />
as well.<br />
A via point is an intermediate destination. You<br />
can place as many via points as you want.<br />
The last point of the route, the final destination.<br />
The route always stands out with its color on the<br />
map, both in daytime and in night color mode.<br />
The active leg of the route is always displayed in<br />
a brighter shade than the inactive (upcoming)<br />
legs.<br />
The section of the route on which you are driving.<br />
If you have not added any via points (only a<br />
destination), the entire route is the active leg. If<br />
you have added via points, the active leg is the<br />
part of the route from your current location to the<br />
next route point (the next via point, or the<br />
destination if there are no more via points to<br />
reach).<br />
The future sections of the route; each of them<br />
becomes active when you reach the via point at<br />
its beginning.<br />
You can choose whether you want to use or<br />
avoid certain road types (page 72). However,<br />
when <strong>Rosen</strong> Navi cannot avoid such roads, the<br />
route will include them and it will show them in a<br />
color that is different from the route color.<br />
4.1.3 Detour menu<br />
This screen contains quick detour possibilities during navigation. It can be opened directly<br />
from the Map screen by tapping .<br />
You have the following options:<br />
• On the main part of the screen you can see the first page of Saved Search Criteria.<br />
Select any of the criteria to quickly receive the list of nearest matching POIs, and<br />
instantly plan a new route to the desired one, or insert it as a via point in your active<br />
route.<br />
• In Advanced mode more buttons appear at the bottom:<br />
• : If you want to bypass a part of the route starting from the next<br />
intersection, tap this button, and select a distance to bypass.<br />
55
• : If you have used the above function before, tap this button to<br />
clear the restrictions from the map.<br />
4.1.4 Cursor menu<br />
As soon as you select one point in the Find menu, the map appears with the Cursor menu, a<br />
menu with possible actions for the selected point.<br />
Alternatively, when you tap the map, control buttons appear. Tap again to place the Cursor, a<br />
radiating red dot. Now tap , and the Cursor menu opens with a list of options.<br />
In order to show a part of the map with the Cursor menu, it contains only a few buttons first.<br />
Tap<br />
Button<br />
to get all the options.<br />
Description<br />
Closes the Cursor menu, and returns to the previous screen.<br />
Zooms out the map.<br />
Zooms in the map.<br />
With the Cursor menu open, you can still move or scale the map,<br />
and tap the map anywhere to place the Cursor to a new location, but<br />
when you use this button, the Cursor jumps back to the place where<br />
it was at the time when you opened the Cursor menu.<br />
Displayed at the Cursor if it is at the same location with which the<br />
Cursor menu was opened.<br />
Displayed at the Cursor if it has been relocated since the Cursor<br />
menu was opened.<br />
Opens a new screen with the address and coordinate of the Cursor,<br />
and the list of nearby POIs.<br />
Opens the full-screen Cursor menu with all the possible options.<br />
A new route is calculated with the Cursor as the destination. The<br />
previous route is deleted.<br />
If the Cursor is at or near the destination, this button replaces the<br />
previous one, and deletes the current destination from the route. The<br />
last via point is promoted as destination, or if there are no via points,<br />
the route is deleted.<br />
The Cursor is added to the active route as an intermediate route<br />
point, a point to be reached before the destination. If there is already<br />
a via point in the route, the Edit Route screen opens to let you<br />
decide where the new via point is to appear in the route.<br />
If the Cursor is at or near one of the via points, this button replaces<br />
the previous one, and deletes the selected via point from the route.<br />
The route is recalculated without the deleted point.<br />
The Cursor is appended at the end of the route as the new<br />
destination. The previous destination is demoted, and becomes the<br />
last via point.<br />
56
Button<br />
Description<br />
This button is similar to the<br />
button, but a new<br />
screen opens, and the route is calculated with all the possible route<br />
calculation methods (Fast, Short, Economical and Easy). Observe<br />
the results, and choose one of the routes to navigate.<br />
The Cursor becomes the start point of the route. This means that the<br />
route will not be started from the current GPS position, and<br />
Automatic Off-route Recalculation needs to be turned off to keep the<br />
start point the selected one.<br />
If the Cursor is at or near the selected start point, this button<br />
replaces the previous one, and deletes the start point from the route.<br />
The current GPS position is used again as the start point, and<br />
Automatic Off-route Recalculation is re-enabled.<br />
The Cursor is saved as a user POI. Select the POI group and give a<br />
name for the POI, then select a suitable icon, enter a phone number,<br />
and additional information if you like.<br />
Map locations can be marked with Pins. Unlike POIs, a Pin has no<br />
name and other details, only a color to let you tell one from another<br />
on the map.<br />
If the Cursor is at or near a Pin, this button replaces the previous<br />
one, and deletes the Pin the Cursor is near to.<br />
The Cursor is saved as the location of a Road Safety Camera<br />
(speed camera or red light camera). A new screen appears where<br />
you can set the type of the camera, the direction of the measured<br />
traffic, and the speed limit checked (if applicable).<br />
If the Cursor is at or near a Road Safety Camera, this button<br />
replaces the previous one, and opens a new screen where you can<br />
edit the details of the camera.<br />
The location of the Cursor is added to the list of frequently visited<br />
destinations, the so called Favorites. You can give a name for the<br />
Favorite.<br />
4.1.5 Position menu<br />
When you follow the recommended route on the map (the Cursor is the current GPS<br />
position), the Position menu replaces the Cursor menu. It does not contain buttons that<br />
modify the current route, as the GPS position is not useful as a route point.<br />
To open the Position menu, tap .<br />
4.1.6 Route Information screen<br />
The Route Information screen has all the data and some of the functions you need while you<br />
navigate. There are two ways to open this screen:<br />
• It can be opened directly from the Map screen by tapping the Turn Preview field ( ).<br />
57
• In Advanced mode, from the <strong>Navigation</strong> menu tap the following buttons: ,<br />
.<br />
In the top section of the screen you see information about the current route. The fields on this<br />
screen are continuously updated while you keep the screen open.<br />
When you open the screen, all fields contain information about reaching your final destination.<br />
Tap any of the fields to see data on the via points starting from the first one through the final<br />
destination again.<br />
You have the following data and functions on this screen:<br />
Name Description Function<br />
Route line<br />
Estimated<br />
Arrival<br />
Distance Left<br />
Time Left<br />
Method<br />
Warning icons<br />
The upper part of this screen shows your<br />
planned route as a horizontal line. Its leftmost<br />
point is the start of the route, the rightmost one<br />
is the final destination, and you can see your<br />
via point flags along the line, spaced in<br />
proportion to their distance.<br />
Shows the estimated arrival time at the final<br />
destination of the route based on information<br />
available for the remaining segments of the<br />
route. The calculation cannot take into account<br />
traffic jams and other possible delays.<br />
Shows the distance you need to travel on the<br />
route before reaching your final destination.<br />
Shows the time needed to reach the final<br />
destination of the route based on information<br />
available for the remaining segments of the<br />
route. The calculation cannot take into account<br />
traffic jams and other possible delays.<br />
This field shows how the route was calculated.<br />
It either displays the Route Calculation Method<br />
or the Vehicle field from the Route Planning<br />
options. If you have chosen Car, Taxi or Bus,<br />
the type of the route (Fast, Short, Easy or<br />
Economical) will be displayed here; if you have<br />
selected Emergency, Bicycle or Pedestrian, this<br />
information will be displayed here.<br />
In these square fields graphical symbol are<br />
displayed in case warnings are attached to the<br />
planned route. These are warnings, so icons<br />
always show information for the whole route,<br />
even if the data fields display values from your<br />
current position to a via point only.<br />
Tap this field to change the<br />
content of all data fields to<br />
via point information.<br />
Tap this field to change the<br />
content of all data fields to<br />
via point information.<br />
Tap this field to change the<br />
content of all data fields to<br />
via point information.<br />
Tap this field to change the<br />
content of all data fields to<br />
via point information.<br />
Tap this field to change the<br />
content of all data fields to<br />
via point information.<br />
Tap any of the icons for an<br />
explanation.<br />
58
Name Description Function<br />
Opens the Route Planning<br />
options screen from<br />
theSettings menu.<br />
Opens the map screen<br />
designed for route planning.<br />
Appears only if at least one via point exists.<br />
Appears only if there are no via points in the<br />
route.<br />
Deletes the next via point<br />
from the route.<br />
Deletes the active route.<br />
4.1.7 Trip Information screen<br />
The Trip Information screen has both route and travel data you might need during your<br />
journey. It can be opened directly from the Map screen by tapping the Trip Data field ( ).<br />
The fields on this screen are continuously updated while you keep the screen open.<br />
When you open the screen, all route data fields contain information about reaching your final<br />
destination. Tap<br />
and the fields concerning your route display data for the next<br />
via point. Tap the button repeatedly to toggle between the two possibilities.<br />
You have the following data and functions on this screen:<br />
Name Description Function<br />
Shows whether the route data fields show<br />
information about the final destination<br />
or (checkered flag) or about the next via point<br />
(yellow flag).<br />
Field next to<br />
the flag<br />
Turn Preview<br />
Shows the name or number of the current<br />
street or road.<br />
Shows the type and distance of the next route<br />
event.<br />
Compass Shows the current heading. Tap this field to show it on<br />
the map screen in one of<br />
the Trip Data fields.<br />
Speedometer<br />
Distance<br />
Remaining<br />
Shows the current speed both graphically and<br />
as a number.<br />
Shows the distance you need to travel on the<br />
route before reaching your final destination.<br />
Tap this field to show it on<br />
the map screen in one of<br />
the Trip Data fields.<br />
Tap this field to show it on<br />
the map screen in one of<br />
the Trip Data fields.<br />
59
Name Description Function<br />
Time<br />
Remaining<br />
Arrival Time<br />
GPS Time<br />
Altitude<br />
Speed Limit<br />
Shows the time needed to reach the final<br />
destination of the route based on information<br />
available for the remaining segments of the<br />
route. The calculation cannot take into account<br />
traffic jams and other possible delays.<br />
Shows the estimated arrival time at the final<br />
destination of the route based on information<br />
available for the remaining segments of the<br />
route. The calculation cannot take into account<br />
traffic jams and other possible delays.<br />
Shows the current time corrected with time<br />
zone offset. The accurate time comes from the<br />
GPS satellites, and the time zone information<br />
comes from the map or it can be set manually<br />
in Regional settings.<br />
Shows the elevation if it is provided by the GPS<br />
receiver.<br />
Shows the speed limit of the current street if the<br />
map contains it.<br />
If you tap the previous button, this one replaces<br />
it.<br />
Tap this field to show it on<br />
the map screen in one of<br />
the Trip Data fields.<br />
Tap this field to show it on<br />
the map screen in one of<br />
the Trip Data fields.<br />
Tap this field to show it on<br />
the map screen in one of<br />
the Trip Data fields.<br />
Tap this field to show it on<br />
the map screen in one of<br />
the Trip Data fields.<br />
Tap this field to show it on<br />
the map screen in one of<br />
the Trip Data fields.<br />
Opens a new screen with<br />
three resettable Trip<br />
Computers.<br />
Tap this button to change<br />
the content of the Route<br />
Data fields to show<br />
information about the next<br />
via point.<br />
Tap this button and the<br />
Route Data fields show<br />
information about the final<br />
destination again.<br />
Most of the fields on this screen have a symbol next to them. This symbol shows whether<br />
the field it is attached to is shown on the map as a Trip Data. It also shows the position of the<br />
data as follows:<br />
Symbol<br />
Description<br />
This value is not shown on the map screen.<br />
This value appears on the map screen in the Trip Data area. This is<br />
the value at the top.<br />
This value appears on the map screen in the Trip Data area. This is<br />
the value in the middle.<br />
This value appears on the map screen in the Trip Data area. This is<br />
the value at the bottom.<br />
60
4.1.7.1 Trip Computer screen<br />
The Trip Computer screen provides collected trip data. It can be opened from the Trip<br />
Information screen by tapping .<br />
The fields on this screen are continuously updated while you keep the screen open.<br />
You can switch between the trips, pause then resume them, or reset their data.<br />
You have the following functions on this screen:<br />
Name<br />
Description<br />
Pauses the trip currently shown on the screen. Values on the screen stop<br />
changing.<br />
,<br />
This button replaces the previous one if it has been activated. Tap it to<br />
resume collecting trip data.<br />
Resets all counters of the currently shown trip. Collecting trip data is<br />
restarted only when <strong>Rosen</strong> Navi receives a position from the GPS.<br />
Cycles through all trips.<br />
4.1.8 Quick menu<br />
The Quick menu is a selection of controls that are frequently needed during navigation. It can<br />
be opened directly from the Map screen by tapping .<br />
If you tap any of the switches in the Quick menu except for the Vehicle type, the Map screen<br />
immediately returns. A switch is on if its lamp is lit. The Vehicle type button is different. It is a<br />
multi-value button. It opens a list of available choices, and the symbol of the selected vehicle<br />
is shown on the button.<br />
Name Main function (single tap) Function (tap and<br />
hold)<br />
Master Volume Adjusts the sound volume of the device. All No action.<br />
slider sounds of the application are involved.<br />
If you only adjust the volume, you need to use<br />
this button to return to the Map screen.<br />
Mutes all sounds of <strong>Rosen</strong> Navi.<br />
Switches between the daytime and night color<br />
schemes manually. This will not disable the<br />
automatic switching between the two schemes:<br />
the other color scheme returns at the next<br />
scheduled time.<br />
Opens the <strong>Navigation</strong><br />
menu.<br />
Opens Sound settings.<br />
Opens Color Profiles<br />
settings.<br />
61
Name Main function (single tap) Function (tap and<br />
hold)<br />
3D buildings can be displayed on the map. Use Opens 3D Settings.<br />
this switch to suppress them temporarily.<br />
Tap this button and select the Vehicle type to<br />
be used for route calculation. Otherwise it is<br />
selected in Route Planning options in Settings<br />
(page 72).<br />
Changing the Vehicle type triggers an<br />
automatic route recalculation.<br />
Turns track log recording on or off otherwise<br />
controlled on the Manage Track Logs screen.<br />
Opens the GPS Data screen with satellite<br />
information, data coming from the GPS<br />
receiver, and a shortcut to the GPS Settings<br />
screen if needed (GPS receiver detection is<br />
automatic).<br />
When a TMC receiver is connected to <strong>Rosen</strong><br />
Navi, this button opens the list of TMC<br />
messages, and provides access to the TMC<br />
Settings and the radio station settings screens.<br />
Opens the Bluetooth settings screen.<br />
Opens Route Planning<br />
options.<br />
Opens Manage Track Logs.<br />
No action.<br />
No action.<br />
No action.<br />
4.1.9 GPS data screen<br />
Tap the following buttons: , to open the GPS Data screen and<br />
to see the status of the GPS reception.<br />
Icon Color Name Description<br />
Green<br />
GPS<br />
position<br />
quality<br />
indicator<br />
<strong>Rosen</strong> Navi has a connection<br />
to the GPS receiver and GPS<br />
position information is<br />
available in 3D: <strong>Rosen</strong> Navi<br />
can calculate both your<br />
horizontal and vertical GPS<br />
position.<br />
Yellow<br />
<strong>Rosen</strong> Navi has a connection<br />
to the GPS receiver and GPS<br />
position information is<br />
available in 2D: only the<br />
horizontal position is<br />
62
Icon Color Name Description<br />
calculated, <strong>Rosen</strong> Navi cannot<br />
calculate your vertical GPS<br />
position.<br />
Grey<br />
<strong>Rosen</strong> Navihas a connection<br />
to the GPS receiver but GPS<br />
position information is not<br />
available.<br />
Red<br />
<strong>Rosen</strong> Navi has no connection<br />
to the GPS receiver.<br />
Green, blinking<br />
Yellow, blinking<br />
Red, blinking<br />
GPS<br />
connection<br />
quality<br />
indicator<br />
<strong>Rosen</strong> Navi is connected to<br />
the GPS receiver.<br />
<strong>Rosen</strong> Navi has no connection<br />
to the GPS receiver but it is<br />
still trying to establish a<br />
connection.<br />
<strong>Rosen</strong> Navi has no connection<br />
to the GPS receiver and does<br />
not try to establish a<br />
connection.<br />
Sky view circle<br />
n/a<br />
n/a<br />
Coordinates<br />
Status bar for the satellites<br />
The virtual sky shows the<br />
visible part of the sky above<br />
you, with your position as the<br />
center. The satellites are<br />
shown at their current<br />
positions. The GPS receives<br />
data from both the green and<br />
yellow satellites. Signals from<br />
the yellow satellites are only<br />
received, while green ones are<br />
used by the GPS to calculate<br />
your current location.<br />
Your current GPS position in<br />
WGS84 format.<br />
Dark bars are for the yellow<br />
and lit bars are for the green<br />
satellites. The more satellites<br />
your GPS tracks (the green<br />
ones), the better is your<br />
calculated position.<br />
4.2 Find menu<br />
Select the destination of your route. Tap the following buttons: , .<br />
Button Description Reference<br />
If you know at least a part of the address, this is the quickest<br />
way to find the location.<br />
page 30<br />
63
Button Description Reference<br />
You can select your destination from the thousands of POIs<br />
included with <strong>Rosen</strong> Navi or from the ones you have previously<br />
created.<br />
The destinations that you have already entered in <strong>Rosen</strong> Navi<br />
are available in the History list.<br />
page 39<br />
page 40<br />
You can select your destination by entering its coordinates. page 41<br />
You can select as your destination a location that you have<br />
already saved as a Favorite.<br />
page 38<br />
Opens a special 2D map screen optimized for route planning.<br />
Only the Zoom in and Zoom out buttons and the route<br />
modification buttons of the Cursor menu appear.<br />
4.3 Route menu<br />
Save, load and edit your routes. Tap the following buttons: , .<br />
Button Description Reference<br />
Opens a screen with useful route data. page 57<br />
You can browse the driving instructions that <strong>Rosen</strong> Navi follows<br />
during navigation. You can exclude maneuvers or streets to<br />
adjust the route to your preferences.<br />
page 23<br />
You can modify the route: remove route points or change their<br />
order.<br />
page 42<br />
Erase the active route with all its route points (start point, via<br />
points and destination). If you later decide that you need the<br />
same route, you will have to rebuild it from scratch.<br />
page 45<br />
You can save the active route for later use. page 46<br />
You can load a previously saved route for navigation. page 46<br />
Opens the Route settings screen with controls to modify the<br />
vehicle, the road types used for route calculation, or the route<br />
calculation method.<br />
page 72<br />
You can run a demonstration of the route at high speed. page 24<br />
You can run a demonstration of the route at normal speed.<br />
page 1<br />
64
4.4 Manage menu<br />
You can manage the content that <strong>Rosen</strong> Navi stores. Tap the following buttons: ,<br />
.<br />
Button Description Reference<br />
Renaming or deleting saved routes page 65<br />
Deleting History items page 65<br />
Recording, simulating, renaming or deleting track logs,<br />
assigning color to them to be shown on the map<br />
page 66<br />
Renaming or deleting Favorites page 67<br />
Creating, updating or deleting POIs<br />
page 67<br />
Creating, updating or deleting POI groups<br />
Modifying POI visibility settings<br />
Creating, renaming or deleting Saved Search Criteria<br />
page 68<br />
4.4.1 Manage Saved Routes<br />
You can manage the previously saved routes. Tap the following buttons: , ,<br />
.<br />
Button<br />
Description<br />
Button with the name of the saved route Opens the selected route for editing.<br />
Deletes the selected route.<br />
Clears the list of saved routes.<br />
,<br />
Turns the page for additional list items.<br />
4.4.2 Manage History<br />
You can manage the list of locations you used lately. Tap the following buttons: , ,<br />
.<br />
Button<br />
Description<br />
65
Button<br />
Description<br />
Deletes the selected item in the History.<br />
Deletes the entire History.<br />
,<br />
Turns the page for additional list items.<br />
4.4.3 Manage Track Logs<br />
You can record Track Logs, then play them back, display them on the map, and see their<br />
details. Tap the following buttons: , , .<br />
Button<br />
Description<br />
Starts recording the track that you drive. (You can also start recording a<br />
track log in the Quick menu.)<br />
Button with the<br />
name of the track<br />
log<br />
Stops the ongoing Track Log recording. (You can also stop the track log<br />
recording in the Quick menu.)<br />
Shows the details of the selected Track Log.<br />
Starts a simulated playback of the selected Track Log on the map.<br />
,<br />
Turns the page for additional list items.<br />
When track log details are shown:<br />
Button<br />
Description<br />
Button with the Opens a keyboard screen to let you rename the Track Log.<br />
name of the Track<br />
Log<br />
Tap this button to hide the Track Log on the map. No color will be<br />
assigned to the Track Log.<br />
Tap one of the colored buttons to assign a color to the Track Log. The<br />
Track Log will be shown on the map with this color.<br />
The map returns with the Track Log. The map is scaled to show the<br />
whole Track Log.<br />
Deletes the selected Track Log.<br />
Saves the Track Log on the inserted memory card in GPX format.<br />
66
4.4.4 Manage Favorites<br />
You can manage the list of your Favorites. Tap the following buttons: , ,<br />
.<br />
Button<br />
Button with the name of the<br />
Favorite<br />
Description<br />
Opens the selected Favorite for editing.<br />
Deletes the selected item in the list of Favorites.<br />
Clears the list of Favorites.<br />
,<br />
Turns the page for additional list items.<br />
4.4.5 Manage POIs<br />
You can manage your POIs, and set the POI visibility for both your POIs and the ones that<br />
came with the product. Tap the following buttons: , , .<br />
Button / Icon<br />
Description<br />
Button with the name of<br />
the POI group<br />
Button with the name and<br />
address of a POI item<br />
Opens the list of the subgroups of this POI group. The new list<br />
behaves the same as this one.<br />
Opens the selected POI for editing. Only the POIs you have<br />
created appear in this list.<br />
Opens the selected POI group for editing.<br />
Tap to filter the list to contain only the POIs that you saved.<br />
Tap to see all POIs in the list.<br />
Creates a new POI group at the given group level.<br />
,<br />
Turns the page for additional list items.<br />
This POI group is not shown on the map.<br />
This POI group and all its subgroups are shown on the map.<br />
This POI group and some of its subgroups are shown on the map.<br />
This POI group contains POIs that you saved.<br />
When a POI group is open for editing:<br />
Button<br />
Description<br />
Items in the POI group will not be shown on the map.<br />
67
Button<br />
, , ...<br />
Description<br />
The distance buttons set the zoom level from which the items<br />
in the POI group will be shown on the map.<br />
Subgroups under the edited POI group will inherit its visibility<br />
settings.<br />
Button with the icon of the<br />
POI group<br />
Tap this button to select a new icon for the POI group.<br />
Deletes the edited POI group. You are only allowed to remove<br />
POI groups that you have created.<br />
When a POI item is open for editing:<br />
Button<br />
Button with the name of<br />
the POI<br />
Button with the icon of the<br />
POI<br />
Description<br />
Tap this button to rename the POI.<br />
Tap this button to select a new icon for the POI.<br />
Tap this button to enter a telephone number for the POI.<br />
Tap this button to enter additional information for the POI.<br />
Tap this button to delete the selected POI.<br />
Tap this button to move the POI to another POI group or<br />
subgroup.<br />
4.4.6 Manage Saved Search Criteria<br />
You can manage the list of search criteria previously saved to easily find frequently searched<br />
POI types. Tap the following buttons: , , .<br />
Button<br />
Button with the name of the Saved<br />
Search Criteria<br />
Description<br />
Tap to rename the saved query.<br />
Deletes the selected item in the list.<br />
Deletes the entire list.<br />
,<br />
Turns the page for additional list items.<br />
Tap to save a new search criteria. Similar to how<br />
you search for a POI, select the search reference<br />
first, then select the POI group or subgroup to<br />
search in.<br />
68
4.4.7 User Data Management<br />
You can manage the data you have saved (Pins, POIs, Favorites, History, and Track logs)<br />
and the settings you have made in the program. Tap the following buttons: , ,<br />
.<br />
Button<br />
Description<br />
Remove Pins Map locations can be marked with Pins using the<br />
Backup User Data<br />
Restore User Data<br />
Delete User Data<br />
Reset Factory Settings<br />
button in the Cursor menu. Tap this button<br />
to remove all your Pins from the map.<br />
All user data and the current settings will be saved on the<br />
inserted memory card. There is always one backup file. If you<br />
perform a backup later, the previous backup will be overwritten<br />
with the new information.<br />
All user data and settings will be overwritten with the information<br />
stored in the backup file. Data and settings created after the<br />
latest backup will be lost.<br />
All user data will be deleted, and settings will return to their<br />
factory defaults.<br />
All settings will return to their factory defaults, but no user data<br />
will be deleted.<br />
4.5 Settings menu<br />
You can configure the program settings, and modify the behaviour of <strong>Rosen</strong> Navi. Tap the<br />
following buttons: , .<br />
The Settings menu has two pages of submenus. Tap<br />
to access the other options.<br />
-<br />
Button Description Reference<br />
You can fine-tune the appearance and content of the Map<br />
screen.<br />
page 70<br />
You can adjust the sounds of <strong>Rosen</strong> Navi. page 71<br />
These settings determine how routes will be calculated. page 72<br />
69
Button Description Reference<br />
These settings allow you to adjust the application to your local<br />
language, measurement units, time and date and their<br />
formats, as well as choose the voice guidance profile you<br />
prefer.<br />
You can control how <strong>Rosen</strong> Navi behaves during navigation.<br />
page 74<br />
page 75<br />
You can enable some handy warnings, and disable the touch<br />
screen in a moving vehicle with Safety Mode.<br />
You can set up the connection to the GPS receiver.<br />
page 76<br />
page 77<br />
You can set up the connection to the TMC receiver. If the TMC<br />
receiver is working, you can select the radio station to be<br />
received.<br />
page 77<br />
You can modify the look and behaviour of the Menu screens.<br />
You can change some device settings to control the screen<br />
backlight when <strong>Rosen</strong> Navi is running.<br />
You can set up an automatic Track Log saving, and fine-tune<br />
its settings.<br />
page 78<br />
page 78<br />
page 79<br />
This screen has no navigation feature. It merely provides<br />
information about the maps and licenses included with your<br />
navigation system.<br />
You can switch to Simple mode. In Simple mode only a few of<br />
the above settings are available. The rest of the settings are<br />
set to values that are optimal for typical use.<br />
page 10<br />
4.5.1 Map Screen settings<br />
You can fine-tune the appearance and content of the Map screen. Tap the following buttons:<br />
, , .<br />
Button<br />
3D Settings<br />
Description<br />
Use 3D settings to determine which of the present 3D objects<br />
are shown on the map, and adjust the level of 3D visual detail.<br />
The options are as follows:<br />
• Landmarks: Landmarks are 3D artistic or block<br />
representations of prominent or well-known objects. 3D<br />
landmarks are only available in selected cities and<br />
countries.<br />
• Elevated Roads: Complex intersections and vertically<br />
isolated roads (such as overpasses or underground<br />
tunnels) are displayed in 3D.<br />
• Building Visibility: Full 3D city building data that<br />
represents actual building size and position on the map.<br />
70
Button<br />
Description<br />
Building data is limited to the city center of major cities in<br />
the US and Europe.<br />
• Terrain Detail Level: 3D terrain map data shows changes<br />
in terrain, elevations or depressions in the land when you<br />
view the map, and use it to plot the route map in 3D when<br />
you navigate.<br />
Color Profiles<br />
Elevation on 2D Map<br />
Show Street Names<br />
Lane Information<br />
<strong>Rosen</strong> Navi is able to show the map and the menus in different<br />
colors during the day and during the night. Select the color<br />
profiles to be used in each mode, and select the automatic or<br />
manual switching between the daytime and night color profiles.<br />
2D maps can also display 3D information. These top-down maps<br />
can display elevation by colors and shading.<br />
Street names and POI icons can be disturbing on the map<br />
during navigation. With this switch you can suppress these map<br />
elements when <strong>Rosen</strong> Navi is following your position on the<br />
map. If you move the map, both the street names and POI icons<br />
reappear immediately.<br />
Some maps contain lane information to help you position your<br />
car in the upcoming intersection. This setting tells <strong>Rosen</strong> Navi<br />
whether to display this information at the top or at the bottom of<br />
the map.<br />
4.5.2 Sound settings<br />
You can adjust the sounds of <strong>Rosen</strong> Navi. Tap the following buttons: , ,<br />
.<br />
Button<br />
Master Volume<br />
Description<br />
Use the switch to mute all sounds of the device and then to reenable<br />
them again. The position of the fader determines the<br />
volume level.<br />
The loudness of <strong>Rosen</strong> Navi is independent of your device<br />
settings. When you exit the program, the device default settings<br />
return.<br />
Voice Guidance Volume<br />
Key Sounds<br />
The slider adjusts the loudness of voice prompts. In its leftmost<br />
position, the voice guidance is suppressed; in its rightmost<br />
position, the master volume applies.<br />
Key sounds are audible confirmation of either pressing hardware<br />
buttons or tapping the touch screen.<br />
The switch turns the key sounds on or off. Key sounds are<br />
played at the master volume level.<br />
Dynamic Volume<br />
When driving at high speed, the noise in the car may be too loud<br />
to clearly hear the voice guidance and other sounds. Using<br />
71
Button<br />
Description<br />
Dynamic Volume you can instruct <strong>Rosen</strong> Navi to increase the<br />
volume when your speed exceeds a certain minimum, and reach<br />
its highest volume at the given maximum speed.<br />
4.5.3 Route Planning options<br />
These settings determine how routes will be calculated. Tap the following buttons: ,<br />
Vehicle<br />
, .<br />
Button<br />
Road Types Used for<br />
Route Planning<br />
Route Calculation Method<br />
Description<br />
You can set the type of vehicle you will use to navigate the<br />
route. Based upon this setting, some of the road types will be<br />
excluded from the route (e.g. highways for pedestrians), or some<br />
of the restrictions may not be taken into account (e.g.<br />
emergency vehicles have only a few restrictions).<br />
To let the route fit your needs, you can also set which road types<br />
are to be considered for or to be excluded from the route, if<br />
possible.<br />
Excluding a route is a preference. It does not necessarily mean<br />
total prohibition. If your destination can only be accessed using<br />
some of the excluded road types, they will be used, but only as<br />
much as necessary. In this case a warning icon will be shown on<br />
the Route Information screen, and the part of the route not<br />
matching your preference will be displayed in a different color on<br />
the map.<br />
You can choose from different route types. The routing method<br />
can also be chosen while creating the route: when the<br />
destination is selected, tap<br />
menu.<br />
in the Cursor<br />
Use Traffic Information When TMC messages are received, this setting tells <strong>Rosen</strong> Navi<br />
whether to use that information in route planning.<br />
Recalculate to Avoid Traffic This setting determines how <strong>Rosen</strong> Navi uses the received TMC<br />
information in route recalculation:<br />
• Automatic: When route recalculation becomes necessary<br />
based on the received TMC events, <strong>Rosen</strong> Navi<br />
recalculates the route automatically.<br />
• <strong>Manual</strong>: When route recalculation becomes necessary<br />
based on the received TMC events, <strong>Rosen</strong> Navi notifies<br />
you, but you can decide whether to recalculate the route<br />
or not.<br />
• Disabled: TMC events are only taken account when the<br />
route is recalculated in an off-route situation.<br />
Vehicle types:<br />
72
• Car<br />
• Taxi<br />
• Bus<br />
• Emergency vehicles<br />
• Bicycle<br />
• Pedestrian<br />
Road Types Used for Route Planning:<br />
Type<br />
Highways<br />
Unpaved<br />
roads<br />
Toll roads<br />
Charge<br />
roads<br />
Permit<br />
needed<br />
Ferries<br />
Crossborder<br />
planning<br />
Carpool<br />
lanes<br />
Description<br />
You might need to avoid highways when you are driving a slow car or you are<br />
towing another vehicle.<br />
<strong>Rosen</strong> Navi excludes unpaved roads by default: unpaved roads can be in a bad<br />
condition and usually you cannot reach the speed limit on them.<br />
By default <strong>Rosen</strong> Navi includes toll roads (pay roads where there is a per-use<br />
charge) in the routes. If you disable toll roads, <strong>Rosen</strong> Navi plans the best toll-free<br />
route.<br />
Charge roads are pay roads where you can purchase a pass or vignette to use<br />
the road for a longer period of time. They can be enabled or disabled separately<br />
from toll roads.<br />
You might need a permit or permission from the owners to use certain roads or<br />
to enter certain areas. <strong>Rosen</strong> Navi excludes these roads from the route<br />
calculation by default.<br />
<strong>Rosen</strong> Navi includes ferries in a planned route by default. However, a map does<br />
not necessarily contain information about the accessibility of temporary ferries.<br />
You might also need to pay a fare on ferries.<br />
In some cases the route calculated according to your other navigation and route<br />
preferences would lead through another country. If you wish to always stay<br />
within the same country, turn this option off.<br />
This control appears only when navigating in the USA. You should check<br />
whether you are allowed to use carpool lanes before enabling this road type.<br />
Route Calculation Method types:<br />
Fast<br />
Short<br />
Option<br />
Description<br />
Gives the quickest possible route if you can travel at or near the speed<br />
limit on all roads. Usually the best selection for fast and normal cars.<br />
Gives a route that has the smallest total distance of all possible routes<br />
between the route points. Usually practical for pedestrians, cyclists or<br />
slow vehicles.<br />
Economical<br />
Combines the benefits of Fast and Short: <strong>Rosen</strong> Navi calculates as if it<br />
were calculating the Fast route, but it takes other roads to save fuel.<br />
73
Easy<br />
Option<br />
Description<br />
Results in a route with fewer turns. With this option, you can make<br />
<strong>Rosen</strong> Navi to take, for example, the highway instead of series of<br />
smaller roads or streets.<br />
4.5.4 Regional settings<br />
These settings allow you to adjust the application for your local language, measurement units,<br />
time and date and their formats, as well as choose the voice guidance profile you prefer. Tap<br />
the following buttons: , , .<br />
Button<br />
Program Language<br />
Voice Profile<br />
Units<br />
Set Date & Time Format<br />
Time and Time Zone<br />
Settings<br />
Description<br />
This button displays the current written language of <strong>Rosen</strong> Navi.<br />
By tapping the button, you can select a new one from the list of<br />
available languages. The application will restart if you change<br />
this setting; you are asked to confirm this.<br />
This button shows the current language of the voice guidance.<br />
By tapping the button, you can select a new one from the list of<br />
available languages and speakers. Tap any of these to hear a<br />
sample voice prompt. Just tap OK when you have selected the<br />
new spoken language.<br />
You can set the distance units to be used by the program.<br />
<strong>Rosen</strong> Navi may not support all the listed units in some voice<br />
guidance languages. If you select a measurement unit not<br />
supported by the chosen voice guidance language, a warning<br />
message will appear.<br />
You can set the date and time format. Various international<br />
formats are available.<br />
You can access time and time zone settings. <strong>Rosen</strong> Navi helps<br />
you with correcting the device time to the ever accurate GPS<br />
time. <strong>Rosen</strong> Navi can also help you set the time zone based on<br />
your current GPS position.<br />
Time and Time Zone Settings:<br />
Button<br />
Auto Time Correction to<br />
GPS<br />
Use Auto Time Zone<br />
Description<br />
Use this feature to synchronize the clock of your device to the<br />
very accurate time provided by the GPS receiver.<br />
Use this feature to synchronize the time zone of the clock of<br />
your device to the time zone based on your current GPS<br />
position.<br />
Set Time Zone<br />
Set time zone manually if you do not want to synchronize the<br />
time zone automatically. This allows you to use Auto Time<br />
Correction and apply a time zone offset to obtain the desired<br />
time.<br />
74
Button<br />
Compare GPS and device<br />
times<br />
Description<br />
The current time of the GPS receiver and the device clock are<br />
displayed. Please note that the GPS clock is only available with<br />
GPS reception. This allows you to check whether any correction<br />
is needed.<br />
4.5.5 <strong>Navigation</strong> settings<br />
You can control how <strong>Rosen</strong> Navi behaves during navigation. Tap the following buttons:<br />
, , .<br />
Button<br />
Keep Position on Road<br />
Off-route Recalculation<br />
Restore Lock-to-Position<br />
Automatic Overview<br />
Description<br />
This feature allows car drivers to always correct GPS position<br />
errors by matching the vehicle position to the road network. For<br />
pedestrian navigation, this feature is automatically disabled to let<br />
the software show your exact position.<br />
By turning off this feature you also turn off the GPS position<br />
error filtering. The position shown on the map will be subject to<br />
all position errors and position fluctuations.<br />
This switch tells <strong>Rosen</strong> Navi whether to automatically recalculate<br />
the route when you deviate from it. If this feature is turned off,<br />
you need to initiate route recalculation manually otherwise<br />
navigation will be stopped until you return to the originally<br />
recommended route.<br />
Setting another point than the current GPS position as the start<br />
point of the active route will automatically disable this feature.<br />
If you have moved or rotated the map during navigation, this<br />
feature moves the map back to your current GPS position and<br />
re-enables automatic map rotation after the given period of<br />
inactivity.<br />
This feature switches the map view to Overview mode when the<br />
next route event is at a distance. Overview is a zoomed out 2D<br />
view to let you see the surrounding area. You have the following<br />
controls for Automatic Overview:<br />
• Turn Distance for Overview: The map view will be<br />
switched to Overview mode if the next route even is at<br />
least as far as this value.<br />
• Default Zoom Level: Overview mode will appear with this<br />
zoom level. You can scale the map in Overview mode but<br />
next time Overview appears again, this zoom level will be<br />
applied.<br />
75
4.5.6 Warning settings<br />
You can enable some handy warnings, and disable the touch screen in a moving vehicle with<br />
Safety Mode. Tap the following buttons: , , .<br />
Button<br />
Warn When Speeding<br />
Description<br />
Maps may contain information about the speed limits of the road<br />
segments. <strong>Rosen</strong> Navi is able to warn you if you exceed the current<br />
limit. This information may not be available for your region (ask your<br />
local dealer), or may not be fully correct for all roads in the map. This<br />
setting lets you decide whether you wish to receive the warnings. You<br />
can set the relative speeding at which the application warns you<br />
(100% is the current speed limit):<br />
• In Built-up Areas: in cities and towns<br />
• Elsewhere: at all other locations<br />
There are two types of warnings. You can turn them on or off<br />
independently:<br />
• Audible Warning: A voice message is played using the<br />
selected voice guidance profile.<br />
• Visible Warning: A symbol with the speed limit appears in the<br />
corner of the map (for example: ).<br />
Speed Camera<br />
Warning<br />
This feature allows you to receive a warning when approaching a<br />
Road Safety Camera. You must ensure on your own liability that<br />
using this feature is legal in the country where you intend to use it.<br />
You have the following options:<br />
• Audible Warning: beeps can be played while you are<br />
approaching the camera, or just alert sounds if you exceed the<br />
speed limit while approaching one of these cameras.<br />
• Visible Warning: the type of the camera and the controlled<br />
speed limit appears on the Map screen while you are<br />
approaching one of these cameras.<br />
Warn if Too Fast for a<br />
Pedestrian<br />
Safety Mode<br />
Enable this warning to be alert if pedestrian mode is activated and<br />
you drive fast. You are asked if you want to change to car navigation<br />
mode. This way you can be sure you will not be routed via one-way<br />
roads in the wrong direction as a pedestrian could, for example.<br />
Safety Mode disables the touch screen above 10 km/h (6 mph) to<br />
keep your attention on the road. While driving, you will not be able to<br />
set a new destination or to change settings. The only screen control<br />
that remains enabled is the gesture that puts you back on the Map<br />
screen.<br />
76
4.5.7 GPS settings<br />
You can set up the connection to the GPS receiver. Tap the following buttons: , ,<br />
.<br />
Button<br />
GPS receiver ...<br />
Description<br />
The first line of the screen informs you about the connection<br />
status of the GPS receiver.<br />
Connecting the GPS receiver is automatic in <strong>Rosen</strong> Navi, so<br />
normally you will not need this screen of settings at all.<br />
GPS Enabled<br />
Port<br />
Baud Rate<br />
Autodetect<br />
Turn the connection to the GPS receiver on or off. Turning off<br />
the GPS receiver can be useful for indoors use or demonstration<br />
purposes.<br />
The communication port used between the GPS receiver and<br />
the application.<br />
The communication speed used between the GPS receiver and<br />
the application.<br />
Tap this button and let <strong>Rosen</strong> Navi find and connect the GPS<br />
receiver.<br />
4.5.8 TMC settings<br />
You can set up the connection to the TMC receiver. If the TMC receiver is working, you can<br />
select the radio station to be received. Tap the following buttons: , ,<br />
.<br />
If there is no TMC receiver connected to <strong>Rosen</strong> Navi, you have the following options:<br />
Button<br />
No TMC Hardware Found!<br />
Description<br />
The first line of the screen informs you about the connection<br />
status of the GPS receiver.<br />
Connecting the TMC receiver is automatic in <strong>Rosen</strong> Navi, so<br />
normally you will not need this screen of settings at all.<br />
Protocol<br />
Port<br />
Baud Rate<br />
Autodetect<br />
The communication protocol used between the TMC receiver<br />
and the application.<br />
The communication port used between the TMC receiver and<br />
the application.<br />
The communication speed used between the TMC receiver and<br />
the application.<br />
Tap this button and let <strong>Rosen</strong> Navi find and connect the TMC<br />
receiver.<br />
With a TMC receiver already connected, the content of the screen is different:<br />
77
Button<br />
Use Auto-tuner<br />
,<br />
Exclude This Station<br />
Show Excluded Stations<br />
Description<br />
If Auto-tuner is turned on, the tuner of <strong>Rosen</strong> Navi sweeps<br />
through the FM CCIR radio band searching for a TMC signal.<br />
The first station with TMC data will be used automatically. When<br />
no TMC signal is available, the tuner keeps on searching. Turn<br />
off Auto-tuner to select a radio station manually.<br />
When Auto-tuner is turned off, search for the desired radio<br />
station manually with these buttons.<br />
Push this button to put the currently received FM radio station on<br />
an exception list, and make <strong>Rosen</strong> Navi search for another<br />
station instead.<br />
This button opens the list of radio stations previously excluded.<br />
You can re-enable any or all of the excluded stations.<br />
4.5.9 Menu settings<br />
You can modify the look and behaviour of the Menu screens. Tap the following buttons:<br />
, , .<br />
Button<br />
Animation<br />
Background<br />
Skin<br />
Description<br />
You can activate and deactivate the Menu animations. When<br />
animation is turned on, buttons on Menu and keyboard screens<br />
appear in an animated way.<br />
You can choose the image to be used as the menu background<br />
image.<br />
You can choose from a list of available skins to change the look<br />
of <strong>Rosen</strong> Navi.<br />
4.5.10 Device settings<br />
You can change some device settings to control the screen backlight when <strong>Rosen</strong> Navi is<br />
running. Tap the following buttons: , , .<br />
Button<br />
Power Management<br />
Description<br />
You can set how the backlight will behave when the screen has<br />
not been touched for a while. You have the following options:<br />
• Backlight Always On: The screen is continuously lit.<br />
• Use Device Settings: The backlight settings of the device<br />
will be applied in <strong>Rosen</strong> Navi.<br />
• Smart: When running on battery, Smart Powersave will<br />
light up the screen only when you press a button, tap the<br />
screen, or if there is something to show you. After a few<br />
seconds the light level decreases, and after another few<br />
seconds the backlight turns off. This helps achieve a<br />
78
Button<br />
Backlight Intensity at<br />
Daytime<br />
Backlight Intensity at Night<br />
Description<br />
longer battery life.<br />
You can set the backlight level for daytime use.<br />
You can set the backlight level for night use.<br />
4.5.11 Track Log settings<br />
You can set up an automatic Track Log saving, and fine-tune its settings. Tap the following<br />
buttons: , , .<br />
Button<br />
Update Interval<br />
Enable Auto-saving<br />
Track Log Database Size<br />
Track Logs Max. Size<br />
Create NMEA/SIRF Log<br />
Description<br />
This is how often track points will be saved. Position information<br />
is normally received once a second from the GPS. If you do not<br />
need such a detailed log, you can increase this number to save<br />
track log space.<br />
When auto-saving is enabled, you do not need to turn track log<br />
saving on and off manually. <strong>Rosen</strong> Navi will automatically start<br />
recording the track log as soon as GPS position is available.<br />
This figure shows how much memory is used by the<br />
automatically saved track logs.<br />
You can set the maximum database size for the automatically<br />
saved track logs. When the limit is reached, the oldest<br />
automatically saved track logs will be deleted.<br />
Independently of the normal track log, you can instruct <strong>Rosen</strong><br />
Navi to record the native GPS data received from the GPS<br />
device. These logs are saved as separate text files on the<br />
memory card, and they cannot be shown or replayed in <strong>Rosen</strong><br />
Navi.<br />
79
5 Glossary<br />
2D/3D GPS reception<br />
The GPS receiver uses satellite signals to calculate its (your) position and need at least four<br />
signals to give a three-dimensional position, including elevation. Because the satellites are<br />
moving and because objects can block the signals, your GPS device might not receive four<br />
signals. If three satellites are available, the receiver can calculate the horizontal GPS position<br />
but the accuracy is lower and the GPS device does not give you elevation data: only 2D<br />
reception is possible.<br />
Active route<br />
The currently navigated route. You can save and load routes in <strong>Rosen</strong> Navi, but only one<br />
route can be active at any given time, and it is always active until you delete it, reach your<br />
destination or you quit <strong>Rosen</strong> Navi. See also: Route.<br />
City Center<br />
The City Center is not the geometric center of the city but an arbitrary point the map creators<br />
have chosen. In towns and villages, it is usually the most important intersection; in larger<br />
cities, it is an important intersection.<br />
GPS accuracy<br />
Several factors have impact on the deviation between your real position and the one given by<br />
the GPS device. For example, signal delay in the ionosphere or reflecting objects near the<br />
GPS device have a different and varying impact on how accurately the GPS device can<br />
calculate your position.<br />
Map<br />
<strong>Rosen</strong> Navi works with digital maps which are not simply the computerized versions of<br />
traditional paper maps. Similarly to the paper road maps, the 2D mode of digital maps show<br />
you streets, roads, and elevation is also shown by colors. In 3D mode, you can see the<br />
altitude differences, for example valleys and mountains, elevated roads, and in selected cities<br />
3D landmarks and 3D buildings are also displayed.<br />
You can use digital maps interactively: you can zoom in and out (increase or decrease the<br />
scale), you can tilt them up and down, and turn them left and right. In GPS-supported<br />
navigation, digital maps facilitate route planning.<br />
North-up map orientation<br />
In North-up mode the map is rotated so its top always faces North. This is the orientation in<br />
2D map view mode and in Overview mode. See also: Track-up map orientation.<br />
Overview mode<br />
80
You can instruct <strong>Rosen</strong> Navi to automatically switch to Overview mode if the next route event<br />
is in a distance. In Overview mode the map is shown in 2D but scaled down to a predefined<br />
zoom level. When you approach the next route event, the previous 2D or 3D map view<br />
returns automatically.<br />
Route<br />
A series of destinations to be reached one after the other. A simple route contains one start<br />
point and only one destination. Multi-point routes contain one or more via points (intermediate<br />
destinations). The last route point is the final destination and the route is cut into different legs<br />
(from one destination to the next).<br />
Scheme<br />
<strong>Rosen</strong> Navi comes with different color schemes for the map for daytime or night use.<br />
Schemes are custom graphic settings for the map and they can have different colors for<br />
streets, blocks or surface waters in 2D and 3D modes, and they display shades or shadows in<br />
different ways in 3D mode.<br />
One daytime scheme and one night scheme is always selected. <strong>Rosen</strong> Navi uses them when<br />
it switches from day to night and back.<br />
Track-up map orientation<br />
In Track-up mode the map is rotated so its top always points in the currend driving direction.<br />
This is the default orientation in 3D map view mode. See also: North-up map orientation.<br />
Road Safety Camera<br />
A special POI type for speed cameras and red light cameras. Different data sources are<br />
available, and you can also mark the position of a Road Safety Camera on the map.<br />
You can configure <strong>Rosen</strong> Navi to warn you when you approach one of these cameras.<br />
81
6 End User Licence Agreement<br />
1. The contracting parties<br />
1.1. Contracting parties to present Agreement are, on the one hand:<br />
Nav N Go Kft (23 Bérc utca, H-1016 Budapest, Hungary; Hungarian reg.no.: 01-09-891838)<br />
as Licensor and the legal user (as defined in Section 2) of the object of present Agreement<br />
according to Section 4, hereinafter referred to as User on the other hand (hereinafter jointly<br />
referred to as Parties).<br />
2. Conclusion of the Agreement<br />
2.1. The Parties hereby acknowledge that present Agreement shall be concluded by implicit<br />
conduct of the Parties, without a signature of the Parties.<br />
2.2. The User hereby acknowledges that following the lawful acquisition of the software<br />
product constituting the object of present Agreement (Section 4), any degree of use,<br />
installation to a computer or other hardware, installation of such hardware into a vehicle,<br />
pressing of the „Accept” button displayed by the software during installation or use<br />
(hereinafter referred to as actions of use) shall be deemed as implicit conduct resulting in the<br />
conclusion of the Agreement between the User and the Licensor.<br />
2.3. Present Agreement shall by no means entitle persons who unlawfully acquire, use, install<br />
on a computer, install in a vehicle or utilize in any manner whatsoever the software product.<br />
2.4. The end user license agreement between the Parties shall be concluded with terms set<br />
forth in present Agreement.<br />
2.5. The time of conclusion of present Agreement is the time of executing the first action of<br />
use (commencement of use).<br />
3. Applicable law<br />
3.1. In issues not regulated by present Agreement the jurisdiction of the Republic of Hungary<br />
shall be applicable, with specific reference to the Act No. 4 of 1959 on the Civil Code (CC)<br />
and to Act No 76 of 1999 on Copyrights (CA).<br />
3.2. Present agreement is issued in English and in Hungarian. In case of dispute the<br />
Hungarian text shall prevail.<br />
4. The object of the Agreement<br />
4.1. The object of present Agreement shall be the navigation guidance software product of<br />
Licensor (hereinafter referred to as software product).<br />
4.2. The software product shall include the operating computer program, its complete<br />
documentation, and the map database belonging thereto.<br />
4.3. Any form of display, storage, coding, including printed, electronic or graphic display,<br />
storage, source or object code of the software product, or any other as yet indefinable form of<br />
display, storage, or coding, or any medium thereof shall be deemed as part of the software<br />
product.<br />
4.4. Error corrections, additions, updates used by the User as defined in Section 2 following<br />
the conclusion of present contract shall also be deemed as part of the software product.<br />
5. Owner of copyrights<br />
5.1. The Licensor - unless contractual or legal regulations state otherwise - is the exclusive<br />
owner of all material copyrights vested in the software product.<br />
5.2. Copyrights extend to the whole software product and its parts separately as well.<br />
5.3. The owner(s) of the copyrights of the map database forming part of the software product<br />
is (are) natural person(s) or corporate entity(es) as listed in the appendix to present<br />
Agreement or in the „About/Map” menu item of the operating computer program (hereinafter<br />
referred to as Database Owner). Licensor hereby states that Licensor has obtained sufficient<br />
usage and representation rights from the Database Owner in order to utilize and give into<br />
further utilization the map database as set forth in present Agreement.<br />
82
5.4. In conclusion and execution of present Agreement the Database Owner is represented<br />
by Licensor in relations to the User.<br />
5.5. By concluding present Agreement, Licensor shall withhold all rights vested in the<br />
software product, except for those that the User is entitled to according to explicit legal<br />
regulations or that of present Agreement.<br />
6. Rights of the User<br />
6.1. The User is entitled to install the software product on one hardware device (desktop,<br />
handheld, portable computer, navigation device) at a time, and to run and use one copy<br />
thereof.<br />
6.2. The User is entitled to make one security copy of the software product. However, if the<br />
software product is operational after installation without the use of the original media copy,<br />
then the original media copy is deemed to be a security copy. In all other cases, the User is<br />
only entitled to use the security copy if the original media copy of the software product has<br />
become unsuitable for proper and legal use without any doubt, such state thereof being<br />
supported by acceptable proof.<br />
7. Limitations of use<br />
7.1. The User is not entitled<br />
7.1.1. to multiply the software product (to make a copy thereof);<br />
7.1.2. to lease, rent, lend, distribute, transfer it to a third person with or without a<br />
consideration;<br />
7.1.3. to translate the software product (including translation (compilation) to other<br />
programming languages);<br />
7.1.4. to decompile the software product;<br />
7.1.5. to modify, extend, transform the software product (in whole or in part), to separate it<br />
into parts, compose it with other products, install it in other products, utilize it in other<br />
products, not even with the aim of achieving a co-operation with other products;<br />
7.1.6. apart from using the computer program, to obtain information from the map database<br />
included in the software product, to decompile the map database, to use, copy, modify,<br />
extend, transform the map database in whole or in part or the group of data stored therein, or<br />
to install it in other products, utilize it in other products, not even with the aim of achieving a<br />
co-operation with other products;<br />
8. Non-warranty, limitation of responsibility<br />
8.1. Licensor hereby informs the User that although the greatest care was taken in producing<br />
the software product, yet with respect to the essence of the software product and the<br />
technical limitations, the Licensor does not warrant for the software product being completely<br />
error free, and the Licensor is not bound by any contractual obligation by which the software<br />
product obtained by the User should be completely error free.<br />
8.2. The Licensor does not warrant that the software product is suitable for any purpose<br />
defined either by the Licensor or the User, and does not warrant that the software product is<br />
capable of co-operating with any other system, device or product (e.g. software or hardware).<br />
8.3. The Licensor does not assume any responsibility for damages incurred due to an error in<br />
the software product (including errors of the computer program, the documentation and the<br />
map database).<br />
8.4. The Licensor does not assume any responsibility for damages incurred due to the<br />
software product not being applicable for any defined purpose, or the error or lack of cooperation<br />
thereof with any other system, device or product (e.g. software or hardware).<br />
8.5. The Licensor shall hereby also draw the attention of the User with great emphasis to the<br />
fact that while utilizing the software product in any form of transportation, observing the traffic<br />
regulations and rules (e.g. use of obligatory and/or reasonable and suitable security<br />
measures, proper and generally expected care and attention in the given situation, and<br />
special care and attention required due to utilizing the software product) is the exclusive<br />
83
esponsibility of the User; the Licensor shall not assume any responsibility for any damages<br />
occurred in relation to utilizing the software product during transportation.<br />
8.6. By concluding present Agreement the User shall especially acknowledge the information<br />
stated in Section 8 above.<br />
9. Sanctions<br />
9.1. The Licensor hereby informs the User that according to regulations of the CA, should the<br />
Licensor find its rights to be breached, the Licensor may<br />
9.1.1. claim the acknowledgement of such breach by court;<br />
9.1.2. claim ceasing the breach and ordering the person under breach from continuing such;<br />
9.1.3. claim that the person under breach give proper compensation (even by way of publicity,<br />
to the expense of the person under breach);<br />
9.1.4. claim the return of the increase of assets due to the breach;<br />
9.1.5. claim ceasing the breaching situation, the restitution of the state before the breach, to<br />
the expense of the person in breach, and may claim the destruction of instruments and<br />
materials used for the breach, and that of the objects created by the breach;<br />
9.1.6. claim damages.<br />
9.2. The Licensor hereby also informs the User that the breach of copyrights and related<br />
rights is a crime according to Act IV of 1978 on the Criminal Code, which may draw as a<br />
sanction a sentence of two years in prison in basic cases and up to eight years in prison in<br />
qualified cases.<br />
9.3. For disputes arising from present Agreement the parties hereby agree on the exclusive<br />
competence of - depending on value and title disputed - either the Central Court of Budapest<br />
Districts (Pesti Központi Kerületi Bíróság) or the Municipal Court of Budapest (Fővárosi<br />
Bíróság).<br />
84