Triple Full Exhaust Instructions - Two Brothers Racing
Triple Full Exhaust Instructions - Two Brothers Racing
Triple Full Exhaust Instructions - Two Brothers Racing

You also want an ePaper? Increase the reach of your titles
YUMPU automatically turns print PDFs into web optimized ePapers that Google loves.
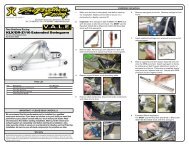
Installation <strong>Instructions</strong><br />
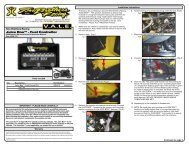
1. Make sure the quad is completely cool before starting the - Remove 3 push pins<br />
installation. Make sure the quad is secure on a level surface<br />
and the wheels are chocked to prevent the quad from rolling.<br />
2. Remove the rear bed assembly:<br />
- Remove the seats.<br />
2008-10 Polaris<br />
Ranger RZR 800<br />
V.A.L.E. <strong>Triple</strong> <strong>Full</strong> <strong>Exhaust</strong> System with M-7 Aluminum Canister<br />
Part # 005-2790106TV<br />
V.A.L.E. TM<br />
V a r i a b l e A x i s L o c k i n g E x h a u s t<br />
- Remove the screws (4) behind the seats.<br />
- Unplug lights from wire harness (1) under drivers side<br />
of bed.<br />
- Remove the screws (4) around the tail pipe.<br />
- Carefully lift bed assembly off.<br />
3. Remove OEM muffler and mid-pipe (you may need to<br />
temporarily remove heat sheild and bed rest):<br />
- Loosen OEM clamp.<br />
IMPORTANT - PLEASE READ CAREFULLY<br />
We recommend that this performance part be installed by a qualified<br />
motorcycle technician. If you have any doubts as to your ability to install this<br />
performance part, please consult with your local motorcycle dealer. Read all<br />
instructions first before starting installation. Make sure the motorcycle and<br />
exhaust system are completely cool before starting the installation. Also,<br />
make sure the bike is secure on a centerstand or ideally a service lift during<br />
installation. Be sure to save all stock components for possible use later.<br />
**This product has not been tested with all available accessories and some<br />
items may cause excessive heat. Excessive heat may cause damage to your<br />
vehicle. <strong>Two</strong> <strong>Brothers</strong> <strong>Racing</strong> will not be responsible for damaged parts.<br />
Warranty<br />
<strong>Two</strong> <strong>Brothers</strong> <strong>Racing</strong> products are intended for closed course competition purposes only, and therefore are sold “as is”<br />
without warranty. <strong>Two</strong> <strong>Brothers</strong> <strong>Racing</strong> specifically disclaims any warranties of merchantability or fitness for a particular<br />
purpose and disclaims all responsibility for consequential and incidental damages or any other losses arising from the use<br />
of these products or parts.<br />
- Remove the bolts (4) in the bed and 2 tiedown hooks.<br />
- Remove header joint springs.<br />
- Remove mid-pipe tension springs.<br />
- Remove mid-pipe.<br />
- Remove muffler assembly.
Installation <strong>Instructions</strong><br />
6. Remove rear frame bolts/nuts to install muffler stabilizer<br />
mount on top of frame rail and center muffler with<br />
mounting bracket attached under frame rail. The stock<br />
hardware is re-used.<br />
9. Locate slip-fit joint exhaust pipes and attach right side<br />
and center pipe with springs. Install left side exhaust<br />
pipe and attach with spring. The left side exhaust pipe<br />
uses OEM tension stop(remove from OEM exhaust and<br />
install on TBR exhaust).<br />
2008-10 Polaris<br />
Ranger RZR 800<br />
V.A.L.E. <strong>Triple</strong> <strong>Full</strong> <strong>Exhaust</strong> System with M-7 Aluminum Canister<br />
Part # 005-2790106TV<br />
V.A.L.E. TM<br />
V a r i a b l e A x i s L o c k i n g E x h a u s t<br />
4. Remove OEM header assembly.<br />
Installation <strong>Instructions</strong><br />
5. Attach the hanger bracket to the TBR center muffler using the 4 (four)<br />
6x14mm socket head cap screws and split lock washers provided.<br />
7. Install TBR header to cylinder head using the supplied<br />
header gasket (if the stock gasket is un-damanged you<br />
may use that instead) and OEM mounting bolts at header<br />
flange. Use supplied 8x20mm socket head cap screw to<br />
secure header assembly to cylinder head on side mount.<br />
10. Mount supplied muffler mounting brackets to bed<br />
support using the supplied 8x35mm socket head cap<br />
screws and lock washers provided, leave loose for now.<br />
8. Attach TBR triple collector with clips as shown in photo.
Installation <strong>Instructions</strong><br />
11. Attach muffler to muffler bracket using the supplied<br />
8x45mm socket head cap screws with lock nuts, leave<br />
loose for now.<br />
14. Tighten X-ring bolts. Tighten muffler mounting bolts on<br />
all 3 mufflers.<br />
2008-10 Polaris<br />
Ranger RZR 800<br />
V.A.L.E. <strong>Triple</strong> <strong>Full</strong> <strong>Exhaust</strong> System with M-7 Aluminum Canister<br />
Part # 005-2790106TV<br />
005-2790106TV<br />
V.A.L.E.<br />
V a r i a b l e A x i s L o c k i n g E x h a u s t<br />
12. Attach TBR muffler to their exhaust pipes using the<br />
supplied 6x14mm socket head cap screws and lock<br />
washers with thread locker using the supplied 2pc.<br />
X-Ring, leave loose for now.<br />
15. Re-install sway bar bolts.<br />
16. Re-install bed assembly.<br />
17. Tighten muffler mounting bracket bolts, and billet<br />
muffler mounting bracket.<br />
Qty. Description Part Number<br />
1 Muffler Canister Left 005-279-206ML<br />
1 Muffler Canister Center 005-275-206MC<br />
1 Muffler Canister Right 005-279-206MR<br />
1 Header Kit 005-27901HK<br />
1 HARDWARE KIT 005-279-3C<br />
6 X-Ring (half) 005-7-2-3<br />
16 6x14mm Socket Head Cap Screw 005-SH614<br />
16 M6 Split Lock Washer 005-WL6<br />
5 80mm Hook Spring 005-S80<br />
1 Header Gasket 005-275G<br />
2 RZR Billet Muffler Mounting Bracket 005-275-21B<br />
2 RZR Billet Muffler Mounting Lower Bracket 005-275-21BU<br />
1 RZR Center Muffler Support Bracket 005-275B2<br />
1 RZR Hanging Support Bracket 005-275B<br />
2 8x1.25mm Flange Nut 005-FNL8<br />
4 M8 Lock Washers 005-WL8<br />
1 8x20mm Socket Head Cap Screw 005-SH820<br />
4 8x35mm Socket Head Cap Screw 005-SH835<br />
2 8x45mm Socket Head Cap Screw 006-SH845<br />
1 Permatex Thread Lock 031-P09179<br />
1 5mm Long Handle Ball end hex key 005-9-18610<br />
1 T20 Torx Screw Wrench 005-9-15820<br />
1 TBR Sticker Kit 015-10212<br />
3 USFS Approved Spark Arrestor (installed) 005-106S<br />
3 P1X Powertip (installed) 005-P1X<br />
13. Make any adjustments to collector or exhaust pipes if<br />
needed by rotation of triple collector. Install supplied<br />
tension springs on left and right side exhaust pipes.<br />
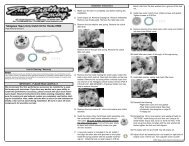
Care & Cleaning<br />
18. Re-install seats and rear cage.<br />
19. Double check to make sure that all hardware is securely<br />
tightened and re-check hardware after every 10 hours.<br />
20. Before you run the quad, clean off all fingerprints and<br />
dirt, as any oily residue will etch the metal and become<br />
somewhat permanent when the system gets hot. Run<br />
the quad and enjoy. It is normal for some white smoke to<br />
appear the first time you start the quad. This is packing/<br />
manufacturing oil from inside the pipe burning off.<br />
Check for gaps or leaks. If you find a leak, a little high<br />
temperature silicon sealant should fix it. After 50 to 100<br />
miles, recheck all fasteners for tightness.<br />
Care & Cleaning<br />
Keep system free of dirt and moisture. Store in a cool, dry place. Make sure vehicle is completely cool before maintenance.<br />
Stainless Header System: Polished stainless steel pipes will turn a light golden hue after a few heat cycles, this is a normal characteristic of high quality stainless steel. Clean using a<br />
mild water based spray cleaner. Always apply cleaner or polish with a soft, clean cloth.<br />
Titanium Header System: Polished titanium pipes will experience color shift ranging from deep blue/purple through amber after a few heat cycles. This is a normal characteristic of high<br />
quality titanium. Clean using a mild water based spray cleaner. Always apply cleaner or polish with a soft, clean cloth.<br />
Polished Aluminum Canisters: Use an aluminum or mag wheel polish to restore the bright finish to factory spec.<br />
Brushed Aluminum Canisters: Clean using a mild water based spray cleaner. Always apply cleaner or polish with a soft, clean cloth.<br />
Carbon Fiber Canisters: Clean using a mild water based spray cleaner. Always apply cleaner or polish with a soft, clean cloth. Always make sure the fiberglass packing inside is in good<br />
condition and not burned out, as exhaust heat inside an empty canister will deteriorate the carbon fiber sleeve.<br />
TBR sells repack kits (Road - #005-10038, Offroad - #005-10038MX) that include everything you need to easily do it yourself.<br />
Titanium Mufflers: For cleaning use a mild water based spray cleaner. Always apply cleaner or polish with a soft, clean cloth. Always make sure the fiberglass packing inside is in good<br />
condition and not burned out, as exhaust heat inside an empty canister will deteriorate the carbon fiber sleeve.<br />
TBR sells repack kits (Road - #005-10038, Offroad - #005-10038MX) that include everything you need to easily do it yourself.<br />
Repack all road canisters at the first signs of packing material deterioration. Part #005-10038<br />
Repack all offroad canisters after every 10 hours of use. Part #005-10038MX<br />
NEVER dyno test your bike with carbon fiber or titanium canisters installed - the intense heat and lack of cooling air can quickly burn through the canister material. <strong>Two</strong> <strong>Brothers</strong> <strong>Racing</strong><br />
does not provide a warranty for burned canisters.