Cadence OrCAD PCB Designer
Cadence OrCAD PCB Designer
Cadence OrCAD PCB Designer

Create successful ePaper yourself
Turn your PDF publications into a flip-book with our unique Google optimized e-Paper software.
Input<br />
J1<br />
2<br />
1<br />
U1<br />
3<br />
+<br />
2<br />
-<br />
LF411<br />
7<br />
V+<br />
V-<br />
4<br />
Inverting<br />
Non-inverting<br />
LF411<br />
2<br />
-<br />
3<br />
+<br />
U2<br />
4<br />
V-<br />
V+<br />
7<br />
VCC<br />
B2<br />
5<br />
OUT<br />
6<br />
B1<br />
1<br />
VEE<br />
VEE<br />
B1<br />
1<br />
OUT<br />
6<br />
B2<br />
5<br />
VCC<br />
Offset null<br />
R4<br />
100k<br />
R1<br />
100k<br />
R2<br />
10k<br />
R3<br />
100k<br />
R5<br />
100k<br />
R8<br />
10k<br />
SET = 0.5<br />
VEE<br />
LF411<br />
2<br />
-<br />
3<br />
+<br />
U3<br />
R6<br />
100k<br />
4<br />
V-<br />
V+<br />
7<br />
R7<br />
100k<br />
VEE<br />
B1<br />
OUT<br />
B2<br />
VCC<br />
1<br />
6<br />
5<br />
VCC<br />
VEE<br />
C1<br />
10u<br />
16 V<br />
C2<br />
10u<br />
16 V<br />
4<br />
3<br />
2<br />
1<br />
Output<br />
J2<br />
+15 V<br />
0 V<br />
-15 V<br />
Output<br />
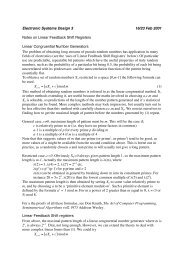
Figure 12. Instrumentation amplifier based on three op-amps.<br />
The circuit is used to amplify a small difference in voltage between its two inputs while rejecting<br />
a large background or noise voltage that affects the two inputs equally. This is often needed<br />
with sensors, so remember this in Team Design Project 3. It may also be helpful later this year.<br />
In practice it is unlikely that the circuit would be build using three separate packages with<br />
single op-amps as in this design. Complete instrumentation amplifiers are available in 8-pin<br />
packages. Even if these were unsuitable, you can get quad packages of four op-amps. However,<br />
it is probably easier to lay out this design than the quad package. We shall not simulate this<br />
circuit, just lay out the <strong>PCB</strong>. The LF411 is a widely used op-amp.<br />
6.1 Schematic capture<br />
Creating a directory for this design, as always, and start a new project in Capture. Place the<br />
components on the schematic but do not connect them yet. The only unfamiliar component<br />
should be the potentiometer, which is called POT – search for it.<br />
Power supply rails are normally hidden to simplify the drawing. All power symbols with<br />
the same name are connected together.<br />
1. Select Place > Power or click the power button on the right and select VCC_CIRCLE from<br />
the CAPSYM library. Use this for both +15V and −15V supplies. Mirror it vertically as<br />
necessary.<br />
2. Select each power symbol in turn, right click to get the pop-up menu and select Edit<br />
Properties. . . . Change the name to VCC for positive and VEE for negative supplies<br />
respectively. This is a standard usage (but there are many others). Check the orientation<br />
of the op-amps carefully! I have mirrored some of them vertically to make the circuit<br />
clearer but this means that the power connections are reversed as well.<br />
28