Cadence OrCAD PCB Designer
Cadence OrCAD PCB Designer
Cadence OrCAD PCB Designer

You also want an ePaper? Increase the reach of your titles
YUMPU automatically turns print PDFs into web optimized ePapers that Google loves.
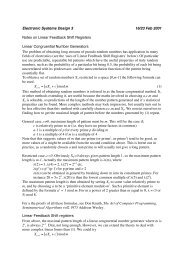
Figure 3. Gain as a function of frequency for different bypass capacitors.<br />
Hint for demonstrators. My results are in figure 3. Increasing the bypass capacitor improves<br />
the gain until it is limited at low frequency by C 1<br />
instead. There isn’t much difference between<br />
the results for 100 µF and 1000 µF so I would use 100 µF. ❦<br />
4 Preparation for <strong>PCB</strong> layout<br />
Once the design of the circuit has been finalised, it should be laid out on the printed circuit<br />
board (<strong>PCB</strong>). This takes a few steps before you leave Capture. The overall design flow for<br />
making a <strong>PCB</strong> is shown in figure 4 on the next page and there is a summary in section 9.<br />
4.1 Edit the circuit<br />
First, the ‘virtual components’ in the schematic must be replaced by real components. Here<br />
this means the voltage sources and param block. There is no way that you can build a real<br />
circuit with a param block for instance! (Well, you could use a pair of sockets and unplug the<br />
component to change it.) The real circuit has connectors for input, output and power, which<br />
must be placed instead. This is shown in figure 5. The types of connector are HEADER 2 and<br />
the like. They are in the connector library, which is in the directory one level above pspice.<br />
The connectors are oriented so that pin 1 is connected to ground in both cases. It is shown by a<br />
square marker on the <strong>PCB</strong>. I have changed the names to make them more descriptive than the<br />
defaults, such as HEADER 2; do not edit the references J1 and J2. Add text to label the pins<br />
of each connector and put your name on the circuit, or you won’t be able to identify it when it<br />
comes out of the printer.<br />
Hint for demonstrators. Some students change the Reference (J1 or J2) of the connectors<br />
to Input or Output instead of changing the Value (HEADER 2 or HEADER 3). This causes<br />
trouble with the netlister later on. ❦<br />
10