

EFIS App for iPad manual - X-Plane.com
EFIS App for iPad manual - X-Plane.com
EFIS App for iPad manual - X-Plane.com

You also want an ePaper? Increase the reach of your titles
YUMPU automatically turns print PDFs into web optimized ePapers that Google loves.
In the center is a directional gyro, indicating which direction the<br />
aircraft is pointing (in the previous image, 194° from north, or<br />
nearly south).<br />
On the right is a box <strong>for</strong> operational warnings—<strong>for</strong> instance, in<br />
the previous image, the aircraft’s engine RPM, oil pressure,<br />
and fuel quantity are all high.<br />
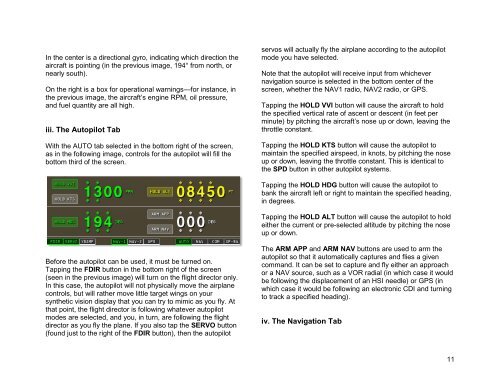
iii. The Autopilot Tab<br />
With the AUTO tab selected in the bottom right of the screen,<br />
as in the following image, controls <strong>for</strong> the autopilot will fill the<br />
bottom third of the screen.<br />
servos will actually fly the airplane according to the autopilot<br />
mode you have selected.<br />
Note that the autopilot will receive input from whichever<br />
navigation source is selected in the bottom center of the<br />
screen, whether the NAV1 radio, NAV2 radio, or GPS.<br />
Tapping the HOLD VVI button will cause the aircraft to hold<br />
the specified vertical rate of ascent or descent (in feet per<br />
minute) by pitching the aircraft’s nose up or down, leaving the<br />
throttle constant.<br />
Tapping the HOLD KTS button will cause the autopilot to<br />
maintain the specified airspeed, in knots, by pitching the nose<br />
up or down, leaving the throttle constant. This is identical to<br />
the SPD button in other autopilot systems.<br />
Tapping the HOLD HDG button will cause the autopilot to<br />
bank the aircraft left or right to maintain the specified heading,<br />
in degrees.<br />
Tapping the HOLD ALT button will cause the autopilot to hold<br />
either the current or pre-selected altitude by pitching the nose<br />
up or down.<br />
Be<strong>for</strong>e the autopilot can be used, it must be turned on.<br />
Tapping the FDIR button in the bottom right of the screen<br />
(seen in the previous image) will turn on the flight director only.<br />
In this case, the autopilot will not physically move the airplane<br />
controls, but will rather move little target wings on your<br />
synthetic vision display that you can try to mimic as you fly. At<br />
that point, the flight director is following whatever autopilot<br />
modes are selected, and you, in turn, are following the flight<br />
director as you fly the plane. If you also tap the SERVO button<br />
(found just to the right of the FDIR button), then the autopilot<br />
The ARM APP and ARM NAV buttons are used to arm the<br />
autopilot so that it automatically captures and flies a given<br />
<strong>com</strong>mand. It can be set to capture and fly either an approach<br />
or a NAV source, such as a VOR radial (in which case it would<br />
be following the displacement of an HSI needle) or GPS (in<br />
which case it would be following an electronic CDI and turning<br />
to track a specified heading).<br />
iv. The Navigation Tab<br />
11


