Manual - Zephyr
Manual - Zephyr
Manual - Zephyr

You also want an ePaper? Increase the reach of your titles
YUMPU automatically turns print PDFs into web optimized ePapers that Google loves.
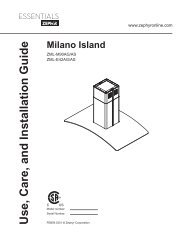
FEB08.0101
ZTR-M90S<br />
<br />
<br />
<br />
<br />
<br />
<br />
<br />
<br />
<br />
<br />
<br />
<br />
<br />
<br />
<br />
e<br />
<br />
<br />
<br />
<br />
<br />
<br />
<br />
<br />
p<br />
p<br />
<br />
<br />
<br />
<br />
i
CONTENTS<br />
INSTALLATION<br />
Mount heights & clearance<br />
Ducting<br />
Specifications<br />
Electrical<br />
Mounting the hood<br />
Ductless Conversion<br />
Carbon Filters<br />
FEATURES & CONTROLS<br />
Touch controls & features<br />
Advance display functions<br />
Filter change indicator<br />
Filter clean indicator<br />
Remote Feature<br />
MAINTENANCE<br />
Cleaning<br />
Lights replacement<br />
WARRANTY<br />
Coverage & exceptions<br />
1<br />
1,2,3<br />
4<br />
4<br />
5,6<br />
7<br />
7<br />
8<br />
8<br />
8,9<br />
8,10<br />
11<br />
12<br />
13<br />
14
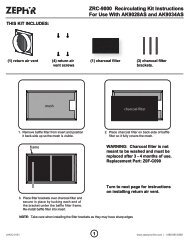
MOUNT HEIGHTS & CLEARANCE<br />
INSTALLATION 1<br />
Minimum mount height between range top to<br />
hood bottom should be no less than 28".<br />
min 36.5" min. 32.5"-max. - 38.5" 35.5<br />
6.5"<br />
min. 28"-max. 36"<br />
min 100.5" min. 96.5"-max. - 107.50 110.5"<br />
36"<br />
Maximum mount height should be no higher<br />
than 36".<br />
It is important to install the hood at the<br />
proper mounting height. Hoods mounted too<br />
low could result in heat damage and fire hazard;<br />
while hoods mounted too high will be<br />
hard to reach and will loose its performance<br />
and efficiency.<br />
If available, also refer range manufacturer's<br />
height clearance requirements and recommended<br />
hood mounting height above range.<br />
*Minimum ceiling clearance 100.5" 96.5” at 28”hood<br />
mounting height.<br />
**Maximum ceiling clearance 107.50" 110.5" at 36"<br />
hood mounting height.<br />
DUCTING<br />
A minimum of 6" round or 3-1/4 x 10"rectangular<br />
duct must be used to maintain maximum air flow<br />
efficiency.<br />
Always use rigid type metal ducts only.<br />
Flexible ducts could restrict air flow by up to 50%.<br />
Also use calculation (on right) to compute total<br />
available duct run when using elbows, transitions<br />
and caps.<br />
ALWAYS, when possible, reduce the number or<br />
transitions and turns. If long duct run is required,<br />
increase duct size from 6" to 7 or 8". If a reducer<br />
is used, install a long reducer instead of a pancake<br />
reducer. Reduce duct size as far away from<br />
opening as possible.<br />
If turns or transitions are required:<br />
Install as far away from opening and as far<br />
apart, between 2, as possible.<br />
Minimum Duct Size:<br />
Round- 6" minimum<br />
Duct Run Calculation:<br />
Maximum run<br />
6" or 3-1/4 x 10" duct<br />
Deduct:<br />
each 90 Elbow used<br />
each 45 elbow used<br />
each 6" to 3/14 x 10"<br />
transition used<br />
each 3/14 x 10" to 6"<br />
each 3/14 x 10" to 6"<br />
transition used<br />
Side Wall Cap w/ damper<br />
Roof Cap<br />
100 FT<br />
15 FT<br />
9FT<br />
1FT<br />
5FT<br />
30 FT<br />
30 FT<br />
e.g.- 1 roof cap, 2x90 elbows, 1 45 elbow used:<br />
=30' + 30' + 9' =69' used, 31' available for straight duct runs.
INSTALLATION<br />
2<br />
DUCTING<br />
WARNING FIRE HAZARD<br />
NEVER exhaust air or terminate duct work into spaces between walls, crawl spaces, ceiling,attics or<br />
garages. All exhaust must be ducted to the outside.<br />
Use Metal ductwork only.<br />
Fasten all connections with sheet metal screws and tape all joints w/ certified Silver Tape or DuctTape.<br />
Some Ducting Options:<br />
Roof Pitch w/<br />
Flashing & Cap<br />
side wall cap<br />
w/ gravity damper<br />
Soffit or crawl space<br />
Air register<br />
side wall cap<br />
w/ gravity damper<br />
Soffit 6" to 3-1/4 x 10"<br />
elbow adaptor.<br />
Ductless Re-circulating option
INSTALLATION 3<br />
DUCTING<br />
Crawl space<br />
Air register<br />
6" to 3-1/4 x 10" elbow<br />
adaptor.<br />
Ductless Re-circulating option
INSTALLATION<br />
4<br />
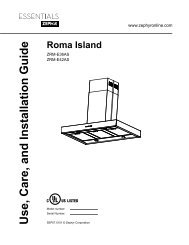
SPECIFICATIONS<br />
1", 2", 3"<br />
35.5"<br />
32-1/2"<br />
26" 29"<br />
6-1/2"<br />
36"<br />
25-3/4"<br />
ELECTRICAL<br />
WARNING<br />
All Electrical work must by performed by qualified electrician or person with similar technical<br />
know how and background.<br />
For personal safety, remove house fuse or open circuit breaker before beginning installation.<br />
Do not use extension cord or adapter plug with this appliance.<br />
Follow National electrical codes or prevailing local codes and ordinances.<br />
Electrical Supply:<br />
This appliance requires a 120V 60Hz electrical supply., and connected to an individual, properly<br />
grounded branch circuit, protected by a 15 or 20 ampere circuit breaker or time delay fuse. Wiring<br />
must be 2 wire w/ ground. Please also refer Electrical Diagram labeled on product.<br />
Cable Lock:<br />
A cable locking connector (not<br />
supplied) might also required by<br />
local codes. Check with local<br />
requirements and codes, purchase<br />
and install appropriate connector if<br />
necessary.<br />
Cable Lock
INSTALLATION 5<br />
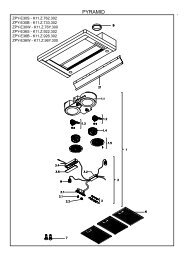
INSTALLATION<br />
Add Blockings<br />
Fasten Support Frame<br />
Mounting the Range Hood<br />
1. Add and secure blocking (minimum 2x4<br />
studs) onto ceiling joist.<br />
2. Fasten round ceiling plate directly onto<br />
ceiling joist or stud blocking.<br />
3. Install duct work & electrical.<br />
4. Raise hood and screw onto tabs of<br />
ceiling plate.
INSTALLATION<br />
6<br />
INSTALLATION<br />
=<br />
=<br />
=<br />
=<br />
=<br />
=<br />
Mounting the Range Hood<br />
6. Attach cover strip with supplied screws.
DUCTLESS CONVERSION<br />
Ductless conversion is intended for applications where an exhaust duct work is not possible to be<br />
installed. When converted, the hood functions as a "purifying" hood rather than an exhaust hood.<br />
Fumes and exhaust from cooking is drawn and filtered by a set of optional Carbon Filters. The air<br />
is then purified and re-circulated back within the home.<br />
We recommend to ALWAYS exhaust air outside of the home by employing existing or installing<br />
new duct work, if possible. The hood is most effective and efficient as an Exhaust unit. Only when<br />
the exhaust option is not possible should you recourse to converting the hood into a "purifying"unit.<br />
When converted to be a "purifying" unit, a set of Carbon Filters are required on top of its standard<br />
Metal Filter set. Order according to its Part number below. The standard Metal Filters are intended<br />
to capture residue from cooking and the optional Carbon Filters help to purify fumes exhausted<br />
from cooking for re-circulation.<br />
Carbon Filters (Required)<br />
1. Purchase ductless Charcoal Filters as follow:<br />
Hood Model: Part No. Filters in pkg.<br />
ZTRE36S ZRC-0080 Z0F-C022 2<br />
INSTALLATION 7<br />
2. Remove metal filters on hood.<br />
3. Install attachment bracket into metal filter.<br />
4. Clip carbon filter onto bracket.<br />
5. Re-install metal filters.<br />
6. Carbon Filters must be replaced after<br />
every 120 hours of use (or approximately<br />
every 2 to 3 months based on the average<br />
of 1-2hrs. of daily cooking time). The<br />
microprocessor in the controls when set,<br />
will count elapsed usage time and indicate<br />
when carbon filter replacement is required<br />
every 120 hrs.<br />
Ducting<br />
1. Refer Page 2&3 for ductless recirculating options.
CONTROLS & FEATURES<br />
8<br />
TOUCH CONTROLS & FEATURES<br />
1<br />
Blower On/Off<br />
5<br />
Display (Speed level, Delay Off Indicator, Filter Clean/ Change)<br />
2<br />
Adjust 6 Speed Levels<br />
3<br />
4<br />
15 Min Delay Off<br />
Lights On/Off/ Hold to Dim<br />
1<br />
Blower On/Off<br />
By pressing , the blower is switched On and Off. When switched on, the blower starts up on speed level 3.<br />
2<br />
3<br />
4<br />
Speed Selection<br />
The 6 speed levels are selected by pressing to decrease and to increase speed level. The display<br />
indicates level selected.<br />
Delay Off<br />
This is used for programmed shut down of blower and lights 15 minutes after the function is activated.<br />
Press once, a dot flashes in the lower right hand side of display indicating the function is on.<br />
The hood will completely shut down in 15 minutes.<br />
Lights On/Off/ Dim<br />
Switch lights On and Off by pressing key once. To dim lights, press and hold- for 2 seconds.<br />
5<br />
Advance Display Functions<br />
Filters Clean Reminder (Metal):<br />
After every 30 hours of use, the display will start flashing an<br />
from residue and possible clogs.<br />
reminding you to clean the metal filters<br />
The standard Metal Filters are required to be cleaned frequently and as recommended in order<br />
to maintain blower efficiency. If improperly maintained, residue from cooking will sift though<br />
filters and cause damage to hood blowers and other sensitive components; and possibly clog<br />
duct work and creates fire hazard.<br />
Filters Change Reminder (Carbon, if fitted):<br />
When your hood is installed as a 'Purifying' (Ductless Recirculating) unit, it is fitted with a set of<br />
Carbon Filters to purify exhaust and fumes from cooking, and re-circulates the air within the home.<br />
These Carbon Filters are required to be replaced after every 120 hours of use. The Filter Change<br />
Reminder function in the microprocessor needs to be switched on. The microprocessor in the<br />
controls when set, will elapsed and count usage time and indicate when carbon filter replacement is<br />
needed every 120 hrs.
CONTROLS & FEATURES 9<br />
CONTROLS: FILTER CHANGE INDICATOR (CARBON FILTERS)<br />
Filters Change Reminder (Carbon, if fitted):<br />
When your hood is installed as a 'Purifying' (Ductless Recirculating) unit, it is fitted with a set of<br />
Carbon Filters to purify exhaust and fumes from cooking, and re-circulates the air within the home.<br />
These Carbon Filters are required to be replaced after every 120 hours of use. The Filter Change<br />
Reminder function in the microprocessor needs to be switched on. The microprocessor in the<br />
controls when set, will elapsed and count usage time and indicate by a flashing when carbon<br />
filter replacement is needed every 120 hrs.<br />
Setting the Filter Change Reminder:<br />
When Off, hold for approx. 5 seconds.<br />
The display will change from<br />
(exhaust mode) to , (purifying mode/<br />
carbon filters used) this indicates that the<br />
elapse timer function is switched on and<br />
Carbon Filters are used.<br />
Filter Replace Indicator:<br />
When the display starts flashing, the<br />
Carbon Filters requires replacement after<br />
120 hours of use.<br />
Re-setting Function:<br />
Once filters are replaced, with hood off,<br />
press and hold , the display will appear;<br />
hold for approximately 5 seconds until<br />
on display disappears . The Filter<br />
Change Reminder is now re-set and a new<br />
120 hours elapse cycle is initiated.<br />
Set Mode<br />
hold 5 secs.<br />
Change Filters<br />
To Reset<br />
hold 5 secs.<br />
display from to <br />
display flashes<br />
display from to < >
CONTROLS & FEATURES<br />
10<br />
CONTROLS: FILTER CLEAN INDICATOR (METAL FILTERS)<br />
Filter Clean Reminder (Standard Metal Filters fitted)<br />
Whether your hood is installed as an Exhaust or Purifying unit, a set of metal filters are<br />
fitted by the factory. These Metal Filters are intended to filter out residue from cooking.<br />
It need not be replaced on a regular basis but are required to be kept clean. The Filter Change<br />
Reminder function in the microprocessor will automatically indicate by a flashing<br />
when the metal filters are needed to be cleaned after every 30 hrs. of use.<br />
Filters can be cleaned by hand or in a dishwasher with non-abrasive soap. Heavily soiled<br />
filters should also be soaked in grease cutting detergent such as '409' or its equivalent,<br />
prior to cleaning.<br />
Filter Clean Reminder:<br />
When flashes on display, the metal<br />
filters installed are required to be cleaned.<br />
This will occur after every 30 hours of use.<br />
Clean Filters<br />
display flashes<br />
Re-setting Function:<br />
Reset the Filter Clean Reminder timer when<br />
filters are cleaned and re-installed. Press<br />
and hold for approx. 5 seconds, the<br />
display will appear; hold for approximately<br />
5 seconds until on display disappears<br />
. The Filter Clean Reminder function<br />
is now re-set and a new 30 hours elapse<br />
cycle is initiated.<br />
To Reset<br />
hold 5 secs. display from to < >
CONTROLS & FEATURES 11<br />
REMOTE FEATURE: TOUCH CONTROLS<br />
Infrared Receiver / Transmitter:<br />
By aiming the infrared transmitter (located at the top of the remote control) to the infrared receiver<br />
(located above the touch controls on the range hood) you can control the following features remotely:<br />
1<br />
Lights On/Off Hold to Dim<br />
2<br />
Adjust 6 Speed Levels<br />
3<br />
Blower On/Off<br />
1<br />
Lights On/Off/ Dim<br />
Switch lights On and Off by pressing key once. To dim lights, press and hold- for 2 seconds.<br />
2<br />
Speed Selection<br />
The 6 speed levels are selected by pressing to decrease and to increase speed level. The display<br />
indicates level selected.<br />
3<br />
Blower On/Off<br />
By pressing , the blower is switched On and Off. When switched on, the blower starts up on speed level 3.
MAINTENANCE 12<br />
CLEANING<br />
Surface Maintenance:<br />
Clean periodically with hot soapy water and clean cotton cloth. Do not use corrosive or abrasive<br />
detergent (e.g. comet powder scrub, EZ-Off oven cleaner), or steel wool/scoring pads which will<br />
scratch and damage surface.<br />
For heavier soil use liquid degreaser such as 'Formula 409' or 'Fantastic' brand cleaner.<br />
After cleaning, you may use non abrasive stainless steel polish/ cleaners such as 3M or<br />
ZEP, to polish and buff out the stainless luster and grain. Always scrub lightly, with<br />
clean cotton cloth, and with the grain.<br />
Metal Filters<br />
The Metal Filters fitted by the factory are<br />
intended to filter out residue and grease<br />
from cooking. It need not be replaced on a<br />
regular basis but are required to be kept clean.<br />
Filters should be cleaned after every 30<br />
hours of use. Use the Filter Clean<br />
Reminder function on the controls to<br />
determine when filters require cleaning<br />
(ref. page 8).<br />
Remove and clean by hand or in<br />
dishwasher. Spray 'Formula 409' or<br />
equivalent degreasing detergent and leave<br />
to soak if heavily soiled.<br />
Dry filters and re-install before using hood.<br />
Replacing Metal Filters<br />
Should filters wear out due to age and<br />
prolonged use, replace with following part<br />
number:<br />
Hood Model: Part No. Filters in pkg.<br />
ZTRE36S Z0F-M052 2<br />
Also replace damaged filter that has<br />
punctured or broken mesh, bent or broken frame.
MAINTENANCE 13<br />
LIGHTS<br />
Replacing Light Bulbs<br />
CAUTION: Light bulb becomes extremely hot when turned on.<br />
DO NOT touch bulb until switched off and cooled. Touching hot<br />
bulbs could cause serious burns.<br />
Make sure all power is turned off and<br />
bulbs are not hot.<br />
Carefully pry trim (w/ glass) off the socket<br />
module.<br />
Replacement bulb w/ 12V 20W low voltage<br />
halogen bulb 2 pin G4 or type JC.
Limited Warranty<br />
STAPLE YOUR RECEIPT HERE<br />
Proof of the original purchase<br />
date is needed to obtain<br />
service under warranty<br />
TO OBTAIN SERVICE UNDER WARRANTY OR FOR ANY SERVICE RELATED QUESTIONS, please call:<br />
1-888-880-8368<br />
<strong>Zephyr</strong> Corporation (referred to herein as “we” or “us”) warrants to the original consumer purchaser (referred to herein<br />
as “you” or “your”) of <strong>Zephyr</strong> products (the “Products”) that such Products will be free from defects in materials or workmanship<br />
as follows:<br />
Two Year Limited Warranty for Parts: For two years from the date of your original purchase of the Products, we will<br />
provide, free of charge, Products or parts to replace those that failed due to manufacturing defects. We may choose, in<br />
our sole discretion, to repair or replace parts before we elect to replace the Products.<br />
One Year Limited Warranty for Labor: For one year from the date of your original purchase of the Products, we will<br />
provide, free of charge, the labor cost associated with repairing the Products or parts to replace those that failed due to<br />
manufacturing defects. After the first year from the date of your original purchase, you are responsible for all labor costs<br />
associated with this warranty.<br />
Warranty Exclusions: This warranty covers only repair or replacement, at our option, of defective Products or parts<br />
and does not cover any other costs related to the Products including but not limited to: (a) normal maintenance and<br />
service required for the Products and consumable parts such as light bulbs, metal and carbon filters and fuses; (b) any<br />
Products or parts which have been subject to freight damage, misuse, negligence, accident, faulty installation or installation<br />
contrary to recommended installation instructions, improper maintenance or repair (other than by us); (c) commercial<br />
use of the Products or use otherwise inconsistent with its intended purpose; (d) natural wear of the finish of the Products<br />
or wear caused by improper maintenance, use of corrosive and abrasive cleaning products, pads, and oven cleaner<br />
products; (e) chips, dents or cracks caused by abuse or misuse of the Products; (f) service trips to your home to teach<br />
you how to use the Products; or (g) damage to the Products caused by accident, fire, floods or act of God. If you are<br />
outside our service area, additional charges may apply for shipping costs for warranty repair at our designated service<br />
locations and for the travel cost to have a service technician come to your home to repair, remove or reinstall the Products.<br />
After the first year from the date of your original purchase, you are also responsible for all labor costs associated<br />
with this warranty.<br />
Limitations of Warranty. OUR OBLIGATION TO REPAIR OR REPLACE, AT OUR OPTION, SHALL BE YOUR SOLE<br />
AND EXCLUSIVE REMEDY UNDER THIS WARRANTY. WE SHALL NOT BE LIABLE FOR INCIDENTAL, CONSE-<br />
QUENTIAL OR SPECIAL DAMAGES ARISING OUT OF OR IN CONNECTION WITH THE USE OR PERFORMANCE OF<br />
THE PRODUCTS. THE EXPRESS WARRANTIES IN THE PRECEDING SECTION ARE EXCLUSIVE AND IN LIEU OF<br />
ALL OTHER EXPRESS WARRANTIES. WE HEREBY DISCLAIM AND EXCLUDE ALL OTHER EXPRESS WARRAN-<br />
TIES FOR THE PRODUCTS, AND DISCLAIM AND EXCLUDE ALL WARRANTIES IMPLIED BY LAW, INCLUDING<br />
THOSE OF MERCHANTABILITY AND FITNESS FOR A PARTICULAR PURPOSE. Some states or provinces do not<br />
allow limitations on the duration of an implied warranty or the exclusion or limitation of incidental or consequential damages,<br />
so the above limitations or exclusions may not apply to you. To the extent that applicable law prohibits the exclusion<br />
of implied warranties, the duration of any applicable implied warranty is limited to the same two-year period<br />
described above. Any oral or written description of the Products is for the sole purpose of identifying the Products and<br />
shall not be construed as an express warranty. Prior to using, implementing or permitting use of the Products, you shall<br />
determine the suitability of the Products for the intended use, and you shall assume all risk and liability whatsoever in<br />
connection with such determination. We reserve the right to use functionally equivalent refurbished or reconditioned<br />
parts or Products as warranty replacements or as part of warranty service. This warranty is not transferable from the<br />
original purchaser and applies in the United States and Canada.<br />
To Obtain Service Under Limited Warranty: To qualify for warranty service, you must: (a) notify us at the address or<br />
telephone number stated below within 60 days of the discovery of the defect; (b) give the model number and part identification<br />
number and serial number; and (c) describe the nature of any defect in the Product or part. At the time of the<br />
request for warranty service, you must present evidence of your proof of purchase and proof of the original purchase<br />
date. If we determine that the warranty exclusions listed above apply or if you fail to provide the necessary documentation<br />
to obtain service, you will be responsible for all shipping, travel, labor and other costs related to the services.<br />
<strong>Zephyr</strong> Corporation, Service Department, 395 Mendell Street, San Francisco, CA 94124 1-888-880-8368<br />
APR08.0101
TO OBTAIN SERVICE UNDER WARRANTY<br />
or any Service Related Questions, please call:<br />
1-888-880-8368<br />
Have your product proof of purchase with date ready for warranty issues.<br />
Or write to:<br />
<strong>Zephyr</strong> Corporation<br />
Service and Warranty Department<br />
395 Mendell Street<br />
San Francisco, CA 94124