Mondopad(INF5520) Hardware Guide - InFocus
Mondopad(INF5520) Hardware Guide - InFocus
Mondopad(INF5520) Hardware Guide - InFocus

You also want an ePaper? Increase the reach of your titles
YUMPU automatically turns print PDFs into web optimized ePapers that Google loves.
Contents<br />
Declaration of Conformity....................................................................................................................................................................... 3<br />
Safety Considerations............................................................................................................................................................................. 6<br />
Information about this <strong>Hardware</strong> <strong>Guide</strong>................................................................................................................................................. 8<br />
What’s Included...................................................................................................................................................................................... 9<br />
Setup..................................................................................................................................................................................................... 10<br />
Attaching the Sound Bar ................................................................................................................................................................ 10<br />
Installing the Feet........................................................................................................................................................................... 12<br />
Attaching the HD Video Conferencing Camera............................................................................................................................... 13<br />
Connecting to Other Devices.......................................................................................................................................................... 14<br />
Connecting AC Power..................................................................................................................................................................... 15<br />
Turning the <strong>INF5520</strong> On/Off................................................................................................................................................................. 16<br />
Setting up the Wireless Mouse and Keyboard...................................................................................................................................... 17<br />
Wireless Mouse.............................................................................................................................................................................. 17<br />
Wireless Keyboard.......................................................................................................................................................................... 17<br />
Using the Remote................................................................................................................................................................................. 18<br />
Using the Keypad.................................................................................................................................................................................. 20<br />
OSD (On-Screen Display) Menu System................................................................................................................................................ 21<br />
Picture Menu.................................................................................................................................................................................. 22<br />
Screen Menu.................................................................................................................................................................................. 23<br />
Audio menu.................................................................................................................................................................................... 24<br />
PIP menu........................................................................................................................................................................................ 25<br />
Configuration 1............................................................................................................................................................................... 27<br />
Configuration 2............................................................................................................................................................................... 28<br />
Advanced Option............................................................................................................................................................................ 29<br />
Troubleshooting.................................................................................................................................................................................... 30<br />
Specifications........................................................................................................................................................................................ 33<br />
Limited Warranty.................................................................................................................................................................................. 36
Declaration of Conformity<br />
Manufacturer: <strong>InFocus</strong> Corporation, 13190 SW 68th Parkway, Portland, Oregon 97223-8368 USA<br />
We declare under our sole responsibility that this tablet conforms to the following directives and norms:<br />
• EMC Directive 2004/108/EC:<br />
o EN 55022<br />
o EN 55024<br />
o EN 61000-3-2<br />
o EN 61000-3-3<br />
• Low Voltage Directive 2006/95/EC<br />
• Safety: IEC 60950-1:2005<br />
• R&TTE Directive: 1999/5/EC<br />
Trademarks<br />
Apple, Mac and Facetime are trademarks or registered trademarks of Apple, Inc. Microsoft, Windows, PowerPoint, Excel and Word<br />
are trademarks or registered trademarks of Microsoft Corporation. Adobe and Acrobat are trademarks or registered trademarks of<br />
Adobe Systems Incorporated. HDMI logo and “High Definition Multimedia Interface” are registered trademarks of HDMI Licensing<br />
LLC. Vidtel is a trademark of Vidtel, Inc. <strong>InFocus</strong>, In Focus, INFOCUS (stylized) and <strong>Mondopad</strong> are either registered trademarks or<br />
trademarks of <strong>InFocus</strong> Corporation in the United States and other countries. All other trademarks are the property of their respective<br />
owners. Any other trademarks, service marks, personal names or product names are assumed to be the property of their respective<br />
owners and are used only for reference. There is no implied sponsorship, affiliation, certification, approval or endorsement if we use<br />
one of these terms.<br />
FCC Warning<br />
This equipment has been tested and found to comply with the limits for a Class A digital device, pursuant to part 15 of<br />
the FCC Rules. These limits are designed to provide reasonable protection against harmful interference when the<br />
equipment is operated in a commercial environment. This equipment generates, uses and can radiate radio frequency<br />
energy and, if not installed and used in accordance with the instruction manual, may cause harmful interference to radio communications.<br />
Operation of the equipment in a residential area is likely to cause harmful interference in which case the user will be required to correct<br />
the interference at his own expense. Changes or modifications not expressly approved by <strong>InFocus</strong> Corporation may void authority<br />
to operate the equipment.<br />
This device complies with part 15 of the FCC Rules. Operation is subject to the following two conditions: (1) This device may not<br />
cause harmful interference and (2) this device must accept any interference received, including interference that may cause undesired<br />
operation.<br />
EN 55022 Warning<br />
This is a Class A product. In a domestic environment it may cause radio interference, in which case the user may be required to take<br />
adequate measures. The typical use is in a conference room, meeting room or auditorium.<br />
<strong>INF5520</strong> <strong>Hardware</strong> <strong>Guide</strong><br />
Page 3
Canada<br />
This Class A digital apparatus complies with Canadian ICES-003. Cet appareil numérique de la classe A est conforme à la norme NMB-<br />
003 du Canada.<br />
INFORMATION FOR RADIO FREQUENCY DEVICES ONLY:<br />
This device complies with part 15 of the FCC Rules / RSS-210. Operation is subject to the following two conditions: (1) This device<br />
may not cause harmful interference and (2) this device must accept any interference received, including interference that may cause<br />
undesired operation.<br />
INFORMATION POUR LES DISPOSITIFS DE FRÉQUENCE RADIO SEULEMENT :<br />
Cet appareil est conforme à l’article 15 des réglementations de la FCC / CNR-210. Le fonctionnement est subordonné aux deux conditions<br />
suivantes : (1) ce appareil ne doit pas provoquer d’interférences nuisibles, et (2) ce appareil doit accepter toute interférence<br />
reçue, y compris des interférences qui peuvent provoquer un fonctionnemnent non désiré.<br />
INFORMATION FOR OPTICAL POINTING DEVICES ONLY:<br />
This product has been tested to comply with International Standard IEC 60825-1: (1993), incld. Amd. 2(2001). This product uses LEDs<br />
that are inherently Class 1.<br />
INFORMATION POUR LES DISPOSITIFS DE POINTAGE OPTIQUE SEULEMENT :<br />
Ce produit a été testé pour se conformer à la norme IEC 60825-1 : (1993), y comp. Amd. 2 (2001). Ce produit utilize des DEL qui sont,<br />
par nature, de classe 1.<br />
Dongle Label:<br />
RG-0918<br />
IC : 8150A-RG0918<br />
CMIIT ID:2009DJ2362<br />
CFT: RCPINRG11-0903<br />
FCC ID: E8HRG-0918<br />
Waste Electrical and Electronie Equipment-WEEE<br />
NOTE: This product is covered electrical and electronic equipment under the European Union’s Waste from Electrical and<br />
Electronic Equipment (“WEEE”) Directive (2002/96/EC). The WEEE Directive requires that covered equipment be collected<br />
and managed separately from typical household waste in all EU member states. Please follow the guidance of your local<br />
environmental authority or ask the shop where you purchased the product for collection or recycling options.<br />
Page 4
Energy Star<br />
As an ENERGY STAR Partner, <strong>InFocus</strong> Corporation has determined that this product meets the ENERGY STAR guidelines<br />
for energy efficiency.<br />
ENERGY STAR® is a joint program of the U.S. Environmental Protection Agency and the U.S. Department of Energy<br />
aimed at saving money and protecting the environment through energy efficient products and practices.<br />
We are proud to offer our customers products with an ENERGY STAR compliant design. This product has been designed and tested to<br />
conform to the ENERGY STAR program requirement for computers at the time of manufacture.<br />
By using ENERGY STAR compliant products and taking advantage of the power management features of your computer, you reduce<br />
the consumption of electricity. Reduced electrical consumption contributes to potential financial saving, a cleaner environment,<br />
and the reduction of greenhouse gas emissions. For more information about ENERGY STAR, go to: http://www.energystar.gov. We<br />
encourage you to make efficient use of energy an integral part of your daily operations. To help in this endeavor, we have preset the<br />
following power-management features to take effect when your computer has been inactive for a specified duration:<br />
ENERGY STAR power-management features<br />
Microsoft Windows 7<br />
• Turns off the display: After 15 minutes<br />
• Puts the computer to sleep: After 30 minutes<br />
To awaken your computer from a display sleep mode, press any key on your keyboard. If the system has entered a deep-sleep mode,<br />
please press the power button to wake up the system. For more information about these settings, refer to your Windows Help and<br />
Support information system.<br />
Agency Approvals<br />
UL, cUL<br />
Other specific Country Approvals may apply. Please see product certification label.<br />
This document applies to regulatory model: <strong>INF5520</strong><br />
Input ratings: AC 100-240V, 7.5A, 50-60Hz<br />
<strong>InFocus</strong> reserves the right to alter product offerings and specifications at any time without notice.<br />
<strong>INF5520</strong> <strong>Hardware</strong> <strong>Guide</strong><br />
Page 5
Safety Considerations<br />
Please read and follow all safety instructions provided below and on the monitor before connecting the monitor to a power<br />
source. Failure to comply with safety instructions may result in fire, electrical shock, or personal injury and may damage or<br />
impair protection provided by the equipment. Please save all safety instructions.<br />
• This tablet is very heavy and should be moved and installed by at least two individuals. Do not attempt to move or install the<br />
tablet yourself, otherwise injury and/or damage may occur.<br />
• When moving the tablet, always hold the tablet firmly using the side and bottom bezels. Do not hold the top bezel.<br />
• When moving the <strong>INF5520</strong> carton, do not tilt or invert the carton. Always keep it in an upright orientation.<br />
• Disconnect all accessories and cables before moving the tablet.<br />
• If the tablet is installed against the wall, maintain a distance of at least 1.98” (5cm) between the tablet and the wall to provide<br />
adequate ventilation.<br />
• Refer to this guide for proper startup and shutdown procedures.<br />
• Follow all warnings and cautions in this manual and on the tablet.<br />
• Locate the tablet at least 4’ (1.2m) away from heating and cooling vents.<br />
• Do not block ventilation openings. Locate the tablet in a well-ventilated area without obstructions to intake or exhaust vents.<br />
• Do not install or use the tablet or sound bar near any heat sources such as radiators, heat registers, stoves, or other devices (including<br />
amplifiers) that produce heat.<br />
• Do not place the tablet in direct sunlight, humid, greasy or dusty places or in places where the tablet may come into contact with<br />
rain, smoke or steam.<br />
• The tablet should not be used with the power cord near water, for instance, near a bathtub, washbowl, kitchen sink or swimming<br />
pool, etc.<br />
• Do not use any components of the tablet, including the sound bar, near water. Warning: To reduce the risk of fire or electric<br />
shock, do not expose this equipment or any component of this equipment to rain or moisture.<br />
• Do not drop the tablet.<br />
• Do not spill liquid on the tablet. Spilled liquid may damage the tablet.<br />
• WARNING: This apparatus must be securely attached to the floor/wall per installation instructions. Tipping, shaking, or rocking<br />
the machine may cause injury or death.<br />
• The power outlet used to power this product should be readliy accessible for fast diconnection in case of emergency.<br />
• No naked flame source, such as lighted candles, should be placed on the apparatus.<br />
• Use the power cord provided. Connect the power cord to a receptacle with a protective safety (earth) ground terminal. A surgeprotected<br />
power strip is recommended. Do not overload wall outlets.<br />
• It is recommended that the Class 1 tablet be grounded.<br />
• Do not install the tablet in places subject to mechanical vibration.<br />
• Do not place the tablet on an unstable surface, which could result in serious personal injuries and tablet damage. When mounting<br />
the tablet to a stand, be sure to following the manufacturer’s instructions. Use only the mounting hardware recommended by<br />
the manufacturer.<br />
• When disconnecting the power cord, hold the plug, not the cord.<br />
• Protect the power cord from being walked on or pinched particularly at plugs, convenience receptacles and the point where they<br />
exit from the tablet.<br />
Page 6
• Unplug the tablet if you are not going to use it for an extensive period of time.<br />
• Unplug the tablet if you need to clean it with the included microfiber cleaning cloth. The screen may be wiped with the cleaning<br />
cloth when the power is off. Never use alcohol, solvents or ammonia-based liquids on this product.<br />
• Wash hands after handling the cables supplied with this product.<br />
• The tablet remote control, mouse and keyboard use batteries. Make sure the batteries’ polarity (+/-) is aligned correctly. Dispose<br />
of used batteries in accordance with local disposal laws.<br />
• Only use properly rated wall and stand mounting hardware that meet this product’s specifications and follow the manufacturer<br />
installation instructions. The warranty does not cover any damage caused by use of improperly rated mounting hardware or from<br />
improper installation.<br />
• Refer all service to qualified service personnel. Do not remove the cover or back. Servicing your own tablet can be dangerous to<br />
you and will void the warranty.<br />
• Only use replacement parts specified by <strong>InFocus</strong>. Unauthorized substitutions may result in fire, electrical shock or injury and may<br />
void the warranty.<br />
• When mounting the tablet to a wall, metric 8 (12mm) screws must be used. In addition, the mounting interface should comply<br />
with the UL1678 standard in North America. The mounting means should be strong enough to bear the weight of the monitor<br />
(approximately 114.2 lbs/51.8 kg without the stand).<br />
• Follow these instructions to help ensure image quality over the life of the tablet. Failure to follow these instructions may affect<br />
the warranty.<br />
• Hg – Lamp contains mercury. Manage in accordance with local disposal laws. See www.lamprecycle.org.<br />
• Lithium Battery (in PC Box) Caution: There is a risk of explosion if the battery is replaced by an incorrect<br />
type. The battery should only be replaced with an identical or equivalent type of battery as recommended<br />
by the manufacturer. Dispose of used batteries in accordance with local disposal laws.<br />
<strong>INF5520</strong> <strong>Hardware</strong> <strong>Guide</strong><br />
Page 7
Information about this <strong>Hardware</strong> <strong>Guide</strong><br />
Although your <strong>INF5520</strong> comes pre-installed with the <strong>Mondopad</strong> software, you must first assemble the <strong>INF5520</strong>. This <strong>Hardware</strong> <strong>Guide</strong><br />
will assist you in setting up the <strong>INF5520</strong>.<br />
After your <strong>INF5520</strong> is fully installed, please refer to the <strong>Mondopad</strong> Software <strong>Guide</strong> at www.infocus.com/<strong>INF5520</strong>docs for more information.<br />
Page 8
POWER<br />
HOME<br />
ON/OFF<br />
POSITION<br />
BRIGHTNESS<br />
BACK<br />
MUTE<br />
INPUT<br />
PIP<br />
INPUT<br />
OK<br />
MENU<br />
RESIZE<br />
SWAP<br />
AUDIO<br />
CONTRAST<br />
INFO<br />
VOL UP<br />
VOL DOWN<br />
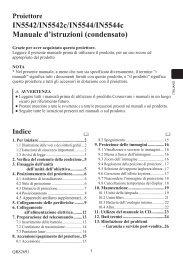
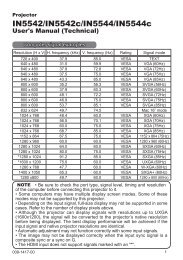
What’s Included<br />
1920 x 1080 <strong>Mondopad</strong><br />
collaboration tablet<br />
i<br />
Quick Setup<br />
<strong>Guide</strong><br />
Remote control<br />
(batteries not included)<br />
Documentation<br />
Cleaning cloth<br />
Security tool<br />
Thumb screws<br />
(set of four)<br />
VGA cable, 4M<br />
USB cable, 3M<br />
(Type A to B)<br />
Power cords<br />
(varies per country)<br />
Camera<br />
Stylus**<br />
Sound bar<br />
These items are<br />
shipped in a separate<br />
box<br />
Mounting brackets<br />
(2 small and 1 large)<br />
Power cord<br />
Thumb screws<br />
(set of four)<br />
These items are<br />
shipped in a separate<br />
box<br />
Feet<br />
(set of two)<br />
Feet spacers<br />
(set of two)<br />
M6 Screws<br />
(set of six)<br />
*Not included for all countries. For setup purposes, a keyboard and mouse are recommended. For additional accessory options, such as stands, carts and wall mounts,<br />
see the <strong>InFocus</strong> website (www.infocus.com/store) or your local dealer.<br />
** The stylus was added as a standard accessory to <strong>INF5520</strong> serial number BJEE14900912 and later.<br />
<strong>INF5520</strong> <strong>Hardware</strong> <strong>Guide</strong><br />
Page 9
Setup<br />
Attaching the Sound Bar<br />
NOTE: If you are not attaching the sound bar, proceed to the next section, “Installing the Feet” on page 12.<br />
1) Carefully place your tablet face-down on a clean, cushioned surface with the top edge hanging off of the cushioned surface by<br />
4-5” (10-13cm). Do NOT place the <strong>INF5520</strong> on its back.<br />
2) Attach the two small rectangular brackets to the sound bar with the provided screws as shown below.<br />
3) Remove four screws from the back of <strong>Mondopad</strong> as shown below.<br />
Page 10
4) Align the rectangular brackets with the screw holes on the tablet and using the screws from Step 3, secure the sound bar<br />
against the bottom edge of the tablet.<br />
5) Connect one end of the AC power cord to the AC In jack on the back of the sound bar.<br />
6) Connect the other end of the AC power cord to the AC Out jack on the Bottom Connector Panel of the tablet.<br />
Power Switch<br />
7) Plug the sound bar’s audio cable into the Audio Out (RCA R/L) jack on the Side Connector Panel located on the back of the<br />
tablet.<br />
8) Turn the power switch ON.<br />
9) Route the power cord and audio cable through the large bracket and align the bracket against the back side of the tablet and<br />
sound bar.<br />
10) Fasten the bracket securely to the tablet and sound bar with the four remaining screws.<br />
<strong>INF5520</strong> <strong>Hardware</strong> <strong>Guide</strong><br />
Page 11
Installing the Feet<br />
1) If you have not already done so, carefully place your tablet face-down on a clean, cushioned surface with the top edge hanging<br />
off of the cushioned surface by 4-5” (10-13cm). Do NOT place the <strong>INF5520</strong> on its back.<br />
2) Remove the tablet feet slot covers with a Philips screwdriver. Discard or save for future use.<br />
3) Slide the feet into the slots provided (the longer side of the feet point toward the front of the tablet), then secure the legs to<br />
the tablet with the provided screws.<br />
Front View<br />
Use the included spacers and<br />
secure the legs here, when<br />
attaching the sound bar.<br />
Secure the legs here when the sound bar is<br />
not being attached.<br />
(The spacers are not used.)<br />
4) Using the handles on the back of the tablet, lift the tablet upright.<br />
For additional accessory options, such as stands, carts and wall mounts, see the <strong>InFocus</strong> website (www.infocus.com/store) or your<br />
local dealer.<br />
WARNINGS:<br />
• This tablet is very heavy and should be moved by at least two individuals.<br />
• Three screw holes have been included in each leg to allow you to adjust the height of the tablet. Regardless of the height, you<br />
must use two of the screw holes in each leg. Failure to do so may result in the screw begin sheared off and the leg collapsing.<br />
• When mounting the tablet to a wall, metric 8 (12mm) screws must be used. In addition, the mounting interface should comply<br />
with the UL1678 standard in North America. The mounting means should be strong enough to bear the weight of the monitor<br />
(approximately 114.2 lbs/51.8 kg without the stand).<br />
Page 12
Attaching the HD Video Conferencing Camera<br />
1) Remove the plastic film from the camera lens.<br />
2) Align the camera bracket with the screw holes on the top edge of the backside of the tablet and then secure the camera to the<br />
tablet with the two provided thumb screws.<br />
3) Plug the USB cable into an available USB slot on the back of the tablet.<br />
4) Manually tilt and pan the camera (+/- 40°) as desired.<br />
<strong>INF5520</strong> <strong>Hardware</strong> <strong>Guide</strong><br />
Page 13
Connecting to Other Devices<br />
A full range of digital and analog video inputs and audio source devices can be connected to the connection panels on the back and<br />
side of <strong>Mondopad</strong>, if desired. Available jacks include: HDMI® (2), VGA, Component (RCA), S-Video, Composite, RS232, Audio in RCA<br />
(1 – R/L), Audio in 3.5mm (1), Audio Out (1 – R/L), RJ45 (2), USB-B (1) and USB-A (6).<br />
Bezel Connector<br />
Panel<br />
Side Connector<br />
Panel<br />
Bottom Connector Panel<br />
Page 14
Bezel Connector Panel<br />
Power button<br />
Keypad<br />
USB-A jacks<br />
USB-B jack<br />
Side Connector Panel<br />
Audio Out (L/R)<br />
RS232<br />
(for Sound Bar)<br />
Audio In (L/R)<br />
Audio In (3.5mm)<br />
RJ45<br />
USB-A<br />
PC Reset<br />
button<br />
Power LED<br />
Antennas<br />
Bottom Connector Panel<br />
Power switch<br />
AC Power In<br />
AC Power Out<br />
HDMI®<br />
VGA<br />
Component<br />
(YPbPr)<br />
S-video<br />
Composite<br />
Connecting AC Power<br />
1) Connect one end of the AC power cord to the AC In jack on the back of the tablet.<br />
2) Connect the other end of the AC power cord to an AC outlet.<br />
3) Press the power switch on the Bottom Connector Panel ON. (The LED on the front of the <strong>Mondopad</strong> tablet displays red.)<br />
NOTES:<br />
• Your tablet should only be operated from the power source indicated on the label.<br />
• Always unplug the AC power cord from the power outlet when you are not using your tablet for an extended period of time.<br />
<strong>INF5520</strong> <strong>Hardware</strong> <strong>Guide</strong><br />
Page 15
Turning the <strong>INF5520</strong> On/Off<br />
1) Verify that the power cord is connected to a power outlet and that the power switch on the Bottom Connector Panel is ON.<br />
2) Press the Power button located on either:<br />
a. the remote<br />
b. the right side of the tablet<br />
c. or the back of the tablet on the PC box.<br />
The front LED turns green.<br />
3) Press the Power button again to put <strong>Mondopad</strong> into Standby. The front LED turns red. You can also put your tablet to sleep using<br />
the keyboard. The front LED turns orange.<br />
NOTES:<br />
If the tablet becomes locked and does not respond to normal power down procedures, the tablet can be powered down by pressing<br />
and holding the PC box Power button (located on the back of the tablet) for 7-8 seconds.<br />
By default, <strong>Mondopad</strong> will time out at 10 minutes and go into system standby after 20 minutes of inactivity. Power settings for the<br />
<strong>Mondopad</strong> can be changed in Windows Control Panel> <strong>Hardware</strong> and Sound > Power Options.<br />
Page 16
Setting up the Wireless Mouse and Keyboard<br />
NOTE: The wireless mouse and keyboard is not included as a standard accessory for some countries. For initial setup and/or configuration,<br />
it may be easier to use a mouse and keyboard. Any standard wired or wireless mouse or keyboard, connected through the<br />
<strong>Mondopad</strong> USB ports, is supported by <strong>Mondopad</strong>.<br />
Wireless Mouse<br />
1) Turn the mouse over and remove the battery cover.<br />
2) Remove the USB dongle from its holder in the battery compartment of<br />
the mouse.<br />
3) Plug it into a free USB-A port on the Bezel Connector Panel of the tablet.<br />
You may be asked to go online to find the necessary drivers. If you<br />
are warned that the drivers have not been tested for compatibility, tap<br />
Continue installation to finish.<br />
4) Insert two (2) AAA batteries (not included) into the mouse by aligning<br />
the + and – end of the batteries as indicated and sliding them in place.<br />
5) Replace the cover and switch the mouse ON using the slide switch<br />
next to the battery bay.<br />
Wireless Keyboard<br />
1) Turn the keyboard over and open the battery cover.<br />
2) Insert two (2) AAA batteries (not included) into the keyboard, by aligning the + and – ends of the batteries and sliding them in<br />
place.<br />
3) Replace the cover.<br />
4) Press the CONNECT button and hold it for one second to allow the keyboard to bind with the dongle.<br />
<strong>INF5520</strong> <strong>Hardware</strong> <strong>Guide</strong><br />
Page 17
POWER<br />
HOME<br />
ON/OFF<br />
POSITION<br />
BRIGHTNESS<br />
BACK<br />
MUTE<br />
INPUT<br />
PIP<br />
INPUT<br />
OK<br />
MENU<br />
RESIZE<br />
SWAP<br />
AUDIO<br />
CONTRAST<br />
INFO<br />
VOL UP<br />
VOL DOWN<br />
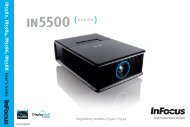
Using the Remote<br />
The remote uses two (2) AAA batteries (not included). Install the batteries by removing the cover from the remote’s back, aligning<br />
the + and – ends of the batteries, sliding them in place and replacing the cover.<br />
To operate, point the remote at the tablet sensor at the bottom right-hand corner of the tablet. The range of optimum operation is<br />
about 26’ (8m) and within a horizontal and vertical angle of 30 degrees.<br />
30˚<br />
30˚<br />
i<br />
CAUTION:<br />
• When disposing of the batteries, be sure to do so in an environmentally proper manner.<br />
• If the remote control gets wet, wipe it dry immediately.<br />
• Avoid excessive heat and humidity.<br />
• Ensure the batteries’ polarity (+/-) is properly aligned.<br />
• Do not mix new and old batteries or different types of batteries together.<br />
• Replace the batteries as soon as they run out.<br />
• Remove batteries from the remote control when storing or not in use for a prolonged period.<br />
Page 18
The remote has the following buttons:<br />
POWER<br />
POWER<br />
Power: Switches the power on or puts the tablet into Standby.<br />
HOME<br />
INPUT<br />
MENU<br />
HOME<br />
Home: Changes the active source back to the embedded PC (<strong>Mondopad</strong>).<br />
ON/OFF<br />
PIP<br />
INPUT<br />
RESIZE<br />
SWAP<br />
INPUT<br />
Input: Toggles the Source menu on and off, which allows the user<br />
to change sources. Options include: HDMI1, HDMI2, PC (<strong>Mondopad</strong>),<br />
VGA, Component, S-video and Video (composite).<br />
POSITION<br />
AUDIO<br />
MENU<br />
Menu: Turns the OSD menu on and off.<br />
RESIZE<br />
Resize: Switches aspect ratios.<br />
BRIGHTNESS<br />
BACK<br />
OK<br />
CONTRAST<br />
INFO<br />
i<br />
PIP<br />
ON/OFF<br />
PiP On/Off: Turns the PiP function on and off and changes the PiP<br />
configuration between two active PiP sources. Options include<br />
corner and side-by-side configurations (50%-resized, 25%-resized<br />
and 50%-fullscreen), depending on source types.<br />
MUTE<br />
VOL UP<br />
VOL DOWN<br />
PIP<br />
INPUT<br />
PIP<br />
SWAP<br />
PiP Input: Switches the PiP window source. Options include<br />
HDMI1, HDMI2, PC, VGA, Component, S-video and Video. Note:<br />
The PiP window is not visible when a secondary source has not<br />
been selected.<br />
PiP Swap: Switches the position of the main and secondary<br />
sources.<br />
PIP<br />
POSITION<br />
PiP Position: Moves the PiP window position from corner to corner<br />
(upper left, upper right, lower left, lower right).<br />
PIP<br />
AUDIO<br />
PiP Audio: Turns the PiP audio mix on and off.<br />
BRIGHTNESS<br />
Brightness: Opens the Brightness OSD menu. Use the right and left<br />
arrow buttons to adjust.<br />
CONTRAST<br />
Contrast: Opens the Contrast OSD menu. Use the right and left<br />
arrow buttons to adjust.<br />
BACK<br />
Back: Returns the user to the previous menu.<br />
OK<br />
Left, Right, Up, Down Arrows and OK: Use these buttons to navigate<br />
through and make changes to the <strong>Mondopad</strong> and Onscreen<br />
Menu features.<br />
<strong>INF5520</strong> <strong>Hardware</strong> <strong>Guide</strong><br />
Page 19
INFO<br />
i<br />
VOL UP<br />
Info: n/a<br />
Vol up: Increases the audio volume.<br />
OK<br />
Vol down: Decreases the audio volume.<br />
MUTE<br />
Mute: Switches the audio on or off.<br />
Using the Keypad<br />
The keypad, located on the right-edge of the tablet, has the following buttons:<br />
Menu button: Turns the OSD menu on and off.<br />
Left/Volume Decrease button: Decreases the audio volume when the OSD menu is off. Decreases<br />
the value of selected OSD items when the OSD menu is on.<br />
Right/Volume Increase button: Increases the audio volume when the OSD menu is off. Increases<br />
the value of selected OSD items when the OSD menu is on.<br />
Up button: Moves the highlight bar up when the OSD or Source menu is on.<br />
Down button: Moves the highlight bar down when the OSD or Source menu is on.<br />
Mute button: Switches the audio on or off.<br />
OK/SOURCE button: Turns the Source menu on allowing the user to change sources. Saves changes/selections<br />
if the OSD menu is on.<br />
Power button: Switches the power on or puts the tablet into Standby.<br />
Page 20
OSD (On-Screen Display) Menu System<br />
The OSD provides the user the ability to control the <strong>Mondopad</strong> display. This is different than the <strong>Mondopad</strong> collaboration software<br />
described in the <strong>Mondopad</strong> Software <strong>Guide</strong>.<br />
To access the OSD, press the Menu button on the remote or the keypad located on the right-hand side of the tablet.<br />
Use the up and down arrows on the remote or keypad to scroll through the menu options and press OK to enter the highlighted<br />
menu. Use the up and down arrows and OK button to select the item you would like to adjust. Left and right arrow buttons are used<br />
to make adjustments.<br />
When your adjustments are complete, press the Back button to go to a different menu or press the Menu button to exit the OSD<br />
menu entirely.<br />
The following pages describe each of the OSD menus in detail.<br />
PICTURE<br />
SCREEN<br />
AUDIO<br />
BRIGHTNESS<br />
CONTRAST<br />
SHARPNESS<br />
BLACK LEVEL<br />
NOISE REDUCTION<br />
TINT<br />
COLOR<br />
COLOR TEMPERATURE<br />
COLOR CONTROL<br />
ADAPTIVE CONTRAST<br />
PICTURE MODE<br />
PICTURE RESET<br />
OFF<br />
10000K<br />
OFF<br />
STANDARD<br />
70<br />
50<br />
50<br />
50<br />
50<br />
50<br />
H POSITION<br />
V POSITION<br />
CLOCK<br />
CLOCK PHASE<br />
ASPECT RATIO<br />
CUSTOM ZOOM<br />
SCREEN RESET<br />
50<br />
50<br />
BALANCE<br />
TREBLE<br />
BASS<br />
SPEAKER<br />
AUDIO SOURCE<br />
AUDIO RESET<br />
INTERNAL<br />
PC<br />
50<br />
50<br />
50<br />
<<br />
<<br />
Sel < > Adjust Enter Back Quit<br />
<<br />
<<br />
Sel < > Adjust Enter Back Quit<br />
<<br />
<<br />
Sel < > Adjust Enter Back Quit<br />
PIP<br />
CONFIGURATION 1<br />
CONFIGURATION 2<br />
PIP SIZE<br />
PIP AUDIO<br />
PIP RESET<br />
SMALL<br />
MAIN<br />
AUTO ADJUST<br />
POWER SAVE<br />
LANGUAGE<br />
SCREEN SAVING<br />
COLOR SYSTEM<br />
OPERATION MODE<br />
BLANK ENABLE<br />
BLANK SCREEN TYPE<br />
CONFIGURATION RESET<br />
FACTORY RESET<br />
ENGLISH<br />
AIO<br />
ON<br />
BLACK<br />
OSD TURN OFF<br />
INFORMATION OSD<br />
SLEEP TIMER<br />
OSD H POSITION<br />
OSD V POSITION<br />
MONITOR INFORMATION<br />
10<br />
OFF<br />
50<br />
50<br />
45<br />
<<br />
<<br />
Sel < > Adjust Enter Back Quit<br />
<<br />
<<br />
Sel < > Adjust Enter Back Quit<br />
<<br />
<<br />
Sel < > Adjust Enter Back Quit<br />
ADVANCED OPTION<br />
INPUT RESOLUTION<br />
BLACK LEVEL EXPANSION<br />
GAMMA SELECTION<br />
SCAN MODE<br />
SCAN CONVERSION<br />
FILM MODE<br />
IR CONTROL<br />
KEYBOARD CONTROL<br />
TILING<br />
HEAT STATUS<br />
DATE AND TIME<br />
SCHEDULE<br />
MONITOR ID<br />
DDC/CI<br />
ADVANCED OPTION RESET<br />
MIDDLE<br />
2.2<br />
UNDER SCAN<br />
PROGRESSIVE<br />
AUTO<br />
ON<br />
<<br />
<<br />
Sel < > Adjust Enter Back Quit<br />
<strong>INF5520</strong> <strong>Hardware</strong> <strong>Guide</strong><br />
Page 21
Picture Menu<br />
PICTURE<br />
BRIGHTNESS<br />
CONTRAST<br />
SHARPNESS<br />
BLACK LEVEL<br />
NOISE REDUCTION<br />
TINT<br />
COLOR<br />
COLOR TEMPERATURE<br />
COLOR CONTROL<br />
ADAPTIVE CONTRAST<br />
PICTURE MODE<br />
PICTURE RESET<br />
OFF<br />
10000K<br />
OFF<br />
STANDARD<br />
70<br />
50<br />
50<br />
50<br />
50<br />
50<br />
<<br />
<<br />
Sel < > Adjust Enter Back Quit<br />
Brightness: changes the intensity of the image. Range: 0-100. (Default 70.)<br />
Contrast: controls the degree of difference between the lightest and darkest parts of the picture and changes the amount of black<br />
and white in the image. Range: 0-100. (Default 50.)<br />
Sharpness: changes the clarity of the edges of a video image. Range: 0-100. (Default 50.)<br />
Black Level: changes the level of brightness at the darkest (black) part of the image. Range: 0-100. (Default 50.)<br />
Noise Reduction: reduces temporal and/or spatial noise in the image. Options include: Off (default), Low, Middle and High.<br />
Tint: adjusts the red-green color balance in the image of NTSC video images. The tint setting applies to NTSC video sources only.<br />
Range: 0-100. (Default 50.)<br />
Color: adjusts the image from black and white to fully saturated color. Range: 0-100. (Default 50.)<br />
Color Temperature: changes the intensity of the colors. Options include: Native, User, 5000K, 6500K, 7500K, 9300K and 10000K<br />
(default).<br />
Color Control: allows the user to finely adjust individual red, green and blue colors. Color Temperature must be set to User to access<br />
this feature. Range: 0-255 for each color.<br />
Adaptive Contrast: When set to On, this feature helps enhance image contrast when displaying dark scenes. Options: Off (default)<br />
and On.<br />
Picture Mode: provides different preset picture modes to choose from. Options include: Standard (default), HighBright, Soft and<br />
sRGB (for VGA only).<br />
Picture Reset: resets all Picture menu items to factory default settings. Options: Yes and No.<br />
Page 22
Screen Menu<br />
SCREEN<br />
H POSITION<br />
V POSITION<br />
CLOCK<br />
CLOCK PHASE<br />
ASPECT RATIO<br />
CUSTOM ZOOM<br />
SCREEN RESET<br />
50<br />
50<br />
<<br />
<<br />
Sel < > Adjust Enter Back Quit<br />
H Position: adjusts the horizontal position of the image. Range: 0-100. (Default 50.)<br />
V Position: adjusts the vertical position of the image. Range: 0-100. (Default 50.)<br />
Clock: adjusts the width of the image (For VGA input only). Range: 0-100.<br />
Clock Phase: adjusts the focus, clarity and stability of the image (For VGA input only). Range: 0-100.<br />
Aspect Ratio: adjusts the ratio of the image width to image height. Options: Auto, Native, 4:3, and Custom.<br />
Custom Zoom: allows the user to adjust zoom, horizontal zoom, vertical zoom, horizontal position and vertical position of the image.<br />
Aspect Ratio must be set to Custom to access this feature. Range: 0-100 for each item.<br />
Screen Reset: resets all Screen menu items to factory default settings. Options: Yes and No.<br />
<strong>INF5520</strong> <strong>Hardware</strong> <strong>Guide</strong><br />
Page 23
Audio menu<br />
AUDIO<br />
BALANCE<br />
TREBLE<br />
BASS<br />
SPEAKER<br />
AUDIO SOURCE<br />
AUDIO RESET<br />
INTERNAL<br />
PC<br />
50<br />
50<br />
50<br />
<<br />
<<br />
Sel < > Adjust Enter Back Quit<br />
Balance: adjusts the balance between the left and right audio outputs. Range: 0-100. (Default 50.)<br />
Treble: adjusts higher pitched (treble) audio sounds. Range: 0-100. (Default 50.)<br />
Bass: adjusts lower-pitched (bass) audio sounds. Range: 0-100. (Default 50.)<br />
Speaker: controls whether both the internal and external speakers (sound bar, etc.) or just external speakers are used. Options include:<br />
Internal (both internal and external speakers operate) and External (only external speakers operate). Default Internal.<br />
Audio Source: selects the audio input source. Options include: PC (default), Audio1, Audio2 and HDMI®.<br />
Audio Reset: resets all Audio menu items to factory default settings. Options: Yes and No.<br />
Page 24
PIP menu<br />
PIP<br />
PIP SIZE<br />
PIP AUDIO<br />
PIP RESET<br />
SMALL<br />
MAIN<br />
<<br />
<<br />
Sel < > Adjust Enter Back Quit<br />
PIP Size: changes the size of the PiP window used in the Corner-to-Corner configuration. Options include: Small (default), Middle and<br />
Large.<br />
PIP Audio: switches the audio source from the main source to the PiP source. Options include: Main (default) and Sub.<br />
PIP Reset: resets all PIP menu items to factory default settings. Options: Yes and No.<br />
The PiP feature allows the user to display two distinct sources simultaneously on the <strong>InFocus</strong> <strong>Mondopad</strong>. These are the supported<br />
combinations and configurations:<br />
Input HDMI1 HDMI2 PC/<strong>Mondopad</strong> VGA Component S-video Composite<br />
HDMI1 <br />
HDMI2 <br />
PC/<strong>Mondopad</strong> <br />
VGA <br />
Component <br />
S-video <br />
Composite <br />
<strong>INF5520</strong> <strong>Hardware</strong> <strong>Guide</strong><br />
Page 25
When the Main picture is PC/<strong>Mondopad</strong>, the following configurations are available:<br />
PiP<br />
PiP<br />
Main<br />
PiP<br />
PiP<br />
Corner-to-Corner<br />
When the Main picture is not PC/<strong>Mondopad</strong>, the following configurations are available:<br />
PiP<br />
PiP<br />
Main Main PiP<br />
Main Main<br />
PiP<br />
PiP<br />
PiP<br />
PiP<br />
Corner-to-Corner<br />
Side-by-Side<br />
Stretched<br />
Picture-on-Picture<br />
Side-by-Side<br />
Native<br />
To change the PiP source: Press remote PiP Input button.<br />
To swap the main and PiP sources: Press the remote’s PiP Swap button.<br />
To change the PiP position for Corner-to-Corner configurations: Press the PiP Position button to move from corner to corner or use<br />
the arrow keys on the remote or keypad to finely adjust the PiP position.<br />
To switch PiP configurations when the Main window is not the PC/<strong>Mondopad</strong>: Press the PiP On/Off button to toggle between the<br />
available configuration options.<br />
To change the audio source between the Main and PiP windows: Go to the PiP Audio option in the PiP menu and choose Main or<br />
Sub.<br />
To change the PiP window size: Press the Menu button on the remote or keypad and go to the PiP Size option in the PiP menu.<br />
To reset the PiP feature to factory default settings: Press the Menu button on the remote or keypad and go to the PiP Reset option<br />
in the PiP menu.<br />
Page 26
Configuration 1<br />
CONFIGURATION 1<br />
AUTO ADJUST<br />
POWER SAVE<br />
LANGUAGE<br />
SCREEN SAVING<br />
COLOR SYSTEM<br />
OPERATION MODE<br />
BLANK ENABLE<br />
BLANK SCREEN TYPE<br />
CONFIGURATION RESET<br />
FACTORY RESET<br />
ENGLISH<br />
AIO<br />
ON<br />
BLACK<br />
<<br />
<<br />
Sel < > Adjust Enter Back Quit<br />
Auto Adjust: automatically adjusts the display of an external VGA source image. Press OK on the remote to activate.<br />
Power Save: allows the user to select whether the <strong>Mondopad</strong> goes into a standby state after no computer or video source has<br />
been detected during three consecutive search cycles. Options include: RGB On/Off and Video On/Off. (Default: RGB On & Video On.)<br />
Language: switches the OSD menu language. Options include: English (default), Italian, German, French, Spanish, Polish, Turkish,<br />
Swedish and Simplified Chinese.<br />
Screen Saving: reduces the risk of image persistence. Opening this submenu allows the user to select cooling fan, brightness and<br />
screen shift behavior.<br />
Cooling Fan: When set to Auto, the fan automatically adjusts based on the internal temperature of the tablet. When set to On,<br />
the fan remains on regardless of internal temperature. Options include: Auto (default) and On.<br />
Brightness: When enabled, reduces brightness and disables brightness adjustment in the Picture menu. Options include: On<br />
and Off (default).<br />
ScreenShift: selects the time interval for the image size to expand slightly and shift the position of pixels in four directions (up,<br />
down, left and right). Options: Off (default) and a range of 10-900 in increments of 10.<br />
Color System: (Applies to composite and S-video signals only.) When Auto is on, the tablet attempts to pick the video standard<br />
automatically based on the input signal. If <strong>Mondopad</strong> is unable to detect the standard correctly, the colors might appear incorrect<br />
or “torn.” If this happens, the user can select the proper video standard. Options include: Auto, NTSC, PAL, SECAM, NTSC<br />
4.43 and PAL-60.<br />
Operation Mode: When Monitor is enabled, <strong>Mondopad</strong> acts like a simple monitor and only displays external source devices. (The<br />
<strong>Mondopad</strong> collaboration software is unavailable.) When AIO (All-in-One) is enabled, both the <strong>Mondopad</strong> collaboration software and<br />
external source devices are displayed. Options: Monitor and AIO (default).<br />
Blank Enable: allows the user to display a blank image when the tablet is in Monitor mode (see Operation Mode above) and no<br />
source is detected. Options include: On and Off (default).<br />
Blank Screen Type: defines the image displayed when the tablet is in Monitor mode (see Operation Mode above) and no source is<br />
detected. Options include: Black (default), Blue, White and (<strong>InFocus</strong>) Logo.<br />
Configuration Reset: resets all Configuration 1 and Configuration 2 menu items to factory default settings. Options: Yes and No.<br />
Factory Reset: resets all menu items to factory default settings. Options: Yes and No.<br />
<strong>INF5520</strong> <strong>Hardware</strong> <strong>Guide</strong><br />
Page 27
Configuration 2<br />
CONFIGURATION 2<br />
OSD TURN OFF<br />
INFORMATION OSD<br />
SLEEP TIMER<br />
OSD H POSITION<br />
OSD V POSITION<br />
MONITOR INFORMATION<br />
10<br />
OFF<br />
50<br />
50<br />
45<br />
<<br />
<<br />
Sel < > Adjust Enter Back Quit<br />
OSD Turn Off: controls how many seconds the OSD menu remains on the screen Range: 5-120 (seconds). (Default: 45)<br />
Information OSD: controls how many seconds the Information OSD remains on the screen. Options include: Off and a range of 1-10<br />
(seconds) in increments of 1. (Default: 10)<br />
Sleep Timer: adjusts the time when the <strong>Mondopad</strong> automatically shuts off. Options include: Off (default) and range of 1-24 (hours)<br />
in increments of 1.<br />
OSD H Position: adjusts the horizontal position of the OSD menu. Range: 0-100. (Default: 50)<br />
OSD V Position: adjusts the vertical position of the OSD menu. Range: 0-100. (Default: 50)<br />
Monitor Information: This read-only submenu displays the model name, serial number, firmware version and amount of time the<br />
product has been powered on (hours/minutes).<br />
Page 28
Advanced Option<br />
ADVANCED OPTION<br />
INPUT RESOLUTION<br />
BLACK LEVEL EXPANSION<br />
GAMMA SELECTION<br />
SCAN MODE<br />
SCAN CONVERSION<br />
FILM MODE<br />
IR CONTROL<br />
KEYBOARD CONTROL<br />
TILING<br />
HEAT STATUS<br />
DATE AND TIME<br />
SCHEDULE<br />
MONITOR ID<br />
DDC/CI<br />
ADVANCED OPTION RESET<br />
MIDDLE<br />
2.2<br />
UNDER SCAN<br />
PROGRESSIVE<br />
AUTO<br />
ON<br />
<<br />
<<br />
Sel < > Adjust Enter Back Quit<br />
Input Resolution: sets the resolution of the VGA input. This is only required when the tablet is unable to detect the VGA input resolution<br />
correctly. Options include: 1024 x 768, 1280 x 768, 1360 x 768, 1366 x 768, 640 x 480, 720 x 480, 852 x 480, 800 x 600, 1064 x<br />
600, 720 x 576, 1400 x1050, 1680 x 1050, 720 x 400, 640 x 400, 1440 x 900, 1600 x 900 and Auto.<br />
Black Level Expansion: reveals additional details in black/dark areas of video inputs. Options include: Low, Middle, High and Off<br />
(default).<br />
Gamma Selection: adjusts the gamma value of the image and optimizes image brightness and contrast. Options include: Native, 2.2<br />
(default), 2.4 and S Gamma.<br />
Scan Mode: removes noise around the edges of a video image. Options include: Under scan (default for VGA sources) and Over scan<br />
(default for video sources).<br />
Scan Conversion: adjusts the conversion of source images. Options include: Interlace and Progressive (recommended).<br />
Film Mode: controls film mode detection and determines whether the original source of the input video was film or video. Options<br />
include: Auto (default) and Off.<br />
IR Control: disables and enables the IR sensor on the tablet. Options include: Normal (default; IR is enabled) and Lock (IR is disabled).<br />
Keyboard Control: disables and enables the keypad on the right-hand side of the tablet. Options include: Lock (keypad is disabled)<br />
and Unlock (default; keypad is enabled).<br />
Tiling: This feature only supported in Monitor Mode.<br />
Heat Status: displays the current internal temperature of the <strong>Mondopad</strong> (+/-5°) and the cooling fan settings. To change the fan settings,<br />
go to the Configuration 1 menu and choose the Screen Saving option.<br />
Date and Time: lists the current date and time information of the <strong>Mondopad</strong> internal clock and allows the user to make date and<br />
time adjustments. Options include: Year, Month, Day, Hour, Minute, Daylight Saving Time.<br />
Schedule: (Supported in Monitor Mode only) enables the user to create up to seven distinct on/off schedules for <strong>Mondopad</strong>. For<br />
each schedule, the user optionally selects the time <strong>Mondopad</strong> should turn on and off, which input source is automatically activated<br />
(if desired) and what day(s) this occurs.<br />
Monitor ID: set the identification number of the <strong>Mondopad</strong> tablet via the RS232C connection. Each tablet must have a unique identification<br />
number when multiple tablets are connected. Range: 1-26. (Default; 1)<br />
DDC/CI: enables and disables DDC/CI communication. Options include: On (default) and Off.<br />
Advanced Option Reset: resets all Advanced Option menu items to factory default settings. Options: Yes and No.<br />
<strong>INF5520</strong> <strong>Hardware</strong> <strong>Guide</strong><br />
Page 29
Troubleshooting<br />
Symptom<br />
Possible Solutions<br />
No power • Verify the power cord is properly connected to the power outlet and to<br />
the <strong>Mondopad</strong>.<br />
• Verify the <strong>Mondopad</strong> power switch is ON and that the Power button<br />
on the remote or keypad has been turned on (the front LED should be<br />
green).<br />
• Plug another electrical device to the power outlet to verify that the<br />
outlet is supplying the proper voltage.<br />
<strong>Mondopad</strong> shuts down suddenly • Check the Sleep Timer setting in the Configuration 2 OSD menu. Disable<br />
the Sleep Timer, if desired.<br />
<strong>Mondopad</strong> is turning on and/or off<br />
automatically at the same time of<br />
day<br />
• Verify that a source is active.<br />
• <strong>Mondopad</strong> may have overheated. Remove any objects blocking the<br />
vents.<br />
• Review the Windows power settings of the <strong>Mondopad</strong> tablet.<br />
• Check both the Date & Time settings and the Schedule settings in the<br />
Advanced Option OSD menu to verify accuracy. Disable scheduling, if<br />
desired.<br />
No image • If attempting to display an external source, see “No image from external<br />
source” below.<br />
• Verify that <strong>Mondopad</strong> is turned on (the front LED should be solid green).<br />
• Verify that the <strong>Mondopad</strong> PC is turned on (the PC LED on the back of<br />
<strong>Mondopad</strong> should be solid green).<br />
• Check the Operation mode in the OSD menu. To see the <strong>Mondopad</strong> Collaboration<br />
software, the Configuration 1> Operation Mode must be set<br />
to AIO. Note: <strong>Mondopad</strong> must be powered off and back on for changes<br />
to take effect.<br />
No image from external source • Verify that connections between the source and the tablet have been<br />
made correctly.<br />
<strong>Mondopad</strong> is not acting like a simple<br />
monitor<br />
• Verify that the cables are in good condition.<br />
• Verify the correct input source is selected and that the input signal is<br />
compatible with the tablet.<br />
• If the external source is not detected, the Video source menu defaults<br />
back to PC/<strong>Mondopad</strong>.<br />
• Change the Operation mode to Monitor in the Configuration 1 menu.<br />
<strong>Mondopad</strong> must be powered off and back on for changes to take effect.<br />
Page 30
No sound • If using the <strong>Mondopad</strong> sound bar, verify that the sound bar is connected<br />
properly and that the sound bar power switch is turned on.<br />
• If the sound bar or an external sound system is not being used, verify<br />
that the Speaker setting in the OSD Audio menu is set to Internal.<br />
• If using an external source, such as S-video, verify that an audio cable is<br />
correctly installed between the device and the tablet.<br />
• Using the remote, verify the volume is turned up enough and not<br />
muted.<br />
• If using the <strong>Mondopad</strong> collaboration software, verify that the volume<br />
is not muted in the application. (Look at the speaker icon in the upper<br />
right-hand corner of the <strong>Mondopad</strong> collaboration software.)<br />
• If playing a video, verify the playback has not been paused and that the<br />
video’s audio has not been muted.<br />
• An HDMI ® 1.3 (or higher) source and source device is required to hear<br />
audio via the HDMI cable.<br />
Audio noise • Noise can occur when infrared communication equipment (for example,<br />
infrared cordless headphones) is used near the tablet. Move the infrared<br />
communication equipment away from the tablet to eliminate the noise.<br />
No touchpad activity with external<br />
computer<br />
Touchpad functions are not functioning<br />
consistently<br />
• Verify that the USB B to USB type A cable is plugged from the laptop into<br />
<strong>Mondopad</strong> correctly.<br />
• Verify that the laptop’s operating system is Windows ® 7. (The <strong>Mondopad</strong><br />
touchpad does not support any other operating systems.)<br />
• Remove all objects placed on the lip of the <strong>Mondopad</strong> display and/or<br />
within 2” of the touchpad screen.<br />
• Disable PiP feature. The <strong>Mondopad</strong> touchpad works best when the<br />
<strong>Mondopad</strong> collaboration software is the main image displayed.<br />
• Power <strong>Mondopad</strong> off and back on after a few seconds. Re-booting<br />
<strong>Mondopad</strong> helps the touchpad to re-synchronize.<br />
Remote is not working • Make sure the batteries are installed in the proper orientation and are<br />
not dead.<br />
• Verify the remote is turned on (the button is on the bottom of the<br />
remote).<br />
• Verify you are pointing the remote at the table and are within 26’ (8m)<br />
and 30 degrees (horz/vert) of the sensor.<br />
• Verify that the IR Control setting in the Advanced Option OSD menu is<br />
set to Normal.<br />
Keypad and/or mouse is not working • Make sure the batteries are installed in the proper orientation and are<br />
not dead.<br />
• Press the Connect button on the bottom of the keypad.<br />
• Verify the USB adapter is installed into the <strong>Mondopad</strong>’s USB port.<br />
• Verify that the Keyboard Control setting in the Advanced Option OSD<br />
menu is set to Unlock.<br />
Video camera is not in focus • Verify that the plastic protecting the camera lens has been removed.<br />
<strong>INF5520</strong> <strong>Hardware</strong> <strong>Guide</strong><br />
Page 31
LED Indicators<br />
Front LED<br />
PC LED<br />
Solution<br />
(near IR sensor)<br />
(back of the tablet)<br />
Off Off • The tablet is completely shut-down. Verify the power<br />
cord is properly connected to the power outlet and to the<br />
<strong>Mondopad</strong>. Verify that the power switch on the back<br />
of the unit is turned on. Plug another electrical device to<br />
the power outlet to verify that the outlet is supplying the<br />
proper voltage.<br />
Red Off • The tablet is hibernating. Press the Power button on the<br />
remote or keypad.<br />
Orange Blinking Green • The tablet is in standby mode. Press the Power button on<br />
the remote or keypad.<br />
Green Green • The tablet is powered on.<br />
For Additional Troubleshooting Support, please contact:<br />
<strong>InFocus</strong> Corporation<br />
Technical Support<br />
6am-5pm PST<br />
877-388-8385<br />
www.infocus.com/support<br />
Page 32
Specifications<br />
To read the latest specifications on the <strong>Mondopad</strong> collaboration tablet, be sure to visit our support website at www.infocus.com/<br />
support, as specifications are subject to change.<br />
Size (viewable)<br />
Resolution 1920 x 1080<br />
Refresh rate<br />
54.6” (138.7 cm diagonal)<br />
60 Hz<br />
Viewing angle ±89˚<br />
Display colors<br />
Brightness<br />
Pixel pitch<br />
Picture-in-Picture<br />
1.07G (10-bit)<br />
450 cd/m2 typical<br />
0.63mm<br />
SBS/4 quadrant PIP<br />
Video input compatibility Full NTSC, 480i, 480p, 720p, 1080i, 1080p/24, 1080p/30, 1080p/60<br />
Data input compatibility<br />
Inputs<br />
Outputs<br />
VGA (640x480), SVGA (800x600), XGA (1024x768), SXGA (1280x1024), SXGA+<br />
(1400x1050), UXGA (1600x1200), WXGA+ (1440x900), WSXGA+ (1680x1050),<br />
WXGA (1280x800), WUXGA (1920x1200)<br />
USB 2.0 Type-A x 6, HDMI® 1.3 x 2, VGA (HD15), Component, S-Video, Composite,<br />
RS232 (DB9), RCA stereo (L/R) audio x 1, 3.5 mm stereo mini-jack, USB<br />
B (for touch screen controller board), RJ45 x 2<br />
RCA audio stereo (L/R) output for sound bar<br />
Touch screen • Multi -Touch touch screen system with support for 2 touch and Windows®<br />
7 gesturing<br />
Speakers (integrated) Stereo 7W x 2<br />
• Glass protection overlay for LCD surface<br />
Power AC 100-240V, 50-60Hz, 7.5A<br />
Energy Star<br />
Operating conditions<br />
• USB connection to PC from touch system panel board<br />
5.2 for PC<br />
5° to 35°C at 0 to 10K ft<br />
Noise
Camera<br />
Resolution<br />
Frame rate<br />
Lens and Field of View<br />
Audio support<br />
Interface<br />
Focus<br />
Tilt<br />
Power<br />
1280 x 720 pixels<br />
720p/30 fps HD MJPEG<br />
F/2.0, 3P Lens, FOV(D) 56.8° in HD mode, FOV(D) 50° in VGA mode 1.0x zoom,<br />
FOV(D) 30° in VGA mode 1.6x zoom<br />
4 built-in Unidirectional microphones<br />
USB 2.0 High Speed<br />
Auto focus<br />
Up/down ±40˚, left/right 40˚<br />
Via USB<br />
Sound bar<br />
Power<br />
Speaker Drivers<br />
Left and Right Channels<br />
Enclosure Type<br />
Sound bar Frequency Response<br />
Sound Pressure Level<br />
(max vol@1m, pink noise)<br />
Signal to Noise Ratio (SNR)<br />
Amplifier Type<br />
Power Output: Watts/Channel<br />
(RMS)<br />
Power Output:<br />
Total Watts (RMS)<br />
Power Output:<br />
Total Watts (Peak)<br />
Power Input Voltage<br />
Rated Power Consumption<br />
Standby Power Consumption<br />
60 Hz AC<br />
Two 3” and one ¾” Aluminum Neodymium Tweeter (per side)<br />
Sealed<br />
90Hz to 20kHz<br />
98dB SPL<br />
110dB<br />
High efficiency Class D amplifier<br />
25 watts/channel @ 1% THD, 1KHz, 2-channels drive<br />
50 watts total system<br />
70 watts total system<br />
90-264 VAC, 50/60Hz, 1.5 amps<br />
150 watts<br />
3 watts<br />
Keyboard<br />
Dimension<br />
Weight<br />
Batteries<br />
Operating Voltage<br />
Power Consumption<br />
Battery Life<br />
Operating Distance<br />
321 x 142 x 25.4mm<br />
~350g excluding batteries<br />
Two (2) AAA alkaline<br />
2.0V~3.2VDC<br />
Operation Mode: 10mA; Sleep Mode:
Mouse<br />
Dimension<br />
Weight<br />
Batteries<br />
Operating Voltage<br />
Power Consumption<br />
Battery Life<br />
Operating Distance<br />
59.2 x 103.6 x 34.8mm<br />
~68g excluding batteries<br />
Two (2) AAA alkaline<br />
2.0V~3.2VDC<br />
Limited Warranty<br />
<strong>InFocus</strong> Limited Warranty For <strong>InFocus</strong> Branded <strong>Hardware</strong> Products Only<br />
LIMITED WARRANTY. <strong>InFocus</strong>’s warranty obligations for the hardware products are limited to the terms set forth herein. <strong>InFocus</strong> warrants<br />
the <strong>InFocus</strong>-branded hardware products against defects in materials and workmanship under normal use for a period outlined in<br />
the Limited Warranty Periods section below from the date of retail purchase by the original end-user purchaser (“Warranty Period”).<br />
The Warranty Period starts on the date of purchase. Your dated sales or delivery receipt, showing the date of purchase of the product,<br />
is your proof of the purchase date. You may be required to provide proof of purchase and proof that the product was purchased new as<br />
a condition of receiving warranty service. If a hardware defect arises and a valid claim is received within the Warranty Period, at its option<br />
and to the extent permitted by law, <strong>InFocus</strong> will either (1) repair the hardware defect at no charge, using new parts or refurbished<br />
parts that are equivalent to new in performance and reliability, (2) exchange the product with a product that is new or refurbished<br />
that is equivalent to new in performance and reliability and is at least functionally equivalent to the original product, or (3) refund<br />
the purchase price of the product. <strong>InFocus</strong> may request that you replace defective parts with customer-installable new or refurbished<br />
parts that <strong>InFocus</strong> provides in fulfillment of its warranty obligation (“Customer Self Repair”). A replacement product or part, including<br />
a Customer Self Repair part that has been installed in accordance with instructions provided by <strong>InFocus</strong>, assumes the remaining warranty<br />
of the original product or ninety (90) days from the date of replacement or repair, whichever provides longer coverage. When a<br />
product or part is exchanged, any replacement item becomes your property and the replaced item becomes <strong>InFocus</strong>’s property. Parts<br />
provided by <strong>InFocus</strong> in fulfillment of its warranty obligation must be used in products for which warranty service is claimed. When a<br />
refund is given, the product for which the refund is provided must be returned to <strong>InFocus</strong> and becomes <strong>InFocus</strong>’s property. This is your<br />
exclusive remedy for defective products.<br />
Limited Warranty Periods are as follows:<br />
• LCD Thin Tablet Device (including embedded PC), Camera, Remote, and Sound Bar Product Limited Warranty Period: one (1) year<br />
from date of purchase.<br />
• Accessory Product Limited Warranty Period: ninety (90) days from date of purchase.<br />
The Accessory Product Limited Warranty covers the accessory items only and excludes normal wear and tear.<br />
Remanufactured Products and Software Products are exempt from the foregoing Limited Warranty. Please refer to the appropriate<br />
Remanufactured Product Limited Warranty or Software Product Limited Warranty for applicable Warranty information.<br />
EXCLUSIONS AND LIMITATIONS. This Limited Warranty applies only to the hardware products manufactured by or for <strong>InFocus</strong>, and sold<br />
by <strong>InFocus</strong>, its worldwide subsidiaries, authorized resellers or country distributors, that can be identified by the “<strong>InFocus</strong>” trademark,<br />
trade name, or logo affixed to it, and to required firmware. The Limited Warranty does not apply to any non-<strong>InFocus</strong> hardware products<br />
or peripherals external to the <strong>InFocus</strong>-branded hardware products (including but not limited to external storage subsystems, displays,<br />
printers, speakers or other peripherals), or to any software applications or programs, even if packaged or sold with the <strong>InFocus</strong> hardware.<br />
Manufacturers, suppliers, or publishers of products, software or peripherals, other than <strong>InFocus</strong>, may provide their own warranties<br />
to the end user purchaser, but <strong>InFocus</strong>, in so far as permitted by law, provides their products “AS IS” without the <strong>InFocus</strong> Limited<br />
Warranty. Software distributed by <strong>InFocus</strong> with or without the <strong>InFocus</strong> brand name (including, but not limited to system software) is<br />
not covered under this Limited Warranty. Refer to the licensing agreement accompanying the software for details of your rights with<br />
respect to its use.<br />
<strong>InFocus</strong> does not warrant that the operation of the products will be uninterrupted or error-free. <strong>InFocus</strong> is not responsible for damage<br />
arising from failure to follow instructions relating to the products’ use.<br />
INFOCUS IS NOT RESPONSIBLE FOR DAMAGE TO OR LOSS OF ANY PROGRAMS, DATA, OR REMOVABLE STORAGE MEDIA. INFOCUS IS<br />
NOT RESPONSIBLE FOR THE RESTORATION OR REINSTALLATION OF ANY PROGRAMS OR DATA OTHER THAN SOFTWARE INSTALLED BY<br />
INFOCUS WHEN THE PRODUCT IS MANUFACTURED.<br />
To enable <strong>InFocus</strong> to provide the best possible support and service during the Limited Warranty Period, you will be required to:<br />
Page 36
• Maintain a proper and adequate environment, and use the <strong>InFocus</strong> hardware products in accordance with the instructions furnished.<br />
• Verify configurations, load most recent firmware, install software patches, run <strong>InFocus</strong> diagnostics and utilities, and implement<br />
temporary procedures or workarounds provided by <strong>InFocus</strong> while <strong>InFocus</strong> works on permanent solutions.<br />
• Allow <strong>InFocus</strong> to keep resident on your systems or sites certain system and network diagnosis and maintenance tools to facilitate<br />
the performance of warranty support (collectively referred to as “Proprietary Service Tools”); Proprietary Service Tools are and<br />
remain the sole and exclusive property of <strong>InFocus</strong>.<br />
Additional Limitations:<br />
• Products external to the system processor (CPU) box, such as external storage subsystems, printers and other peripherals, are<br />
covered by the applicable warranty for those products or options.<br />
• An effective repair does not necessarily require the replacement of a defective part. For example, cleaning the heads of a floppy<br />
drive or updating revision levels of ROM BIOS on a PCA board are activities that in many instances deliver an effective repair.<br />
• BIOS/Firmware upgrades are not covered under the Limited Warranty. Firmware that is an integral part of the option hardware<br />
board is not automatically upgraded when new versions of firmware are released.<br />
• It is the responsibility of the customer to ensure that their software is compatible with the latest BIOS/firmware revision.<br />
This Limited Warranty does not apply: (a) to consumable or expendable parts, such as batteries, or protective coatings designed<br />
to diminish over time unless failure has occurred due to a defect in materials or workmanship; (b) to cartons, carrying cases, shipping<br />
cases, external cabinets, accessories used in connection with the product; (c) to cosmetic damage, including but not limited to<br />
scratches, dents, and broken plastic on ports; (d) to damage caused by use with non-<strong>InFocus</strong> products; (e) to damage caused by accident,<br />
abuse, misuse, improper ventilation, smoke exposure, contamination, improper or inadequate maintenance, cleaning or calibration,<br />
liquid contact, unusual physical or electrical stress and/or power surges, virus infection, fire, earthquake, disaster, lightning<br />
or other external causes; (f) to damage caused by operating the product outside the permitted or intended uses or usage parameters<br />
described by <strong>InFocus</strong> (including burned monitor screens and incorrect input voltage); (g) to damage caused by service (including<br />
upgrades and expansions) performed by anyone other than a representative of <strong>InFocus</strong> or an <strong>InFocus</strong> Authorized Service Provider<br />
(“ASP”) or your own installation of customer-installable parts as instructed by <strong>InFocus</strong>; (h) to a product or part that has been modified<br />
to alter functionality or capability without the written permission of <strong>InFocus</strong> (including use of an unauthorized mount); (i) to defects<br />
caused by normal wear and tear or otherwise due to the normal aging of the product; (j) to failure to follow maintenance procedures<br />
as outlined in the product user documentation including where a schedule is specified for regular cleaning of certain parts (based on<br />
usage and environment); (k) to loss or damage in transit; or (l) if the product is not used under normal operating conditions which<br />
are defined as use not in excess of 16 hours continuously per day with a minimum 8 hour period of continuous rest in the powered<br />
off state; or (m) if any <strong>InFocus</strong> serial number has been removed or defaced. In addition, LCD burn-in as a result of excessive display<br />
of static images on the product is not covered under the terms of this Limited Warranty.<br />
Important: Do not open the hardware products unless otherwise directed by <strong>InFocus</strong> for the purposes of a Customer Self Repair<br />
(CSR). Opening the hardware products may cause damage that is not covered by this Limited Warranty. Only <strong>InFocus</strong> or an ASP<br />
should perform service on the hardware products.<br />
TO THE EXTENT PERMITTED BY LAW, THIS WARRANTY AND THE REMEDIES SET FORTH ABOVE ARE EXCLUSIVE AND IN LIEU OF ALL<br />
OTHER WARRANTIES, REMEDIES AND CONDITIONS, WHETHER ORAL, WRITTEN, STATUTORY, EXPRESS OR IMPLIED. AS PERMITTED<br />
BY APPLICABLE LAW, INFOCUS SPECIFICALLY DISCLAIMS ANY AND ALL STATUTORY OR IMPLIED WARRANTIES, INCLUDING, WITHOUT<br />
LIMITATION, WARRANTIES OF MERCHANTABILITY AND FITNESS FOR A PARTICULAR PURPOSE AND WARRANTIES AGAINST HIDDEN OR<br />
LATENT DEFECTS. IF INFOCUS CANNOT LAWFULLY DISCLAIM STATUTORY OR IMPLIED WARRANTIES THEN TO THE EXTENT PERMITTED<br />
BY LAW, ALL SUCH WARRANTIES SHALL BE LIMITED IN DURATION TO THE DURATION OF THE EXPRESS WARRANTY AND TO THE<br />
REPAIR OR REPLACEMENT SERVICE AS DETERMINED BY INFOCUS IN ITS SOLE DISCRETION. NO INFOCUS RESELLER, AGENT,<br />
OR EMPLOYEE IS AUTHORIZED TO MAKE ANY MODIFICATION, EXTENSION, OR ADDITION TO THIS WARRANTY. IF ANY TERM<br />
<strong>INF5520</strong> <strong>Hardware</strong> <strong>Guide</strong><br />
Page 37
IS HELD TO BE ILLEGAL OR UNENFORCEABLE, THE LEGALITY OR ENFORCEABILITY OF THE REMAINING TERMS SHALL NOT BE<br />
AFFECTED OR IMPAIRED.<br />
EXCEPT AS PROVIDED IN THIS WARRANTY AND TO THE MAXIMUM EXTENT PERMITTED BY LAW, INFOCUS IS NOT RESPONSIBLE FOR<br />
DIRECT, SPECIAL, INCIDENTAL OR CONSEQUENTIAL DAMAGES RESULTING FROM ANY BREACH OF WARRANTY OR CONDITION, OR UN-<br />
DER ANY OTHER LEGAL THEORY, INCLUDING BUT NOT LIMITED TO LOSS OF USE; LOSS OF REVENUE; LOSS OF ACTUAL OR ANTICIPATED<br />
PROFITS (INCLUDING LOSS OF PROFITS ON CONTRACTS); LOSS OF THE USE OF MONEY; LOSS OF ANTICIPATED SAVINGS; LOSS OF BUSI-<br />
NESS; LOSS OF OPPORTUNITY; LOSS OF GOODWILL; LOSS OF REPUTATION; LOSS OF, DAMAGE TO, COMPROMISE OR CORRUPTION OF<br />
DATA; OR ANY INDIRECT OR CONSEQUENTIAL LOSS OR DAMAGE HOWSOEVER CAUSED INCLUDING THE REPLACEMENT OF EQUIPMENT<br />
AND PROPERTY, ANY COSTS OF RECOVERING, PROGRAMMING OR REPRODUCING ANY PROGRAM OR DATA STORED IN OR USED WITH<br />
THE INFOCUS PRODUCT AND ANY FAILURE TO MAINTAIN THE CONFIDENTIALITY OF DATA STORED ON THE PRODUCT. THE FOREGOING<br />
LIMITATION SHALL NOT APPLY TO DEATH OR PERSONAL INJURY CLAIMS, OR ANY STATUTORY LIABILITY FOR INTENTIONAL AND GROSS<br />
NEGLIGENT ACTS AND/OR OMISSIONS. INFOCUS DISCLAIMS ANY REPRESENTATION THAT IT WILL BE ABLE TO REPAIR ANY PRODUCT<br />
UNDER THIS WARRANTY OR MAKE A PRODUCT EXCHANGE WITHOUT RISK TO OR LOSS OF PROGRAMS OR DATA.<br />
LIMITATION ON BRINGING ACTION: NO ACTION, REGARDLESS OF FORM, ARISING OUT OF THE AGREEMENT TO PURCHASE THE<br />
PRODUCT MAY BE BROUGHT BY PURCHASER MORE THAN ONE YEAR AFTER THE CAUSE OF ACTION HAS ACCRUED. GOVERNING<br />
LAW: ANY ACTION, REGARDLESS OF FORM, ARISING OUT OF THE AGREEMENT TO PURCHASE THE PRODUCT IS GOVERNED BY<br />
THE LAWS OF THE STATE OF OREGON, U.S.A. MANDATORY ARBITRATION – ANY ACTION, REGARDLESS OF FORM, ARISING OUT<br />
OF THE AGREEMENT TO PURCHASE THE PRODUCT IS SUBJECT TO MANDATORY ARBITRATION.<br />
ADDITIONAL RIGHTS. FOR CUSTOMERS, WHO ARE COVERED BY CONSUMER PROTECTION LAWS OR REGULATIONS IN THEIR COUN-<br />
TRY OF PURCHASE OR, IF DIFFERENT, THEIR COUNTRY OF RESIDENCE, THE BENEFITS CONFERRED BY THIS WARRANTY ARE IN AD-<br />
DITION TO ALL RIGHTS AND REMEDIES PROVIDED BY SUCH CONSUMER PROTECTION LAWS AND REGULATIONS. THIS WARRANTY<br />
DOES NOT EXCLUDE, LIMIT OR SUSPEND ANY RIGHTS OF CONSUMERS ARISING OUT OF NONCONFORMITY WITH A SALES CON-<br />
TRACT. SOME COUNTRIES, STATES AND PROVINCES DO NOT ALLOW THE EXCLUSION OR LIMITATION OF INCIDENTAL OR CONSE-<br />
QUENTIAL DAMAGES OR ALLOW LIMITATIONS ON HOW LONG AN IMPLIED WARRANTY OR CONDITION MAY LAST, SO THE LIMITA-<br />
TIONS OR EXCLUSIONS DESCRIBED BELOW MAY NOT APPLY TO YOU. THIS WARRANTY GIVES YOU SPECIFIC LEGAL RIGHTS, AND YOU<br />
MAY ALSO HAVE OTHER RIGHTS THAT VARY BY COUNTRY, STATE OR PROVINCE. INFOCUS, THE WARRANTOR UNDER THIS LIMITED<br />
WARRANTY, IS IDENTIFIED AT THE END OF THIS DOCUMENT.<br />
EXTENDED WARRANTIES. <strong>InFocus</strong> extended product warranties are available for an additional charge. For further information on<br />
<strong>InFocus</strong> extended product warranties, please contact <strong>InFocus</strong> or your product reseller.<br />
OBTAINING WARRANTY SERVICE. Please access and review the online help resources located at www.infocus.com/support before<br />
seeking warranty service. If the product is still not functioning properly after making use of these resources, please contact <strong>InFocus</strong><br />
Technical Support or, if applicable, an ASP using the information provided below. When contacting <strong>InFocus</strong> via telephone, other charges<br />
may apply depending on your location. When calling, <strong>InFocus</strong> Technical Support or an ASP will help determine whether your product<br />
requires service and, if it does, will inform you how <strong>InFocus</strong> will provide it. You must assist in diagnosing issues with your product and<br />
follow <strong>InFocus</strong>’s warranty processes. <strong>InFocus</strong> may restrict service to the country where <strong>InFocus</strong> or its Authorized Distributors originally<br />
sold the hardware product. <strong>InFocus</strong> will provide warranty service either (i) at an ASP location, where service is performed at the location,<br />
or the ASP may send the product to an <strong>InFocus</strong> repair service location for service, (ii) by sending you prepaid way bills (and if you<br />
no longer have the original packaging, <strong>InFocus</strong> may send you packaging material at your cost) to enable you to ship the product to<br />
an <strong>InFocus</strong> repair service location, or (iii) by sending you customer-installable new or refurbished replacement parts to enable you to<br />
conduct Customer Self Repair, or (iv) by exchanging the product for a new or refurbished replacement.<br />
Customer Self Repair<br />
<strong>InFocus</strong> products are designed with many Customer Self Repair (CSR) parts to minimize repair time and allow for greater flexibility in<br />
performing defective parts replacement. If during the diagnosis period, <strong>InFocus</strong> identifies that the repair can be accomplished by the<br />
use of a CSR part, <strong>InFocus</strong> will ship that part directly to you for replacement. There are two categories of CSR parts:<br />
• Parts for which customer self repair is mandatory. If you request <strong>InFocus</strong> to replace these parts, you will be charged for the travel<br />
and labor costs of this service.<br />
• Parts for which customer self repair is optional. These parts are also designed for customer self repair. If, however, you require<br />
that <strong>InFocus</strong> replace them for you, this may be done at no additional charge under the type of warranty service designated for<br />
your product.<br />
Based on availability and where geography permits, <strong>InFocus</strong> will attempt to ship CSR parts out the next business day. Customer re-<br />
Page 38
ceipt will vary based upon the actual part, customer location and shipping method. Next day, same-day or four-hour delivery may be<br />
offered at an additional charge where geography permits. If assistance is required, you can call the <strong>InFocus</strong> Technical Support Center<br />
and a technician will help you over the phone. <strong>InFocus</strong> specifies in the materials shipped with a replacement CSR part whether a<br />
defective part must be returned to <strong>InFocus</strong>. In cases where it is required to return the defective part to <strong>InFocus</strong>, you must ship the<br />
defective part back to <strong>InFocus</strong> within a defined period of time, normally five (5) business days, and clearly display the Return Material<br />
Authorization (RMA#) on the outside of the shipping carton or a similar package affording an equal degree of protection. The defective<br />
part must be returned with the associated documentation in the provided shipping material. Failure to return the defective part<br />
may result in <strong>InFocus</strong> charging you for the replacement. With a Customer Self Repair, <strong>InFocus</strong> will pay all shipping and part return<br />
costs and determine the courier/carrier to be used.<br />
<strong>InFocus</strong> may utilize a doorstep swap process, which involves an <strong>InFocus</strong> delivery person delivering the replacement product or CSR<br />
part to the Customer and picking up the defective product or part at the time of delivery for return to <strong>InFocus</strong>. Upon receipt of the<br />
replacement product or part, the original product or part becomes the property of <strong>InFocus</strong> and you agree to follow instructions,<br />
including arranging the return of original product or part to <strong>InFocus</strong> in a timely manner. When providing a product exchange or<br />
Customer Self Repair (CSR) part requiring the return of the original product or part, <strong>InFocus</strong> may require a credit card authorization<br />
as security for the retail price of the replacement product or part and applicable shipping costs. When returning product to <strong>InFocus</strong>,<br />
a Return Material Authorization Number (RMA #) is required and must be clearly displayed on the outside of the shipping carton or a<br />
similar package affording an equal degree of protection. Service options, parts availability and response times may vary according to<br />
the country in which service is requested. Service options are subject to change at any time. You may be responsible for shipping and<br />
handling charges if the product cannot be serviced in the country in which service is requested. If you seek service in a country that<br />
is not the country of original purchase, you will comply with all applicable import and export laws and regulations and be responsible<br />
for all custom duties, V.A.T. and other associated taxes and charges. Where international service is available, <strong>InFocus</strong> may repair or<br />
exchange defective products and parts with comparable products and parts that comply with local standards. In accordance with<br />
applicable law, <strong>InFocus</strong> may require that you furnish proof of purchase details and/or comply with registration requirements before<br />
receiving warranty service. Resources with more details on this and other matters on obtaining warranty service are described below.<br />
PRIVACY. <strong>InFocus</strong> will maintain and use customer information in accordance with the <strong>InFocus</strong> Privacy Policy available at www.Infocus.<br />
com/privacy and <strong>InFocus</strong>’s applicable legal obligations.<br />
BACKUP. If your product is capable of storing software programs, data and other information, you should protect its contents against<br />
possible operational failures. Before you deliver your product for warranty service it is your responsibility to keep a separate backup<br />
copy of the contents, remove all personal information and data that you want to protect and disable any security passwords. THE<br />
CONTENTS OF YOUR PRODUCT WILL BE DELETED AND THE STORAGE MEDIA REFORMATTED IN THE COURSE OF WARRANTY SERVICE.<br />
Your product or a replacement product will be returned to you as your product was configured when originally purchased, subject<br />
to applicable updates. <strong>InFocus</strong> may install system software updates as part of warranty service that will prevent the hardware from<br />
reverting to an earlier version of the system software. Third party applications installed on the hardware may not be compatible or<br />
work with the hardware as a result of the system software update. You will be responsible for reinstalling all other software programs,<br />
data and passwords. Recovery and reinstallation of software programs and user data are not covered under this Limited Warranty.<br />
RESOURCES. Support and service information including Authorized Distributor and Authorized Service Provider locations is available<br />
at: www.infocus.com/support.<br />
<strong>InFocus</strong> Corporation, 13190 SW 68th Parkway, Suite 200, Portland, OR 97223-8368 USA<br />
© 2011-2012 <strong>InFocus</strong> Corp. All rights reserved. <strong>InFocus</strong> and the <strong>InFocus</strong> logo are trademarks of <strong>InFocus</strong> Corp., registered in the U.S.<br />
and other countries.<br />
<strong>INF5520</strong> <strong>Hardware</strong> <strong>Guide</strong><br />
Page 39