Create successful ePaper yourself
Turn your PDF publications into a flip-book with our unique Google optimized e-Paper software.
Declaration of Conformity<br />
Manufacturer: <strong>InFocus</strong> Corporation, 13190 SW 68th Parkway, Portland, Oregon<br />
97223-8368 USA<br />
We declare under our sole responsibility that this projector conforms to the<br />
following directives and norms:<br />
EMC Directive 2004/108/EC<br />
EuP Directive 2005/32/EC<br />
EMC: EN 55022<br />
EN 55024<br />
EN 61000-3-2<br />
EN 61000-3-3<br />
Low Voltage Directive 2006/95/EC<br />
Safety: IEC 60950-1:2005, MOD<br />
Trademarks<br />
Apple, Macintosh, and PowerBook are trademarks or registered trademarks of Apple<br />
Computer, Inc. IBM is a trademark or registered trademark of International Business<br />
Machines, Inc. Microsoft, PowerPoint, and Windows are trademarks or registered trademarks<br />
of Microsoft Corporation. Adobe and Acrobat are trademarks or registered trademarks of<br />
Adobe Systems Incorporated. DLP® and the DLP logo are registered trademarks of Texas<br />
Instruments and BrilliantColor is a trademark of Texas Instruments. <strong>InFocus</strong>, In Focus, and<br />
INFOCUS (stylized) are either registered trademarks or trademarks of <strong>InFocus</strong> Corporation in<br />
the United States and other countries.<br />
FCC Warning<br />
This device complies with part 15 of the FCC Rules. Operation is subject to the following two<br />
conditions: (1) This device may not cause harmful interferences, and (2) this device must<br />
accept any interference received, including interference that may cause undesired operation.<br />
NOTE: This equipment has been tested and found to comply with the limits for a Class B<br />
digital device, pursuant to part 15 of the FCC Rules. These limits are designed to provide<br />
reasonable protection against harmful interference in a residential installation. This equipment<br />
generates, uses and can radiate radio frequency energy and, if not installed and used in<br />
accordance with the instructions, may cause harmful interference to radio communications.<br />
However, there is no guarantee that interference will not occur in a particular installation. If<br />
this equipment does cause harmful interference to radio or television reception, which can be<br />
determined by turning the equipment off and on, the user is encouraged to try to correct the<br />
interference by one or more of the following measures:<br />
--Reorient or relocate the receiving antenna.<br />
--Increase the separation between the equipment and receiver.<br />
--Connect the equipment into an outlet on a circuit different from that to which the receiver is<br />
connected.<br />
--Consult the dealer or an experienced radio/TV technician for help.<br />
Changes or modifications not expressly approved by <strong>InFocus</strong> Corporation may void authority<br />
to operate the equipment.<br />
Canada<br />
This Class B digital apparatus complies with Canadian ICES-003.<br />
Cet appareil numérique de la classe B est conforme à la norme NMB-003 du Canada.<br />
Agency Approvals<br />
UL, cUL<br />
Other specific Country Approvals may apply. Please see product certification label.<br />
This document applies to regulatory model H8300.<br />
Input ratings: AC 100-240V, 4.3-1.6A,50-60Hz<br />
<strong>InFocus</strong> reserves the right to alter product offerings and specifications at any time without<br />
notice.<br />
1
Table of Contents<br />
Introduction 5<br />
Positioning the projector 7<br />
Ceiling Mount 8<br />
Cable management 9<br />
Connecting power 10<br />
Connecting a computer source 10<br />
Displaying an image 11<br />
Adjusting the image 12<br />
Connecting a video device 13<br />
Video device connections 13<br />
Shutting down the projector 15<br />
Troubleshooting your setup 15<br />
Using the remote control 23<br />
Using the keypad buttons 24<br />
Optimizing computer images 24<br />
Presentation features 24<br />
Optimizing video images 25<br />
Customizing the projector 25<br />
Using the menus 26<br />
Basic Picture menu 27<br />
Advanced Picture menu 28<br />
Setup menu 29<br />
Status and Service menu 31<br />
Help 31<br />
Maintenance 32<br />
Cleaning the lens 32<br />
Replacing the projection lamp 33<br />
Using the security lock 34<br />
Appendix 35<br />
SplitScreen Compatibility 35<br />
RS-232 commands 36<br />
Index 44<br />
2
Important Operating Considerations for Safety<br />
• Refer to this guide for proper startup and shutdown procedures.<br />
• Follow all warnings and cautions in this manual and on the projector.<br />
• Place the projector in a horizontal position no greater than 8 degrees off axis.<br />
• Locate the projector at least 4' (1.2m) away from any heating or cooling vents.<br />
• Do not block ventilation openings. Locate the projector in a well-ventilated<br />
area without obstructions to intake or exhaust vents. Do not place the projector<br />
on a tablecloth or other soft covering that may block the vents.<br />
• Do not place the projector in direct sunlight, humid, greasy or dusty places or<br />
in places where the projector may come into contact with smoke or steam.<br />
• Do not touch the exhaust vents. This area will become hot while the projector<br />
is being used. Be sure children are kept away from this area.<br />
• Do not look directly into the lens while the projector is being used. Be<br />
especially careful that children do not stare directly into the lens.<br />
• Do not push objects of any kind into this projector through its venting as object<br />
may touch dangerous voltage that could result in a fire or electrical shock.<br />
• Do not drop the projector.<br />
• Do not spill liquid on the projector. Spilled liquid may damage the projector.<br />
• Do not place any object on the projector.<br />
• Do not stand or step on the projector.<br />
• Use the power cord provided. Connect the power cord to a receptacle with a<br />
protective safety (earth) ground terminal. The AC power cord has a three-pin<br />
grounding-type power plug. This plug will only fit a grounding-type power<br />
outlet. This is a safety feature. Do not remove the grounding pin on the power<br />
plug.<br />
• A surge-protected power strip is recommended. Do not overload wall outlets.<br />
• When disconnecting the power cord, hold the plug, not the cord. Unplug the<br />
projector from the wall outlet, if the projector is unused for an extended time.<br />
• Wash hands after handling the cables supplied with this product.<br />
• The projector remote control uses batteries. Make sure the batteries’ polarity<br />
(+/-) is aligned correctly. Dispose of used batteries in accordance with local<br />
disposal laws.<br />
• Use an <strong>InFocus</strong> approved ceiling mount kit for proper fitting, ventilation and<br />
installation. The projector warranty does not cover any damage caused by use<br />
of non-approved ceiling mount kits or by installing in an improper location.<br />
• When the projector is ceiling mounted, wear protective eyewear to prevent eye<br />
injury before opening lamp door.<br />
• The projector must be installed by a qualified professional in order to ensure<br />
proper operation and reduce the risk of hazards or injury. It is not<br />
recommended you install the projector yourself.<br />
• Refer all service to qualified service personnel. Servicing your own projector<br />
can be dangerous to you and will void the warranty.<br />
• Only use replacement parts specified by <strong>InFocus</strong>. Unauthorized substitutions<br />
may result in fire, electrical shock, or injury, and may void the warranty<br />
• Only genuine <strong>InFocus</strong> lamps are tested for use in this projector. Use of non<br />
<strong>InFocus</strong> lamps may cause electrical shock and fire, and may void the projector<br />
warranty.<br />
• Hg – Lamp contains mercury. Manage in accordance with local<br />
disposal laws. See www.lamprecycle.org.<br />
• The projector uses a high-pressure mercury glass lamp. The lamp may fail<br />
prematurely, or it may rupture with a popping sound if jolted, scratched, or<br />
handled while hot. The risk of lamp failure or rupture also increases as the<br />
lamp age increases; please replace the lamp when you see the “Replace Lamp”<br />
message.<br />
• In the unlikely event of a lamp rupture, particles may exit through the projector<br />
vents. Keep people, food, and drinks out of the "keep out" area under and<br />
around the projector, as indicated by the "X" areas below.<br />
3
2’ / 0.6 m<br />
3’ / 1 m<br />
8’ /2.4m<br />
5’ /1.5m<br />
Unplug this projector from the wall outlet and refer servicing to qualified service<br />
personnel under the following conditions:<br />
• When the power cord or plug is damaged or frayed<br />
• If liquid has been spilled into the projector<br />
• If the projector has been exposed to rain or water<br />
• If the projector does not operate normally by following the operating<br />
instructions. Adjust only those controls that are covered by the operating<br />
instructions as improper adjustment of other controls may result in damage and<br />
may required extensive work to restore the projector to normal operation<br />
• If the projector has been dropped<br />
• When the projector exhibits a distinct change in performance, this indicates a<br />
need for service.<br />
Follow these instructions to help ensure image quality and lamp life over the life of<br />
the projector. Failure to follow these instructions may affect the warranty. For<br />
complete details of the warranty, see the Warranty Booklet.<br />
4
Introduction<br />
Your new digital projector is simple to connect, easy to use, and straightforward to<br />
maintain. It is a versatile projector that is flexible enough for home video viewing<br />
and business presentations, too. The SP8602 has native 1920x1080 (1080p)<br />
resolution. Your projector is compatible with a wide variety of computers and video<br />
devices.<br />
Product specifications<br />
To read the latest specifications on your multimedia projector, be sure to visit our<br />
support website at www.infocus.com/support, as specifications are subject to<br />
change.<br />
Online registration<br />
Register your projector on our website at www.infocus.com/register to activate<br />
your warranty and receive product updates, announcements, and registration<br />
incentives.<br />
Included Items<br />
Optional Accessories<br />
Optional accessories include optional top covers in a variety of finishes, the<br />
Commander-2 remote, ceiling mount, and LiteShow II. These items and other<br />
accessories can be found on our website at www.infocus.com or at your local<br />
dealer.<br />
Top front cover<br />
Top rear cover<br />
LiteTouch keypad<br />
Lamp access<br />
panel<br />
Lens<br />
Remote control<br />
receiver (IR)<br />
Projector<br />
Power cord<br />
connector<br />
Remote Control<br />
HDMI cable<br />
Power Cord<br />
Documentation<br />
5
Connector panel<br />
The projector provides both computer and video connection options, including:<br />
• VGA computer<br />
• HDMI (2)<br />
• S-video<br />
• Composite video<br />
• Component video (3)<br />
• USB port<br />
The projector also provides the following connectors:<br />
Security lock<br />
Composite<br />
video<br />
USB<br />
S-video<br />
HDMI<br />
VGA<br />
RS-232<br />
• 12V screen trigger outputs (3)<br />
• IR Repeater input (for use with IR receivers that follow the Xantech connector<br />
specification T=Signal, R= GND, S=12VDC)<br />
• RS-232 connector for serial control. Command control codes are in the<br />
Appendix and on our support website at www.infocus.com/support.<br />
12V External Trigger outputs<br />
The three 3.5mm mini-jack 12 volt, 0.25 amp DC outputs are screen/lens triggers:<br />
12V External<br />
Trigger outputs<br />
Component<br />
video<br />
IR<br />
Repeater<br />
• The “Lamp” trigger turns on when the lamp is lighted. If you connect your<br />
projection screen to this output using the cable that came with your screen, the<br />
screen will move down when the lamp is turned on and the screen will return<br />
to its storage position, when the lamp is turned off.<br />
Cable cover<br />
• The Letterbox “1” and “2” triggers are active when the projector is placed in<br />
letterbox mode and are utilized for variable masking and anamorphic lens<br />
control. (These triggers are off when SplitScreen is active.)<br />
6
Positioning the projector<br />
To determine where to position the projector, consider the size and shape of your<br />
screen, the location of your power outlets, and the distance between the projector<br />
and the rest of your equipment. Here are some general guidelines:<br />
• Position the projector on a flat surface at a right angle to the screen. The<br />
projector must be at least 4.9’ (1.5m) from the projection screen.<br />
• Position the projector within 10’ (3m) of your power source and within 6’<br />
(1.8m) of your video device (unless you purchase extension cables). To ensure<br />
adequate cable access, do not place the projector within 6” (.15m) of a wall or<br />
other object.<br />
• Position the projector to the desired distance from the screen. The distance<br />
from the lens of the projector to the screen, the zoom setting, and the video<br />
format determine the size of the projected image.<br />
• If the image is square but not centered on the screen or viewing area, adjust it<br />
by using the lens shift dials. Use the Horizontal dial to shift the lens left or<br />
right. Use the Vertical dial to shift the lens up or down.<br />
NOTE: As the lens is shifted away from the lens centerline, the horizontal<br />
shift range is reduced. To adjust lens shift efficiently we suggest you follow<br />
these steps:<br />
• The vertical image offset range is 105%~130% for the SP8602 (default is<br />
105%). The default horizontal image offset is +/-15%, however at maximum<br />
vertical image offset, there is no horizontal lens shift.<br />
20%<br />
Screen Height<br />
100% (H)<br />
5%<br />
100% (H)<br />
20%<br />
Screen<br />
Distance (L)<br />
Maximum Shift<br />
Horizontal Offset +/-15%<br />
1 Use vertical lens shift to move the image closer to the lens centerline than the<br />
final vertical position.<br />
2 Use horizontal lens shift to determine the center horizontal position, then move<br />
image to the center horizontal position.<br />
3 Use vertical lens shift to move the image away from the lens centerline to the<br />
final vertical position.<br />
4 Use horizontal lens shift to move the image to the final horizontal position.<br />
5 If lens shift is unable to move the image far enough, move the projector<br />
(preferable) or tilt the projector and then use vertical and horizontal keystone to<br />
re-position the image.<br />
7
Range of distance to the screen for a given screen size<br />
Diagonal Screen<br />
Size (inches/m)<br />
Distance to screen<br />
Minimum<br />
distance (feet/m)<br />
Maximum Distance<br />
(feet/m)<br />
60/1.524 6.50/1.98 10.01/3.05<br />
80/2.032 8.73/2.66 13.42/4.09<br />
90/2.286 9.84/3.00 15.12/4.61<br />
150/3.810 16.54/5.04 25.3/7.71<br />
Ceiling Mount<br />
If you wish to install the projector on the ceiling:<br />
• The projector must be installed by a qualified professional in order to ensure<br />
proper operation and reduce the risk of hazards or injury. It is not<br />
recommended you install the projector yourself.<br />
• We strongly recommend using <strong>InFocus</strong> approved ceiling mounts for proper<br />
fitting, ventilation and installation. Refer to the installation guide that comes<br />
with the <strong>InFocus</strong> Ceiling Mount Kit (p/n SP-CEIL-INSTALL) for more<br />
information. The warranty does not cover any damage caused by use of nonapproved<br />
ceiling mount kits or by installing in an improper location.<br />
• The ceiling must be strong enough to support the projector and the installation<br />
must be in accordance with any local building codes. Consult your dealer for<br />
more information.<br />
• Maximum supported physical pitch is +/-8º.<br />
• Maximum supported physical horizontal roll is +/-8º.<br />
• Keep all adjacent surfaces 3” (76mm) from sides, front and rear and .87”<br />
(22mm) from the bottom of projector to preserve required airflow around the<br />
projector.<br />
8º<br />
8
Cable management<br />
The integrated cable management system allows you to keep the cables organized.<br />
To use the cable management system, thread the cables into the slots as shown in<br />
the illustration.<br />
cable management system<br />
Using the cable management<br />
system provides you with a clean,<br />
professional-looking installation.<br />
9
Connecting power<br />
Connect the black power cord to the Power connector on the rear of the projector<br />
and to your electrical outlet. The Power light on the Status Indicator Panel (page 15)<br />
turns amber.<br />
Connect power cord<br />
NOTE: Always use the power cord that shipped with the projector.<br />
Connecting a computer source<br />
HDMI 1.3 connection<br />
HDMI is a standard, uncompressed, all-digital audio/video interface. HDMI<br />
provides an interface between sources, such as set-top boxes, DVD players, and<br />
receivers and your projector. Plug an HDMI cable into the video out connector on<br />
the video device and into either the HDMI 1 or HDMI 2 connector on the projector.<br />
To take advantage of HDMI 1.3 Deep Color (30 bit) you must have a 1.3-<br />
compatible source.<br />
VGA connection<br />
Connect one end of the provided computer cable to the VGA connector on the<br />
projector and the other to the VGA connector on your computer. If you are using a<br />
desktop computer, you will need to disconnect the monitor cable from the<br />
computer’s video port first.<br />
Connect HDMI cable<br />
Connect computer cable<br />
10
horizontal vertical<br />
Displaying an image<br />
Touch the Power button on the keypad or the remote.<br />
The Power button blinks green and the fans start to run. When the lamp turns on, the<br />
start up screen will display and the Power button will become solid green. It can<br />
take a minute for the image to achieve full brightness.<br />
No start up screen? Get help on page 16.<br />
Press Power button<br />
focus<br />
z om<br />
Turn on your computer or video device.<br />
The image should appear on the projection screen. If it doesn’t, press the Source<br />
button on the projector’s keypad or remote.<br />
If you are using a VGA cable to connect your computer to the projector:<br />
If using a laptop, make sure its external video port is active.<br />
Many laptops do not automatically turn on their external video port when a<br />
projector is connected. Usually a key combination like Fn + F8 or CRT/LCD key<br />
turns the external display on and off. Locate a function key labeled CRT/LCD or a<br />
function key with a monitor symbol. Press Fn and the labeled function key<br />
simultaneously.<br />
Refer to your laptop’s documentation for more information about your laptop’s key<br />
combination or go to the <strong>InFocus</strong> website at: http://www.infocus.com/Support/<br />
LaptopActivation.aspx.<br />
No laptop image? Try pressing the Auto Image button on the keypad or<br />
remote.<br />
Turn on computer or video<br />
device<br />
Activate laptop’s external port<br />
Monitor key or<br />
LCD/CRT key<br />
Fn key<br />
11
Adjusting the image<br />
Position the projector to the desired distance from the screen at a 90 degree angle to<br />
the screen. See page 8 for a table listing of screen sizes and distances.<br />
Adjust distance<br />
Remove the projector top cover<br />
Remove cover<br />
a. Slide the tabs on the side toward the rear of the projector to unlock the<br />
projector top cover.<br />
(b)<br />
(a)<br />
b. Slide the top toward the front of the projector to unhook it from the projector<br />
body.<br />
c. Lift off.<br />
(a)<br />
horizontal vertical<br />
focus<br />
z om<br />
(c)<br />
Adjust the zoom or focus.<br />
If the image is square but not centered on the screen or viewing area, adjust it by<br />
using the lens shift dials. See page 7 for details.<br />
Adjust zoom, focus and lens<br />
shift<br />
focus<br />
zoom<br />
Rotate the elevator feet for granular adjustment of the projector’s height. Avoid<br />
placing your hands near the hot exhaust vent at the side of the projector.<br />
horizontal<br />
vertical<br />
Adjust the Contrast or Brightness in the Basic Picture menu. See page 27 for help<br />
with these menu adjustments.<br />
Adjust height<br />
Release button<br />
Elevator foot<br />
12
Connecting a video device<br />
You can connect video devices such as VCRs, DVD players, camcorders, digital<br />
cameras, video game consoles, HDTV receivers, and TV tuners to the projector.<br />
You can connect the projector to most video devices that can output video. You<br />
cannot directly connect the coaxial cable that enters your house from a cable or<br />
satellite company; the signal must pass through a tuner first. Examples of tuners are<br />
digital cable boxes, VCRs, digital video recorders, and satellite TV boxes.<br />
Basically, any device that can change channels is considered a tuner.<br />
Although the aspect ratio is automatically selected by the projector based on the<br />
signal input, you can change the aspect ratio, if desired. The projector’s Aspect<br />
Ratio setting is accessed through the Resize button on the remote or through the<br />
projector’s Basic Picture Menu. See page 27 for more information.<br />
Video device connections<br />
You can order cables from <strong>InFocus</strong> or use your own.<br />
Composite video connection<br />
Plug the composite video cable’s yellow connector into the video out connector on<br />
the video device. Plug the other yellow connector into the yellow Composite<br />
connector on the projector.<br />
Keep in mind that video output from composite connections is not as high quality as<br />
S-video.<br />
HDMI 1.3 connection<br />
HDMI is a standard, uncompressed, all-digital audio/video interface. HDMI<br />
provides an interface between sources, such as set-top boxes, DVD players, and<br />
receivers and your projector. Plug an HDMI cable into the video out connector on<br />
the video device and into either the HDMI 1 or HDMI 2 connector on the projector.<br />
To take advantage of HDMI 1.3 Deep Color (30 bit) you must have a 1.3-<br />
compatible source.<br />
S-video connection<br />
If your video device uses a round, four-prong S-video connector, plug an S-video<br />
cable into the S-video connector on your video device and into the S-video<br />
connector on the projector.<br />
Keep in mind that S-video delivers higher quality video output than composite.<br />
VGA connection<br />
If your video device has a 15-pin VGA output, plug one end of the included<br />
computer cable into the VGA connector on your video source. This connector may<br />
be labeled “To Monitor” on the video source. Plug the computer cable into the VGA<br />
connector on the projector.<br />
Component video connection<br />
Plug the component cable into the video device. Plug the other end of the<br />
component cable into the Component 1, Component 2 or Component 3<br />
connectors.<br />
In addition, a Component to VGA adapter can be used in conjunction with the VGA<br />
connectors. Plug the component cable into the video device. Plug the other end of<br />
the component cable into the adapter and plug the adapter into the VGA connector.<br />
Component offers the highest quality analog video output.<br />
13
What is Aspect Ratio?<br />
Aspect ratio is the ratio of the image width to image height. HDTV and most DVDs<br />
are 16:9, which is the default for this projector. When in 4:3 mode the projector<br />
places black bars on both sides of the image. Native mode centers the image and<br />
turns off the internal scaler so that any resolution larger than the native projector<br />
resolution is cropped on the edges. Letterbox expands the image to fill the screen.<br />
Natural Wide stretches a 4:3 image to fill the entire 16:9 screen. The center twothirds<br />
of the image is unchanged; the edges of the image are stretched.<br />
What you plan to project will also help you choose between 4:3 and 16:9. For<br />
example, most TV shows are 4:3, while most movies are 16:9. If you have a 16:9<br />
screen, then you should select an aspect ratio of 16:9 for anamorphic movies and<br />
HDTV, and Native for 4:3 content. If you have a 4:3 screen you should still use 16:9<br />
for anamorphic movies or HDTV, but you also have the option of using 4:3, Native,<br />
or Natural Wide for 4:3 content. Force Wide can also be enabled to automatically<br />
resize less common aspect ratios to 16:10.<br />
16:9 aspect<br />
ratio<br />
4:3 aspect<br />
ratio<br />
9<br />
3<br />
16:9 image input<br />
16:9 image<br />
9<br />
16<br />
16<br />
4:3 image input 4:3 image on 16:9 screen<br />
9<br />
4<br />
letterbox image input<br />
16<br />
16:9 image fills 16:9 screen<br />
letterbox<br />
aspect ratio<br />
3<br />
9<br />
4<br />
16<br />
4:3 image input 4:3 image fills 16:9 screen<br />
natural wide<br />
aspect ratio<br />
3<br />
9<br />
4<br />
16<br />
14
Shutting down the projector<br />
Screen Save Time<br />
You can make the black screen appear after a preset number of minutes by turning<br />
on the Screen Save Time feature in the Setup menu. See page 29.<br />
Auto Off Time<br />
The projector has an Auto Off Time feature that automatically turns the projector<br />
off if no active sources are detected and no user interaction with the projector is<br />
performed for 30 minutes. By default, this feature is off. You can change the length<br />
of time, see page 29.<br />
Turning off the projector<br />
To turn the projector off, press the Power button on the remote or keypad. The lamp<br />
turns off and the LED blinks amber for 10 seconds while the fans continue to run to<br />
cool the lamp. When the lamp has cooled, the LED lights amber and the fans stop.<br />
Unplug the power cable to completely power off the projector.<br />
Troubleshooting your setup<br />
The Status Indicator Panel on top of the projector indicates the state of the projector<br />
and is a helpful when troubleshooting.<br />
Icon<br />
Power, solid amber<br />
Table 1: Status indicator light behavior and meaning<br />
Power, blinking green<br />
Power, solid green<br />
Meaning<br />
The projector is plugged in.<br />
The power button has been pressed and the<br />
software is initializing.<br />
The projector is on and initialized.<br />
15<br />
Power, blinking amber<br />
Temperature<br />
Lamp<br />
Wrench/Service<br />
The power button has been pressed to turn<br />
the projector off and the fans are running<br />
to cool the projector.<br />
The projector is too hot. Make sure the<br />
vents aren’t blocked (see page 21). Turn<br />
the projector off and wait one minute, then<br />
turn the projector on again. Contact<br />
Technical Support if the problem persists.<br />
Visit www.infocus.com/support to contact<br />
service.<br />
Turn the projector off and wait one minute,<br />
then turn the projector on again. If the<br />
lamp light turns on again, replace the lamp<br />
and reset the lamp timer (page 34).<br />
Turn the projector off and wait one minute,<br />
then turn the projector on again. If the<br />
service lamp turns on again, service is<br />
required. Visit www.infocus.com/support<br />
to contact service.
Problem Solution Result<br />
No start up screen<br />
Plug power cord into the projector, then press Correct image<br />
power button<br />
Startup<br />
Screen<br />
Only start up screen appears<br />
Press the Source button<br />
Activate the laptop’s external port<br />
Computer image projected<br />
A<br />
Startup<br />
Screen<br />
Restart laptop<br />
A<br />
16
Problem Solution Result<br />
No computer image, just the words “Signal out of<br />
range”<br />
Press the Auto Image button on the keypad or on the remote.<br />
To adjust computer refresh rate, go to Control Panel ><br />
Display > Settings > Advanced > Adapter (location varies by<br />
operating system).<br />
Computer image projected<br />
A<br />
Signal out of<br />
the range<br />
Only my laptop’s background appears, not the<br />
Desktop icons<br />
You may also need to set a different resolution on your<br />
computer, as shown in the following problem, “image fuzzy<br />
or cropped”<br />
Windows - Disable “Extend my Windows Desktop” in<br />
Control Panel > Display > Settings > Display 2 (location<br />
varies by operating system)<br />
Background and Desktop projected<br />
A<br />
A<br />
Uncheck this<br />
option, then<br />
click Apply<br />
17
Problem Solution Result<br />
Image fuzzy or cropped<br />
A<br />
A<br />
Set your computer’s display resolution to the native<br />
resolution of the projector (Start > Settings > Control<br />
Panel > Display > Settings tab)<br />
Image clear and not cropped<br />
A<br />
For a laptop,<br />
disable laptop<br />
monitor or turnon<br />
dual-display<br />
mode<br />
Image not centered on screen<br />
Move projector, adjust zoom and lens shift<br />
Correct image<br />
horizontal vertical<br />
focus<br />
z om<br />
A<br />
18
Problem Solution Result<br />
Image not square Adjust Keystone in the Basic Picture menu Square image<br />
Image not sharp Adjust Sharpness in the Basic Picture menu Correct image<br />
Image does not fit 4:3 or 16:9 screen<br />
Change aspect ratio to 4:3 or 16:9 in Basic<br />
Picture>Aspect Ratio menu<br />
Correct image<br />
19
A<br />
Problem Solution Result<br />
Image upside down<br />
Turn off Ceiling Mount in Setup menu<br />
Correct image<br />
Image reversed left to right<br />
Turn off Rear Project in Setup menu<br />
Correct image<br />
A<br />
Projected colors don’t match source<br />
Adjust color, tint, brightness, contrast in the Basic<br />
Picture menu and/or color space in the Advanced<br />
Picture menu<br />
Correct image<br />
COLOR<br />
COLOR<br />
20
Problem Solution Result<br />
The video embedded in my PowerPoint<br />
presentation does not play on the screen<br />
Turn off the internal LCD display on your laptop<br />
Embedded video plays correctly<br />
A<br />
B<br />
A<br />
B<br />
Lamp won’t turn on, Temperature light is on<br />
Make sure vents aren’t blocked, turn the projector off<br />
and allow it to cool for one minute.<br />
Lamp turns on<br />
Temperature light<br />
Startup<br />
Screen<br />
21
Problem Solution Result<br />
“Replace lamp” message appears at startup, lamp<br />
won’t turn on, Lamp light is turned on<br />
Lamp must be replaced (see page 33)<br />
Lamp turns on<br />
Lamp light<br />
Lamp door<br />
Replace lamp<br />
Startup<br />
Screen<br />
Still need assistance?<br />
If you need assistance, visit our support website at www.infocus.com/support or<br />
call us. Check out the How To section for additional information on using this<br />
projector for home theater or gaming applications.<br />
This product is backed by a limited warranty. An extended warranty plan may be<br />
purchased from your dealer. When sending the projector in for repair, we<br />
recommend shipping the unit in its original packing material, or having a<br />
professional packaging company pack the unit. Please insure your shipment for its<br />
full value.<br />
22
Using the remote control<br />
• Source 1, 2, 3 switches between user assigned sources.<br />
The remote uses two (2) AA batteries. You can install the batteries by removing the<br />
cover from the remote’s back, aligning the + and - ends of the batteries, sliding them<br />
into place, and then replacing the cover.<br />
Caution:<br />
• When disposing of the batteries, be sure to do so in an environmentally proper<br />
manner.<br />
• If the remote control gets wet, wipe it dry immediately.<br />
• Avoid excessive heat and humidity.<br />
• Ensure the batteries’ polarity (+/-) is aligned correctly.<br />
• Do not mix new and old batteries together, or different types of batteries<br />
together.<br />
• Replace the batteries as soon as they run out.<br />
• Remove batteries from the remote control when storing or not in use for a<br />
prolonged period.<br />
To operate, point the remote at the front of the projector (not at the computer). The<br />
range of optimum operation is about 30’ (9m).<br />
Press the remote’s Power button to turn the projector on and off (see page 15 for<br />
shutdown information).<br />
Press the remote’s Menu button to open the projector’s menu system. Use the arrow<br />
buttons to navigate, and the Select button to select features and adjust values in the<br />
menus. See page 26 for more information on the menus.<br />
The remote also has the following buttons:<br />
• Help accesses the projector’s help feature (see page 31).<br />
• Resize switches between aspect ratios (see page 27).<br />
• Overscan removes noise at the edge of a video image.<br />
• Source switches between sources.<br />
• Custom can be assigned to a special function, like Blank Screen or Freeze (see<br />
page 29).<br />
• Auto Image resynchronizes the projector to the source.<br />
• Presets selects between different stored settings (see page 27).<br />
23<br />
Troubleshooting the remote<br />
• Make sure the batteries are installed in the proper orientation and are not dead.<br />
• Make sure you’re pointing the remote at the projector or the screen, not the<br />
computer, and are within the remote range of 30’ (9m). For best results, point<br />
the remote at the projector.<br />
Navigation<br />
buttons
Using the keypad buttons<br />
Most buttons are described in detail in other sections, but here is an overview of<br />
their functions:<br />
Power–turns the projector on and off (page 10).<br />
Auto Image–resynchronize the projector to the source.<br />
Presets–cycles through the available preset settings (page 27).<br />
Menu–opens the onscreen menus (page 26).<br />
Select–confirms choices made in the menus (page 26).<br />
Up/Down/Left/Right arrows–navigates to and adjusts settings in the menus<br />
(page 26).<br />
Source–changes the active source (page 10).<br />
Help–button to access the projector’s help feature (page 31)<br />
Menu navigation<br />
buttons<br />
Optimizing computer images<br />
After the projector is running and the image is on the screen, you can optimize the<br />
image using the onscreen menus. For general information on using the menus, see<br />
page 26.<br />
• Adjust the Keystone, Contrast, or Brightness in the Basic Picture menu<br />
(page 27).<br />
• Change the Aspect Ratio. Choose the option that best fits your input source<br />
(page 27).<br />
• Adjust the Color Temperature in the Advanced Picture menu (page 28).<br />
• Adjust the Phase, Tracking, or Horizontal or Vertical position in the Advanced<br />
Picture menu (page 28).<br />
• Once you have optimized the image for a particular source, you can save the<br />
settings using Presets. This allows you to quickly recall these settings later<br />
(page 27).<br />
Presentation features<br />
Several features are provided to make giving presentations easier. Here is an<br />
overview, details are found in the menu section.<br />
• The Custom key allows you to assign various features to the button. The<br />
default effect is Source Info, which displays information about the projector<br />
and current source. See page 29 for details.<br />
• The Search Screen option lets you change the appearance of the blank screen<br />
and start up screen (page 30).<br />
• Two options, Auto Off and Screen Save Time, are provided to automatically<br />
shut down the projector after several minutes of inactivity or display a black<br />
screen. This helps preserve lamp life (page 29).<br />
24
Optimizing video images<br />
After your video device is connected properly and the image is on the screen, you<br />
can optimize the image using the onscreen menus. For general information on using<br />
the menus, see page 26.<br />
• Adjust the Keystone, Contrast, Brightness, Color, Tint or Sharpness in the<br />
Basic Picture menu (page 27).<br />
• Change the Aspect Ratio. Choose the option that best fits your input source<br />
(page 27).<br />
• Adjust the Color Temperature. Select a listed warmth value (page 28).<br />
• Turn on Overscan to remove noise on the edges of the image (page 28).<br />
Customizing the projector<br />
You can customize the projector for your specific setup and needs. See page 29 to<br />
page 30 for details on these features.<br />
• For rear projection, turn Rear Project on in the Setup menu.<br />
• For ceiling mounted projection, turn Ceiling Mount on in the Setup menu.<br />
• Specify which source the projector checks first for active video during<br />
power-up.<br />
• Specify the function of the Custom key on the remote.<br />
• Turn the projector’s display messages on and off.<br />
• Turn on power saving features.<br />
• Specify appearance of blank screen and startup screen.<br />
• Specify the language viewed on the menus.<br />
25
Using the menus<br />
To open the menus, press the Menu button on the keypad or remote. (The menus<br />
automatically close after 60 seconds if no buttons are pressed.) Use the arrow<br />
buttons to move up and down to highlight the desired menu, then press the Select<br />
button.<br />
To change a menu setting, highlight it, press Select, then use the arrow buttons to<br />
adjust the value or select an option or turn the feature on or off. Press Select to<br />
confirm your changes. Use the arrow buttons to navigate to another setting. When<br />
your adjustments are complete, press Menu to access a different menu; press the<br />
Menu button at any time to navigate to the higher-level menu and ultimately close<br />
the menus.<br />
Menu navigation<br />
buttons<br />
The menus are grouped by usage:<br />
• The Basic Picture menu provides common image adjustments.<br />
• The Advanced Picture menu provides more complex image adjustments.<br />
• The Setup menu provides set-up type adjustments that are not changed often.<br />
• The Status and Service menu provides information about the projector and<br />
source.<br />
Basic Picture menu<br />
Advanced Picture menu<br />
Setup menu<br />
Status and Service menu<br />
26
Basic Picture menu<br />
To adjust the following settings, highlight the setting, press Select, use the arrow<br />
buttons to adjust the values, then press Select to confirm the changes.<br />
Brightness: Changes the intensity of the image.<br />
Contrast: Controls the degree of difference between the lightest and darkest parts<br />
of the picture and changes the amount of black and white in the image.<br />
Sharpness: Changes the clarity of the edges of a video image. Select a sharpness<br />
setting.<br />
Color: Adjusts a video image from black and white to fully saturated color. The<br />
color setting applies to video sources only.<br />
Tint: Adjusts the red-green color balance in the image of NTSC video images. The<br />
tint setting applies to NTSC video sources only.<br />
SplitScreen: Allows two distinct sources to be displayed simultaneously. Switch<br />
primary sources, make picture adjustments and choose one of multiple display<br />
options: either two side by side horizontal or vertical source regions, or a small<br />
secondary source image displayed on top of the primary source in one of four<br />
placement options. For display options, see page 35.<br />
Auto Image: Forces the projector to reacquire and lock to the input signal. This is<br />
useful when signal quality is marginal.<br />
Aspect Ratio: Aspect ratio is the ratio of the image width to image height. TV<br />
screens are usually 4:3. HDTV and most DVDs are 16:9.<br />
Select Auto to have the projector choose the ratio. Choose Native to see the<br />
unmodified input with no resizing by the projector. Select 16:9 to watch enhanced<br />
widescreen DVDs.<br />
For more information regarding Aspect Ratio, see page 14.<br />
Apply Preset...: Presets are provided that optimize the projector for displaying<br />
computer presentations and video images under certain conditions.<br />
There is also a user-definable preset. To set this preset, adjust the image and select<br />
Save <strong>User</strong> in the Presets menu. You can recall these settings in the future by<br />
selecting the <strong>User</strong> preset.<br />
Horz/Vert Keystone: Adjusts the image horizontally and vertically and makes a<br />
squarer image.<br />
Digital Zoom: Changes the size of projector’s display area. If the display area has<br />
been resized by this setting, it can be moved by changing the Horz Shift and Vert<br />
Shift settings.<br />
Horz Shift/Vert Shift: Moves the display area horizontally or vertically if its size<br />
has been changed by the Digital Zoom setting.<br />
Increasing keystone<br />
Basic Picture menu<br />
Aspect ratio<br />
Decreasing keystone<br />
27
Advanced Picture menu<br />
BrilliantColor: Produces an expanded onscreen color spectrum that delivers<br />
enhanced color saturation for bright, true-to-life images. Choose Normal Look for<br />
most video sources and Bright Look for most computer sources.<br />
Iris/DynamicBlack: Select Auto to constantly adjust the aperture based on the<br />
amount of black in the current scene, or select a percentage for a fixed aperture size<br />
(100% is maximum size).<br />
Color Temperature: Changes the intensity of the colors. Select a listed relative<br />
warmth value.<br />
Overscan: Removes noise around the video image.<br />
Phase: Adjusts the horizontal phase of a computer source.<br />
Sync Threshold: (progressive signals only) If a hardware device, such as a DVD<br />
player, is not syncing properly with the projector, select this option to help it to sync<br />
when connected to the projector.<br />
Tracking: Adjusts the vertical scan of a computer source.<br />
Color Space: This option applies to computer and component video sources. It<br />
allows you to select a color space that has been specifically tuned for the input<br />
signal. When Auto is selected, the projector automatically determines the standard.<br />
To choose a different setting, turn off Auto, then choose RGB for computer sources<br />
or choose either REC709 or REC601 for component video sources.<br />
Noise Reduction: Reduces temporal and/or spatial noise in the image.<br />
Flesh Tone Correction: Controls the amount of flesh tone correction applied to the<br />
image.<br />
Set Black Level...: Analyzes the current input image and calculates an offset value<br />
which is then added to the analog to digital converter black level value. This<br />
ensures optimum black level for each analog source.<br />
Detect Film: Controls film mode detection, and determines whether the original<br />
source of the input video was film or video.<br />
Motion Smoothing: This feature predicts the motion direction of objects and<br />
pixels, and generates more frames to smooth the image and action, resulting in a<br />
very crisp image.<br />
Gamma: Select the appropriate gamma from among Video, Film, Bright, and CRT.<br />
Color Gamut: Sets the color gamut of the input signal.<br />
Color Gain: Adjusts the gain of the red, green, or blue channel of the image.<br />
Color Offset: Adjusts the offset of the red, green, or blue channel of the image.<br />
Horizontal/Vertical Position: Adjusts the position of a computer source.<br />
Horizontal/Vertical Pincushion: Correct optical pincushion distortion.<br />
.<br />
Advanced Picture menu<br />
28
Setup menu<br />
Language: Allows you to select a language for the onscreen display.<br />
Key Click: Turns the key click sound on or off. When this setting is on, pressing<br />
keys on the keypad causes the projector’s speaker to play a “click” sound.<br />
Blank Key: Select what to display when the blank key on the remote is pressed: a<br />
solid color screen (blue, black or white), the factory logo screen, a timer, or test<br />
patterns. The timer option is useful for classroom tests or break times during<br />
meetings.<br />
Custom Key: Allows you to assign a different function to the Custom button,<br />
allowing you to quickly and easily use the effect. Highlight an effect and press<br />
Select to choose a different one.<br />
• Source Info: The default action. Shows the Source Info menu.<br />
• Projector Info: Shows the Projector Info menu.<br />
• Aspect Ratio: Sets the ratio of image width to image height (see page 14 and<br />
page 27).<br />
• Auto Image: Resynchronizes the projector to the source (page 24).<br />
• Overscan: Removes noise around the image.<br />
• Freeze Screen: Pauses the projected image.<br />
• Source: Cycles through available sources.<br />
• Closed Captions: Enables or disables Closed Captioning.<br />
• SplitScreen: Enables or disables SplitScreen. Before using this for the first<br />
time, configure SplitScreen sources and layouts using the SplitScreen menu<br />
(page 27)<br />
Source Key: Enables or disables Source Keys on the optional Commander-2<br />
remote.<br />
AC Power On: When this feature is on, the projector automatically turns on when<br />
electrical power is connected. This allows control of ceiling mounted projectors<br />
with a wall power switch.<br />
Auto Off Time: Automatically turns the projector off after no signals are detected<br />
for a preset number of minutes. If an active signal is received before the projector<br />
powers down, the image will be displayed.<br />
Screen Save Time: Automatically blanks the screen with a black color after no<br />
signals are detected for a preset number of minutes. The image returns when an<br />
active source is detected or a remote or keypad button is pressed.<br />
Sleep Timer: Allows the projector to automatically power off after it has been on<br />
for a specified amount of time.<br />
Always-On Functions: Enables IR Repeater and USB functions while the<br />
projector is off. Selecting this setting increases the amount of power used by the<br />
projector while off.<br />
Lamp Low Power: Toggles between On and Off. Turn it Off to raise the light<br />
output of the lamp. This also raises the fan speed, making the projector louder.<br />
Default is On.<br />
Power Sounds: Controls whether the projector makes a sound when powered on<br />
and off.<br />
Auto Source: When this feature is On, the projector automatically finds the active<br />
source, checking the selected Power-up Source first. When this feature is Off, the<br />
projector defaults to the source selected in Power-up Source. To display another<br />
source, you must manually select one by pressing the Source button on the remote<br />
or keypad.<br />
Power-up Source: Determines which source the projector checks first for active<br />
video during power-up.<br />
Fast Color Refresh: Changes the color wheel speed from 4x to 6x.<br />
Closed Captions: Controls closed caption display while audio is not muted. If this<br />
setting is not off, and audio is not muted, and the source is NTSC and contains<br />
captions on the selected channel, then the projector must display caption text<br />
overlaid on the image.<br />
Ceiling Mount: Turns the image upside down for ceiling-mounted projection.<br />
Rear Project: Reverses the image so you can project from behind a translucent<br />
screen.<br />
Prevent PC Screen Saver: Prevents your computer from going into Screen Save<br />
mode. The projector must be connected to the PC via a USB cable for this feature to<br />
work.<br />
29
Search Screen: Allows you to display one of the following options instead of the<br />
default screen at startup, and when no source is detected. Options include the<br />
factory logo screen, or a blue, black or white screen.<br />
Show Messages: Displays status messages (such as “Searching”) in the lower-left<br />
corner of the screen.<br />
Menu Offset: Allows you to change the position of the On Screen Display items.<br />
Menu Transparency: Allows you to change how much of the projected image<br />
behind the menu you can see. As the value increases, more of the image behind the<br />
menu is visible.<br />
Magnify Controls: Allows you to change the function of the arrow buttons when<br />
the menu is not shown. By default, the arrow buttons allow you to advance slides<br />
while in PowerPoint’s SlideShow mode. To make the arrow buttons also adjust<br />
magnify settings, choose Magnify Controls to turn magnify controls on. Now when<br />
the menu is not shown, you can press the Select button to switch between the<br />
magnification settings (Magnify Level, Magnify Horizontal Position and Magnify<br />
Vertical Position), then press Select again to turn off magnify controls and use the<br />
arrow buttons to advance slides.<br />
Keypad: Enables or disables keypad.<br />
Glow Ring: Controls the brightness level of the glow ring status indicator.<br />
Serial Port, Baud Rate: Selects the serial port and baud rate.<br />
Serial Port Echo: Controls whether the serial port echoes characters.<br />
Setup menu<br />
30
Status and Service menu<br />
Source Info: Displays current source settings (read-only).<br />
Projector Info: Displays current projector settings (read-only).<br />
Reset Lamp Hours: Resets the lamp hours used counter in the Projector Info menu<br />
to zero. Do this only after changing the lamp.<br />
HDMI Long Cable: Adjusts the input for different lengths of HDMI cable. Enable<br />
for HDMI cables greater than 5 meters and disable for HDMI cables less than 5<br />
meters.<br />
Factory Reset: Restores all settings to their default.<br />
Service Code: Only used by authorized service personnel.<br />
Help<br />
Press Help (on the keypad or remote) at any time to get interactive help for solving<br />
common, picture, sound, and cabling problems.<br />
Status and Service menu<br />
31
Maintenance<br />
Cleaning the lens<br />
1 Turn the projector off and unplug the power cord.<br />
2 Apply a non-abrasive camera lens cleaner to a soft, dry cloth.<br />
• Avoid using an excessive amount of cleaner, and don’t apply the cleaner<br />
directly to the lens. Abrasive cleaners, solvents or other harsh chemicals<br />
might scratch the lens.<br />
3 Lightly wipe the cleaning cloth over the lens in a circular motion.<br />
WARNINGS:<br />
• Turn the projector off and unplug power cord before cleaning any part of the<br />
projector.<br />
• Do not open any cover on the projector, except the lamp cover or projector top<br />
cover.<br />
• Do not attempt to service this product yourself as opening and removing<br />
covers may expose you to dangerous voltage and other hazards. Refer all<br />
servicing to qualified service personnel.<br />
32
Replacing the projection lamp<br />
The lamp hours timer in the Projector Info menu counts the number of hours the<br />
lamp has been in use. Twenty hours before the lamp life expires, the message<br />
“Replace lamp” appears on the screen at startup.<br />
• NOTE: Be sure to use the <strong>InFocus</strong> lamp module designed for this projector.<br />
You can order new lamps from www.infocus.com (in select areas), your<br />
retailer or your dealer. Only genuine <strong>InFocus</strong> lamps are tested for use in this<br />
projector. Use of non <strong>InFocus</strong> lamps may cause electrical shock and fire, and<br />
may void the projector warranty. <strong>InFocus</strong> is not liable for the performance,<br />
safety or certification of any other lamps.<br />
1 Turn the projector off and unplug the power cord.<br />
2 Wait 60 minutes to allow the projector to cool thoroughly.<br />
3 Remove the lamp door by removing the screws on the side of the lamp door,<br />
and lifting the door off.<br />
Turn off and<br />
unplug projector<br />
Wait 60<br />
minutes<br />
WARNINGS:<br />
• The projector uses a high-pressure mercury glass lamp. The lamp may fail<br />
prematurely, or it may rupture with a popping sound if jolted, scratched, or<br />
handled while hot. The risk of lamp failure or rupture also increases as the<br />
lamp age increases; please replace the lamp when you see the “Replace Lamp”<br />
message.<br />
• To avoid burns, allow the projector to cool for at least 60 minutes before you<br />
replace the lamp.<br />
• Unplug the power cord before replacing the lamp.<br />
• Do not drop the lamp module. The glass may shatter and cause injury.<br />
• Do not touch the glass surface of the lamp module. Fingerprints can obscure<br />
projection sharpness and may cause the glass to shatter.<br />
• Be extremely careful when removing the lamp housing. In the unlikely event<br />
that the lamp ruptures, small glass fragments may be generated. The lamp<br />
module is designed to contain most of these fragments, but use caution when<br />
removing it.<br />
• Before replacing a ruptured lamp, clean the lamp compartment and dispose of<br />
cleaning materials. Wash hands after lamp replacement.<br />
• When replacing the lamp while the projector is ceiling-mounted, wear<br />
protective eyewear to prevent eye injury.<br />
• Hg – Lamp contains mercury. Manage in accordance with local<br />
disposal laws. See www.lamprecycle.org.<br />
33
4 Loosen the captive screws that attach the lamp housing to the projector.<br />
5 Using the handle, carefully remove the lamp housing. Dispose of the lamp in an<br />
environmentally proper manner in accordance with local disposal laws.<br />
6 Install the new lamp housing, pressing the lamp into place.<br />
7 Tighten the captive screws.<br />
8 Replace the lamp door and tighten both screws.<br />
9 Plug in the power cord and press the Power button to turn the projector back on.<br />
10 To reset the lamp hour timer, navigate to the Status and Service menu and<br />
select Reset Lamp Hours. See page 31 for details.<br />
Using the security lock<br />
The projector has a security lock for use with a Cable Lock System. Refer to the<br />
information that came with the lock for instructions on how to use it.<br />
Security lock<br />
34
Appendix<br />
SplitScreen Compatibility<br />
Splitscreen allows two distinct sources to be displayed simultaneously. Switch primary sources, make picture adjustments and choose one of multiple display options: either<br />
two side by side horizontal or vertical source regions, or a small secondary source image displayed on top of the primary source in one of four placement options.lets you<br />
show two different sources at the same time. See page 27 for details. The following source combinations are supported:<br />
Table 2:<br />
HDMI 1<br />
HDMI 2<br />
VGA/Component 4<br />
Component 1<br />
Component 2<br />
Component 3<br />
S-video<br />
Composite<br />
HDMI 1 HDMI 2<br />
VGA/<br />
Component 4 Component 1 Component 2 Component 3 S-video Composite<br />
X X X<br />
X X X X X<br />
X X X<br />
X X X<br />
X X X X X<br />
X X X X X<br />
X X X<br />
X X X<br />
35
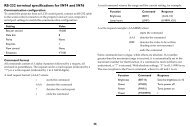
RS-232 Commands<br />
IMPORTANT: When formatting commands sent from a control system or<br />
computer, enclose commands in parentheses “(“ and “)”. When entering custom<br />
commands into Scheduled Tasks in the projector’s web interface, enclose<br />
commands in less than/greater than symbols “” instead.<br />
Communication Configuration<br />
Visit our website for additional RS-232 settings and information.<br />
To control this projector via RS-232, connect a null modem cable and set the control<br />
system serial port settings to match the following communication configuration:<br />
Setting<br />
RS-232 Port Settings<br />
Value<br />
Bits per second 115,200<br />
Data bits 8<br />
Parity<br />
Stop bits 1<br />
Flow control<br />
Emulation<br />
None<br />
None<br />
VT100<br />
Command Format<br />
All commands consist of 3 alpha characters followed by a request, all enclosed in<br />
parentheses. The request can be a read request (indicated by a"?") or a write request<br />
(indicated by 1 to 4 ASCII digits).<br />
AAA denotes the command<br />
? denotes the read request<br />
) ends the command<br />
A read command returns the range and the current setting, for example:<br />
Read Command Examples<br />
Function Command Response<br />
Brightness (BRT?) (0-100, 50)<br />
Volume (VOL?) (0-100, 50)<br />
Lamp Hours (LMP?) (0-32766, 42)<br />
A write request example:<br />
(AAA####) where<br />
(starts the command<br />
AAA denotes the command<br />
#### denotes the value to be written<br />
(leading zeros not necessary)<br />
) ends the command<br />
Some commands have ranges, while others are absolute. If a number greater than<br />
the maximum range is received, it is automatically set to the maximum number for<br />
that function. If a command is received that is not understood, a "?" is returned.<br />
With absolute settings, "0" is off, 1-9999 is on. The one exception is the Power<br />
command, where 0 is off and 1 is on.<br />
To assure the projector can process a command, wait 3 seconds before entering the<br />
next command.<br />
A read request example:<br />
(AAA?) where<br />
(starts the command<br />
36
Write Command Examples<br />
Function Commend Response<br />
Brightness (BRT100) Sets the brightness to<br />
100<br />
Power (PWR0) Turns power off<br />
Function<br />
AC Power On<br />
0: Disable; 1: Enable<br />
Always-On<br />
Functions<br />
Commands<br />
RW Min Max Default Step<br />
APO RW 0 1 0 1<br />
SPS RW 0 2 0 1<br />
Power (PWR1) Turns power on<br />
Error Conditions<br />
Not all commands are supported for all projectors. If an unsupported command is<br />
issued, the command will be ignored. If a command is received that is not<br />
understood, a ‘?’ character will be returned indicating the commandwas not<br />
understood.<br />
Limitations<br />
The projector cannot respond to commands coming in at a high-rate. Therefore, a<br />
delay must occur between commands to ensure that the command gets properly<br />
executed. To assure the projector can process a command, wait 3 seconds before<br />
entering the next command.<br />
The Step column refers to increasing or decreasing the menu bar position since the<br />
On-screen Display is not an exact match of values. For example, Step 2 changes the<br />
data by 2 through the CLI (Command Line Interface). The menu bar is up (or down)<br />
by 1.<br />
Aspect Ratio<br />
0: Auto<br />
1: Native<br />
2: 4:3<br />
3: 16:9<br />
4: Letterbox<br />
5: Panorama<br />
6: 16:10<br />
Aspect Ratio of<br />
Current Source<br />
? = Query<br />
Auto Image<br />
1: Enable<br />
ARZ RW 0 6 0 1<br />
QAR R source specific<br />
AIM W n/a 1 1 1<br />
Auto Off Time AOT RW 0 6 6 1<br />
Auto Source<br />
0: Disable; 1: Enable<br />
Blank Screen<br />
0: Off; 1: On<br />
ASC RW 0 1 1 1<br />
BLK RW 0 1 0 1<br />
37
Blank Screen Style<br />
0: Blue Screen<br />
1: Timer<br />
2: Test Pattern<br />
3: Black Screen<br />
4: White Screen<br />
5: Factory Logo<br />
BSS RW 0 5 0 1<br />
Color Temp.<br />
0: Warmest<br />
1: Warm<br />
2: Cool<br />
4: Bright<br />
TMP RW 0 4 source specific 1<br />
Contrast CON RW 0 100 50 1<br />
Brightness BRT RW 0 100 50 1<br />
BrilliantColor<br />
0: Normal; 1: Bright<br />
Ceiling Projection<br />
0: Disable; 1: Enable<br />
Closed Captions<br />
0: Off<br />
1: CC1<br />
2: CC2<br />
BCL RW 0 1 0 1<br />
CEL RW 0 1 0 1<br />
CLC RW 0 2 0 1<br />
Color CLR RW 0 100 50 1<br />
Color Gamut<br />
0: Auto<br />
1: SMPTE_C<br />
2: REC709<br />
3: EBU<br />
4: Maximum<br />
Color Space<br />
0: RGB<br />
1: REC709<br />
2: REC601<br />
3: RGB Video<br />
4: Auto<br />
CGA RW 0 4 0 1<br />
CSM RW 0 4 4 1<br />
Current Source<br />
Color Gamut<br />
? = Query<br />
Current Source<br />
Color Space<br />
? = Query<br />
Current Source<br />
Name<br />
? = Query<br />
Current Source<br />
Resolution<br />
? = Query<br />
Current Source<br />
Signal<br />
? = Query<br />
Current Source<br />
Value<br />
? = Query<br />
QCG R source specific<br />
QCS R source specific<br />
QAS R source specific<br />
RES R source specific<br />
QST R source specific<br />
QSF R source specific<br />
38
Custom Key<br />
0: Blank Screen<br />
3: Aspect Ratio<br />
4: Source<br />
5: Auto image<br />
6: Freeze<br />
8: Source Info<br />
10: Projector Info<br />
14: Overscan<br />
16: Closed Captions<br />
17: SplitScreen<br />
Detect Film<br />
0: Disable<br />
1: Enable<br />
Digital Zoom<br />
Setting<br />
DynamicBlack<br />
0: Auto<br />
1: 100%<br />
2: 90%<br />
3: 80%...<br />
10: 10%<br />
Error Condition<br />
0: No error<br />
1: Lamp won’t strike<br />
after 5 attempts<br />
3: Lamp went out<br />
unexpectedly<br />
4: Fan Failure<br />
5: Over temperature<br />
6: Low voltage<br />
EFK RW 0 17 8 1<br />
TTO RW 0 1 1 1<br />
DZM RW 0 100 100 10<br />
DYB RW 0 10 1 1<br />
ERR R 0 6 0 1<br />
Fast Color Refresh<br />
0: Off<br />
1: Video only<br />
2: On (all sources)<br />
Firmware Version<br />
? = Query<br />
Flesh Tone<br />
Correction<br />
Force Wide<br />
0: Disable<br />
1: Enable<br />
Freeze<br />
0: Disable<br />
1: Enable<br />
Gamma<br />
2: Video<br />
3: Film<br />
5: Bright<br />
7: CRT<br />
Glow Ring<br />
0: Disable; 1: Enable<br />
Help Command<br />
0: Disable; 1: Enable<br />
FCR RW 0 2 0 1<br />
FVS R string 1<br />
FTC RW 0 100 0 10<br />
FWM RW 0 1 1 1<br />
FRZ RW 0 1 0 1<br />
GTB RW 0 7 source specific 1<br />
GLO RW 0 1 1 1<br />
HLP RW 0 1 0 1<br />
Horz. Keystone DKH RW 0 100 50 1<br />
Horz. Pincushion HPC RW 0 100 50 1<br />
Horz. Position HPS RW 0 100 50 1<br />
? = Query<br />
Factory Reset<br />
1: reset<br />
RST W n/a 1 1 1<br />
Horz. Refresh<br />
Frequency<br />
? = Query<br />
QHR R string<br />
39
Horz. Shift DSH RW 0 100 50 1<br />
Key Click<br />
0: Disable; 1: Enable<br />
Keypad Enable<br />
0: Disable; 1: Enable<br />
Lamp Hours in High<br />
Power Mode<br />
? = Query<br />
Lamp Hours in Low<br />
Power Mode<br />
? = Query<br />
Lamp Life<br />
? = Query<br />
Lamp Low Power<br />
0: Disable; 1: Enable<br />
Lamp Resets<br />
(Total number)<br />
? = Query<br />
KCL RW 0 1 1<br />
KPE RW 0 1 1 1<br />
LMO R 0 n/a 1<br />
LME R 0 n/a 1<br />
LIF R n/a 2000<br />
IPM RW 0 1 1 1<br />
LMR R 0 n/a 1<br />
Language<br />
0: English<br />
1: French<br />
2: German<br />
3: Italian<br />
5: Korean<br />
6: Norwegian<br />
7: Portuguese<br />
8: Russian<br />
9: Simp Chinese<br />
10: Spanish<br />
11: Trad Chinese<br />
12: Swedish<br />
13: Dutch<br />
14: Polish<br />
15: Turkish<br />
16: Danish<br />
17: Finnish<br />
Magnify Controls<br />
0: Disable; 1: Enable<br />
Magnify Horz.<br />
Position<br />
LAN RW 0 17 0<br />
(9 for China<br />
models)<br />
MGC RW 0 1 1 1<br />
MGH RW 0 100 50 5<br />
1<br />
Lamp Total On Time<br />
(All Bulbs)<br />
? = Query<br />
Lamp Total High<br />
Power Time (All<br />
Bulbs)<br />
? = Query<br />
Lamp Total Low<br />
Power Time (All<br />
Bulbs)<br />
? = Query<br />
LMT R 0 n/a 1<br />
LTO R 0 n/a 1<br />
LTE R 0 n/a 1<br />
Magnify Level MGL RW 0 100 0 5<br />
Magnify Vert.<br />
Position<br />
Menu<br />
0: Clear; 1: Display<br />
Menu Lockout<br />
1: Basic Picture<br />
2: Adv Picture<br />
4: Setup Menu<br />
8: Status & Service<br />
15: All Menus<br />
MGV RW 0 100 50 5<br />
MNU RW 0 1 0 1<br />
MNL RW 0 15 0<br />
40
Menu Navigation<br />
0: Menu Key<br />
1: Up Key<br />
2: Down Key<br />
3: Select Key<br />
4: Left Key<br />
5: Right Key<br />
NAV W 0 5 n/a 1<br />
Menu Offset OFF RW 0 100 0 10<br />
Menu Transparency<br />
0: Opaque<br />
20: 20% Trans.<br />
Motion Smoothing<br />
0: Disable<br />
1: Low<br />
2: Normal<br />
3: High<br />
4: Demo<br />
Native Resolution<br />
? = Query<br />
TOE RW 0 90 20 5<br />
MSM RW 0 4 0 1<br />
NRS R string<br />
Noise Reduction NRL RW 0 100 50 1<br />
Overscan<br />
0: disable<br />
1: zoom<br />
2: crop<br />
OVS W 0 2 0 1<br />
Phase MSS RW 0 100 50 1<br />
Pixel Clock Freq.<br />
? = Query<br />
Power<br />
0: Turn Off<br />
1: Turn On<br />
QPC R string<br />
PWR RW 0 1 0 1<br />
Power Sounds<br />
0: Disable; 1: Enable<br />
Power-up Source<br />
0: VGA<br />
1: HDMI1<br />
2: HDMI 2<br />
3: Component 1<br />
4: Component 2<br />
5: Component 3<br />
6: S-video<br />
7: Composite<br />
Presets<br />
1: <strong>User</strong><br />
5: Presentation<br />
7: Video<br />
8: ISF Day<br />
9: ISF Night<br />
10: Bright<br />
11: Whiteboard<br />
12: Blackboard<br />
13: Beige Wall<br />
Prevent PC Screen<br />
Saver<br />
0: Disable; 1: Enable<br />
Projector Info menu<br />
1: Display<br />
Projector Model<br />
? = Query<br />
Projector Serial No.<br />
? = Query<br />
Rear Projection<br />
0: Disable; 1: Enable<br />
ACE RW 0 1 1 1<br />
DSC RW 0 7 1 1<br />
PST RW 1 13 source specific 1<br />
NND RW 0 1 1 1<br />
PRI W 1 1<br />
MDL R string<br />
USN R string<br />
REA RW 0 1 0 1<br />
41
Reset Lamp Hours<br />
1: Reset<br />
Save <strong>User</strong> Presets<br />
1: Save<br />
Screen Save<br />
0: Never<br />
1: 5 minutes<br />
2: 10 minutes<br />
3: 15 minutes<br />
4: 20 minutes<br />
5: 25 minutes<br />
6: 30 minutes<br />
Search Screen<br />
0: Factory Logo<br />
1: Blue<br />
3: Black<br />
4: White<br />
Serial Port Baud<br />
Rate<br />
0: 2400<br />
1: 4800<br />
2: 9600<br />
3: 14400<br />
4: 19200<br />
5: 38400<br />
6: 57600<br />
7: 115200<br />
8: 1200<br />
Serial Port Echo<br />
0: Disable; 1: Enable<br />
Set Black Level<br />
Command<br />
1: Execute<br />
LRT W n/a 1 1 1<br />
US1 W n/a 1 1 1<br />
SSV RW 0 6 0 1<br />
DSU RW 0 4 0 1<br />
BR1 RW 0 8 7 1<br />
EC1 RW 0 1 0<br />
BLC W 1 1<br />
Sharpness<br />
0: Maximum<br />
1: High<br />
2: Normal<br />
3: Low<br />
4: Minimum<br />
Show Messages<br />
0: Disable; 1: Enable<br />
SleepTimer<br />
0: Off<br />
1: 2 hours<br />
2: 4 hours<br />
3: 6 hours<br />
Source<br />
0: VGA<br />
1: HDMI1<br />
2: HDMI 2<br />
3: Component 1<br />
4: Component 2<br />
5: Component 3<br />
6: S-video<br />
7: Composite<br />
SHP RW 0 4 2 1<br />
DMG RW 0 1 0 1<br />
SLT RW 0 3 0 1<br />
SRC RW 0 7 1 1<br />
Source Adv. PC CAD+ W +<br />
Source Adv. Video VAD+ W +<br />
Source Info menu<br />
1: Display<br />
Source Name (0-7)<br />
* = Factory Names<br />
Source 1-4<br />
Commands<br />
SR1 = Source Key 1<br />
SR2 = Source Key 2<br />
ABT W n/a 1 1 1<br />
SNn RW string<br />
SRn RW SR1 = VGA<br />
SR2 = HDMI 1<br />
SR3 = HDMI 2<br />
42
SplitScreen Enable<br />
0: off; 1: on<br />
SplitScreen 2nd<br />
Source<br />
0:off<br />
1: VGA<br />
2: HDMI1<br />
3: HDMI 2<br />
4: Component 1<br />
5: Component 2<br />
6: Component 3<br />
7: S-video<br />
8: Composite<br />
SplitScreen 2nd<br />
Source Location<br />
0: right<br />
1: bottom<br />
2: left<br />
3: top<br />
4: PiP bottom right<br />
5: PiP bottom left<br />
6: PiP top left<br />
7: PiP top right<br />
SplitScreen 2nd<br />
Source Size<br />
0: small; 1: medium<br />
2: large<br />
SplitScreen Swap<br />
1: enable<br />
SSC RW 0 1 0 1<br />
SSL RW 0 8 source specific -<br />
See <strong>User</strong> <strong>Guide</strong><br />
SplitScreen<br />
Matrix in<br />
Appendix<br />
SSY RW 0 7 0 1<br />
SSZ RW 0 2 2 1<br />
SSS W n/a 1 1 1<br />
Sync Threshold STH RW 0 100 50 10<br />
1<br />
System State<br />
1: Off<br />
2: Start Up<br />
4: Search<br />
7: Source Displayed<br />
9: Blank Screen<br />
12: Cool Down<br />
13: Screen Save<br />
17: Flash Update<br />
18: Error<br />
SYS R 1 18 7 1<br />
Test Pattern Select TPS RW 0 21 9 1<br />
Tint TNT RW 0 100 50 1<br />
Total Lamp Hours<br />
? = Query<br />
LMP R 0 n/a 1<br />
Tracking MTS RW 0 100 50 1<br />
Vert. Keystone DKV RW 0 100 50 1<br />
Vert. Pincushion VPC RW 0 100 50 1<br />
Vert. Position VPS RW 0 100 50 1<br />
Vert. Refresh Freq.<br />
? = Query<br />
QVR R string<br />
Vert. Shift DSV RW 0 100 50 1<br />
Video Standard<br />
0: Auto; 1: NTSC<br />
2: PAL; 5: SECAM<br />
Red Gain<br />
Green Gain<br />
Blue Gain<br />
VSU RW 0 5 0 1<br />
RCG<br />
GCG<br />
BCG<br />
RW 0 100 50 1<br />
43<br />
Red Offset<br />
Green Offset<br />
Blue Offset<br />
RCO<br />
GCO<br />
BCO<br />
RW 0 100 50 1
INDEX<br />
Numerics<br />
16x9 vs 4x3 13<br />
A<br />
Aspect Ratio 13, 14<br />
C<br />
Cable box 13<br />
Computer In connector 10<br />
Connecting<br />
Computer 10<br />
Video device 13<br />
Connecting a computer source 10<br />
Contacting <strong>InFocus</strong> 22<br />
Customer service contact information 22<br />
D<br />
Digital Zoom 27<br />
F<br />
Focus 12<br />
H<br />
Help 31<br />
K<br />
Keypad buttons 24<br />
Keystone 19<br />
L<br />
Laptop video port activation 11<br />
M<br />
Menu usage 26<br />
O<br />
Optimizing computer image 24<br />
Optimizing video images 25<br />
P<br />
Position the projector 7<br />
Power connector 10<br />
Power cord 10<br />
Presentation features 24<br />
Projector<br />
Connecting video devices 13<br />
Keypad buttons 24<br />
Menus 26<br />
Positioning 7<br />
Setting up 7<br />
Shutting down 15<br />
Troubleshooting problems 15<br />
projector<br />
Connecting computers 10<br />
R<br />
Remote control 23<br />
S<br />
Screen Aspect 13<br />
Screen Save 15<br />
Shutting down the projector 15<br />
S-video connector 13<br />
T<br />
TV tuner 13<br />
W<br />
Warranty 22<br />
Z<br />
Zoom 12<br />
44


