Create successful ePaper yourself
Turn your PDF publications into a flip-book with our unique Google optimized e-Paper software.
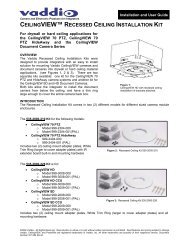
Quick Connect <strong>CCU</strong> <strong>Kit</strong> <strong>and</strong> WallVIEW <strong>Kit</strong> for the AW-HE120<br />
Overview:<br />
The <strong>Vaddio</strong> Quick-Connect <strong>CCU</strong> system for the AW-HE120 camera allows the user to control<br />
the color output of the camera’s image sensor through both Red <strong>and</strong> Blue Gain controls, Detail,<br />
Chroma, Gamma, Total Pedestal, as well as Iris <strong>and</strong> Gain levels, to provide a higher quality<br />
image. In addition, there are also Red <strong>and</strong> Blue Pedestal parameters. In addition, there are<br />
also Pedestal, Gamma <strong>and</strong> Chroma adjustments for added fine-tuning of the camera’s image.<br />
Figure: Front Panel of the Quick-Connect <strong>CCU</strong> for the AW-HE120 Camera<br />
The Panasonic AW-HE120 uses st<strong>and</strong>ard RS-422 control protocol. To be 100% compatible with <strong>Vaddio</strong><br />
equipment, everything is included to convert <strong>Vaddio</strong>’s RS-232 to RS-422. This allows for the operation with the<br />
complete line of <strong>Vaddio</strong> ProductionVIEW consoles (Precision Camera Controller, ProductionVIEW HD,<br />
ProductionVIEW HD MV <strong>and</strong> the ProductionVIEW HD-SDI MV with integrated multi-viewers.<br />
The <strong>CCU</strong> has many features, including Tally illumination on the front panel <strong>and</strong> on the on the camera which<br />
allows the presenter to know which camera is live <strong>and</strong> what <strong>CCU</strong> to adjust if a tweak is needed. Genlock is<br />
delivered to the camera over Cat-5 with a level adjustment on the EZIM <strong>CCU</strong>. The ability to store settings on two<br />
discrete Scene buttons is included, <strong>and</strong> buttons for Auto White Balance, One Push White Balance <strong>and</strong> Auto Iris<br />
programming are also available.<br />
The AW-HE120 HD PTZ Camera features a 20x zoom lens <strong>and</strong> a three (3), 1/3-type 2.2 megapixel CMOS imager<br />
sensors. The systems are available as a WallVIEW <strong>CCU</strong> HE120 System with the camera included, or as a Quick-<br />
Connect <strong>CCU</strong> <strong>Kit</strong>, without the camera. The Quick-Connect <strong>CCU</strong> for the AW-HE120 has the ability to produce<br />
remarkable video in a wide range of shooting conditions<br />
Important Safeguards:<br />
Read <strong>and</strong> underst<strong>and</strong> all instructions <strong>and</strong> warranty statements before using. Do not operate any device if it has<br />
been dropped or damaged. In this case, a <strong>Vaddio</strong> technician must examine the product before operating. To<br />
reduce the risk of electric shock, do not immerse in water or other liquids <strong>and</strong> avoid extremely humid conditions.<br />
General Safeguard: Use only the power supply provided with the system. Use of any<br />
unauthorized power supply will void any <strong>and</strong> all warranties. Please do not cut the<br />
secondary side (or the DC side) of the power supply <strong>and</strong> attempt to extend the power to the<br />
camera. The warranty is voided when the cable is cut.<br />
Please do not use “pass-thru” type RJ-45 connectors. These pass-thru type connectors do not<br />
work well for professional installations <strong>and</strong> can be the cause of intermittent connections which,<br />
can result in the RS-232 control line failing <strong>and</strong> locking up, <strong>and</strong>/or compromising the HSDS<br />
signals. For best results please use st<strong>and</strong>ard RJ-45 connectors <strong>and</strong> test all cables for proper pinouts<br />
prior to use <strong>and</strong> connection to <strong>Vaddio</strong> product.<br />
Intended Use<br />
Before operating the device, please read the entire manual thoroughly. The system was designed, built <strong>and</strong><br />
tested for use indoors, <strong>and</strong> with the provided power supply <strong>and</strong> cabling. The use of a power supply other than the<br />
one provided or outdoor operation has not been tested <strong>and</strong> could damage the device <strong>and</strong>/or create a potentially<br />
unsafe operating condition.<br />
Save These Instructions<br />
The information contained in this manual will help you install <strong>and</strong> operate your product. If these instructions are<br />
misplaced, <strong>Vaddio</strong> keeps copies of Specifications, Installation <strong>and</strong> User Guides <strong>and</strong> most pertinent product<br />
drawings for the <strong>Vaddio</strong> product line on the <strong>Vaddio</strong> website. These documents can be downloaded from<br />
www.vaddio.com free of charge.<br />
© 2012 <strong>Vaddio</strong> - All Rights Reserved. Document Number <strong>342</strong>-<strong>0498</strong> Rev A Page 3 of 16