Pow-R-Master⢠- Ideal Industries Inc.
Pow-R-Master⢠- Ideal Industries Inc.
Pow-R-Master⢠- Ideal Industries Inc.

Create successful ePaper yourself
Turn your PDF publications into a flip-book with our unique Google optimized e-Paper software.
<strong>Pow</strong>-R-Master<br />
Air <strong>Pow</strong>ered Custom Stripmaster ®<br />
#45-2521
Operating Instructions<br />
The IDEAL <strong>Pow</strong>-R-Master Stripmaster ® Wire Stripper is a hand held,<br />
air-powered production tool designed to strip most insulation types in the<br />
10 to 30 AWG range. Standard blades have 3 – 6 stripping holes.<br />
Three types of gripper pad surfaces are available Grit, File, and Parallel<br />
File.<br />
Unpacking - please read<br />
Do not connect to an air supply until all set-up steps have been completed and<br />
checked. Personal injury or damage to the unit may result. The IDEAL <strong>Pow</strong>-R-<br />
Master is packaged without stripping blades. Stripping blades must be<br />
ordered separately according to<br />
the wire specifications.<br />
Set-Up and Calibration<br />
1. Locate the guide plate (34), the blade set (31 )(ordered separately), and<br />
the blade retaining screws (29).<br />
2. Place the movable and stationary blade halves (31) on the frame. Make<br />
sure the link (23) is secured around the leg of the moveable blade half.<br />
3. Place the guide plate (34) on top of the blade set (31).<br />
4. Install the blade retaining screws (29), but do not tighten.<br />
5. Connect the unit to an air source (80 to 125 PSI operating pressure)<br />
using the Hose bard (11) port located on the end of the unit.<br />
WARNING: Never connect an air source with pressure in<br />
excess of 150 PSI. Personal injury or damage to the unit may result.<br />
6. Actuate the unit by pressing down the lever (4). Leave the lever<br />
(4) in the depressed position. Tighten the blade retaining screws<br />
(29) to 6 to 8 inch pounds.<br />
7. Release the lever (4).<br />
8. The unit is ready for operation.<br />
-1-
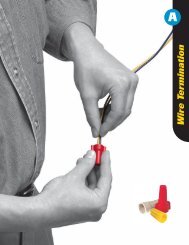
Proper use of the Tool<br />
WARNING: To avoid personal injury, keep fingers away for the gripper<br />
pads and blades during operation.<br />
1. Hold the stripper in the right hand while holding the wire to be stripped in<br />
the left hand.<br />
2. Place the wire in the proper stripping hole making sure to keep fingers<br />
clear of the gripper pads.<br />
3. Press the Lever down to strip the wire.<br />
4. Release the Lever and simultaneously withdraw the wire away from the<br />
gripper pad to prevent smashing the wire.<br />
5. Insert the next wire for stripping<br />
Maintenance<br />
The IDEAL <strong>Pow</strong>-R-Master Stripmaster ® Wire Stripper is designed to provide<br />
thousands of strips with minimal maintenance. To preserve peak operating<br />
efficiency, occasionally:<br />
1. Clean any debris from the blade mating surfaces and the gripper pads.<br />
2. Occasionally lubricate the lever, link and sprocket (23), the piston rod (5),<br />
the piston rod pin (19), and the chain (22) with a thick grease. IDEAL<br />
Cylinder Lubricant (Part #1181.019) is recommended.<br />
Valve Spool Seal Replacement<br />
Warning: Make sure the air supply is disconnected before servicing.<br />
1. Remove the actuation lever pin (2), the screw (8), and the lever (4).<br />
2. Remove the Retainer (9).<br />
3. Remove the valve spool (12).<br />
continued on page 3.<br />
- 2 -
Valve Spool Seal Replacement cont.<br />
4. Install the new valve spool (12).<br />
5. Reinstall the Retainer (9).<br />
6. Reinstall the actuation lever pin (2), the screw (8), and the lever (4).<br />
Trouble Shooting<br />
Problem:<br />
Solutions:<br />
Wire slips through the gripper pad.<br />
a. Clean gripper pads of debris with a wire brush.<br />
b. Change gripper pads.<br />
Problem: Blades and gripper pads close on the wire but the<br />
insulation is not removed.<br />
Solutions:<br />
a. Make sure the wire is located in the correct stripping hole.<br />
b. Make sure the blade is designed for the wire.<br />
c. Make sure the area between the blades is free of debris.<br />
d. Make sure the operating air pressure is between 80<br />
and 125 PSI.<br />
e. Make sure the lever, links and sprockets (23) and chain (22)<br />
linkage areas are well lubricated.<br />
- 3 -
Notes<br />
- 4 -
- 5 -
Item Req. Name Part. No.<br />
1 1 Assy. Housing and Gland K 7244<br />
2 1 Pin (1/8 x 3/8 Type C) 281.091<br />
3 1 Cover IA1938<br />
4 1 Lever, Trigger K 7185<br />
5 1 Piston K 7186<br />
6 1 Cylinder K 7187<br />
7 2 Screw (10-32 x 4” SHCS) 113.117<br />
8 1 Screw (8-32 x 5/8 BHCS) 115.001<br />
9 1 Retainer K 7188<br />
10 1 Valve Body H 2562<br />
11 1 Fitting 263.038<br />
12 1 Spool & Sleeve Assy. w/Seals K 7190<br />
13 1 Spring 88.001<br />
14 1 “O” - Ring 483.031<br />
15 2 “O” - Ring 483.042<br />
16 2 Cup Seal - Bushing 483.034<br />
17 1 “O” - Ring 483.043<br />
18 1 “O” - Ring 483.041<br />
19 1 Assy. Rod Piston LB1542<br />
20 2 Screw (8-32 x 3/8 BHCS) 115.014<br />
21 2 Pin (1-16 x 3/8 Type C) 281.107<br />
22 1 Chain (.1475 Pitch) 123.003<br />
23 2 Assy. Lever, Link & Sprocket IA1941<br />
24 1 Spring L 4387<br />
25 1 Jaw Spring L 5092<br />
26 1 Washer 632.142<br />
27 1 Screw (6-32 x 5/16 BHCS) 115.030<br />
28 1 Washer 632.102<br />
29 4 Screw/Lockwasher (5-40 x 3/8 RHCS) 355.002<br />
30 1 Stationary Gripper L 5217<br />
31 1 Set Blade Set Ordered Separate<br />
32 1 Moveable Gripper L 5212<br />
33 1 Sub-Assy. Frame LB1593<br />
34 1 Guide Plate L 4536<br />
35 1 Nameplate LB1531<br />
36 1 Warning Label LA1923<br />
37 1 Warning Label LA1924<br />
38 As Reqrd. Lubricant (Cylinder) 1181.019<br />
39 As Reqrd. Adhesive (Loctite #222) 1202.057<br />
40 As Reqrd. Adhesive (Loctite #271) 1202.035<br />
41 As Reqrd. Grease 1181.011
IDEAL INDUSTRIES, INC.<br />
Sycamore, IL 60178, U.S.A.<br />
800-435-0705 Customer Assistance<br />
www.idealinedustries.com<br />
ND 941-1<br />
Printed in U.S.A.