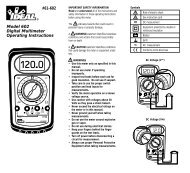
61-764, 61-766, 61-768 Series 660A Clamp Meters Manual with ...
61-764, 61-766, 61-768 Series 660A Clamp Meters Manual with ...
61-764, 61-766, 61-768 Series 660A Clamp Meters Manual with ...

Create successful ePaper yourself
Turn your PDF publications into a flip-book with our unique Google optimized e-Paper software.
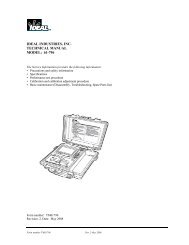
IDEAL INDUSTRIES, INC.<br />
TECHNICAL MANUAL<br />
MODELS: <strong>61</strong>-<strong>764</strong><br />
<strong>61</strong>-<strong>766</strong><br />
<strong>61</strong>-<strong>768</strong><br />
The Service Information provides the following information:<br />
• Precautions and safety information<br />
• Specifications<br />
• Performance test procedure<br />
• Calibration and calibration adjustment procedure<br />
• Basic maintenance (replacing the battery)<br />
Form number: TM<strong>61</strong><strong>764</strong>-6-8<br />
Revision: 5. Date: Nov 2007<br />
Form number TM<strong>61</strong><strong>764</strong>-6-8 Rev 5 November 2007
TABLE OF CONTENTS<br />
Title<br />
Page<br />
Introduction 1<br />
Precautions and Safety Information 1<br />
Symbol Table 1<br />
TightSight Display Notes 1<br />
High Voltage Warning (HI-V) 2<br />
Safety Information 2<br />
Certifications and Compliance 3<br />
Specifications 3<br />
General Specification 3<br />
Voltage Specifications 4<br />
Current Specifications 4<br />
Resistance Specifications 4<br />
Frequency Specification 4<br />
Capacitance Specifications 4<br />
Continuity Specifications 4<br />
Performance Verification 5/6<br />
Calibration 7/8<br />
Calibration Reference Points 9/10<br />
Replacing the Battery 11<br />
Form number TM<strong>61</strong><strong>764</strong>-6-8 Rev 5 November 2007
Page 1<br />
Introduction<br />
Warning<br />
To avoid shock or injury, do not perform the verification<br />
tests or calibration procedures described in this manual<br />
unless you are qualified to do so.<br />
The information provided in this document is for the use<br />
of qualified personnel only.<br />
Caution<br />
The <strong>61</strong>-760 series contains parts that can be damaged by static<br />
discharge. Follow the standard practices for handling static sensitive<br />
devices.<br />
For additional information about IDEAL INDUSTRIES, INC. and its products,<br />
and services, visit IDEAL INDUSTRIES, INC. web site at:<br />
www.idealindustries.com<br />
Precautions and Safety Information<br />
Use the meter only as described in the Users <strong>Manual</strong>. If you do not<br />
do so, the protection provided by the meter may be impaired.<br />
Read the “Safety Information” page before servicing this product.<br />
In this manual, a Warning identifies conditions and actions that<br />
pose hazard (s) to the user; a Caution identifies conditions and<br />
actions that may damage the meter or the test instruments.<br />
The Symbols<br />
The symbols used on the meter and in this manual are explained<br />
in Table A.<br />
Table A Symbols<br />
Symbol Description Symbol Description<br />
Battery<br />
HI-V<br />
High Voltage Indicator<br />
>30 V indicator is on<br />
Cautionary or important<br />
information in manual<br />
Continuity indicator<br />
Danger- Risk of electrical<br />
shock<br />
Double Insulation- Protection<br />
Class II<br />
CAT III IEC Over-voltage Category III<br />
CAT IV IEC Over-voltage Category IV<br />
TightSight Display Notes:<br />
Only AC/DC amps units of measure are displayed in the TightSight display since primary use is<br />
for viewing current measurements in tight locations. The display will show numerical values<br />
only for other functions. The main display is to be used to view units of measure for all other<br />
functions.<br />
Form number TM<strong>61</strong><strong>764</strong>-6-8 Rev 5 November 2007
Page 2<br />
High Voltage Warning (HI-V):<br />
The meter beeps and lights an LED when >30V AC/DC voltage is present through test leads of<br />
the meter. This enhanced safety feature alerts the user that dangerous voltage is present across<br />
the leads even if the meter is set on an incorrect function or range.<br />
Notes: This feature does not work through the clamp head as the clamp is intended to only<br />
measure current. Audible indication can be turned off by sliding the switch in battery<br />
compartment.<br />
SAFETY<br />
Review the following safety precautions to avoid injury and prevent damage to this product or any<br />
products connected to it. To avoid potential hazards, use the product only as specified.<br />
CAUTION.<br />
These statements identify conditions or practices that could result in damage to the equipment or other<br />
property.<br />
WARNING.<br />
These statements identify conditions or practices that could result in personal injury or loss of life.<br />
Specific precautions<br />
Do not operate <strong>with</strong>out covers. To avoid personal injury, do not apply any voltage or current to the<br />
product <strong>with</strong>out the covers in place.<br />
Electric overload. Never apply a voltage to a connector on the product that is outside the range specified<br />
for that connector.<br />
Avoid electric shock. To avoid injury or loss of life, do not connect or disconnect probes or test leads<br />
while they are connected to a voltage source.<br />
Do not operate in wet/damp conditions. To avoid electric shock, do not operate this product in wet or<br />
damp conditions.<br />
Form number TM<strong>61</strong><strong>764</strong>-6-8 Rev 5 November 2007
Page 3<br />
Certifications and Compliances<br />
Designed to EN <strong>61</strong>010-1, EN <strong>61</strong>010-2-032, UL <strong>61</strong>010B-1,<br />
Safety<br />
UL <strong>61</strong>010B-2-032 specifications<br />
1000V DC Category III<br />
Input rating<br />
Over voltage category<br />
600V DC Category IV<br />
750V AC Category III<br />
600V AC Category IV<br />
CAT IV: Outside and service entrance.<br />
CAT III: Distribution level mains, fixed installation.<br />
CAT II: Local level mains, appliances, and portable equipment.<br />
CAT I: Signal level, special equipment or parts of<br />
equipment, telecommunication, electronics.<br />
General Specifications<br />
Characteristics<br />
Description<br />
Display<br />
3¾ Digit LCD display<br />
Display Count 6600 count, maximum reading 6600<br />
Over range Indication “OL” is displayed<br />
Sampling Rate<br />
2.0 time/second<br />
Operating<br />
Relative Humidity<br />
0°C to 50°C (32°F to 122°F)<br />
0 ~ 70% RH<br />
Storage Environment: -20°C to 60°C (-4°F to 140°F) at
Page 4<br />
<strong>61</strong>-<strong>764</strong><br />
Function /<br />
Range<br />
Ranges<br />
Accuracy<br />
660.0mV, 50Hz - 60Hz<br />
1.7% + 8digits<br />
AC Voltage<br />
6.600V/66.00V/660.0V, 50Hz - 100Hz 1.2% + 8 digits<br />
6.600V/66.00V/660.0V, 100Hz - 400Hz 1.5% + 8 digits<br />
750V, 50Hz - 400Hz 1.5% + 8 digits<br />
DC Voltage<br />
660.0mV<br />
1.0% + 2 digits<br />
6.600V/66.00V/660.0V/1000V<br />
0.5% + 2 digits<br />
AC Current<br />
66.00A/660.0A, 50Hz - 60Hz<br />
1.7% + 8 digits<br />
66.00A/660.0A, 60Hz - 400Hz<br />
3.0% + 8 digits<br />
660.0Ω/6.600KΩ/66.00KΩ/400.0KΩ 1.0% + 4 digits<br />
Resistance 4.000MΩ<br />
5.0% + 4 digits<br />
10.00MΩ<br />
12.0% + 5 digits<br />
Continuity
Page 5<br />
AC Converter: <strong>61</strong>-<strong>764</strong> - Average responding, RMS Calibrated to Sine Wave<br />
<strong>61</strong>-<strong>766</strong>, <strong>61</strong>-<strong>768</strong> – True RMS sensing<br />
Overload Protection:<br />
AC and DC Voltage: Not to exceed 1000V DC or 750VAC RMS<br />
AC Current: Not to exceed <strong>660A</strong> AC<br />
DC Current: Not to exceed <strong>660A</strong> DC<br />
Resistance: Not to exceed 600V DC or VAC RMS<br />
Capacitance, Frequency, Continuity: Not to exceed 600V DC or VAC RMS<br />
PERFORMANCE VERIFICATIONS<br />
Perform the following analysis; if the meter conforms to the limits listed in Table 1 through 7 the meter is<br />
functioning correctly. If the meter does not conform to any of the listed limits the calibration procedure<br />
must be performed.<br />
Performance Verification Preparation<br />
1. Turn on the calibrator, allow calibrator to warm up. Temperature stabilization<br />
should be reached after 30 minutes.<br />
2. Remove battery cover and using a calibrated meter to ensure the battery measures a minimum of 7.5V<br />
DC. If the battery measures under 7.5V DC, replace the battery (see Battery Replacement page 11)<br />
before beginning the performance test.<br />
3. Input the values listed in Table 1 through 7.<br />
Table 1 AC Voltage Test<br />
Function<br />
Low High<br />
Input<br />
/Range<br />
Limit Limit<br />
Model Number<br />
V AC 660mV 350mV AC @ 50Hz 343.2 356.8 <strong>61</strong>-<strong>764</strong>, <strong>61</strong>-<strong>766</strong>, <strong>61</strong>-<strong>768</strong><br />
V AC 6.6V 3.5V AC @ 50Hz 3.450 3.550 <strong>61</strong>-<strong>764</strong>, <strong>61</strong>-<strong>766</strong>, 71-<strong>768</strong><br />
V AC 6.6V 3.5V AC @ 400Hz 3.439 3.5<strong>61</strong> <strong>61</strong>-<strong>764</strong>, <strong>61</strong>-<strong>766</strong>, 71-<strong>768</strong><br />
V AC 66V 35V AC @ 50Hz 34.50 35.50 <strong>61</strong>-<strong>764</strong>, <strong>61</strong>-<strong>766</strong>, <strong>61</strong>-<strong>768</strong><br />
V AC 66V 35V AC @ 400Hz 34.39 35.<strong>61</strong> <strong>61</strong>-<strong>764</strong>, <strong>61</strong>-<strong>766</strong>, <strong>61</strong>-<strong>768</strong><br />
V AC 660V 350V AC @ 50Hz 345.0 355.0 <strong>61</strong>-<strong>764</strong>, <strong>61</strong>-<strong>766</strong>, <strong>61</strong>-<strong>768</strong><br />
V AC 660V 350V AC @ 400Hz 343.9 356.1 <strong>61</strong>-<strong>764</strong>, <strong>61</strong>-<strong>766</strong>, <strong>61</strong>-<strong>768</strong><br />
V AC 750V 700V AC @ 50Hz 681 719 <strong>61</strong>-<strong>764</strong>, <strong>61</strong>-<strong>766</strong>, <strong>61</strong>-<strong>768</strong><br />
V AC 750V 700V AC @ 400Hz 681 719 <strong>61</strong>-<strong>764</strong>, <strong>61</strong>-<strong>766</strong>, <strong>61</strong>-<strong>768</strong><br />
Table 2 DC Voltage Test<br />
Function<br />
Low High<br />
Input<br />
/Range<br />
Limit Limit<br />
Model Number<br />
V DC 660mV 350mV 346.3 353.7 <strong>61</strong>-<strong>764</strong>, <strong>61</strong>-<strong>766</strong>, <strong>61</strong>-<strong>768</strong><br />
V DC 6.6V 3.5V 3.480 3.520 <strong>61</strong>-<strong>764</strong>, <strong>61</strong>-<strong>766</strong>, <strong>61</strong>-<strong>768</strong><br />
V DC 66V 35V 34.80 35.20 <strong>61</strong>-<strong>764</strong>, <strong>61</strong>-<strong>766</strong>, <strong>61</strong>-<strong>768</strong><br />
V DC 660V 350V 348.0 352.0 <strong>61</strong>-<strong>764</strong>, <strong>61</strong>-<strong>766</strong>, <strong>61</strong>-<strong>768</strong><br />
V DC 1000V 900V 893 907 <strong>61</strong>-<strong>764</strong>, <strong>61</strong>-<strong>766</strong>, <strong>61</strong>-<strong>768</strong><br />
Form number TM<strong>61</strong><strong>764</strong>-6-8 Rev 5 November 2007
Page 6<br />
Table 3 AC Current Test<br />
Function<br />
Low High<br />
Input<br />
/Range<br />
Limit Limit<br />
Model Number<br />
A AC 66A 10A AC @ 50Hz 9.75 10.25 <strong>61</strong>-<strong>764</strong><br />
A AC 66A 10A AC @ 50Hz 9.73 10.27 <strong>61</strong>-<strong>766</strong><br />
A AC 66A 10A AC @ 400Hz 9.62 10.38 <strong>61</strong>-<strong>764</strong><br />
A AC 66A 10A AC @ 400Hz 9.60 10.40 <strong>61</strong>-<strong>766</strong><br />
A AC <strong>660A</strong> 500A AC @ 50Hz 490.7 509.3 <strong>61</strong>-<strong>764</strong><br />
A AC <strong>660A</strong> 500A AC @ 50Hz 490.5 509.5 <strong>61</strong>-<strong>766</strong><br />
A AC <strong>660A</strong> 500A AC @ 50Hz 489.0 511.0 <strong>61</strong>-<strong>768</strong><br />
A AC <strong>660A</strong> 500A AC @ 400Hz 484.2 515.8 <strong>61</strong>-<strong>764</strong><br />
A AC <strong>660A</strong> 500A AC @ 400Hz 484.0 516.0 <strong>61</strong>-<strong>766</strong>, <strong>61</strong>-<strong>768</strong><br />
Table 4 DC Current Test<br />
Function<br />
Low High<br />
Input<br />
/Range<br />
Limit Limit<br />
Model Number<br />
A DC <strong>660A</strong> 100A DC 97.5 102.5 <strong>61</strong>-<strong>768</strong><br />
A DC <strong>660A</strong> 500A DC 489.5 510.5 <strong>61</strong>-<strong>768</strong><br />
Table 5 Resistance Test<br />
Function /Range Input<br />
Low High<br />
Limit Limit<br />
Model Number<br />
Ω 660 100Ω 98.6 101.4 <strong>61</strong>-<strong>764</strong>, <strong>61</strong>-<strong>766</strong>, <strong>61</strong>-<strong>768</strong><br />
Ω 6.6K 1KΩ .986 1.014 <strong>61</strong>-<strong>764</strong>, <strong>61</strong>-<strong>766</strong>, <strong>61</strong>-<strong>768</strong><br />
Ω 66K 10KΩ 9.86 10.14 <strong>61</strong>-<strong>764</strong>, <strong>61</strong>-<strong>766</strong>, <strong>61</strong>-<strong>768</strong><br />
Ω 400K 100KΩ 98.6 101.4 <strong>61</strong>-<strong>764</strong>, <strong>61</strong>-<strong>766</strong>, <strong>61</strong>-<strong>768</strong><br />
Ω 4M 1MΩ .946 1.054 <strong>61</strong>-<strong>764</strong>, <strong>61</strong>-<strong>766</strong>, <strong>61</strong>-<strong>768</strong><br />
Ω 10M 10MΩ 8.75 112.5 <strong>61</strong>-<strong>764</strong>, <strong>61</strong>-<strong>766</strong>, <strong>61</strong>-<strong>768</strong><br />
Table 6 Capacitance and Frequency Test<br />
Function /Range Input<br />
Low High<br />
Limit Limit<br />
Model Number<br />
Hz<br />
50Hz @ 5A 49.6 50.4 <strong>61</strong>-<strong>766</strong><br />
{through clamp}<br />
Hz {auto} 200Hz @ 10A 199.5 200.5 <strong>61</strong>-<strong>766</strong><br />
{through clamp}<br />
MFD 6.6µF 1µF .960 1.040 <strong>61</strong>-<strong>766</strong><br />
MFD 66µF 10µF 9.60 10.40 <strong>61</strong>-<strong>766</strong><br />
MFD 660µF 100µF 96.0 104.0 <strong>61</strong>-<strong>766</strong><br />
Table 7 Continuity Check<br />
Function<br />
Low High<br />
Test Value<br />
/Range<br />
limits Limit<br />
20Ω beep on 19.4 20.6<br />
Continuity 40Ω beep off 39.2 40.8<br />
Model Number<br />
<strong>61</strong>-<strong>764</strong>, <strong>61</strong>-<strong>766</strong>, <strong>61</strong>-<strong>768</strong><br />
Form number TM<strong>61</strong><strong>764</strong>-6-8 Rev 5 November 2007
Page 7<br />
CALIBRATION<br />
Calibration Preparation<br />
1. Turn on the calibrator, allow calibrator to warm up. Perform calibration at<br />
23±2°C (73.4°F ±3.5°F) at relative humidity of < 70%. Temperature stabilization should be<br />
reached after 30 minutes.<br />
2. Disconnect the test leads and turn the range switch to “OFF”.<br />
3. Remove the screws holding the battery cover, one at the jaw, and the screw for the TightSight<br />
cover.<br />
4. Remove the case bottom using care not to damage the leads of battery snap and spring<br />
to the continuity beeper. (Beeper is attached to the bottom case cover.)<br />
5. Using a calibrated meter ensure the battery measures a minimum of 7.5V DC.<br />
If the battery measures under 7.5V DC, replace the battery (see Battery Replacement page 11).<br />
Calibration Procedure<br />
It is recommended that all IDEAL meters undergo the following calibration procedure on<br />
an annual basis.<br />
The class of calibrator or equipment should have an accuracy that exceeds, by an expectable ratio the<br />
accuracy of this instrument.<br />
V DC Calibration:<br />
<strong>61</strong>-<strong>764</strong> (Refer to Figure 1A), <strong>61</strong>-<strong>766</strong> (Refer to Figure 2A), <strong>61</strong>-<strong>768</strong> (Refer to Figure 3A)<br />
1. Set the function / range to 6.6V DC.<br />
2. Connect the calibrator to the V and COM inputs on the meter.<br />
3. Output 3.900V DC.<br />
Adjust VR1 (VR 1KΩ) until unit display reads 3.900. (<strong>61</strong>-<strong>764</strong>, <strong>61</strong>-<strong>766</strong>)<br />
Adjust VR2 (VR 1KΩ) until unit display reads 3.900. (<strong>61</strong>-<strong>768</strong>)<br />
4. De-energize source and remove test leads<br />
V AC Zero Calibration:<br />
<strong>61</strong>-<strong>766</strong> (Refer to Figure2A), <strong>61</strong>-<strong>768</strong> (Refer to Figure 3A)<br />
1. Set the function /range to 750V AC.<br />
2. Short the V and COM input on the meter.<br />
3. Adjust VR3 (VR 220kΩ) until display reads 000.<br />
4. De-energize source and remove test leads.<br />
V AC Calibration:<br />
<strong>61</strong>-<strong>766</strong> (Refer to Figure 2A), <strong>61</strong>-<strong>768</strong> (Refer to Figure 3A)<br />
1. Set the function/range to the 6.6V AC.<br />
2. Connect the calibrator to the V and COM inputs on the meter.<br />
3. Output 3.900VAC/60Hz.<br />
Adjust VR2 (VR 1KΩ) until unit display reads 3.895 ± 1 digit. (<strong>61</strong>-<strong>766</strong>)<br />
Adjust VR1 (VR 1KΩ) until unit display reads 3.895 ± 1 digit. (<strong>61</strong>-<strong>768</strong>)<br />
4. De-energize source and remove test leads.<br />
Form number TM<strong>61</strong><strong>764</strong>-6-8 Rev 5 November 2007
Page 8<br />
Calibration Procedure (cont’d)<br />
A AC Calibration:<br />
<strong>61</strong>-<strong>764</strong> (Refer to Figure 1B), <strong>61</strong>-<strong>766</strong> (Refer to Figure 2B) (Adjustments made under front panel label.)<br />
1. Set the function / range to the <strong>660A</strong> AC.<br />
2. Set output of the AC calibrator for 10.00A/60Hz +/- 0.01% and connect it to Coil = 10N = 100.0A<br />
AC.<br />
3. <strong>Clamp</strong> the jaws to the coil = 10N.<br />
4. Adjust VR2 (VR 1KΩ) for a display reading of 100.0 ±1 digit. (<strong>61</strong>-<strong>764</strong>)<br />
Adjust VR4 (VR 2KΩ) for a display reading of 100.0 ±1 digit. (<strong>61</strong>-<strong>766</strong>)<br />
5. De-energize source and remove test leads.<br />
A DC Zero Calibration<br />
<strong>61</strong>-<strong>768</strong> (Refer to Figure 3B)<br />
1. Set the function/range to A DC.<br />
2. Short the V and COM inputs on the meter.<br />
3. Adjust VR5 (VR 5KΩ) until display reads 000.<br />
4. De-energize source and remove test leads.<br />
A DC Calibration<br />
<strong>61</strong>-<strong>768</strong> (Refer to Figure 3B)<br />
1. Set the function / range to the A DC.<br />
2. Set output of the DC calibrator for +10.00A ± 0.01% and connect it to Coil = 10N = +100.0A DC.<br />
3. <strong>Clamp</strong> the jaws to the coil = 10N.<br />
4. Adjust VR4 (VR 3.3KΩ) for a display reading of 100.0 ±1 digit.<br />
5. De-energize source and remove test leads.<br />
Calibration of the <strong>61</strong>-760 series is complete.<br />
Remove all leads from the calibrator and equipment.<br />
Return unit to proper operating condition.<br />
Form number TM<strong>61</strong><strong>764</strong>-6-8 Rev 5 November 2007
Page 9<br />
<strong>61</strong>-<strong>764</strong> (Figure 1A) <strong>61</strong>-<strong>764</strong> (Figure 1B)<br />
<strong>61</strong>- <strong>766</strong> (Figure 2A) <strong>61</strong>-<strong>766</strong> (Figure 2B)<br />
Form number TM<strong>61</strong><strong>764</strong>-6-8 Rev 5 November 2007
Page 10<br />
<strong>61</strong>-<strong>768</strong> (Figure 3A) <strong>61</strong>-<strong>768</strong> (Figure 3B)<br />
Form number TM<strong>61</strong><strong>764</strong>-6-8 Rev 5 November 2007
Page 11<br />
Battery Replacement (Refer to Figure 4)<br />
1. Disconnect the test leads from any circuit under test and turn off meter.<br />
2. Use a Philips head screwdriver to remove the screws on battery cover.<br />
3. Remove battery from the battery compartment.<br />
4. Install new 9V battery (NEDA #1604). An alkaline type is recommended.<br />
5. Install new battery into compartment using care to install to proper polarity.<br />
6. Reinstall battery cover.<br />
Figure 4<br />
Form number TM<strong>61</strong><strong>764</strong>-6-8 Rev 5 November 2007