LanTEK® II Series Manual - Ideal Industries Inc.
LanTEK® II Series Manual - Ideal Industries Inc.
LanTEK® II Series Manual - Ideal Industries Inc.

Create successful ePaper yourself
Turn your PDF publications into a flip-book with our unique Google optimized e-Paper software.
Chapter 6<br />
Structured cabling testing<br />
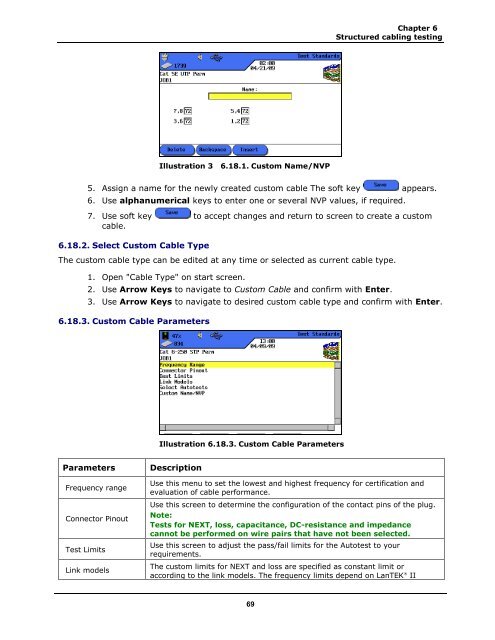
Illustration 3 6.18.1. Custom Name/NVP<br />
5. Assign a name for the newly created custom cable The soft key appears.<br />
6. Use alphanumerical keys to enter one or several NVP values, if required.<br />
7. Use soft key to accept changes and return to screen to create a custom<br />
cable.<br />
6.18.2. Select Custom Cable Type<br />
The custom cable type can be edited at any time or selected as current cable type.<br />
1. Open "Cable Type" on start screen.<br />
2. Use Arrow Keys to navigate to Custom Cable and confirm with Enter.<br />
3. Use Arrow Keys to navigate to desired custom cable type and confirm with Enter.<br />
6.18.3. Custom Cable Parameters<br />
Illustration 6.18.3. Custom Cable Parameters<br />
Parameters<br />
Frequency range<br />
Connector Pinout<br />
Test Limits<br />
Link models<br />
Description<br />
Use this menu to set the lowest and highest frequency for certification and<br />
evaluation of cable performance.<br />
Use this screen to determine the configuration of the contact pins of the plug.<br />
Note:<br />
Tests for NEXT, loss, capacitance, DC-resistance and impedance<br />
cannot be performed on wire pairs that have not been selected.<br />
Use this screen to adjust the pass/fail limits for the Autotest to your<br />
requirements.<br />
The custom limits for NEXT and loss are specified as constant limit or<br />
according to the link models. The frequency limits depend on LanTEK ®<br />
<strong>II</strong><br />
69