LanTEK® II Series Manual - Ideal Industries Inc.
LanTEK® II Series Manual - Ideal Industries Inc. LanTEK® II Series Manual - Ideal Industries Inc.
Chapter 4 Preferences 4.8. Talkset Use this menu to set signal strength of tone generator, volume of internal speaker and volume of talkset. Also use this menu to change the talkset mode. 1. Use Arrow Keys to navigate to "Talkset" menu and press Enter. Illustration 4.8. Talkset 2. Use Arrow Keys to select the desired option. 3. On options Toner Volume, Speaker Volume or Talkset Volume, use soft keys to set signal strength and volume. 4. On option Talkset, use soft key / to select desired setting. 5. Press Enter to save the information entered. Press Escape to exit the menu without making changes. 4.9. Date and Time Accurate date and time settings are important for the reliable identification of records and test reports. 1. Use Arrow Keys to navigate to "Date and Time" menu and press Enter. Illustration 4.9. Date and Time 2. Use soft key / to set the desired Time format. 3. Use Arrow Keys to navigate to option Time. 4. Use Alphanumeric Keys to enter the time. 5. Use Arrow Keys to navigate to option Date Format. 25
Chapter 4 Preferences 6. Use soft keys to select the desired format MDY (month/day/year), DMY (day/month/year) or YMD (year/month/day). 7. Use Arrow Keys to navigate to option Date. 8. Use Alphanumeric Keys to enter the date. 9. Use Arrow Keys to navigate to option Date/Time Display. 10. Use soft key / to select the desired setting. 11. Press Enter to save the information entered. Press Escape to exit the menu without making changes. 4.10. Restore Default Use this menu to reset all tester settings to their factory defaults. Using this option will not delete stored tests. 1. Use Arrow Keys to navigate to "Restore Defaults" menu and press Enter. Illustration 4.10. Restore Defaults 2. Use the soft key to accept default settings. 3. Use the soft key to exit the screen without making changes. 26
- Page 1 and 2: LanTEK ® II Series Manual 0
- Page 3 and 4: Standard Warranty Policy of IDEAL I
- Page 5 and 6: Table of contents CHAPTER 1 Your La
- Page 7 and 8: Table of contents 6.11.1. Insertion
- Page 9 and 10: Table of contents 13.1. Technical S
- Page 11 and 12: Chapter 1 Your LanTEK ® II Cable C
- Page 13 and 14: CHAPTER 2 Product Description 2.1.
- Page 15 and 16: Chapter 2 Product Description 2.1.2
- Page 17 and 18: Chapter 2 Product Description 2.2.
- Page 19 and 20: 2.3. Power Management Chapter 2 Pro
- Page 21 and 22: CHAPTER 3 Basics of the Cable Test
- Page 23 and 24: Chapter 4 Preferences 1. Use Arrow
- Page 25: Chapter 4 Preferences 1. Use Arrow
- Page 29 and 30: CHAPTER 5 Autotest Using Autotest,
- Page 31 and 32: Chapter 5 Autotest Autotest Pref Th
- Page 33 and 34: Chapter 5 Autotest 2. Use Arrow Key
- Page 35 and 36: Chapter 5 Autotest 5.3.1. Simple Ca
- Page 37 and 38: Chapter 5 Autotest 3. Use Alphanume
- Page 39 and 40: Chapter 5 Autotest 5.4.1. Cable Nam
- Page 41 and 42: Chapter 5 Autotest AAA A / AAA A -
- Page 43 and 44: Chapter 5 Autotest Illustration 2 5
- Page 45 and 46: Chapter 5 Autotest 20. Make correct
- Page 47 and 48: Chapter 5 Autotest 5.6. DualMODE Fu
- Page 49 and 50: Chapter 5 Autotest Illustration 2 5
- Page 51 and 52: Chapter 5 Autotest 5.9. Calibration
- Page 53 and 54: Chapter 5 Autotest 5.9.2. Coaxial C
- Page 55 and 56: Chapter 5 Autotest 3. Use soft key
- Page 57 and 58: Chapter 5 Autotest Illustration 4 5
- Page 59 and 60: CHAPTER 6 Structured Cabling Testin
- Page 61 and 62: Chapter 6 Structured cabling testin
- Page 63 and 64: Chapter 6 Structured cabling testin
- Page 65 and 66: 6.11. Insertion Loss Test (Attenuat
- Page 67 and 68: Chapter 6 Structured cabling testin
- Page 69 and 70: Chapter 6 Structured cabling testin
- Page 71 and 72: Chapter 6 Structured cabling testin
- Page 73 and 74: CHAPTER 8 Fiber Testing with FiberT
- Page 75 and 76: Chapter 8 Fiber testing (LWL) Fiber
Chapter 4<br />
Preferences<br />
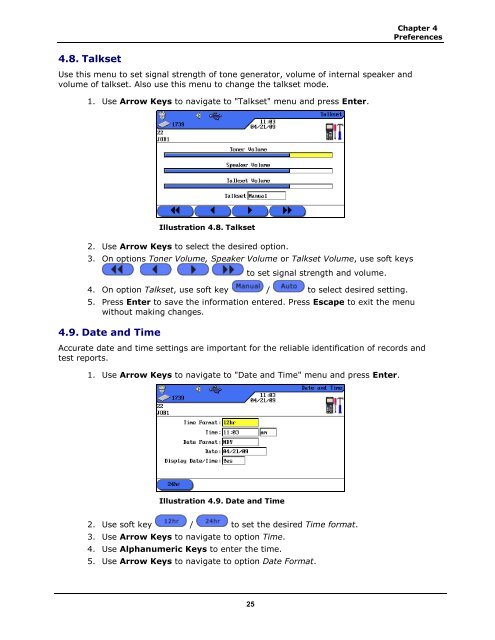
4.8. Talkset<br />
Use this menu to set signal strength of tone generator, volume of internal speaker and<br />
volume of talkset. Also use this menu to change the talkset mode.<br />
1. Use Arrow Keys to navigate to "Talkset" menu and press Enter.<br />
Illustration 4.8. Talkset<br />
2. Use Arrow Keys to select the desired option.<br />
3. On options Toner Volume, Speaker Volume or Talkset Volume, use soft keys<br />
to set signal strength and volume.<br />
4. On option Talkset, use soft key / to select desired setting.<br />
5. Press Enter to save the information entered. Press Escape to exit the menu<br />
without making changes.<br />
4.9. Date and Time<br />
Accurate date and time settings are important for the reliable identification of records and<br />
test reports.<br />
1. Use Arrow Keys to navigate to "Date and Time" menu and press Enter.<br />
Illustration 4.9. Date and Time<br />
2. Use soft key / to set the desired Time format.<br />
3. Use Arrow Keys to navigate to option Time.<br />
4. Use Alphanumeric Keys to enter the time.<br />
5. Use Arrow Keys to navigate to option Date Format.<br />
25


