SchoolDude On-line Facility Work Order Instructions Quick Step ...
SchoolDude On-line Facility Work Order Instructions Quick Step ...
SchoolDude On-line Facility Work Order Instructions Quick Step ...

Create successful ePaper yourself
Turn your PDF publications into a flip-book with our unique Google optimized e-Paper software.
<strong>SchoolDude</strong><br />
<strong>On</strong>‐<strong>line</strong> <strong>Facility</strong> <strong>Work</strong> <strong>Order</strong> <strong>Instructions</strong><br />
All facility‐related work order requests, with the exception of immediate emergencies, will be processed<br />
and managed through the powerful on‐<strong>line</strong> work order management system called <strong>SchoolDude</strong>.<br />
The process is very easy. Simply follow the instructions below when you submit your first work order<br />
request. The first request will populate you as a new “requester” in the system, allowing you to<br />
generate future requests.<br />
<strong>Quick</strong> <strong>Step</strong> Guide for Requesters<br />
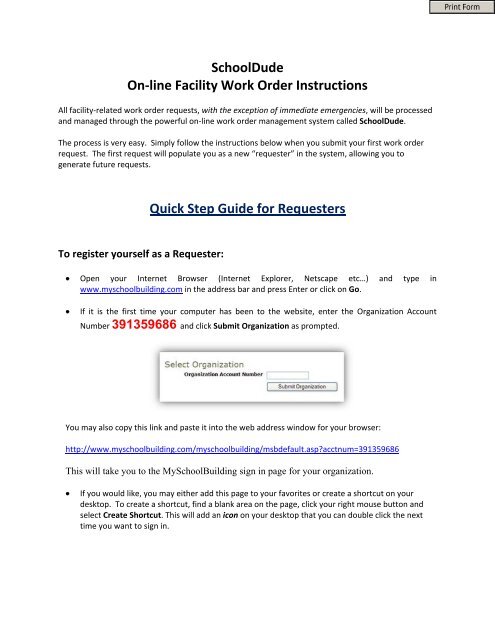
To register yourself as a Requester:<br />
• Open your Internet Browser (Internet Explorer, Netscape etc…) and type in<br />
www.myschoolbuilding.com in the address bar and press Enter or click on Go.<br />
• If it is the first time your computer has been to the website, enter the Organization Account<br />
Number 391359686 and click Submit Organization as prompted.<br />
You may also copy this link and paste it into the web address window for your browser:<br />
http://www.myschoolbuilding.com/myschoolbuilding/msbdefault.asp?acctnum=391359686<br />
This will take you to the MySchoolBuilding sign in page for your organization.<br />
• If you would like, you may either add this page to your favorites or create a shortcut on your<br />
desktop. To create a shortcut, find a blank area on the page, click your right mouse button and<br />
select Create Shortcut. This will add an icon on your desktop that you can double click the next<br />
time you want to sign in.
Enter your email and click Submit. If you are not already registered as a user, the system will notify<br />
you that it cannot find your email address. You will be prompted to either correct your email<br />
address or enter your last name if you are a new requester. <strong>On</strong> the next screen, enter your first<br />
name which is required and contact numbers if desired.<br />
<strong>On</strong>ce you have entered your information, you will come to the work request form. If you do not<br />
need to submit a request and simply want to add yourself as a Requester, click on the Settings tab.<br />
At the bottom of the screen, enter the submittal password of password and click on Submit.<br />
You are now entered as a Requester in MaintenanceDirect.<br />
To enter a work request:<br />
Note that all required fields have a red box and check mark next to them.
Click on the <strong>Work</strong> Request Tab and follow the steps to submit your work order.<br />
<strong>Step</strong> 1: This will be filled in with your information from the email address you entered at the sign in<br />
screen.<br />
<strong>Step</strong> 2: Click on the drop down arrow and highlight a Location that you want the work to be done at<br />
and click the mouse. Follow the same steps for Building and Area *if selections are available. Also<br />
be sure to enter your Area description or Room #.<br />
*Note* When entering more than one request at a time without logging out, your location will be<br />
set to a default. A red link to the right of the location will appear that says Change Location should<br />
you need to enter a request for a different location. There is also a box under step 2 that says Yes,<br />
remember my area entries for my next new request entry. If this box is checked, the Area and<br />
Area/Room Number entries for the next request will be saved. <strong>On</strong>ce you log out and log back into<br />
MySchoolBuilding, everything will be reset and Locations, Area, and Area/Room Number will need to be<br />
selected again.<br />
<strong>Step</strong> 3: Select the icon that best describes your problem and click on it.
<strong>Step</strong> 4: Type in your description of the problem.<br />
<strong>Step</strong> 5: Type in the best time for a technician to come by if available.<br />
<strong>Step</strong> 6: Click on the drop down arrow and select a purpose code if available.<br />
<strong>Step</strong> 7: Type in a when you would like the work to be completed if available. You may click on the<br />
calendar to choose a date or type in a date in this format: 12/06/04, but you may not type text into<br />
this field.<br />
<strong>Step</strong> 8: Select a Budget if available.<br />
<strong>Step</strong> 9: Add an attachment if available. You may only add two attachments no larger than 3MB<br />
each.<br />
<strong>Step</strong> 10: Type in the submittal password of: password<br />
<strong>Step</strong> 11: Click submit.<br />
After you click submit, the screen will refresh and go to the My Request Tab.
<strong>On</strong> this screen you will see up to date information on your request including the status, work order<br />
number and action taken notes. You can click on the gray box with a black dot in it next to any of the<br />
information listed in the blue bar to sort all requests in ascending or descending order by that<br />
information.<br />
You can also search for any work order request by typing in a key word in the Search box and<br />
clicking on GO. This will pull up any of your requests with that word in it. For example, typing keys<br />
would pull up any request dealing with keys.<br />
Click on the <strong>Work</strong> Request Tab to input a new request.