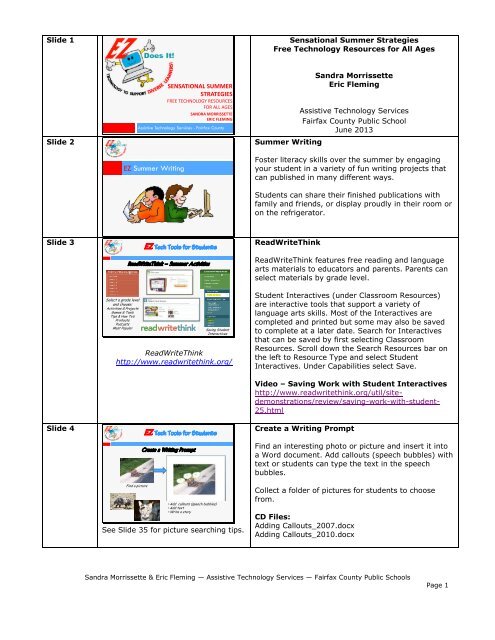
Sensational Summer Strategies - Fairfax County Public Schools
Sensational Summer Strategies - Fairfax County Public Schools
Sensational Summer Strategies - Fairfax County Public Schools

Create successful ePaper yourself
Turn your PDF publications into a flip-book with our unique Google optimized e-Paper software.
Slide 1<br />
<strong>Sensational</strong> <strong>Summer</strong> <strong>Strategies</strong><br />
Free Technology Resources for All Ages<br />
Slide 2<br />
SENSATIONAL SUMMER<br />
STRATEGIES<br />
FREE TECHNOLOGY RESOURCES<br />
FOR ALL AGES<br />
SANDRA MORRISSETTE<br />
ERIC FLEMING<br />
Assistive Technology Services - <strong>Fairfax</strong> <strong>County</strong><br />
<strong>Summer</strong> Writing<br />
Sandra Morrissette<br />
Eric Fleming<br />
Assistive Technology Services<br />
<strong>Fairfax</strong> <strong>County</strong> <strong>Public</strong> School<br />
June 2013<br />
EZ <strong>Summer</strong> Writing<br />
Foster literacy skills over the summer by engaging<br />
your student in a variety of fun writing projects that<br />
can published in many different ways.<br />
Students can share their finished publications with<br />
family and friends, or display proudly in their room or<br />
on the refrigerator.<br />
Slide 3<br />
ReadWriteThink<br />
ReadWriteThink features free reading and language<br />
arts materials to educators and parents. Parents can<br />
select materials by grade level.<br />
Select a grade level<br />
and choose:<br />
Activities & Projects<br />
Games & Tools<br />
Tips & How To’s<br />
Printouts<br />
Podcasts<br />
Most Popular<br />
Saving Student<br />
Interactives<br />
ReadWriteThink<br />
http://www.readwritethink.org/<br />
Student Interactives (under Classroom Resources)<br />
are interactive tools that support a variety of<br />
language arts skills. Most of the Interactives are<br />
completed and printed but some may also be saved<br />
to complete at a later date. Search for Interactives<br />
that can be saved by first selecting Classroom<br />
Resources. Scroll down the Search Resources bar on<br />
the left to Resource Type and select Student<br />
Interactives. Under Capabilities select Save.<br />
Video – Saving Work with Student Interactives<br />
http://www.readwritethink.org/util/site-<br />
demonstrations/review/saving-work-with-student-<br />
25.html<br />
Slide 4<br />
Create a Writing Prompt<br />
Find an interesting photo or picture and insert it into<br />
a Word document. Add callouts (speech bubbles) with<br />
text or students can type the text in the speech<br />
bubbles.<br />
Find a picture<br />
• Add callouts (speech bubbles)<br />
• Add text<br />
• Write a story<br />
See Slide 35 for picture searching tips.<br />
Collect a folder of pictures for students to choose<br />
from.<br />
CD Files:<br />
Adding Callouts_2007.docx<br />
Adding Callouts_2010.docx<br />
Sandra Morrissette & Eric Fleming — Assistive Technology Services — <strong>Fairfax</strong> <strong>County</strong> <strong>Public</strong> <strong>Schools</strong><br />
Page 1
Slide 5<br />
NaturalReader (Free Version)<br />
•Copy/paste text into a large reading window or<br />
use a “floating bar”<br />
•Can be adjusted for speed or volume<br />
Version 11<br />
Version 10<br />
NaturalReader<br />
www.naturalreaders.com<br />
NaturalReader Folder:<br />
NaturalReader10.exe (version 10)<br />
standardsetup.exe (version 11<br />
naturalreader.pdf<br />
NaturalReader is a free application that uses the<br />
Windows Text-to-Speech engine to read aloud text.<br />
Assist students who benefit from hearing<br />
information read to them to help with<br />
comprehension<br />
Assist students who are reading below grade level<br />
Assist students with editing written work<br />
Students copy and paste text into the large<br />
reading window or use a “floating bar”<br />
Can be adjusted for speed or volume<br />
Reading bar reads web pages and PDF files<br />
Video Tutorials:<br />
http://www.naturalreaders.com/howto.php?referp=p<br />
cbar<br />
Slide 6<br />
Speak Tool in MS Word 2010<br />
•Available in MS Word 2010<br />
•Speaks text in Word documents<br />
•Select text & click the Speak<br />
•Must add Speak tool to the Quick<br />
Access Toolbar (QAT) or ribbon<br />
•Speed and voice may be adjusted in<br />
the Control Panel<br />
Available in MS Word 2010<br />
Speaks text in Word documents<br />
Select text & click the Speak tool<br />
Must add Speak tool to the Quick Access Toolbar<br />
(QAT) or ribbon<br />
Speed and voice may be adjusted in the Control<br />
panel<br />
Additional information at:<br />
http://office.microsoft.com/enus/word-help/using-the-speak-text-tospeech-feature-HA102066711.aspx<br />
Add the Speak tool to the QAT in Word 2010:<br />
File tab Options Quick Access Toolbar<br />
Choose commands from: All Commands <br />
Select Speak Click the Add button<br />
FCPS Technology@Home<br />
Download Microsoft Office and<br />
Windows – Free download for students<br />
http://www.fcps.edu/it/technology/Tec<br />
hnologyHome.shtml<br />
CD File:<br />
Office_2010_Text-to-Speech.pdf<br />
Sandra Morrissette & Eric Fleming — Assistive Technology Services — <strong>Fairfax</strong> <strong>County</strong> <strong>Public</strong> <strong>Schools</strong><br />
Page 2
Slide 7<br />
Make Beliefs Comix<br />
• 2, 3, or 4 panel comics<br />
• choose characters<br />
• fill in talk balloons<br />
storyboards<br />
printables<br />
MakeBeliefsComix<br />
http://www.makebeliefscomix.com/<br />
CD Files:<br />
makebeliefscomix.pdf<br />
21_Things.pdf<br />
concept comix storybd.doc<br />
concept comix storybd_moon.doc<br />
discuss_comix_storybd.pdf<br />
girl_and_cat_printable.pdf<br />
comic_strip_printable.pdf<br />
MakeBeliefsComix is an educational comic strip<br />
creator from author Bill Zimmerman. Students<br />
choose characters and fill in the talk balloons to<br />
create 2, 3, or 4 panel comics. Click on the demo bird<br />
on the main page for a tutorial. If 4 panels are not<br />
enough, add the To Be Continued panel prompt and<br />
write another 4 panel “chapter”. There is no save<br />
option so it’s a good idea to storyboard before going<br />
to the website. When the comic is finished, print a<br />
copy or email the comic.<br />
Make Beliefs Comix also has more than 350 free<br />
printables that can be printed for students to write<br />
and color.<br />
Slide 8<br />
PowerPoint E-Books<br />
EZ PowerPoint E-Books<br />
E-Books are books in electronic format and may<br />
include text, auditory output, pictures, sound<br />
Create e-books for students with text appropriate<br />
for their reading level and auditory support if<br />
needed<br />
E-books are multisensory and support multiple<br />
intelligences<br />
Students can create their own e-books<br />
CD File:<br />
Create_EBooks folder with graphics and instructions<br />
for creating a PowerPoint e-book<br />
Slide 9<br />
E-Book Templates<br />
Ready-to-use templates may be used:<br />
to create custom books for students<br />
for student projects<br />
FourBlocks Wiki<br />
http://fourblockssharing.wikispaces.com/PowerPoint+<br />
Book+Templates<br />
Four Blocks Wiki<br />
http://fourblock.wikispaces.com/<br />
FourBlocksWiki also has PowerPoint E-<br />
Books to download.<br />
CD Files:<br />
Book_Template_1.ppt<br />
Book_Template_2.ppt<br />
Book_Template_3_.ppt<br />
Sandra Morrissette & Eric Fleming — Assistive Technology Services — <strong>Fairfax</strong> <strong>County</strong> <strong>Public</strong> <strong>Schools</strong><br />
Page 3
Slide 10<br />
E-Books Templates<br />
Ready-to-use templates look like a book. Students<br />
can add pictures, text, and record themselves reading<br />
their story.<br />
Teacher Education<br />
http://educ-reality.com/using-powerpointwith-effect-book-templates/<br />
27 different templates<br />
Teacher Education<br />
Using PowerPoint with Effect: Book Templates<br />
http://educ-reality.com/using-powerpoint-witheffect-book-templates/<br />
CD Files:<br />
27 templates in the EBooks Templates folder<br />
Slide 11<br />
Photo Albums<br />
PowerPoint feature that quickly turns digital photos or<br />
graphic files into a PowerPoint slide show.<br />
Open a Photo Album – PowerPoint<br />
2007:<br />
Insert Tab Illustrations Group <br />
Photo Album Tool Select New<br />
Photo Album<br />
Open a Photo Album – PowerPoint<br />
2010:<br />
Insert Tab Images Group Photo<br />
Album Tool Select New Photo<br />
Album<br />
Tip – Change the text format for all<br />
the slides:<br />
Click the Home tab click the Select<br />
tool in the Editing group click<br />
Select All<br />
Click the Design tab click the<br />
Fonts tool (Themes group)<br />
Select a Built-In font theme or select<br />
Create New Theme Fonts and select<br />
your own fonts<br />
The Font Theme will be applied to all<br />
the slides<br />
Collect graphics in a folder<br />
Open a New Photo Album (see directions on left)<br />
Click the File/Disk button and navigate to your<br />
folder to insert your graphics<br />
o Select a contiguous group of pictures by using<br />
the SHIFT+click technique. Click on the first<br />
graphic file that you want, press SHIFT, and then<br />
click the last file that you want to select.<br />
o Select all the pictures by clicking CTRL +A.<br />
o Select some of the pictures by holding down the<br />
CTRL key and clicking them individually.<br />
In the Photo Album dialog box, under Album<br />
Layout, select a picture layout option: 1 picture<br />
with title, 2 pictures with title or 4 pictures with title<br />
Select a Frame shape click Create Save the<br />
PowerPoint<br />
Optional: Delete the first slide (Photo Album Title<br />
slide)<br />
Click in the text box at the top of each slide and<br />
type text for the slide<br />
Optional: Compress the graphics to reduce the file<br />
size of the finished PowerPoint. Student can then<br />
email their eBook to friends or relatives.<br />
CD Files:<br />
PhotoAlbum.pdf<br />
PhotoAlbum_2007.pdf<br />
CompressinggrahicsPPT.pdf<br />
CompressinggrahicsPPT07.pdf<br />
Sandra Morrissette & Eric Fleming — Assistive Technology Services — <strong>Fairfax</strong> <strong>County</strong> <strong>Public</strong> <strong>Schools</strong><br />
Page 4
Slide 12<br />
Outline to PowerPoint<br />
Create an outline in Word and easily transfer it to a<br />
PowerPoint slide show or eBook.<br />
Create the outline click the Send to Microsoft<br />
Office PowerPoint command<br />
Each Heading I style in the outline will become the<br />
title of a slide and sublevels will be contained<br />
within that slide.<br />
Create an outline in Word and<br />
send to PowerPoint<br />
template<br />
choose a design template<br />
& add graphics<br />
MS Word 2007 (add tool to the<br />
QAT)<br />
Click the Office button click the<br />
Word Options button (bottom right)<br />
Select Customize (in the left pane)<br />
Choose Commands From drop down<br />
Select All Commands<br />
Select Send to Microsoft Office<br />
PowerPoint command click Add<br />
click OK<br />
Command is now on the QAT<br />
MS Word 2010 (add tool to the QAT)<br />
Click the Office button click the Word Options<br />
button (bottom right)<br />
Select Customize (in the left pane)<br />
Choose Commands From drop down Select All<br />
Commands<br />
Select Send to Microsoft Office PowerPoint<br />
command click Add click OK<br />
Command is now on the QAT<br />
CD Files:<br />
Outline_to_PPT_Template.doc<br />
ExplorersOutlineTemplate.doc<br />
ExplorersOutline.doc<br />
PolarBearOutlineTemplate.doc<br />
PolarBearOutline.doc<br />
OutlineParaBasic.doc<br />
OutlineFirstLast.doc<br />
5ParaOutline.doc<br />
Power Outline.doc<br />
Slide 13<br />
E-Book to Mini-Book<br />
Follow direction the handout:<br />
Print as handouts cut apart slides staple<br />
PowerPoint E-Book<br />
print as handouts<br />
cut & staple<br />
CD Files:<br />
PPT_to_MiniBk.pdf<br />
PPT_to_MiniBk2010.pdf<br />
Slide 14<br />
E-Book to Small Accordion<br />
• print handouts<br />
• cut around slides leaving<br />
a strip on the right side<br />
• fold strips into “valleys” & “mountains”<br />
• glue slides together to form an<br />
accordion<br />
print E-Book as handouts (6 per page)<br />
cut around slides leaving a strip on the right side<br />
fold the strips on half the slides toward the slide to<br />
form a “valley” fold<br />
fold the strips on the other half away from the<br />
slide to form a “mountain” fold<br />
glue the straight edge of each slide into the<br />
“valley” or “mountain” of the previous slide to<br />
form an accordion<br />
Sandra Morrissette & Eric Fleming — Assistive Technology Services — <strong>Fairfax</strong> <strong>County</strong> <strong>Public</strong> <strong>Schools</strong><br />
Page 5
Slide 15<br />
E-Book to Accordion<br />
Follow the instructions on Slide 1 of the template.<br />
print e-book as handouts<br />
print template on<br />
colored paper<br />
cut<br />
glue<br />
fold<br />
CD File:<br />
EBookAccordion.ppt<br />
Slide 16<br />
Publishing with Templates<br />
EZ Publishing with Templates<br />
Use the following templates to create a variety of<br />
student projects. Students may compose their text in<br />
MS Word and then copy & paste into a template. Add<br />
graphics and print.<br />
Follow the directions that accompany each slide.<br />
Slide 17<br />
Word Mini-Book Template<br />
Create small, pocket-sized books with text and<br />
graphics. Follow the directions in the handouts.<br />
CD Files:<br />
MiniBook.dot (Western)<br />
minibk.pdf (Western)<br />
MiniBookHandout.pdf<br />
Marilyn Western<br />
www.edzone.net/~mwestern<br />
Marilyn Western’s<br />
Technology Tips for Classroom Teachers<br />
http://www.edzone.net/~mwestern/<br />
Slide 18<br />
PowerPoint Mini-Book<br />
The Mini-Book Foldable template is good for students<br />
who have difficulty rotating graphics in the MS Word<br />
mini-book template.<br />
template<br />
•print slide 1 on colored<br />
paper<br />
•print information slides<br />
on white paper<br />
•fold colored paper<br />
•cut out boxes<br />
•glue<br />
Mini-book ideas:<br />
short creative stories<br />
All About Me<br />
vacation mini-journal<br />
fun facts<br />
CD Files:<br />
MiniBk.ppt (instructions on Slide 1)<br />
minibk.pdf (Western) (includes folding directions)<br />
Sandra Morrissette & Eric Fleming — Assistive Technology Services — <strong>Fairfax</strong> <strong>County</strong> <strong>Public</strong> <strong>Schools</strong><br />
Page 6
Slide 19<br />
PowerPoint Pop-Up Books<br />
Follow the directions on the template for adding text<br />
and graphics. Paste a graphic in the square(s) on the<br />
second slide. Print. Cut and fold according to the<br />
template directions. Students can create individual<br />
pop-up books or a class book can be created by<br />
gluing the tops and bottoms of the pages together. A<br />
file folder makes a nice cover.<br />
Vicki Blackwell<br />
www.vickiblackwell.com<br />
Vicki Blackwell<br />
www.vickiblackwell.com<br />
CD Files:<br />
PopUpBkSingleTemp.ppt (Blackwell)<br />
PopUpBkTemp.ppt (Blackwell)<br />
Slide 20<br />
Pop-Up Suitcase<br />
template<br />
Vicki Blackwell<br />
www.vickiblackwell.com<br />
template<br />
Follow the directions on the template for adding text<br />
and graphics. Paste two graphics in the squares on<br />
the second slide. Print. Cut and fold according to the<br />
template directions. Print out Suitcase_cutout.ppt<br />
and cut out the small or large suitcase to use as a<br />
pattern. Cut a suitcase out of a file folder, or folded<br />
heavy paper. Glue the printed pop-up into the folded<br />
suitcase. Cut out a luggage tag and glue on the<br />
suitcase. Print Travel Stickers.ppt and cut out some<br />
travel stickers to glue to the outside of the suitcase.<br />
CD Files:<br />
suitcasepopuptemp.ppt (Blackwell)<br />
Travel Stickers.ppt (Blackwell)<br />
Suitcase_cutout.ppt<br />
Slide 21<br />
Pop-Up Brochure<br />
Follow the directions on the handout to create a<br />
simple brochure with a pop-up picture. This template<br />
could also be used to create a greeting card.<br />
blank template<br />
CD Files:<br />
Popupbrochure_temp.ppt<br />
PopUpBrochure.pdf<br />
Slide 22<br />
Fan Books – Oval and Octagon<br />
oval template<br />
Vicki Blackwell<br />
www.vickiblackwell.com<br />
octagon templates<br />
Open one of the templates<br />
Add a text box to each oval or octagon. Type<br />
some text (insert text here) in each box and select<br />
font and size.<br />
Duplicate the slide as many times as needed.<br />
Students add text and graphics<br />
Print and cut out the fans<br />
Punch a hole at the dot at the bottom and connect<br />
together with a brad or ring.<br />
Vicki Blackwell<br />
www.vickiblackwell.com<br />
CD Files:<br />
fanbook_temp.ppt (Blackwell)<br />
FanBook_Landscape.ppt<br />
FanBook_Portrait.ppt<br />
Sandra Morrissette & Eric Fleming — Assistive Technology Services — <strong>Fairfax</strong> <strong>County</strong> <strong>Public</strong> <strong>Schools</strong><br />
Page 7
Slide 23<br />
Popsicle Books<br />
Open a Popsicle Book template<br />
Add graphics and text to the appropriate boxes in<br />
the template. Print those slides.<br />
Follow the directions in the PopsicleBook.ppt to<br />
assemble the popsicle book.<br />
Cut out the picture and text boxes.<br />
Glue onto the Popsicle Book pages.<br />
Popsicle Book.ppt<br />
large popsicle book<br />
small popsicle book<br />
Optional: Print blank boxes for students to write their<br />
own text and draw their own illustrations.<br />
Use to:<br />
Retell or sequence a story<br />
Create books for emergent readers<br />
Creative writing<br />
Supplies:<br />
Paper<br />
Rubber bands<br />
Popsicle sticks or drinking straws<br />
Plastic drinking straws may be used in place of<br />
popsicle sticks.<br />
CD Files:<br />
PopsicleBook.ppt<br />
Popsicle_Sm.ppt<br />
Popsicle_Sm.pptx (PowerPoint 2007)<br />
Popsicle_Lg.ppt<br />
Popsicle_Lg.pptx (PowerPoint 2007)<br />
Slide 24<br />
PowerPoint 3-D Circle Books<br />
PPT<br />
Blackline<br />
Master<br />
Follow the directions on the templates to create a<br />
folded circle book or a 3-D circle book. The<br />
circle_book_blm.ppt template is a blackline master to<br />
print and complete offline.<br />
Vicki Blackwell<br />
www.vickiblackwell.com<br />
PPT Template<br />
Vicki Blackwell<br />
www.vickiblackwell.com<br />
CD Files:<br />
circle_book_blm.ppt (Blackwell)<br />
circlebookdigital.ppt (Blackwell)<br />
circle_book_sample.ppt (Blackwell)<br />
Planet_Circle_Book_Sample.ppt<br />
Planet_Circle_Book_Template.ppt<br />
Slide 25<br />
Mini-Posters<br />
Should I make<br />
it in<br />
Should I make<br />
it in<br />
Use a templates to create a one-page poster. Type<br />
text in the boxes, insert graphics, add callouts, and<br />
modify the word art.<br />
Word?<br />
PowerPoint?<br />
MS Word<br />
PowerPoint<br />
PPT Template<br />
Word Template<br />
CD Files:<br />
PosterTemp.ppt<br />
PosterPenguins.ppt<br />
PosterTemp.doc<br />
PenguinPoster.doc<br />
Slide 26<br />
Peek-Over Books<br />
Vicki Blackwell<br />
www.vickiblackwell.com<br />
Students type their text, print, and fold the book up<br />
and under the cutout hands.<br />
CD Files:<br />
peekover_dir.pdf (Blackwell)<br />
Peek-Over templates (Blackwell) in the PeekOver<br />
folder.<br />
18 different templates<br />
Sandra Morrissette & Eric Fleming — Assistive Technology Services — <strong>Fairfax</strong> <strong>County</strong> <strong>Public</strong> <strong>Schools</strong><br />
Page 8
Slide 27<br />
MS Word Shape Books<br />
Shape books may be used on the computer. Students<br />
click in the text box and type their text. Optional:<br />
delete the text box, print, and use for off-computer<br />
activities.<br />
Vicki Blackwell<br />
www.vickiblackwell.com<br />
25 different templates<br />
CD Files:<br />
Shape book templates in the Shapebooks folder.<br />
Vicki Blackwell<br />
www.vickiblackwell.com<br />
Slide 28<br />
Internet Resources<br />
EZ Internet Resources<br />
The internet is a great source of information and<br />
pictures for students to use in a variety of creative<br />
writing projects.<br />
Parents can keep online searching and research safe<br />
by either viewing websites with their student or by<br />
finding and bookmarking appropriate sites. Parents<br />
can also collect graphics in a folder on the computer<br />
desktop for students to access.<br />
Slide 29<br />
Word Clouds for Kids – ABCya.com<br />
Word Clouds for Kids is an easy-to-use word cloud<br />
generator recommended for students in grades 2-5.<br />
create a wordle from student writing<br />
& import into a template<br />
create a Father’s Day<br />
wordle<br />
ABCya.com<br />
http://www.abcya.com/<br />
Word Clouds for Kids<br />
http://www.abcya.com/word_clouds.htm<br />
A word cloud is a graphical representation of word<br />
frequency. Type or paste text into the word cloud<br />
text box and press the arrow to generate a word<br />
cloud. Change the font, color scheme, and layout.<br />
Save or print the word cloud.<br />
Save a word cloud and use it in a template or<br />
copy/paste the text from a creative writing document<br />
into the word cloud text box and use the word cloud<br />
to illustrate the story.<br />
“My Favorite Holiday”<br />
(Pop-Up Book Template)<br />
“My Favorite Meal”<br />
Sandra Morrissette & Eric Fleming — Assistive Technology Services — <strong>Fairfax</strong> <strong>County</strong> <strong>Public</strong> <strong>Schools</strong><br />
Page 9
Slide 30<br />
Wordle Clouds<br />
Father’s Day Wordle<br />
About Me<br />
<strong>Summer</strong><br />
Wordle<br />
http://www.wordle.net/create<br />
Snagit<br />
http://www.techsmith.com/snagit.html<br />
Jing (Free for Mac & Windows)<br />
http://www.techsmith.com/jing.html<br />
Capture is a free screen capture utility<br />
for Windows computers. Capture does<br />
not need to be installed. Just doubleclick<br />
to open and follow the handout<br />
directions.<br />
Take-a-screenshot.org<br />
Website with instructions for creating<br />
screen shots in different computer<br />
formats (PC, Mac):<br />
http://take-a-screenshot.org/<br />
Wordle generates “word clouds” from text that is<br />
pasted or typed into Wordle. The clouds give greater<br />
prominence to words that appear more frequently in<br />
the source text. The clouds may be modified with<br />
different fonts, layouts, and color schemes. You can<br />
print out the Wordle or take a screen capture and<br />
save it as a graphic file.<br />
Wordle Tips:<br />
Use a ~ between words to group words<br />
Right-click on a word to remove it<br />
Double-click the window to remove the color from<br />
the insides of the words so only the outline<br />
remains<br />
Wordle Ideas:<br />
Create an artistic gift for a holiday (Father’s Day,<br />
Mother’s Day)<br />
Character’s in a book<br />
All About Me<br />
CD Files:<br />
WordleHelp.pdf<br />
Capture.exe (Windows computers)<br />
UsingCapture.pdf<br />
Jing.pdf<br />
Note: Vista and Windows 7 include a<br />
program for taking screenshots called<br />
Snipping Tool.<br />
Slide 31<br />
Word Clouds using Tagxedo<br />
Father’s Day Wordle<br />
Tagxedo is a free internet based website that<br />
generates word clouds. The more frequent the word<br />
is mentioned, the larger in size the word will appear<br />
in the cloud. The neat feature about Tagxedo is you<br />
can control the shape of your cloud by simply<br />
uploading your own pictures or choosing from a<br />
library of their shapes. Word clouds may be saved in<br />
different formats.<br />
CD Files:<br />
Tagxedo-Word Clouds with Shapes.pdf<br />
101_Ways_to_Use_Tagxedo.pdf<br />
Tagxedo_How_to.pdf<br />
SilhouetteMan3.jpg<br />
Sandra Morrissette & Eric Fleming — Assistive Technology Services — <strong>Fairfax</strong> <strong>County</strong> <strong>Public</strong> <strong>Schools</strong><br />
Page 10
Slide 32<br />
Make a Poster – BigHugeLabs.com<br />
Endangered Animals<br />
Research Project<br />
Trading<br />
Cards<br />
print<br />
different<br />
sizes<br />
BigHugeLabs.com – Motivator<br />
http://bighugelabs.com/motivator.php<br />
BigHugeLabs.com – Trading Cards<br />
http://bighugelabs.com/deck.php<br />
Big Huge Labs Ideas – Pinterest<br />
http://pinterest.com/jessicablanca/big<br />
-huge-labs-ideas/<br />
Create a motivational style poster quickly and<br />
easily. Select a picture and type three lines of text in<br />
a word processor. Open the Motivator page, upload<br />
the picture, and complete the selections: Landscape<br />
or Portrait, select a border, select colors (Title &<br />
border, text, background), type a title, paste your<br />
text, select a font, and click the create button. Click<br />
the Save button to save the poster as a .JPEG file.<br />
Insert the .JPEG file into Word and print or use a<br />
poster template and print a poster.<br />
Create trading cards quickly and easily. Open the<br />
Trading Cards page and select a picture, choose a<br />
background, type a title, subtitle, and description.<br />
May add up to 7 decorative icons. Click the Create<br />
button to create the trading card. Click the Save<br />
button to save the trading card as a .JPEG file. Follow<br />
the directions on Slide 38 to print in a variety of<br />
sizes.<br />
CD Files:<br />
trading card storyboard.doc<br />
BHL-Magazine Cover.pdf<br />
BigHugeLabTrading+Cards.pdf<br />
MotivatorPosterBigHugeLabs.pdf<br />
Slide 33<br />
Publisher Poster Templates<br />
Open MS Office Publisher and follow the directions<br />
below or open one of the poster templates. Publisher<br />
is not available for Macintosh computers.<br />
Slide 34<br />
select a poster template<br />
add text and pictures<br />
print – trim – tape together<br />
CD Files:<br />
MediumLandscape_18x24.pub<br />
MediumPortrait_18x24.pub<br />
LargeLandscape_24x36.pub<br />
LargePortrait_24x36.pub<br />
Publisher 2007<br />
More Blank Page Sizes (top row of choices) <br />
<strong>Public</strong>ation Types Posters folder<br />
Publisher 2010<br />
<strong>Public</strong>ation Types Blank Page Sizes Posters<br />
Select a template<br />
Two good sizes are Large 24 x 36 and Medium 18<br />
x 24 – scroll down past the banner templates to<br />
find these two<br />
Add text and graphics<br />
Print (prints on multiple pages)<br />
Cut, tape and laminate<br />
Posters – Excel Templates<br />
2 X 2 template (4 pages)<br />
3 X 3 template (9 pages)<br />
add text, graphics, word art<br />
Follow the directions in ExcelPosters.pdf to create a<br />
custom sized poster in Excel or use one of the<br />
templates. Add WordArt, text & graphics. Print (prints<br />
on multiple pages), cut, and tape together.<br />
CD Files:<br />
ExcelPosters.pdf<br />
PosterTemp_4pgLandscape.xls<br />
PosterTemp_4pgPortrait.xls<br />
PosterTemp_9pgPortrait.xls<br />
Sandra Morrissette & Eric Fleming — Assistive Technology Services — <strong>Fairfax</strong> <strong>County</strong> <strong>Public</strong> <strong>Schools</strong><br />
Page 11
Slide 35<br />
Finding Pictures & Graphics<br />
The following websites have a variety of graphics and<br />
photos that can be used in different student projects.<br />
Phillip’s Photos<br />
Wikipedia<br />
http://www.wikipedia.org/<br />
Microsoft<br />
Clip Art<br />
Pixabay – Free Images<br />
http://pixabay.com/<br />
DK Clip Art<br />
http://www.clipart.dk.co.uk/home<br />
Pics4Learning<br />
http://www.pics4learning.com/<br />
Flickr<br />
http://www.flickr.com/<br />
Microsoft Clip Art is also a great source<br />
for graphics and pictures.<br />
Phillip’s Photos<br />
http://www.pppst.com/clipart.html<br />
DK Clip Art<br />
http://www.clipart.dk.co.uk/home<br />
Pics4Learning<br />
http://www.pics4learning.com/<br />
Ben’s Guide to U.S. Government for Kids<br />
http://bensguide.gpo.gov/k-2/index.html<br />
Slide 36<br />
Google Image Search by Usage Results<br />
Click “Images”<br />
Select Advanced<br />
Search<br />
Select a filter & click Advanced Search<br />
Results are displayed for<br />
selected filter<br />
Use Google Advanced Search to find copyrightfriendly<br />
pictures for student projects.<br />
Type a word in the Google search box<br />
Click Images<br />
Click the wheel and select Advanced from the<br />
menu<br />
Scroll down to usage rights and select from the<br />
drop down menu<br />
Slide 37<br />
Finding Pictures in Flickr<br />
Flickr is a website where people can share their<br />
photographs online. Many of the photographs can be<br />
downloaded to use in student projects. To easily find<br />
photos to download, do an Advanced Search for<br />
photos posted under a Creative Commons license.<br />
www.flickr.com<br />
*Flickr is not content-filtered for<br />
children so either search with your<br />
student or search and download<br />
photos yourself for them to use.<br />
Go to the Flickr website<br />
Type a word in the search box click Search<br />
Click Advanced Search (by the Search button)<br />
Scroll down the page and check the box for Only<br />
search within Creative Commons-licensed<br />
content<br />
Click the blue Search button<br />
The pictures that are displayed are copyrightfriendly<br />
and may be downloaded<br />
Click on a picture<br />
Click on the Actions button above the picture<br />
Click View all sizes<br />
Select a pictures size click the blue download text<br />
(i.e. Download the Large size of this photo)<br />
Sandra Morrissette & Eric Fleming — Assistive Technology Services — <strong>Fairfax</strong> <strong>County</strong> <strong>Public</strong> <strong>Schools</strong><br />
Page 12
Slide 38<br />
Slide 39<br />
Slide 40<br />
organize in a folder<br />
Photo Printing Wizard<br />
Windows XP<br />
Photo Printing Wizard<br />
Windows 7<br />
print a contact sheet<br />
Windows 7:<br />
Collect all the graphics in one folder<br />
Organize drop-down Select all<br />
Click the Print button<br />
Select a printer, paper size and<br />
quality<br />
Scroll down the right frame and<br />
select Contact sheet (prints 35 per<br />
page)<br />
Yahoo! Kids<br />
http://kids.yahoo.com/<br />
DuckDuckGo<br />
http://duckduckgo.com/<br />
Organizing Project Graphics & Printing Contact<br />
Sheets<br />
Collect and organize graphics for student projects in<br />
folders. Print a contact sheet of thumbnails from a<br />
folder of pictures.<br />
Windows XP:<br />
Collect all the graphics for a project in one folder<br />
View menu Thumbnails<br />
Edit menu Select All<br />
File Print (Photo Printing Wizard opens)<br />
Click Next<br />
Graphics with check marks will be printed <br />
Deselect any graphics you do not want to print <br />
Click next<br />
Select a printer from the drop-down menu Click<br />
next<br />
Select Contact sheet (prints 36 prints per page)<br />
from the Available layouts<br />
Click Next to print the Contact Sheet<br />
Kid-Friendly Search Engines<br />
Kid-friendly search engines are easier for students to<br />
use and have some content filtering built in.<br />
Encourage students to read about topics of interest<br />
and then create a publication using a template.<br />
Kid-Friendly Search Sites<br />
http://www.kidfriendlysearch.com/<br />
Dib Dab Doo and Dilly too. . .<br />
http://www.dibdabdoo.com/<br />
KidRex<br />
http://www.kidrex.org/<br />
Kids Click!<br />
http://www.kidsclick.org/<br />
FCPS Online Databases<br />
Grolier Online<br />
Kids<br />
Kids InfoBits<br />
<strong>Fairfax</strong> <strong>County</strong> <strong>Public</strong> <strong>Schools</strong> subscribes to a variety<br />
of online databases for students to use. Open the<br />
FCPS home page and click on the Students tab.<br />
Under Get Help With Homework click on Library<br />
online databases. Select by subject, alphabetically,<br />
grade level, vendor, or ebooks.<br />
plus many, many more!<br />
Amazing<br />
Animals of the<br />
World<br />
Be sure and check out:<br />
Grolier Online Kids<br />
World Book Early World of Learning<br />
Kids InfoBits<br />
Amazing Animals of the World<br />
Culture Grams<br />
Tumble Books (username: fairfax – password:<br />
fairfax)<br />
Tumblereadables (username: fairfax – password:<br />
login)<br />
Sandra Morrissette & Eric Fleming — Assistive Technology Services — <strong>Fairfax</strong> <strong>County</strong> <strong>Public</strong> <strong>Schools</strong><br />
Page 13
Slide 41<br />
Click Advanced search<br />
Select a reading level<br />
Results are displayed for selected<br />
reading level<br />
Google Search by Reading Level<br />
Google’s new advanced search feature categorizes<br />
results by reading level.<br />
Type search words in the search box<br />
Click on the Options button and<br />
select Advanced Search<br />
Type the search words<br />
Click in the reading level section<br />
Select:<br />
o Annotate results with reading levels (see<br />
illustration below)<br />
o Basic<br />
o Intermediate<br />
o Advanced<br />
Annotate results with reading levels:<br />
Slide 42<br />
Assistive Technology Services (ATS)<br />
<strong>Fairfax</strong> <strong>County</strong> <strong>Public</strong> <strong>Schools</strong><br />
<strong>Public</strong> Web:<br />
http://www.fcps.edu/dss/sei/ats/index.shtml<br />
<strong>Public</strong> Web: http://www.fcps.edu/ss/its/index.htm<br />
Assistive Technology Services - <strong>Fairfax</strong> <strong>County</strong><br />
Sandy Morrissette – skmorrissette@fcps.edu<br />
Eric Fleming – EVFleming@fcps.edu<br />
Sandra Morrissette & Eric Fleming — Assistive Technology Services — <strong>Fairfax</strong> <strong>County</strong> <strong>Public</strong> <strong>Schools</strong><br />
Page 14