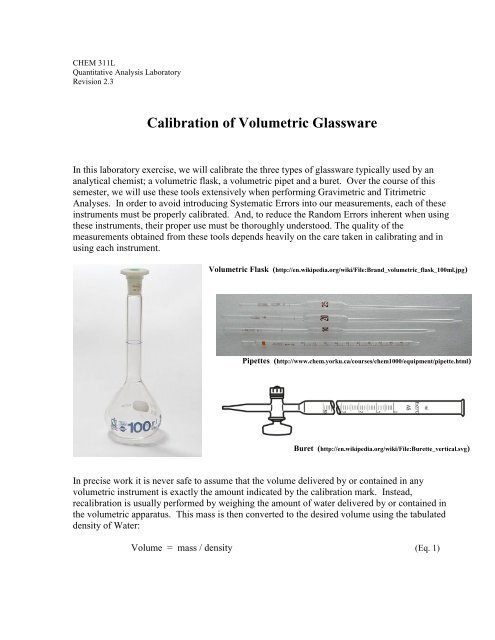
Calibration of Volumetric Glassware
Calibration of Volumetric Glassware
Calibration of Volumetric Glassware

You also want an ePaper? Increase the reach of your titles
YUMPU automatically turns print PDFs into web optimized ePapers that Google loves.
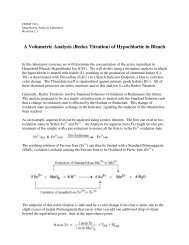
CHEM 311L<br />
Quantitative Analysis Laboratory<br />
Revision 2.3<br />
<strong>Calibration</strong> <strong>of</strong> <strong>Volumetric</strong> <strong>Glassware</strong><br />
In this laboratory exercise, we will calibrate the three types <strong>of</strong> glassware typically used by an<br />
analytical chemist; a volumetric flask, a volumetric pipet and a buret. Over the course <strong>of</strong> this<br />
semester, we will use these tools extensively when performing Gravimetric and Titrimetric<br />
Analyses. In order to avoid introducing Systematic Errors into our measurements, each <strong>of</strong> these<br />
instruments must be properly calibrated. And, to reduce the Random Errors inherent when using<br />
these instruments, their proper use must be thoroughly understood. The quality <strong>of</strong> the<br />
measurements obtained from these tools depends heavily on the care taken in calibrating and in<br />
using each instrument.<br />
<strong>Volumetric</strong> Flask (http://en.wikipedia.org/wiki/File:Brand_volumetric_flask_100ml.jpg)<br />
Pipettes (http://www.chem.yorku.ca/courses/chem1000/equipment/pipette.html)<br />
Buret (http://en.wikipedia.org/wiki/File:Burette_vertical.svg)<br />
In precise work it is never safe to assume that the volume delivered by or contained in any<br />
volumetric instrument is exactly the amount indicated by the calibration mark. Instead,<br />
recalibration is usually performed by weighing the amount <strong>of</strong> water delivered by or contained in<br />
the volumetric apparatus. This mass is then converted to the desired volume using the tabulated<br />
density <strong>of</strong> Water:<br />
Volume = mass / density (Eq. 1)
P a g e | 2<br />
All volumetric apparati should be either purchased with a <strong>Calibration</strong> Certificate or calibrated by<br />
the analyst in this manner.<br />
Systematic Errors Affecting <strong>Volumetric</strong> Measurements<br />
The volume occupied by a given mass <strong>of</strong> liquid varies with temperature, as does the volume <strong>of</strong><br />
the device that holds the liquid. 20 o C has been chosen as the normal temperature for calibration<br />
<strong>of</strong> much volumetric glassware.<br />
Glass is a fortunate choice for volumetric ware as it has a relatively small coefficient <strong>of</strong> thermal<br />
expansion; a glass vessel which holds 1.00000L at 15 o C holds 1.00025L at 25 o C. If desired, the<br />
volume values (V) obtained at a temperature (t) can be corrected to 20 o C by use <strong>of</strong>:<br />
V20 = V [1 + 0.000025 (20 - t)] (Eq. 2)<br />
In most work, this correction is small enough it may be ignored.<br />
However, the thermal expansion <strong>of</strong> the contained liquid is frequently <strong>of</strong> importance. Dilute<br />
aqueous solutions have a coefficient <strong>of</strong> thermal expansion <strong>of</strong> about 0.025%/ o C. A liter <strong>of</strong> water<br />
at 15 o C will occupy 1.002L at 25 o C. A correction for this expansion must frequently be applied<br />
during calibration procedures.<br />
Parallax is another source <strong>of</strong> error when using volumetric ware. A correction for this expansion<br />
must frequently be applied during calibration procedures. Frequently, graduation marks encircle<br />
the apparatus to aid in this.<br />
Readings which are either too high or too low will result otherwise.<br />
(Quantitative Analysis, 4 th Ed. by Conway Pierce,<br />
Edward L. Haenisch and Donald T. Sawyer; John Wiley<br />
& Sons; 1948.)
Tips for Correct Use <strong>of</strong> <strong>Volumetric</strong> <strong>Glassware</strong><br />
Pipets<br />
P a g e | 3<br />
The Pipet is used to transfer a volume <strong>of</strong> solution from one container to another. Most<br />
<strong>Volumetric</strong> Pipets are calibrated To-Deliver (TD); with a certain amount <strong>of</strong> the liquid<br />
remaining in the tip and as a film along the inner barrel after delivery <strong>of</strong> the liquid. The<br />
liquid in the tip should not be blown-out. Pipets <strong>of</strong> the "blow-out" variety will usually<br />
have a ground glass ring at the top. And, drainage rates from the pipet must be carefully<br />
controlled so as to leave a uniform and reproducible film along the inner glass surface.<br />
Measuring Pipets will be gradated in appropriate units.<br />
Once the pipet is cleaned and ready to use, make sure the outside <strong>of</strong> the tip is dry. Then<br />
rinse the pipet with the solution to be transferred. Insert the tip into the liquid to be used<br />
and draw enough <strong>of</strong> the liquid into the pipet to fill a small portion <strong>of</strong> the bulb. Hold the<br />
liquid in the bulb by placing your fore finger over the end <strong>of</strong> the stem.<br />
(Quantitative Analysis, 4 th Ed. by Conway Pierce,<br />
Edward L. Haenisch and Donald T. Sawyer; John Wiley<br />
& Sons; 1948.)<br />
Withdraw the pipet from the liquid and gently rotate it at an angle so as to wet all<br />
portions <strong>of</strong> the bulb. Drain out and discard the rinsing liquid. Repeat this once more.<br />
To fill the pipet, insert it vertically in the liquid, with the tip near the bottom <strong>of</strong> the<br />
container. Apply suction to draw the liquid above the graduation mark. Quickly place a<br />
fore finger over the end <strong>of</strong> the stem. Withdraw the pipet from the liquid and use a dry<br />
paper to wipe <strong>of</strong>f the stem. Now place the tip <strong>of</strong> the pipet against the container from<br />
which the liquid has been withdrawn and drain the excess liquid such that the meniscus is<br />
at the graduation mark.<br />
Move the pipet to the receiving container and allow the liquid to flow out (avoiding<br />
splashing) <strong>of</strong> the pipet freely. When most <strong>of</strong> the liquid has drained from the pipet, touch<br />
the tip to the wall <strong>of</strong> the container until the flow stops and for an additional count <strong>of</strong> 10.
<strong>Volumetric</strong> Flasks<br />
Burets<br />
P a g e | 4<br />
The <strong>Volumetric</strong> Flask is used to prepare Standard Solutions or in diluting a sample. Most<br />
<strong>of</strong> these flasks are calibrated To-Contain (TC) a given volume <strong>of</strong> liquid. When using a<br />
flask, the solution or solid to be diluted is added and solvent is added until the flask is<br />
about two-thirds full. It is important to rinse down any solid or liquid which has adhered<br />
to the neck. Swirl the solution until it is thoroughly mixed. Now add solvent until the<br />
meniscus is at the calibration mark. If any droplets <strong>of</strong> solvent adhere to the neck, use a<br />
piece <strong>of</strong> tissue to blot these out. Stopper the flask securely and invert the flask at least 10<br />
times.<br />
The Buret is used to accurately deliver a variable amount <strong>of</strong> liquid. Fill the buret to<br />
above the zero mark and open the stopcock to fill the tip. Work air bubbles out <strong>of</strong> the tip<br />
by rapidly squirting the liquid through the tip or tapping the tip while solution is draining.<br />
The initial buret reading is taken a few seconds, ten to twenty, after the drainage <strong>of</strong> liquid<br />
has ceased. The meniscus can be highlighted by holding a white piece <strong>of</strong> paper with a<br />
heavy black mark on it behind the buret.<br />
(Quantitative Analysis, 4 th Ed. by Conway Pierce,<br />
Edward L. Haenisch and Donald T. Sawyer; John Wiley<br />
& Sons; 1948.)<br />
Place the flask into which the liquid is to be drained on a white piece <strong>of</strong> paper. (This is<br />
done during a titration to help visualize color changes which occur during the titration.)<br />
The flask is swirled with the right-hand while the stopcock is manipulated with the lefthand.<br />
(Quantitative Analysis, 4 th Ed. by Conway Pierce,<br />
Edward L. Haenisch and Donald T. Sawyer; John Wiley<br />
& Sons; 1948.)
P a g e | 5<br />
The buret should be opened and allowed to drain freely until near the point where liquid<br />
will no longer be added to the flask. Smaller additions are made as the end-point <strong>of</strong> the<br />
addition is neared. Allow a few seconds after closing the stopcock before making any<br />
readings. At the end-point, read the buret in a manner similar to that above.<br />
As with pipets, drainage rates must be controlled so as to provide a reproducible liquid<br />
film along the inner barrel <strong>of</strong> the buret.<br />
Cleaning <strong>Volumetric</strong> <strong>Glassware</strong><br />
Cleaning <strong>of</strong> volumetric glassware is necessary to not only remove any contaminants, but to<br />
ensure its accurate use. The film <strong>of</strong> water which adheres to the inner glass wall <strong>of</strong> a container as<br />
it is emptied must be uniform.<br />
Two or three rinsings with tap water, a moderate amount <strong>of</strong> agitation with a dilute detergent<br />
solution, several rinsings with tap water, and two or three rinsings with distilled water are<br />
generally sufficient if the glassware is emptied and cleaned immediately after use.<br />
If needed, use a warm detergent solution (60-70 o C). A buret or test tube brush can be used in the<br />
cleaning <strong>of</strong> burets and the neck <strong>of</strong> volumetric flasks. <strong>Volumetric</strong> flasks can be filled with<br />
cleaning solution directly. Pipets and burets should be filled by inverting them and drawing the<br />
cleaning solution into the device with suction. Avoid getting cleaning solution in the stopcock.<br />
Allow the warm cleaning solution to stand in the device for about 15 minutes; never longer than<br />
20 minutes. Drain the cleaning solution and rinse thoroughly with tap water and finally 2-3<br />
times with distilled water.<br />
Pipets and burets should be rinsed at least once with the solution with which they are to filled<br />
before use.<br />
A General <strong>Calibration</strong> Procedure<br />
As was noted above, volumetric glassware is calibrated by measuring the mass <strong>of</strong> Water that is<br />
Contained In or Delivered By the device.<br />
To obtain an accurate mass measurement, buoyancy effects must be corrected for. The amount<br />
<strong>of</strong> air displaced by the standard weights <strong>of</strong> the balance is somewhat different than the amount <strong>of</strong><br />
air displaced by the weighed water. This difference leads to different buoyancies for these<br />
objects; meaning the balance levels at a point other than when the two objects are <strong>of</strong> the same<br />
mass. This can be corrected for using:<br />
mtrue = mmeas + da ( (mmeas/d) – (mmeas/ds) ) (Eq. 3)
P a g e | 6<br />
where ds is the density <strong>of</strong> the standard weights (8.47 g/cm 3 ), da is the density <strong>of</strong> air (� 0.0012<br />
g/cm 3 ), and d is the density <strong>of</strong> the object being measured.<br />
This mass data is then converted to volume data using the tabulated density <strong>of</strong> Water (See<br />
Appendix) at the temperature <strong>of</strong> calibration. (In very accurate work, the thermometer must also<br />
be calibrated as an incorrect temperature reading will lead to the use <strong>of</strong> an incorrect density for<br />
Water. This, in turn, will give an inaccurate volume calibration.)<br />
Finally, this volume data is corrected to the standard temperature <strong>of</strong> 20 o C. This can be<br />
accomplished using the thermal expansion coefficient <strong>of</strong> Water; 0.00025/ o C:<br />
V20 = V [1 + 0.00025 (20 - t)] (Eq. 4)<br />
Further details concerning calibration <strong>of</strong> laboratory glassware can be found in the NIST<br />
publication “The <strong>Calibration</strong> <strong>of</strong> Small <strong>Volumetric</strong> Laboratory <strong>Glassware</strong>” by Josephine<br />
Lembeck; NBSIR 74-461. This publication can be found at:<br />
http://ts.nist.gov/MeasurementServices/<strong>Calibration</strong>s/upload/74-461.PDF<br />
Thus, in this exercise we will calibrate a volumetric flask and a pipet and determine a buret<br />
Correction Factor by calibrating each <strong>of</strong> these devices with Water. In each case, the measured<br />
mass <strong>of</strong> the calibrating Water will be corrected for buoyancy effects and the resulting volume<br />
will be standardized to 20 o C.
Procedures<br />
P a g e | 7<br />
Begin by cleaning a 5 mL or 25 mL <strong>Volumetric</strong> Pipet, a 50 mL Buret, and a 25 mL<br />
<strong>Volumetric</strong> Flask according to the procedure outlined above. It is imperative for the<br />
purposes <strong>of</strong> calibration that these glassware items be cleaned such that Water drains<br />
uniformly and does not leave breaks or droplets on the walls <strong>of</strong> the glass.<br />
If detergent solutions are not sufficient to clean your glassware, a Cleaning Solution<br />
(Dichromate in Conc. Sulfuric Acid) may be used. Consult you instructor before taking<br />
this step.<br />
Once cleaned, the Buret should be filled with Distilled Water and clamped in an upright<br />
position and stored in this manner until needed. The <strong>Volumetric</strong> Flask should be clamped<br />
in an inverted position so that it may dry.<br />
<strong>Calibration</strong> <strong>of</strong> a Pipet<br />
Use your cleaned pipet. Note if this is a Class A or other device. Weigh a receiving container on<br />
the Analytical Balance; a 100 mL plastic beaker with Aluminum Foil cover. Pipet distilled water<br />
into the plastic beaker and reweigh it.<br />
Record the temperature <strong>of</strong> the water used.<br />
Repeat the procedure at least 2 more times. Dry the plastic beaker and re-weigh it for each<br />
replication. (Are you pipeting consistently and correctly?)<br />
Calculate the apparent mass and the buoyancy corrected mass <strong>of</strong> the water delivered for each<br />
time you pipet. From this mass, and the density <strong>of</strong> water at the given temperature (See<br />
Appendix), calculate the volume <strong>of</strong> the water delivered. Correct the volume to 20 o C. Calculate<br />
the Average, Standard Deviation and 90% Confidence Interval for your calibration result.<br />
Is your result within the listed tolerance for this pipet? (See Appendix. What is the better<br />
question to ask?)<br />
<strong>Calibration</strong> <strong>of</strong> a Buret<br />
Use your cleaned 50mL buret. Note if this is a Class A or other device. Fill the buret with<br />
water. Make sure the tip is free <strong>of</strong> bubbles. Drain into a waste beaker until it is at, or just below,<br />
the zero mark. Allow 10-20 seconds for drainage. Make an initial reading to a precision <strong>of</strong> at<br />
least 0.01 mL. Test for tightness <strong>of</strong> the stopcock by allowing the buret to stand for 5 minutes and<br />
then re-reading the volume. There should be no noticeable change in the reading.
P a g e | 8<br />
Once the tightness <strong>of</strong> the stopcock is assured, refill the buret and again drain into a waste until it<br />
is at, or just below, the zero mark. Allow for drainage. Touch the tip <strong>of</strong> the buret to the wall <strong>of</strong><br />
the waste beaker to remove the pendent drop <strong>of</strong> water. Make a volume reading.<br />
Weigh a receiving container on the Analytical Balance; a 100 mL plastic beaker with Aluminum<br />
Foil cover. Drain about 5 mL <strong>of</strong> water from the buret into the beaker. Allow 10-20 seconds for<br />
drainage. Touch the tip <strong>of</strong> the buret to the wall <strong>of</strong> the beaker to again remove the pendent drop.<br />
Read the buret and weigh the water.<br />
Calculate the actual volume <strong>of</strong> water delivered by the buret in the same manner as outlined above<br />
in the procedure on calibrating pipets. Calculate the Correction Factor by subtracting the<br />
apparent volume delivered, as given by the buret readings, from the actual volume delivered.<br />
Repeat the procedure at least once more. The two Correction Factors should agree within 0.04<br />
mL. If they do not, repeat the procedure again. Report the average Correction Factor for 5 mL.<br />
Repeat this process for 15 mL, 25 mL, 35 mL, and 45 mL delivered.<br />
Plot the Average Buret Correction Factor vs. Volume Delivered using Excel or some other<br />
graphing s<strong>of</strong>tware.<br />
Label and store your buret properly; upright and filled with Distilled Water. This is the<br />
buret you will use for the remainder <strong>of</strong> the course.<br />
<strong>Calibration</strong> <strong>of</strong> a <strong>Volumetric</strong> Flask<br />
Use your cleaned 25mL volumetric flask. Note if this is a Class A or other device. Weigh the<br />
flask empty. Fill the flask to the mark and re-weigh it. Measure the temperature <strong>of</strong> the water<br />
used.<br />
Repeat the procedure at least twice more.<br />
Calculate the true volume <strong>of</strong> the flask using the method outlined above. Report the Average,<br />
Standard Deviation, and 90% Confidence Interval for this result.<br />
Is your result within the listed tolerance for this flask?
Appendix - Density <strong>of</strong> Water<br />
Temperature ( o C) Density (g/mL)<br />
10 0.9997026<br />
11 0.9996084<br />
12 0.9995004<br />
13 0.9993801<br />
14 0.9992474<br />
15 0.9991026<br />
16 0.9989460<br />
17 0.9987779<br />
18 0.9985986<br />
19 0.9984082<br />
20 0.9982071<br />
21 0.9979955<br />
22 0.9977735<br />
23 0.9975415<br />
24 0.9972995<br />
25 0.9970479<br />
26 0.9967867<br />
27 0.9965162<br />
28 0.9962365<br />
29 0.9959478<br />
30 0.9956502<br />
P a g e | 9
Appendix - Tolerances for Class A <strong>Volumetric</strong> <strong>Glassware</strong> at 20 o C<br />
Pipets<br />
Capacity (mL) Tolerances (mL)<br />
0.5 0.006<br />
1 0.006<br />
2 0.006<br />
5 0.01<br />
10 0.02<br />
20 0.03<br />
25 0.03<br />
50 0.05<br />
100 0.08<br />
<strong>Volumetric</strong> Flasks<br />
Burets<br />
Capacity (mL) Tolerances (mL)<br />
5 0.02<br />
10 0.02<br />
25 0.03<br />
50 0.05<br />
100 0.08<br />
250 0.12<br />
500 0.20<br />
1000 0.30<br />
2000 0.50<br />
Capacity (mL) Tolerances (mL)<br />
5 0.01<br />
10 0.02<br />
25 0.03<br />
50 0.05<br />
100 0.20<br />
P a g e | 10<br />
With the exception <strong>of</strong> Graduated Cylinders, the Tolerances for Class B devices is<br />
typically twice that <strong>of</strong> a Class A device. (ASTM E694)
![is numerically equivalent to [0,1].](https://img.yumpu.com/21969136/1/190x245/is-numerically-equivalent-to-01.jpg?quality=85)