
You also want an ePaper? Increase the reach of your titles
YUMPU automatically turns print PDFs into web optimized ePapers that Google loves.
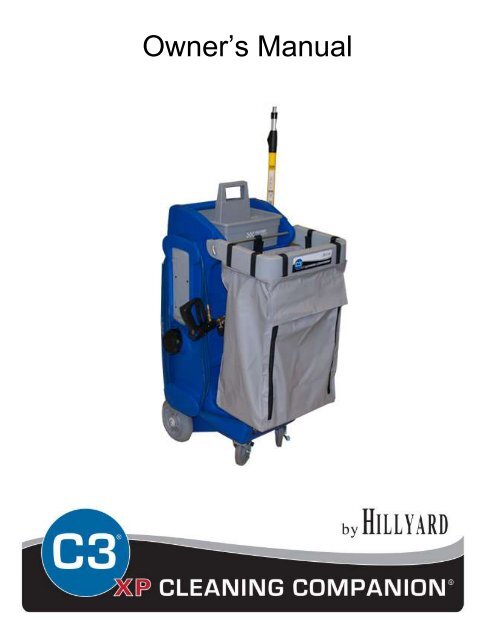
Owner’s <strong>Manual</strong>
Packing List:<br />
C3XP Unit<br />
Spray gun w/ 2 settings<br />
12-volt battery<br />
Telescoping handle<br />
Removable Cleaning Caddy<br />
Pivot arm<br />
Utility Bag<br />
10 Gallon water reservoir (integral)<br />
17 ft. discharge hose (installed)<br />
Battery charger<br />
Instruction manual<br />
18’’ floor squeegee<br />
Pivot arm lock bar w/locking nut<br />
Initial Setup:<br />
The battery is shipped installed and charged, but not connected to the pump. To connect the battery,<br />
remove the back cover by removing the four screws with a phillips head screwdriver. Connect<br />
terminal on the black wire to the black terminal on the battery. If the pump begins to run, turn the unit off<br />
with the switch on the front. Put the back cover back onto the unit by replacing the four screws with a<br />
phillips head screwdriver.<br />
Attach the spray gun to the discharge hose.<br />
Attach plastic pivot arm to front of machine, install pivot arm lock bar through the pivot arm and the<br />
C3XP machine, attach and tighten locking nut. (see picture on front of manual for reference)<br />
Remove utility bag from plastic and install onto pivot arm with attached straps. Install utility bag with<br />
zippers facing away from machine.<br />
Remove the black cap from the water fill port (it rotates COUNTER CLOCK WISE to open). Fill the<br />
tank to line (10.1 gallons) with cool clear tap water.<br />
To connect the chemicals, remove the shipping cap, slide bottle into machine with the bottle opening<br />
to the outside of the machine and attach the chemical feed line to the bottle by screwing the cap on<br />
the line onto the bottle.<br />
C3XP <strong>Owner's</strong> <strong>Manual</strong><br />
06/10/2011<br />
1 of 6
Initial Priming:<br />
Set the spray gun to the low pressure setting (see attached spray gun instructions).<br />
Set the chemical selector to the desired product. (see diagram at bottom of page) [IN ORDER FOR<br />
THE MACHINE TO INITIALLY PRIME CORRECTLY, YOU MUST PRIME WITH Cleaning<br />
Companion PRODUCT IN USE]<br />
Turn the switch on. The power switch is lighted when it is in the on position. The pump should run for<br />
a short time then stop. (There is a pressure switch in the pump that will stop the pump when the<br />
discharge pressure reaches the set point).<br />
Direct the spray nozzle into a drain or other container and pull the trigger.<br />
Run until a steady spray pattern is established.<br />
Release the trigger. The pump should stop almost immediately. If it does not, operate the unit longer<br />
as it is not fully primed.<br />
Turn the selector to the other products and repeat.<br />
Normal Operation:<br />
The power switch is lighted when it is in the on position.<br />
The pump will run when the trigger on the spray gun is pulled and stop when it is released.<br />
The C3 is designed to use a low pressure setting for applying the cleaning/disinfecting<br />
solution and high pressure setting for clear water rinsing. The new C3 rollover valve achieves<br />
the low pressure setting by sending water through 2 spray tips and achieves the high<br />
pressure setting by only utilizing the one high pressure tip.<br />
When finished using the C3 machine, make sure the spray gun is left in the high pressure<br />
(rinse) position to minimize dripping.<br />
Detailed instructions for spray gun operation are contained at the end of this manual.<br />
The pump will run for approximately 3 hours on a fully charged battery. The charger cannot be used<br />
to run a C3 that has a fully discharged battery.<br />
To select which chemical you would like to use, point selector switch to desired chemical using arrow<br />
on selector switch. (See Diagram Below)<br />
To select the rinse mode, place selector switch arrow to the position that is straight up from the<br />
chemicals. (See Diagram Below)<br />
C3XP <strong>Owner's</strong> <strong>Manual</strong><br />
06/10/2011<br />
2 of 6
Charging the Unit:<br />
The charger will recharge a fully discharged battery (pump will not run) overnight (10-12 hours).<br />
To charge, plug the charger into a wall outlet and then plug the 12 volt lead into the 12 volt receptacle<br />
on the dashboard of the C3XP.<br />
The charger is charging the battery when the light on the charger is on. The C3 XP has a<br />
battery meter installed on the unit. When all of the bars make a complete half circle, the<br />
machine is charged.<br />
Always keep the C3XP charger plugged into the C3XP when not in use. This will not<br />
overcharge the battery and will help lengthen the life of the battery.<br />
Included on the battery gauge is an hour meter. The hour meter helps identify when the<br />
machine is being used and when to perform routine maintenance. The hour meter only runs<br />
when the pump is running. The hour meter will not add hours when the switch is left on.<br />
Maintenance:<br />
Daily:<br />
1. Run 1-2 gallons of clear water through the pump while the selector is in the rinse position<br />
(approximately 2 to 4 minutes).<br />
NOTE: FAILURE TO RINSE THE PUMP AFTER USE WILL VOID THE WARRANTY ON THE<br />
PUMP.<br />
Periodic:<br />
2. Rinse both spray nozzles and accessories while you are rinsing the pump.<br />
3. Turn the unit off with the switch. Relieve the pressure in the discharge hose by pulling the<br />
trigger on the spray gun after the switch has been turned off.<br />
4. Check the unit for any damage or leakage.<br />
5. Charge the unit when not in use<br />
6. If unit is going to be stored where it can freeze, drain the water reservoir and run the<br />
pump until there is no more water in the system. Allow the system to thaw before you<br />
start the pump.<br />
1. Soak both spray tips in <strong>Hillyard</strong> Extra Strength CSP ® to help minimize tip blockage and<br />
protect the pump from excessively cycling the pressure switch.<br />
2. Remove water supply line from the bottom of the tank and clean inlet screen located within<br />
the foot valve.<br />
C3XP <strong>Owner's</strong> <strong>Manual</strong><br />
06/10/2011<br />
3 of 6
Troubleshooting:<br />
1. If the spray is weak or there is no spray.<br />
The pump does not operate at full flow if there is air in the system. Air can enter the system<br />
from several sources:<br />
a. Out of water – fill the water reservoir and prime the system.<br />
b. Out of chemical – replace the chemical container and prime the system.<br />
c. Foot valve is clogged – clean or replace the foot valve in the reservoir. To access the<br />
foot valve, remove water fill cap and pull tube out of the tank.<br />
2. Pump pulses.<br />
There is a pressure switch in the pump. If the pump is pulsing, this switch is cycling and the<br />
life of the pump will be greatly reduced. If the pressure switch is cycling, you will hear the<br />
pump sounding irregular and the pump will be shutting on and off very quickly. Normally,<br />
this is caused by blocked spray tips.<br />
Please follow this progression when addressing a pulsing pump:<br />
a. Make sure there are absolutely no air leaks in the system.<br />
b. Make sure chemical caps are screwed tightly.<br />
c. Make sure all connections are tight and there are no water leaks in the system.<br />
d. Make sure you are properly primed and have chemical running through the system.<br />
e. Soak tips in <strong>Hillyard</strong> Extra Strength CSP overnight and rinse, this will help remove<br />
scale and mineral deposits.<br />
f. You may have to remove debris by using a small paper clip into the tip and rinse<br />
(this is delicate process, using too aggressive of techniques can ultimately damage<br />
the spray pattern and performance of the spray tips).<br />
g. The switch can be adjusted and may be necessary to help the pump run more<br />
smoothly. Adjust pressure switch as a last option, serious damage can occur<br />
by adjusting the pressure switch. It is best to have the switch adjusted by<br />
taking to a professional service department. To adjust the switch, remove the<br />
blue cover. In the black end of the pump there is a hole. Using a 5/64 hex wrench,<br />
turn the screw in the hole CW until the pump operates smoothly. Then turn it an<br />
additional ½ turn. Over adjustment will overload the pump and cause the pump life<br />
to be shortened.<br />
C3XP <strong>Owner's</strong> <strong>Manual</strong><br />
06/10/2011<br />
4 of 6
<strong>Hillyard</strong> C3® and C3XPTM Spray Gun Use Instructions<br />
The C3 and C3XP are designed to use a low pressure setting for applying the cleaning/disinfecting solution and high<br />
pressure setting for clear water rinsing. The rollover valve achieves the low pressure setting by sending water through<br />
2 spray tips and achieves the high pressure setting by only utilizing the one high pressure tip.<br />
Water Rinse - High Pressure Setting<br />
SPRAY<br />
NOZZLE<br />
SPRAY<br />
GUN<br />
BODY<br />
Top View<br />
Turn the black<br />
knob on the<br />
rollover valve<br />
to the right<br />
until it stops.<br />
Rinse water will<br />
flow only out of<br />
the bottom high<br />
pressure tip as<br />
pictured.<br />
Rinse Water<br />
Flows From<br />
Bottom Only<br />
(High Pressure)<br />
Chemical Application - Low Pressure Setting<br />
SPRAY<br />
NOZZLE<br />
SPRAY<br />
GUN<br />
BODY<br />
Top View<br />
Turn the<br />
black knob<br />
one full turn<br />
to the left<br />
from the rinse<br />
position, solution<br />
will flow<br />
from both tips<br />
as pictured.<br />
Mixed Cleaning<br />
Solution<br />
Flows From<br />
Both Nozzles<br />
(Low Pressure)<br />
Note: The knob will keep turning to the left for several turns but you only need to turn one turn to the left from rinse to send the<br />
solution through both spray tips.<br />
C3XP <strong>Owner's</strong> <strong>Manual</strong><br />
06/10/2011<br />
5 of 6
Warranty Information<br />
<strong>Hillyard</strong> C3XP ®<br />
The <strong>Hillyard</strong> C3XP is sold with a full parts and labor warranty.<br />
1year warranty on parts and labor from date of delivery<br />
This warranty covers the C3XP machine with the exception of wear items. Wear items are<br />
materials that simply wear out after time and usage. No amount of maintenance will stop them<br />
from being consumed. Wear items include gaskets, wheels, cords, hoses, filters, bearings,<br />
squeegee blades, spray guns, carbon brushes or other items deemed as a wear item by the<br />
manufacturer.<br />
For a full one-year from date of delivery, all parts, with the exception of wear items, will be replaced at<br />
no charge for the part, including labor. This warranty covers manufacturer’s defects in workmanship.<br />
This warranty does not cover travel time.<br />
This warranty does not apply to any machine that has had:<br />
Damage incurred during shipment or caused by accident.<br />
Incompatible or corrosive chemicals used through it.<br />
Lack of proper maintenance.<br />
Misuse, negligence, abuse, fire or use of the product for other than its intended purpose.<br />
Modification of machine from its original condition, service parts installed or repairs performed<br />
by anyone other than authorized distributor or service center.<br />
Need prompt service on this or any other machine?<br />
Call 1-800-365-1555 ask for customer service<br />
Contact your local <strong>Hillyard</strong> Distributor<br />
Email customerservice@hillyard.com<br />
C3XP <strong>Owner's</strong> <strong>Manual</strong><br />
06/10/2011<br />
6 of 6