275 Gym Finish - Hillyard
275 Gym Finish - Hillyard
275 Gym Finish - Hillyard

Create successful ePaper yourself
Turn your PDF publications into a flip-book with our unique Google optimized e-Paper software.
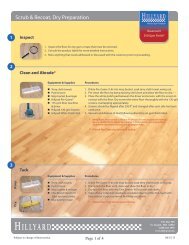
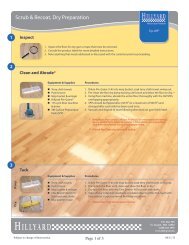
Scrub & Recoat, Dry Preparation<br />
1<br />
Inspect<br />
<strong>275</strong> <strong>Gym</strong> <strong>Finish</strong><br />
1. Inspect the floor for any gum or tape that must be removed.<br />
2. Consult the product labels for more detailed instructions.<br />
3. Note anything that needs addressed or discussed with the customer prior to proceeding.<br />
4. If a competitive water-based finish is currently on the floor, consult with <strong>Hillyard</strong> Technical Service<br />
for further instructions.<br />
2<br />
Clean and Abrade*<br />
Equipment & Supplies<br />
• Terry cloth towels<br />
• Push broom<br />
• Mop bucket & wringer<br />
• <strong>Hillyard</strong> Pre-Game®<br />
• 175-rpm floor machine<br />
& driver<br />
• <strong>Hillyard</strong> white polish pad<br />
• <strong>Hillyard</strong> 120-grit screens<br />
Procedures<br />
1. Dilute Pre-Game (1:4) into mop bucket, soak terry cloth towel, wring out.<br />
2. Pre-clean the floor by damp tacking until clean and allow the floor to dry.**<br />
3. Place the white polish pad between the driver and screen, with the screen in<br />
contact with the floor. Dry screen the entire floor thoroughly with the<br />
120-grit screens, overlapping appropriately.<br />
4. Screens should be flipped after 250 ft² and changed after each side has<br />
been used once.<br />
5. Vacuum and dispose of dust following directions on gym finish label.<br />
* New or sanded floors should be recoated 2-3 times before wet preparation.<br />
Glue-down installations should only be prepared dry.<br />
** A Quick-Pass may also be used for tacking.<br />
3<br />
Damp<br />
Dry<br />
Tack<br />
Equipment & Supplies<br />
• Terry cloth towels<br />
• Push broom<br />
• Mop bucket & wringer<br />
• Chix Brand Stretch ‘N<br />
Dust tool and cloths<br />
• Blue painter’s tape<br />
Procedures<br />
1. Dilute Pre-Game (1:4) into mop bucket, soak terry cloth towel, wring out.<br />
2. Damp tack the floor until clean and allow the floor to dry.*<br />
3. Dry tack the floor with the Chix Stretch ‘N Dust tool and cloths.<br />
4. Tape off any volleyball standards or related objects within the court with<br />
blue painter’s tape to prevent finishing over them.<br />
* A Quick-Pass may also be used for tacking.<br />
®<br />
P.O. Box 909<br />
St. Joseph, MO 64502<br />
1-800-365-1555<br />
www.hillyard.com<br />
Page 1 of 3<br />
Subject to change without notice. 04/03/13
Scrub & Recoat, Wet Preparation<br />
1<br />
Inspect<br />
<strong>275</strong> <strong>Gym</strong> <strong>Finish</strong><br />
1. Inspect the floor for any gum or tape that must be removed.<br />
2. Consult the product labels for more detailed instructions.<br />
3. Note anything that needs addressed or discussed with the customer prior to proceeding.<br />
4. If a competitive water-based finish is currently on the floor, consult with <strong>Hillyard</strong> Technical Service<br />
for further instructions.<br />
2<br />
Clean and Abrade<br />
Equipment & Supplies<br />
• Mop bucket & wringer<br />
• Clean mops & handles<br />
• <strong>Hillyard</strong> Pre-Game®<br />
• 175-rpm floor machine<br />
& driver<br />
• <strong>Hillyard</strong> white polish pad<br />
• <strong>Hillyard</strong> 120-grit screens<br />
• Wet vacuum<br />
Procedures<br />
Wood floors must contain sufficient finish build for wet preparation method.<br />
New or sanded floors should be recoated 2-3 times before wet preparation.<br />
Glue-down installations should only be prepared dry.<br />
1. Dilute Pre-Game (1:4) into mop bucket.<br />
2. Place the white polish pad between the driver and screen, with the screen in<br />
contact with the floor.<br />
3. Apply the Pre-Game solution over a 10-foot X 10-foot area and screen the<br />
floor thoroughly with the 120-grit screens, overlapping appropriately.<br />
4. Screens should be flipped after 250 ft² and changed after each side has<br />
been used once.<br />
5. Vacuum the slurry with a wet vacuum.<br />
6. Rinse the same area with clean water and pick up with a wet vacuum.<br />
7. Repeat these steps until entire floor has been properly cleaned and abraded.<br />
8. Allow the floor to dry overnight.<br />
3<br />
Damp<br />
Dry<br />
Tack<br />
Equipment & Supplies<br />
• Terry cloth towels<br />
• Push broom<br />
• Mop bucket & wringer<br />
• Chix Brand Stretch ‘N<br />
Dust tool and cloths<br />
• Blue painter’s tape<br />
Procedures<br />
1. Dilute Pre-Game (1:4) into mop bucket, soak terry cloth towel, wring out.<br />
2. Damp tack the floor until clean and allow the floor to dry.*<br />
3. Dry tack the floor with the Chix Stretch ‘N Dust tool and cloths.<br />
4. Tape off any volleyball standards or related objects within the court with<br />
blue painter’s tape to prevent finishing over them.<br />
* A Quick-Pass may also be used for tacking.<br />
®<br />
P.O. Box 909<br />
St. Joseph, MO 64502<br />
1-800-365-1555<br />
www.hillyard.com<br />
Page 2 of 3<br />
Subject to change without notice. 04/03/13
Scrub & Recoat, Application<br />
<strong>275</strong> <strong>Gym</strong> <strong>Finish</strong><br />
4<br />
Apply <strong>275</strong> <strong>Gym</strong> <strong>Finish</strong>, T-Bar Method<br />
Equipment & Supplies<br />
• Heavyweight T-Bar<br />
• T-Bar pad<br />
• Watering can<br />
• <strong>275</strong> <strong>Gym</strong> <strong>Finish</strong><br />
Procedures<br />
1. Run a bead of <strong>275</strong> <strong>Gym</strong> <strong>Finish</strong> the length of the gym using the watering<br />
can.<br />
2. Saturate the T-Bar pad and pull the applicator at a 30° angle the length of<br />
the floor, always keeping the <strong>275</strong> <strong>Gym</strong> <strong>Finish</strong> flowing towards the<br />
unfinished side of the floor.<br />
3. When reaching the end of the run, turn the T-Bar 180° and pull in the<br />
opposite direction. Always feather with the grain of the wood.<br />
4. Continue until the entire floor is coated. <strong>275</strong> <strong>Gym</strong> <strong>Finish</strong> should be applied<br />
at a rate of 500-600 ft²/gallon.<br />
5. Turn on the exhaust system 2-4 hours after application.<br />
Apply <strong>275</strong> <strong>Gym</strong> <strong>Finish</strong>, <strong>Hillyard</strong> Multi-Flo XP® Method<br />
Equipment & Supplies<br />
• Multi-Flo XP w/pads<br />
• Heavyweight T-Bar<br />
• T-Bar pad<br />
• Watering can<br />
• <strong>275</strong> <strong>Gym</strong> <strong>Finish</strong><br />
Procedures<br />
1. Place <strong>275</strong> <strong>Gym</strong> <strong>Finish</strong> container on Multi-Flo XP and set up Multi-Flo XP as<br />
described in manual.<br />
2. We suggest using 3 weights on the short bar and 1 weight on the long bar.<br />
3. Run a bead of finish the length of the gym using the Multi-Flo XP.<br />
4. Saturate the Multi-Flo XP pads and pull the applicator at a 30° angle the length of<br />
the floor, always keeping the <strong>275</strong> <strong>Gym</strong> <strong>Finish</strong> flowing towards the unfinished<br />
side of the floor.<br />
5. When reaching the end of the run, turn the applicator 180° and pull the<br />
Multi-Flo XP in the opposite direction. A heavyweight T-Bar may be used to feather<br />
the ends.<br />
6. Continue until the entire floor is coated. <strong>275</strong> <strong>Gym</strong> <strong>Finish</strong> should be applied<br />
at a rate of 500-600 ft²/gallon.<br />
7. Turn on the exhaust system 2-4 hours after application.<br />
5<br />
Allow <strong>275</strong> <strong>Gym</strong> <strong>Finish</strong> to Cure<br />
• Allow <strong>275</strong> <strong>Gym</strong> <strong>Finish</strong> to cure at least 72 hours before opening up to light traffic<br />
and one week before opening up to athletic use.*<br />
* Temperature and humidity will affect the drying and curing properties.<br />
®<br />
P.O. Box 909<br />
St. Joseph, MO 64502<br />
1-800-365-1555<br />
www.hillyard.com<br />
Page 3 of 3<br />
Subject to change without notice. 04/03/13