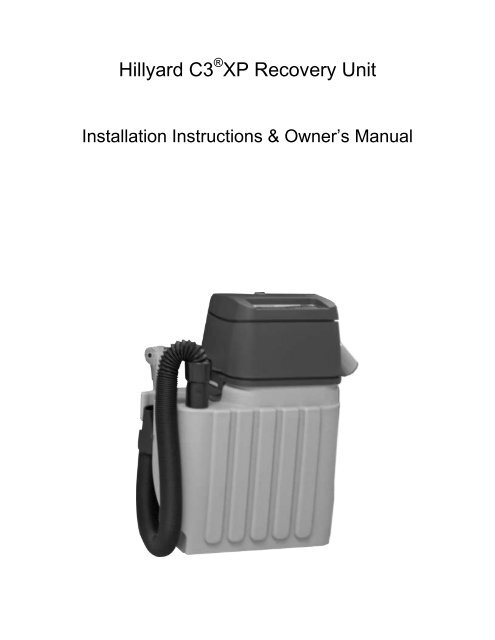
Hillyard C3 XP Recovery Unit
Hillyard C3 XP Recovery Unit
Hillyard C3 XP Recovery Unit

You also want an ePaper? Increase the reach of your titles
YUMPU automatically turns print PDFs into web optimized ePapers that Google loves.
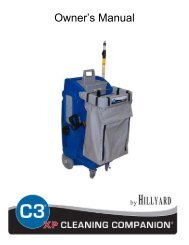
<strong>Hillyard</strong> <strong>C3</strong> ® <strong>XP</strong> <strong>Recovery</strong> <strong>Unit</strong><br />
Installation Instructions & Owner’s Manual
<strong>Hillyard</strong> <strong>C3</strong>®<strong>XP</strong> <strong>Recovery</strong> System Packing List<br />
Packing List:<br />
1- <strong>Recovery</strong> Tank<br />
1- Power Cord<br />
1- Black <strong>Recovery</strong> Hose<br />
1- Gray Dump Hose<br />
1- Floor Tool<br />
1- 2-Piece Wand<br />
1- Hose Clamp<br />
1- <strong>Recovery</strong> Tank Lock Bar<br />
1- Cotter Pin<br />
1-Exhaust Diverter<br />
1-Cleaning Caddy Retainer Bar<br />
2-Acorn Nuts<br />
2-Pivot Arm Bolts<br />
2-Nylon Nuts<br />
1-Stabilizer Bar<br />
2-Push Nuts<br />
<strong>C3</strong><strong>XP</strong> <strong>Recovery</strong> System Owners Manual<br />
07/14/2011<br />
1
<strong>Hillyard</strong> <strong>C3</strong><strong>XP</strong> Assembly Installation Instructions<br />
1 Make sure water reservoir is empty.<br />
10<br />
2 Make sure chemical bottles are removed from<br />
unit.<br />
3 Remove front pivot arm and utility bag from the<br />
unit.<br />
4 Lay unit face down with the rear wheels up.<br />
Secure drain hose to bottom of tank with hose<br />
clamp. Insert top of drain hose into holder.<br />
5 Pry the push nut<br />
that secures the<br />
wheel to the axle<br />
off of the right<br />
side of the axle.<br />
Discard push nut.<br />
11 Set tank onto<br />
the front of<br />
machine,<br />
secure with<br />
metal rod<br />
and supplied<br />
cotter pin.<br />
6 Remove the right wheel and slide the axle out<br />
of the machine (do not remove the left wheel<br />
or push nut).<br />
7 Place the<br />
stabilizer bar as<br />
shown into the<br />
<strong>C3</strong><strong>XP</strong> and slide<br />
the axle through<br />
the stabilizer bar.<br />
12 Snap vacuum<br />
head onto tank.<br />
Secure hose<br />
to tank. Snap<br />
2-piece wand<br />
together. Install<br />
squeegee floor<br />
tool. Place wand<br />
into holder like<br />
pictured below.<br />
8 Reinstall right wheel and install new push nut*<br />
on the axle and tap the push nut in securely<br />
with a flathead screwdriver. Test the installation<br />
by gently pulling on the right wheel to insure<br />
the push nut has secured the wheel properly.<br />
*1 extra push nut is included with this kit in case both were<br />
removed during the installation of the safety bar.<br />
9 Tip unit back upright.<br />
<strong>C3</strong><strong>XP</strong> <strong>Recovery</strong> System Owners Manual<br />
07/14/2011<br />
2
Operation Tips:<br />
- Make sure you are not standing in water when plugging vacuum<br />
in.<br />
- Do not leave cord in standing water<br />
- Make sure floor tool is not clogged<br />
- Empty recovery tank when not in use<br />
- Rinse and clean recovery tank periodically<br />
- Be mindful of the amount of foam in the recovery tank, empty<br />
tank more often when using high foaming cleaners and<br />
disinfectants.<br />
- When using high foaming products, such as Suprox® you may opt<br />
to use defoamer to reduce risk of foam getting to the vacuum<br />
motor.<br />
<strong>C3</strong><strong>XP</strong> <strong>Recovery</strong> System Owners Manual<br />
07/14/2011<br />
3
<strong>Hillyard</strong> <strong>C3</strong> ® <strong>XP</strong> <strong>Recovery</strong> System Warranty<br />
The <strong>Hillyard</strong> <strong>C3</strong><strong>XP</strong> <strong>Recovery</strong> <strong>Unit</strong> is sold with a full parts and labor warranty.<br />
1 year parts warranty<br />
5 year warranty on the recovery tank<br />
90 days parts and labor warranty<br />
30 days labor warranty on replacement parts<br />
This warranty covers the <strong>C3</strong><strong>XP</strong> <strong>Recovery</strong> <strong>Unit</strong> machine with the exception of wear<br />
items. Wear items are materials that simply wear out after time and usage. No<br />
amount of maintenance will stop them from being consumed. Wear items include<br />
gaskets, wheels, cords, hoses, filters, bearings, wand (gun), floor tool or other<br />
items deemed as a wear item by the manufacturer.<br />
This full parts and labor warranty is effective for 90 days from date of delivery.<br />
For a full one-year from date of delivery all parts, with the exception of wear items will be<br />
replaced at no charge for the part. This one-year warranty does not cover labor, shipping or<br />
handling charges that may apply. This warranty covers manufacturer’s defects in workmanship.<br />
This warranty does not apply to any machine that has had:<br />
Water damage to motor<br />
Damage incurred during shipment or caused by accident.<br />
Incompatible or corrosive chemicals used through it.<br />
Lack of proper maintenance.<br />
Misuse, negligence, abuse, fire or use of the product for other than its intended purpose.<br />
Modification of machine from its original condition, service parts installed or repairs<br />
performed by anyone other than authorized distributor or service center.<br />
Need prompt service on this or any other machine?<br />
1-800-365-1555 ask for customer service<br />
Email customerservice@hillyard.com<br />
Contact your local <strong>Hillyard</strong> Distributor<br />
<strong>C3</strong><strong>XP</strong> <strong>Recovery</strong> System Owners Manual<br />
07/14/2011<br />
4