hillyard synthetic and non-wood sports floor care - Hillyard Inc.
hillyard synthetic and non-wood sports floor care - Hillyard Inc.
hillyard synthetic and non-wood sports floor care - Hillyard Inc.

Create successful ePaper yourself
Turn your PDF publications into a flip-book with our unique Google optimized e-Paper software.
HILLYARD<br />
SYNTHETIC AND NON-WOOD<br />
SPORTS FLOOR CARE
RENOVATING SYNTHETIC AND<br />
NON-WOOD SPORTS FLOORS<br />
Synthetic <strong>and</strong> <strong>non</strong>-<strong>wood</strong> <strong>sports</strong> <strong>floor</strong>s<br />
need to be properly prepared before any<br />
maintenance coats are applied. For new<br />
<strong>synthetic</strong> <strong>sports</strong> <strong>floor</strong>s, make sure to<br />
check with the manufacturer regarding<br />
the warranty <strong>and</strong> specific maintenance<br />
recommendations before beginning. For<br />
older <strong>floor</strong>s that are out of warranty, simply<br />
follow the steps on these two pages<br />
to strip existing maintenance coatings,<br />
clean, <strong>and</strong> prepare the <strong>floor</strong> for coating<br />
with Seal 341 or Protective Coating.<br />
Salvation ® is the ideal product for preparing/renovating<br />
<strong>synthetic</strong> <strong>and</strong> <strong>non</strong>-<strong>wood</strong><br />
<strong>sports</strong> <strong>floor</strong>s. It’s a great choice for<br />
stripping existing maintenance coatings<br />
or preparing an older, uncoated <strong>floor</strong>.<br />
Start by sweeping away all loose<br />
dirt <strong>and</strong> debris with a dust mop or a<br />
push broom. Place wet <strong>floor</strong> signs<br />
in entryways. Then place Turkish<br />
toweling at all work area entrances<br />
to help keep the Salvation solution<br />
from being tracked outside the gymnasium.<br />
Mix the Salvation according to<br />
label directions. For most <strong>floor</strong>s,<br />
you will need 8 to 16 ounces of<br />
Salvation per gallon of warm water<br />
in a mop bucket. The Salvation solution<br />
will remove any soil buildup or<br />
polishes <strong>and</strong> prepare the <strong>floor</strong> properly.<br />
Apply a liberal amount of the<br />
Salvation solution to an area approximately<br />
10’ by 10’. Let the solution<br />
work for about 10 minutes. Be<br />
<strong>care</strong>ful not to allow the Salvation to<br />
dry on the <strong>floor</strong>. If necessary, apply<br />
more solution during the scrubbing<br />
process.
While the Salvation ® solution is<br />
working, soak the appropriate scrub<br />
pad(s) in the cleaning solution. This<br />
will keep the pad from absorbing the<br />
solution from the <strong>floor</strong>. Place the<br />
saturated pad under a <strong>floor</strong> machine<br />
or automatic scrubber <strong>and</strong> begin<br />
scrubbing 10' by 10' sections of the<br />
<strong>floor</strong>. To ensure the <strong>floor</strong> is well<br />
cleaned, first scrub one direction <strong>and</strong><br />
then the other.<br />
Immediately pick up the cleaning<br />
solution with a wet vacuum or automatic<br />
scrubber. Make sure not to let<br />
the solution dry on the <strong>floor</strong>.<br />
Next, mix four ounces of Nutra-<br />
Rinse ® per gallon of water. The<br />
Nutra-Rinse solution will help remove<br />
any alkaline residue. Heavy<br />
rinse the section you just scrubbed<br />
with the Nutra-Rinse solution. After<br />
the solution of Nutra-Rinse has set<br />
on the <strong>floor</strong> a few minutes, pick it up<br />
with a wet vacuum or automatic<br />
scrubber.<br />
Repeat all steps for each 10’ x 10’<br />
area to be prepared, until the entire<br />
<strong>floor</strong> has been properly cleaned. Finish<br />
by damp mopping the entire <strong>floor</strong><br />
twice with clean water <strong>and</strong> let the<br />
<strong>floor</strong> dry thoroughly. Remember to<br />
change your rinse water frequently.
APPLYING HILLYARD<br />
SEAL 341 OR PROTECTIVE COATING<br />
Synthetic <strong>and</strong> <strong>non</strong>-<strong>wood</strong> <strong>sports</strong> <strong>floor</strong>s<br />
are easier to keep clean when they are<br />
coated with a protective finish. The finish<br />
holds dirt, scuffs, <strong>and</strong> rubber burns<br />
on the surface where they can be easily<br />
removed. <strong>Hillyard</strong> has developed two<br />
maintenance coatings specifically designed<br />
for <strong>synthetic</strong> <strong>and</strong> <strong>non</strong>-<strong>wood</strong><br />
<strong>sports</strong> <strong>floor</strong>s. <strong>Hillyard</strong> Protective Coating<br />
is a water emulsion finish formulated to<br />
protect your <strong>floor</strong>, enhance the appearance,<br />
<strong>and</strong> make it easier to clean <strong>and</strong><br />
maintain. Seal 341 is designed to seal<br />
<strong>and</strong> protect your <strong>floor</strong> while enhancing<br />
its natural colors. Both finishes are formulated<br />
to st<strong>and</strong> up to scuffing, scratching,<br />
rubber burns, <strong>and</strong> heel marks.<br />
Begin by placing wet <strong>floor</strong> signs in<br />
entryways to prevent people from<br />
walking on the freshly coated surface.<br />
Pour the <strong>Hillyard</strong> Protective<br />
Coating or Seal 341 into a clean mop<br />
bucket <strong>and</strong> saturate a rayon mop.<br />
Wring out the mop to the point it<br />
is still well saturated but not dripping<br />
<strong>and</strong> apply a uniform coat. Work<br />
small areas at a time using straight,<br />
even, figure "8" motions. After the<br />
entire area is coated, let the <strong>floor</strong> dry<br />
for at least one hour.<br />
Apply a second coat in the opposite<br />
direction using the same procedures.<br />
Allow this coat to dry at least<br />
one hour, then apply the third coat.<br />
After the third coat has been applied,<br />
allow four to six hours (overnight if<br />
possible) cure time before opening<br />
the <strong>floor</strong> to traffic. It is important not<br />
to apply more than three coats in an<br />
eight hour time span.
DAILY AND<br />
WEEKLY MAINTENANCE<br />
Now that the <strong>floor</strong> is looking its best,<br />
following some simple maintenance<br />
procedures will keep it looking that way.<br />
Dust mopping with a Super Hil-Tone ®<br />
treated dust mop removes the grit,<br />
s<strong>and</strong>, <strong>and</strong> dirt that gets tracked onto the<br />
<strong>floor</strong> to grind away at the finish. You<br />
should dust mop at least twice a day<br />
when the <strong>floor</strong> is in use. Besides daily<br />
dust mopping, you will also need to incorporate<br />
routine damp mopping or<br />
auto scrubbing procedures within your<br />
maintenance program. Regular damp<br />
mopping or auto scrubbing with <strong>Hillyard</strong><br />
Clean Scrub ® can help keep your <strong>floor</strong><br />
looking like new <strong>and</strong> extend the life of<br />
the finish.<br />
When dust mopping, never use a<br />
freshly treated dust mop. This can<br />
leave the <strong>floor</strong> streaked, unattractive,<br />
<strong>and</strong> possibly slippery. Treat your<br />
mop with Super Hil-Tone the night<br />
before it is to be used, hang it up,<br />
<strong>and</strong> use it the following day.<br />
Regular damp mopping or auto<br />
scrubbing with Clean Scrub can help<br />
keep your <strong>floor</strong> looking like new <strong>and</strong><br />
extend the life of the coating. After<br />
placing wet <strong>floor</strong> signs, mix Clean<br />
Scrub at a rate of one ounce per gallon<br />
of water in a mop bucket for<br />
damp mopping. Using a clean rayon<br />
mop, damp mop the entire <strong>floor</strong> <strong>and</strong><br />
allow to dry.<br />
If an automatic scrubber is available,<br />
take advantage of this labor<br />
saver. Mix Clean Scrub at one ounce<br />
per gallon of water in the solution<br />
tank. Use red pads under the auto<br />
scrubber to scrub the entire <strong>floor</strong>.
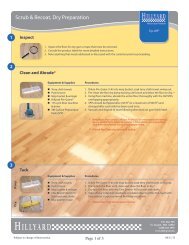
SCRUBBING<br />
AND RECOATING<br />
Once or twice a year, you will need to<br />
recoat your <strong>sports</strong> <strong>floor</strong> to maintain the<br />
level of protection <strong>and</strong> enhance its appearance.<br />
Scrubbing with <strong>Hillyard</strong><br />
Clean Scrub ® will remove dirt, scuffs,<br />
<strong>and</strong> rubber burns. Deep scrubbing<br />
with Clean Scrub does not remove all of<br />
the existing maintenance finish, but<br />
does deep clean the surface <strong>and</strong> prepare<br />
it for recoating. Recoating with<br />
two coats of Protective Coating or<br />
Seal 341 restores the maintainable finish<br />
on the surface of the <strong>floor</strong> <strong>and</strong> enhances<br />
the appearance at the same<br />
time.<br />
Begin by sweeping the entire <strong>floor</strong><br />
to remove loose soil <strong>and</strong> debris from<br />
the surface. Place Turkish toweling<br />
at the entrances of the work area to<br />
avoid tracking the cleaning solution<br />
off the intended surface.<br />
Place the wet <strong>floor</strong> signs in all appropriate<br />
positions, <strong>and</strong> mix the<br />
Clean Scrub at a rate of three ounces<br />
per gallon in a mop bucket or auto<br />
scrubber.<br />
Apply a liberal amount of the<br />
Clean Scrub solution to an area approximately<br />
10’ by 10’ <strong>and</strong> allow the<br />
solution to work for several minutes.
While the scrub solution is working,<br />
soak a red scrub pad(s) in the<br />
cleaning solution. This will keep the<br />
pad from absorbing the solution<br />
from the <strong>floor</strong>. Place the saturated<br />
pad(s) under the <strong>floor</strong> machine or<br />
auto scrubber <strong>and</strong> begin scrubbing.<br />
It is a good idea to run the <strong>floor</strong> machine<br />
or scrubber in both directions.<br />
Immediately pick up the cleaning<br />
solution with a wet vacuum or auto<br />
scrubber. Make sure the solution<br />
does not dry on the <strong>floor</strong>. Follow by<br />
flood rinsing <strong>and</strong> then damp mopping<br />
using clean water. Make sure<br />
the <strong>floor</strong> is well rinsed <strong>and</strong> damp<br />
mopped twice.<br />
After the <strong>floor</strong> has dried at least an<br />
hour, pour <strong>Hillyard</strong> Protective Coating<br />
or Seal 341 into a clean mop<br />
bucket <strong>and</strong> saturate a rayon mop.<br />
Wring out the mop to the point it is<br />
still well saturated but not dripping<br />
<strong>and</strong> apply a uniform coat. Work<br />
small areas at a time using straight,<br />
even, figure "8" motions.<br />
After the entire area is coated, let<br />
the <strong>floor</strong> dry for at least one hour.<br />
Apply a second coat in the opposite<br />
direction using the same procedures.<br />
Allow this coat to dry overnight<br />
before opening to traffic.<br />
© 1997, <strong>Hillyard</strong>, <strong>Inc</strong>.
HILLYARD<br />
<strong>Hillyard</strong> Floor Treatments<br />
P.O. Box 909<br />
St. Joseph, MO 64502<br />
Phone: 1-800-365-1555<br />
Fax: 1-800-861-0256<br />
http://www.<strong>Hillyard</strong>.com<br />
®