VISO 1 Owners Manual (pdf) - Hi-Fi Klubben
VISO 1 Owners Manual (pdf) - Hi-Fi Klubben
VISO 1 Owners Manual (pdf) - Hi-Fi Klubben

You also want an ePaper? Increase the reach of your titles
YUMPU automatically turns print PDFs into web optimized ePapers that Google loves.
®<br />
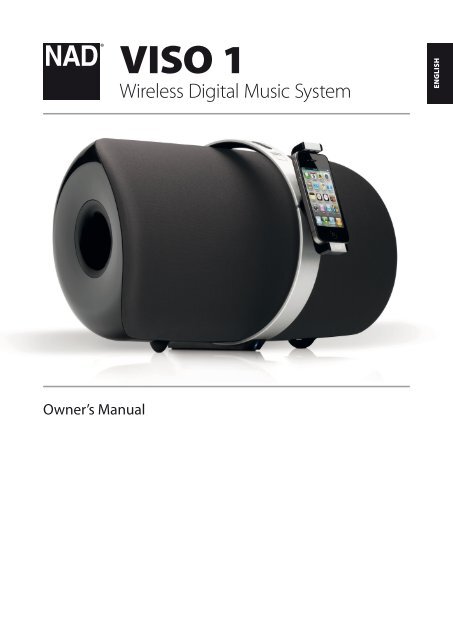
<strong>VISO</strong> 1<br />
Wireless Digital Music System<br />
ENGLISH<br />
DEUTSCH<br />
РУССКИЙ<br />
SVENSKA<br />
ITALIANO<br />
PORTUGUÊS ESPAÑOL FRANÇAIS<br />
NEDERLANDS<br />
Owner’s <strong>Manual</strong>
IMPORTANT SAFETY INSTRUCTIONS<br />
ENGLISH PORTUGUÊS<br />
FRANÇAIS ESPAÑOL ITALIANO DEUTSCH NEDERLANDS SVENSKA РУССКИЙ<br />
1 Read these instructions.<br />
2 Keep these instructions.<br />
3 Heed all warnings.<br />
4 Follow all instructions.<br />
5 Do not use this apparatus near water.<br />
6 Clean only with a dry cloth.<br />
7 Do not block any of the ventilation openings. Install in accordance with the<br />
manufacturer’s instructions.<br />
8 Do not install near any heat sources such as radiators, heat registers, stoves, or<br />
other apparatus (including amplifiers) that produce heat.<br />
9 Do not defeat the safety purpose of the polarized or grounding type plug. A<br />
polarized plug has two blades with one wider than the other. A grounding type<br />
plug has two blades and a third grounding prong. The wide blade or the third<br />
prong is provided for your safety. When the provided plug does not fit into your<br />
outlet, consult an electrician for replacement of the obsolete outlet.<br />
10 Protect the power cord from being walked on or pinched particularly at plugs,<br />
convenience receptacles, and the point where they exit from the apparatus.<br />
11 Only use the attachments/accessories specified by the manufacturer.<br />
12 Use only with a cart, stand, tripod, bracket, or table specified by the<br />
manufacturer, or sold with the apparatus. When a cart is used, use<br />
caution when moving the cart/apparatus combination to avoid injury<br />
from tip-over.<br />
13 Unplug this apparatus during lightning storms or when unused for long periods<br />
of time.<br />
14 Refer all servicing to qualified service personnel. Servicing is required when the<br />
apparatus has been damaged in any way, such as power supply cord or plug is<br />
damaged, liquid has been spilled or objects have fallen into the apparatus, the<br />
apparatus has been exposed to rain or moisture, does not operate normally, or has<br />
been dropped.<br />
15 When disposing of used batteries, please comply with governmental regulations<br />
or environmental public instruction’s rules that apply in your country or area.<br />
Batteries (battery pack or batteries installed) must not be exposed to excessive<br />
heat such as sunshine, fire or the like.<br />
CAUTION<br />
Danger of explosion if battery is incorrectly replaced.<br />
Replace only with the same or equivalent type.<br />
WARNING<br />
TO REDUCE THE RISK OF FIRE OR ELECTRIC SHOCK, DO NOT EXPOSE THIS PRODUCT TO<br />
RAIN OR MOISTURE.<br />
CAUTION<br />
TO PREVENT ELECTRIC SHOCK, MATCH WIDE BLADE OF PLUG TO WIDE SLOT, FULLY<br />
INSERT.<br />
THE LIGHTNING FLASH WITH ARROWHEAD SYMBOL, WITHIN AN<br />
EQUILATERAL TRIANGLE, IS INTENDED TO ALERT THE USER TO THE<br />
PRESENCE OF UNINSULATED “DANGEROUS VOLTAGE” WITHIN THE<br />
PRODUCT’S ENCLOSURE THAT MAYBE OF SUFFICIENT MAGNITUDE TO<br />
CONSTITUTE A RISK OF ELECTRIC SHOCK TO PERSONS.<br />
THE EXCLAMATION POINT WITHIN AN EQUILATERAL TRIANGLE IS<br />
INTENDED TO ALERT THE USER TO THE PRESENCE OF IMPORTANT<br />
OPERATING AND MAINTENANCE (SERVICING) INSTRUCTIONS IN THE<br />
LITERATURE ACCOMPANYING THE APPLIANCE.<br />
THE EQUIPMENT MUST BE CONNECTED TO AN EARTHED MAINS SOCKET-OUTLET.<br />
NAD is a trademark of NAD Electronics International, a division of Lenbrook Industries Limited<br />
Copyright 2011, NAD Electronics International, a division of Lenbrook Industries Limited<br />
CAUTION<br />
Changes or modifications to this equipment not expressly approved by NAD<br />
Electronics for compliance could void the user’s authority to operate this equipment.<br />
NOTES ON ENVIRONMENTAL PROTECTION<br />
At the end of its useful life, this product must not be disposed of with<br />
regular household waste but must be returned to a collection point for<br />
the recycling of electrical and electronic equipment. The symbol on the<br />
product, user’s manual and packaging, point this out.<br />
The materials can be reused in accordance with their markings.<br />
Through re-use, recycling of raw materials or other forms of recycling of old products,<br />
you are making an important contribution to the protection of our environment. Your<br />
local administrative office can advise you of the responsible waste disposal point.<br />
INFORMATION ABOUT COLLECTION AND DISPOSAL OF WASTE BATTERIES<br />
(DIRECTIVE 2006/66/EC OF THE EUROPEAN PARLIAMENT AND THE COUNCIL<br />
OF EUROPEAN UNION) (FOR EUROPEAN CUSTOMERS ONLY)<br />
Batteries bearing any of these symbols indicate that<br />
they should be treated as “separate collection” and not<br />
as municipal waste. It is encouraged that necessary<br />
measures are implemented to maximize the separate<br />
collection of waste batteries and to minimize the disposal<br />
of batteries as mixed municipal waste.<br />
End-users are exhorted not to dispose waste batteries<br />
as unsorted municipal waste. In order to achieve a high<br />
level of recycling waste batteries, discard waste batteries<br />
separately and properly through an accessible collection<br />
point in your vicinity. For more information about collection and recycling of waste<br />
batteries, please contact your local municipality, your waste disposal service or the<br />
point of sale where you purchased the items.<br />
By ensuring compliance and conformance to proper disposal of waste batteries,<br />
potential hazardous effects on human health is prevented and the negative impact of<br />
batteries and waste batteries on the environment is minimized, thus contributing to<br />
the protection, preservation and quality improvement of the environment.<br />
WARNING!<br />
The unit must not be exposed to dripping or splashing liquids, and liquid-filled objects<br />
such as vases or cups should not be placed on the unit.<br />
CAUTION<br />
Changes or modifications to this equipment not expressly approved by NAD<br />
Electronics for compliance could void the user’s authority to operate this equipment.<br />
The disconnect device of the apparatus is its mains plug. Cut off power to the<br />
apparatus by disconnecting its mains plug from the mains outlet.<br />
The mains plug of the apparatus should be easily accessible or free from any<br />
obstruction during intended use.<br />
RECORD YOUR MODEL NUMBER (NOW, WHILE YOU CAN SEE IT)<br />
The model and serial number of your new <strong>VISO</strong> 1 are located on the back of the<br />
cabinet. For your future convenience, we suggest that you record these numbers here:<br />
Model no: ......................................<br />
Serial no.: . . . . . . . . . . . . . . . . . . . . . . . . . . . . . . . . . . . . . .<br />
iPod is a trademark of Apple Inc., registered in the U.S. and other countries.<br />
2
INTRODUCTION<br />
THANK YOU FOR CHOOSING NAD.<br />
NAD <strong>VISO</strong> 1 – The Music System Made for iPod!<br />
The NAD <strong>VISO</strong> 1 is an inspired design married to the latest and most<br />
sophisticated audio technologies. <strong>VISO</strong> 1 includes NAD’s Direct Digital<br />
technology which offers two major advances in iPod music systems.<br />
<strong>Fi</strong>rst, it plays in its native digital format the music stored in the iPod,<br />
completely bypassing the audio circuit limitations of the iPod. Secondly, the<br />
processing power inherent in Direct Digital technology optimizes the sonic<br />
performance of the loudspeaker. <strong>VISO</strong> 1 has 2-way speaker system with<br />
electronic crossover and bi-amplification that guarantees lowest distortion<br />
and widest frequency response.<br />
As with all our products, NAD’s “Music <strong>Fi</strong>rst” design philosophy guided the<br />
<strong>VISO</strong> 1 design that it can confidently promise you both state-of-the-art<br />
video technology and audiophile-quality music listening for years to come.<br />
We encourage you to take a few minutes now to read right through this<br />
manual. Investing a little time here at the outset might save you a good<br />
deal of time later, and is by far the best way to ensure that you make the<br />
most of your investment in the <strong>VISO</strong> 1.<br />
One more thing: We urge you to register your <strong>VISO</strong> 1 ownership on the NAD<br />
Worldwide Web site:<br />
http://NADelectronics.com/warranty<br />
WHAT’S IN THE BOX<br />
Packed with your <strong>VISO</strong> 1 you will find<br />
• Two detachable mains power cord – one for European version models<br />
(C version) and one for North American version models (AH version)<br />
• The <strong>VISO</strong> 1 remote control with 3V CR2025 battery<br />
• <strong>VISO</strong> 1 Quickstart Guide<br />
SAVE THE PACKAGING<br />
Please save the box and all of the packaging in which your <strong>VISO</strong> 1 arrived.<br />
Should you move or otherwise need to transport your <strong>VISO</strong> 1, this is by<br />
far the safest container in which to do so. We’ve seen too many otherwise<br />
perfect components damaged in transit for lack of a proper shipping<br />
carton, so please: Save that box!<br />
CHOOSING A LOCATION<br />
Choose a location that is well ventilated (with at least several inches to<br />
both sides and behind), and that will provide a clear line of sight, within<br />
25 feet/8 meters, between the <strong>VISO</strong> 1’s front panel and your primary<br />
listening/viewing position - this will ensure reliable infrared remote control<br />
communications.<br />
For warranty information contact your local distributor.<br />
NAD SHALL NOT BE HELD LIABLE FOR ANY TECHNICAL OR<br />
USER INTERFACE DISCREPANCIES IN THIS MANUAL.THE <strong>VISO</strong> 1<br />
OWNER’S MANUAL MAY BE SUBJECT TO CHANGE WITHOUT PRIOR<br />
NOTICE. CHECK OUT THE NAD WEBSITE FOR THE LATEST VERSION<br />
OF THE <strong>VISO</strong> 1 OWNER’S MANUAL.<br />
РУССКИЙ<br />
SVENSKA<br />
ENGLISH<br />
PORTUGUÊS ESPAÑOL FRANÇAIS<br />
ITALIANO<br />
NEDERLANDS<br />
DEUTSCH<br />
3
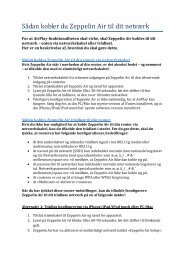
IDENTIFICATION OF CONTROLS<br />
ENGLISH PORTUGUÊS<br />
FRANÇAIS ESPAÑOL ITALIANO DEUTSCH NEDERLANDS SVENSKA РУССКИЙ<br />
1<br />
7 8<br />
ATTENTION!<br />
Please make sure that the <strong>VISO</strong> 1 is powered off or unplugged from the mains power source before making any connections. It is also advisable to power<br />
down or unplug all associated components while making or breaking any signal or AC power connections.<br />
6<br />
9<br />
2<br />
3<br />
4<br />
5<br />
4
IDENTIFICATION OF CONTROLS<br />
1 POWER BUTTON<br />
• Press this button to switch ON the <strong>VISO</strong> 1. When the POWER button<br />
is pressed, the blue POWER indicator flashes continuously and then<br />
eventually gets fixed to blue.<br />
• Press again the POWER button to switch OFF the <strong>VISO</strong> 1.<br />
2 USB<br />
• <strong>VISO</strong> 1 may need a software update to be in step with the latest<br />
technology trends. Check with your authorized NAD distributors for<br />
future software updates. Only authorized NAD distributors or service<br />
centers are allowed to implement a software update.<br />
• Connect to this input a USB memory stick containing the software<br />
update. Use USB adaptor when necessary.<br />
3 S/PDIF (OPTICAL)<br />
• Connect OPTICAL IN to corresponding optical output of sources<br />
such as CD, DVD or BD players, digital cable box, digital tuners and<br />
other applicable components.<br />
4 COMPONENT VIDEO OUT<br />
• Connect Component Video Out to the Component Video input of a<br />
compatible video monitor/TV.<br />
• Be sure to observe consistency in connecting the Y/Pb/Pr jacks to<br />
the corresponding devices.<br />
• Refer also to the item about COMPONENT VIDEO OUTPUT at the<br />
<strong>VISO</strong> 1 FEATURES section.<br />
6 S, +/-<br />
• Toggle “S” button to step through the Sources in the following order<br />
– Docked iPod, Bluetooth device and S/PDIF input source device.<br />
• Press “+” to increase the volume level; “ - ” to lower it.<br />
7 CONNECTOR COVER<br />
• Use to protect the pin connectors.<br />
• Remove before docking an iPod<br />
IMPORTANT NOTE ABOUT THE PIN CONNECTORS<br />
Playback of a docked iPod maybe impaired if the pin connectors are dirty.<br />
Ensure that the <strong>VISO</strong> 1 pin connectors are clean, free of any lint or any other<br />
contaminations. Ensure the same with the corresponding pin connectors<br />
of the iPod model you will be docking into the <strong>VISO</strong> 1.<br />
8 DOCKING CRADLE<br />
• Remove the dock’s connector cover before docking an iPod player.<br />
• The docking cradle can be rotated 90 degrees allowing for “portrait”<br />
or “landscape” orientation of applicable iPod models.<br />
• Your iPod will be charged while it is docked to the <strong>VISO</strong> 1.<br />
9 POWER INDICATOR<br />
• When the POWER button is pressed, the blue POWER indicator<br />
flashes continuously and then eventually gets fixed to blue.<br />
• The blue POWER indicator will flash when the source is changed or<br />
a remote control command is received.<br />
ENGLISH<br />
PORTUGUÊS ESPAÑOL FRANÇAIS<br />
5 AC MAINS INPUT<br />
• The <strong>VISO</strong> 1 comes supplied with a separate detachable mains power<br />
cord. There are 2 supplied power cords – select applicable type for<br />
your usage. Before connecting the plug to the mains powers source,<br />
connect firmly first the other end to <strong>VISO</strong> 1’s AC Mains input socket.<br />
• Always disconnect the mains power plug from the mains power<br />
source first, before disconnecting the cable from the <strong>VISO</strong> 1’s AC<br />
Mains input socket.<br />
• Power Rating : 100 - 240V ~50/60Hz 35W<br />
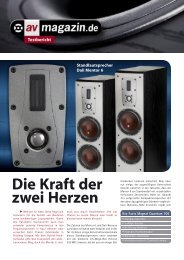
<strong>VISO</strong> 1 REMOTE CONTROL<br />
ITALIANO<br />
DEUTSCH<br />
S<br />
+<br />
9 4j 0<br />
-<br />
<br />
S<br />
Select through Sources.<br />
+/- Increase or decrease loudness level.<br />
0 Skip forward to the next song.<br />
9 Skip back to the previous song.<br />
uj Start playback. Pause playback temporarily.<br />
Press and hold to toggle iPod video output between connected TV and iPod’s own display screen<br />
(applicable only to iPod models that support component video signal)<br />
X<br />
Temporarily mutes audio output or restores audio from mute mode.<br />
NEDERLANDS<br />
SVENSKA<br />
<strong>VISO</strong> 1<br />
РУССКИЙ<br />
5
<strong>VISO</strong> 1 FEATURES<br />
ENGLISH PORTUGUÊS<br />
FRANÇAIS ESPAÑOL ITALIANO DEUTSCH NEDERLANDS SVENSKA РУССКИЙ<br />
SOURCE SELECTION<br />
<strong>VISO</strong> 1 source selection can be directed in two ways.<br />
A <strong>Hi</strong>erarchical system<br />
The three <strong>VISO</strong> 1 sources are automatically selected by the following<br />
order of priority<br />
1 Docked iPod<br />
2 Bluetooth device<br />
3 S/PDIF source device<br />
• An active Bluetooth device or an active source device<br />
connected to the S/PDIF (Optical) input is immediately<br />
disconnected if an iPod player is docked in the <strong>VISO</strong> 1. The<br />
docked iPod player immediately takes priority over both devices<br />
and becomes the active source device.<br />
• With no docked iPod player, an active device connected to the<br />
S/PDIF input is immediately disconnected when a Bluetooth<br />
device gets paired or connected with <strong>VISO</strong> 1. The Bluetooth<br />
device takes priority and becomes the active source device.<br />
Check the corresponding Bluetooth device’s manual on how to<br />
pair it with <strong>VISO</strong> 1.<br />
<strong>VISO</strong> 1 SOURCE SELECTION FLOWCHART<br />
iPod<br />
Docked?<br />
Yes<br />
Play iPod<br />
Source Button<br />
Press<br />
No<br />
B<br />
Use of “S” (Source) button<br />
Toggle “S” button to step through the Sources in the following order –<br />
Docked iPod, Bluetooth device and S/PDIF source device.<br />
Both source selection methods can be best described by the flowchart<br />
below.<br />
Bluetooth<br />
Connected?<br />
Undock iPod Dock iPod Play Bluetooth<br />
Dock iPod<br />
Yes<br />
Source Button<br />
Press<br />
No<br />
Play Optical<br />
Source Button<br />
Press<br />
6
<strong>VISO</strong> 1 FEATURES<br />
COMPONENT VIDEO OUTPUT<br />
Using compatible iPod models, one can playback a stored video in one’s<br />
iPod and view the video via <strong>VISO</strong> 1 by making use of the following methods<br />
Y Pb Pr<br />
• If your particular iPod model supports component video signal, connect<br />
<strong>VISO</strong> 1’s Y, Pb and Pr output terminals to the corresponding Y, Pb, Pr<br />
(Component Video) input terminals of a compatible TV.<br />
• Switch your TV to the corresponding Component Video input to view<br />
your iPod’s video playback.<br />
• Press and hold [4j] to toggle iPod video output between the<br />
connected TV and the iPod’s own display screen.<br />
Pb<br />
• If your particular iPod model does not support component video signal<br />
but supports composite video signal, connect only <strong>VISO</strong> 1’s “Pb” output<br />
terminal to the corresponding composite video input of a compatible<br />
TV.<br />
• Switch your TV to the corresponding Composite Video input to view<br />
your iPod’s video playback.<br />
Check with your iPod distributor which video signal your particular iPod<br />
model supports.<br />
EXTENDED MODE<br />
When you dock your iPod into <strong>VISO</strong> 1 and a check mark appears and “OK<br />
to disconnect” is shown in the iPod display screen, it means that your<br />
particular model can only be played back by <strong>VISO</strong> 1 in Extended Mode.<br />
NEAR FIELD<br />
The NAD <strong>VISO</strong> 1 includes a special feature that subtly reduces the amount<br />
of high frequency power to optimize performance for ‘near field’ listening.<br />
You may prefer this setting if you listen at a very close distance or have a<br />
very small room. For most installations the factory setting is correct.<br />
NEAR FIELD SETUP<br />
1 Press and hold “S” button until the blue POWER indicator flashes<br />
continuously.<br />
2 While the blue POWER indicator flashes continuously, press “-” to set<br />
Near field mode.<br />
3 <strong>VISO</strong> 1 remains in <strong>Fi</strong>eld mode and the blue POWER indicator remains<br />
flashing. If there is no activity for 5 seconds, the <strong>VISO</strong> 1 will default back<br />
to normal mode and the blue POWER indicator stops flashing.<br />
RESTORING <strong>VISO</strong> 1 TO ITS FACTORY DEFAULT SETTINGS<br />
Sometimes power spikes and drop-outs may from time to time cause some<br />
inadvertent functionality. The procedure below will reset the <strong>VISO</strong> 1 to its<br />
factory default settings.<br />
1 Press and hold “+” and then press POWER button to turn ON the <strong>VISO</strong> 1.<br />
2 Release “+” when the POWER indicator turns red and flash three times.<br />
<strong>VISO</strong> 1 will continue on to initialize.<br />
The following applies to your applicable iPod model in Extended Mode.<br />
• The click wheel is non-functional.<br />
• Access to iPod menu is not possible.<br />
• Playback of the first song automatically starts after docking the iPod.<br />
РУССКИЙ<br />
SVENSKA<br />
ENGLISH<br />
PORTUGUÊS ESPAÑOL FRANÇAIS<br />
ITALIANO<br />
NEDERLANDS<br />
DEUTSCH<br />
7
www.NADelectronics.com<br />
©2011 NAD ELECTRONICS INTERNATIONAL<br />
A DIVISION OF LENBROOK INDUSTRIES LIMITED<br />
All rights reserved. NAD and the NAD logo are trademarks of NAD Electronics International, a division of Lenbrook Industries Limited.<br />
No part of this publication may be reproduced, stored or transmitted in any form without the written permission of NAD Electronics International.<br />
<strong>VISO</strong>1_eng_OM_v10 - 10/11