AQUALAND GRAPH Ver.2 - CITIZEN
AQUALAND GRAPH Ver.2 - CITIZEN
AQUALAND GRAPH Ver.2 - CITIZEN

Create successful ePaper yourself
Turn your PDF publications into a flip-book with our unique Google optimized e-Paper software.
<strong>AQUALAND</strong> <strong>GRAPH</strong><br />
<strong>Ver.2</strong><br />
INSTRUCTION MANUAL
Preface<br />
Thank you for purchasing the communication unit and Aqualand Graph. Aqualand Graph is<br />
designed to transfer dive profile data stored on Hyper Aqualand (Watch) into a personal<br />
computer via the communication unit. The data transferred into the personal computer can be<br />
easily controlled and converted into graphic data. It can manage both character data entered<br />
and diving record as a journal and allows still-frame image/moving image data corresponding to<br />
each journal to be pasted on a journal. Moreover, <strong>AQUALAND</strong> <strong>GRAPH</strong> can be used to print out<br />
those data, which is very useful in storing diving records.<br />
We hope that your copy of Aqualand Graph will let you enjoy your sports life all the more.<br />
• All rights to both this manual and software are reserved by <strong>CITIZEN</strong> WATCH CO., LTD.<br />
(JAPAN)<br />
• No part of this document may be reproduced in any form, in whole or in part, without the<br />
express written permission of <strong>CITIZEN</strong> WATCH CO., LTD. (JAPAN)<br />
• The contents of this manual are subject to change without prior notice due to any<br />
improvements and updates made.<br />
• Windows 98, Windows Me, Windows 2000 and Windows XP are the registered trademarks of<br />
the Microsoft Corporation, USA.<br />
• The company names and trade names used in this manual are generally the registered<br />
trademarks or trademarks of respective holders.<br />
2
Notes on Usage<br />
Communication Unit<br />
The communication unit is comprised of precision electronic components and parts. Please<br />
exercise care when handling the unit.<br />
• Store and operate the unit in a location where the temperature is between 5˚C and 40˚C (41˚F<br />
and 104˚F) and the humidity is between 20 and 80% (with no dew condensation).<br />
Furthermore, be sure to avoid locations where sharp changes in temperature are likely to<br />
occur.<br />
• Do not subject the unit to shock or vibration. Please pay special attention to not store the unit<br />
in locations where it may be subject to shock or vibration.<br />
• Keep the unit away from any location where it may be exposed to direct sunlight or a large<br />
amount of dust. Particularly, please pay special attention to not leave the unit in any vehicle.<br />
• Do not disassemble or modify the unit at any time as this may damage the unit.<br />
• Care should be taken to not splash water on or dampen the unit and ensure that the watch<br />
(Hyper Aqualand) is not wet when setting it.<br />
• When cleaning the unit, wipe it off with a soft slightly damp cloth using water or a neutral<br />
detergent. Never use benzene or thinner when cleaning the unit.<br />
• Avoid using the unit near a radio or television set. Operating the communication unit near such<br />
devices may result in difficulties when receiving data.<br />
• <strong>CITIZEN</strong> WATCH CO., LTD. and <strong>CITIZEN</strong> TRADING CO., LTD. shall not be responsible for<br />
any losses or lost profits, caused by repairs, difficulties with the unit or software, or any similar<br />
claims from anyone.<br />
<strong>AQUALAND</strong> <strong>GRAPH</strong><br />
• <strong>CITIZEN</strong> WATCH CO., LTD. and <strong>CITIZEN</strong> TRADING CO., LTD. shall not be responsible for<br />
any losses, erased programs or data, lost profits or claims from anyone resulting from the use<br />
of this software.<br />
• <strong>CITIZEN</strong> has checked the operation of various personal computers on which “<strong>AQUALAND</strong><br />
<strong>GRAPH</strong>” operates. “<strong>AQUALAND</strong> <strong>GRAPH</strong>” will be applicable to your own personal computer,<br />
but, should any trouble arise, please contact our Service Center.<br />
3
<strong>AQUALAND</strong> <strong>GRAPH</strong><br />
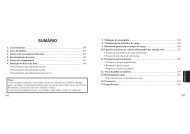
CONTENTS<br />
Preface ................................................................. 2<br />
1. System Configuration ...................................... 5<br />
1.1. <strong>AQUALAND</strong> <strong>GRAPH</strong> Product Configuration ... 5<br />
1.2. System Requirements .............................. 5<br />
2. Communication Unit ....................................... 7<br />
2.1. Name and Function of Each Part ............ 7<br />
2.2. Connecting the Watch and Computer ..... 7<br />
3. Installing <strong>AQUALAND</strong> <strong>GRAPH</strong> ...................... 9<br />
4. Startup and Ending <strong>AQUALAND</strong> <strong>GRAPH</strong> ..... 10<br />
4.1. Startup of <strong>AQUALAND</strong> <strong>GRAPH</strong> ............. 10<br />
4.2. Ending of <strong>AQUALAND</strong> <strong>GRAPH</strong> .............. 10<br />
5. Main Window .................................................. 11<br />
5.1. Change Log Display Data ....................... 13<br />
5.2. Menus ..................................................... 14<br />
5.3. Tool Bar .................................................. 15<br />
6. Settings .......................................................... 16<br />
6.1. General ................................................... 16<br />
6.1.1. File Locations ................................... 16<br />
6.1.2. Units ................................................. 17<br />
6.1.3. Units when Creating a New Log<br />
(Unit : Depth) .................................... 17<br />
6.1.4. Album Thumbnails ............................ 17<br />
6.1.5. Serial Port ......................................... 17<br />
6.1.6. Select Folder .................................... 18<br />
6.2. Customized Items ................................... 19<br />
6.2.1. Items ................................................. 20<br />
6.2.2. Contents ........................................... 20<br />
6.2.3. Initial definition .................................. 20<br />
6.3. Fixed Items ............................................. 21<br />
6.3.1. Diver ................................................. 21<br />
6.3.2. Weather ............................................ 22<br />
6.3.3. Tank Material .................................... 23<br />
6.3.4. Diving Service (D. Service) .............. 24<br />
6.3.5. Dive Style ......................................... 25<br />
6.3.6. Water Conditions (Water Cond.) ...... 26<br />
6.3.7. Diving Suit / Inner Wear ................... 27<br />
6.3.8. Equipment ........................................ 28<br />
6.4. Dive Locations ........................................ 29<br />
6.4.1. Location ............................................ 30<br />
6.4.2. Dive Site ........................................... 30<br />
8. Add Log Data ................................................. 33<br />
8.1. Create New Log ...................................... 36<br />
8.2. Edit ......................................................... 37<br />
8.3. Delete ..................................................... 37<br />
8.4. Edit Album .............................................. 38<br />
8.4.1. Add Image ........................................ 39<br />
8.4.2. Delete Image .................................... 39<br />
8.4.3. Change Thumbnails ......................... 39<br />
8.4.4. Import Log ........................................ 40<br />
8.4.5. Export Log ........................................ 40<br />
9. Diving List ....................................................... 41<br />
9.1. Sort ......................................................... 41<br />
9.2. Select Log Item ....................................... 41<br />
9.3. Search .................................................... 42<br />
9.4. Print Log List ........................................... 43<br />
10. Display Graph .............................................. 44<br />
10.1. Panel Settings ...................................... 45<br />
10.2. Set Line Type ....................................... 46<br />
10.3. Print Graph ........................................... 47<br />
11. Print Log ....................................................... 48<br />
11.1. Print ...................................................... 48<br />
11.2. Print Preview ........................................ 49<br />
12. Create HTML Document .............................. 50<br />
12.1. Set Background .................................... 51<br />
12.2. Save HTML File .................................... 51<br />
13. Trip Summary ............................................... 52<br />
13.1. Register Trip Summary ......................... 52<br />
13.2. Customize ............................................. 54<br />
13.3. Trip Summary Display .......................... 55<br />
13.4. Edit Trip Summary ................................ 56<br />
13.5. Delete Log ............................................ 57<br />
13.6. List of Trip Summaries .......................... 57<br />
14. Limiting Values ............................................. 58<br />
14.1. No.of Registrations ............................... 58<br />
14.2. No. of Entered Characters .................... 59<br />
14.3. Entered Values ..................................... 60<br />
15. Communication Unit Specifications .............. 61<br />
7. Transfer .......................................................... 31<br />
7.1 Connecting the Communication Unit ....... 32<br />
7.2 Transfer ................................................... 32<br />
4
1. System Configuration<br />
1.1. <strong>AQUALAND</strong> <strong>GRAPH</strong> Product Configuration<br />
1<strong>AQUALAND</strong> <strong>GRAPH</strong> INSTALL MANUAL ........................... 1<br />
2Communication unit ............................................................ 1<br />
3<strong>AQUALAND</strong> <strong>GRAPH</strong> CD-ROM .......................................... 1<br />
1.2. System Requirements<br />
In addition to the products mentioned above, the following equipment is necessary in order to operate <strong>AQUALAND</strong> <strong>GRAPH</strong>.<br />
1Personal Computer<br />
Personal computer equipped with a serial port and able to operate with Windows 98, Windows Me, Windows 2000 or<br />
Windows XP (Pentium 200 MHz or more recommended)<br />
2System Software<br />
Windows 98, Windows Me, Windows 2000 or Windows XP<br />
3Memory Capacity<br />
32 MB or more (64 MB or more is recommended)<br />
4Hard Disk<br />
15 MB (or more) free space is required in the Windows directory and 10 MB (or more) free space is required in the install<br />
directory when installing the application. (minimum of 100 MB recommended).<br />
5Monitor<br />
Color display having resolution of SVGA (resolution: 800 M 600, 256 colors) or better compatible with Windows 98,<br />
Windows Me, Windows 2000 or Windows XP<br />
6Serial Port and RS-232C Straight Through Cable<br />
The cable should be shielded and connected as follows:<br />
(A high-speed serial port is recommended.)<br />
• If the serial communications port of your personal computer has 9 pins:<br />
PC Side<br />
Communication Unit Side<br />
9 Pins Female 2 ---------------------------------- 3 25 Pins Male<br />
3 ---------------------------------- 2<br />
04 ---------------------------------- 20<br />
5 ---------------------------------- 7<br />
6 ---------------------------------- 6<br />
7 ---------------------------------- 4<br />
8 ---------------------------------- 5<br />
• IIf the serial communications port of your personal computer has 25 pins:<br />
PC Side<br />
Communication Unit Side<br />
25 Pins Female 1 ---------------------------------- 1 25 Pins Male<br />
2 ---------------------------------- 2<br />
3 ---------------------------------- 3<br />
4 ---------------------------------- 4<br />
5 ---------------------------------- 5<br />
6 ---------------------------------- 6<br />
7 ---------------------------------- 7<br />
20 ---------------------------------- 20<br />
5
7Disk Drive<br />
A CD-ROM disk drive (Required during installation).<br />
8Hyper Aqualand (Watch)<br />
9Printer<br />
A printer supported by the Windows system software running on your personal computer<br />
0Web Browser<br />
A Web browser is required for HTML preview of journal and others. It must be linked with the HTML files when relating<br />
files.<br />
6
2. Communication Unit<br />
The communication unit is used to transfer data (log data / profile data) stored in the watch to your personal computer.<br />
There are two different product sizes, the CMUT-01, with no stand for the communication unit, and the CMUT-03, which<br />
comes with a stand.<br />
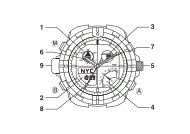
2.1. Name and Function of Each Part<br />
• RS-232C Connector<br />
Used to connect the communication unit with the subject computer via the serial adapter cable.<br />
• Connection Pins<br />
Used to connect the transfer terminal of the watch. There are three pins; the center pin is put in contact with the transfer pin<br />
of the watch, while the other two pins are put in contact with the watch case.<br />
• Fixing Claw<br />
Used to keep the watch pressed against the connection pins.<br />
• Detachable stand: for use with the CMUT-03<br />
This is attached to the main body of the communications unit.<br />
The stand should always be used with the CMUT-03 communications unit.<br />
Attachment method: The stand is attached by sliding it horizontally over the metal fixtures on the underside of the main<br />
communications unit.<br />
RS-232C connector<br />
RS-232C connector<br />
Detachable stand<br />
Fixing claw Connection pins Fixing claw Connection pins<br />
<br />
<br />
<br />
2.2. Connecting the Watch and Computer<br />
• How to Connect:<br />
Follow the steps below to connect the watch to your personal computer.<br />
1Make sure that the power supply to the personal computer is turned off.<br />
2Connect the serial communication port of your personal computer to the connector of the communication unit using the<br />
RS-232C serial adapter cable.<br />
3Turn on the power to your personal computer and start up the <strong>AQUALAND</strong> <strong>GRAPH</strong> system.<br />
4Set the watch to the transfer mode, and then recall the data. (Refer to the User’s Manual for Watch)<br />
5Insert the watch so that the transfer pin comes into contact with the center of the three connector pins.<br />
Then, push the watch down into the holder (refer to Figure 2 below).<br />
7
• How to Disconnect:<br />
Take hold of the band portion of the watch and raise it from the side opposite to the connector pins (fixing claw side) until it<br />
is separated from the fixing claw. Quit <strong>AQUALAND</strong> <strong>GRAPH</strong> operation and turn off the power supply to your personal<br />
computer before disconnecting the serial adapter cable.<br />
For users who use the CMUT-01 type communication unit by<br />
metal-band watch<br />
Precautions for data transmission<br />
Hold the watch and the communication unit with your fingers as shown in the illustration below during data transmission. Be<br />
sure to hold it in place until the Aqualand Graph has finished receiving data.<br />
When a metal-band model Hyper Aqualand is set onto the communication unit, the wristband touching the unit base may lift<br />
the watch slightly from the unit during data transmission. This may cause the terminals to lose contact, and data may not be<br />
transmitted correctly.<br />
8
3. Installing <strong>AQUALAND</strong> <strong>GRAPH</strong><br />
Install Aqualand Graph according to the procedure described below.<br />
(1) Turn on the power of the PC and confirm that operating system (OS) has started up.<br />
* When using Windows 2000 or Windows XP, it is necessary to login to Windows as an “Administrator”.<br />
(2) Place the CD-ROM provided in the CD-ROM drive of the PC. The <strong>AQUALAND</strong> <strong>GRAPH</strong> installation menu is displayed<br />
automatically.<br />
If the installation menu is not displayed, double-click on "install.exe" contained on the CD-ROM inserted into the CD-ROM<br />
drive to display the installation menu.<br />
(3) Click on "Install <strong>AQUALAND</strong> <strong>GRAPH</strong> 2 V21". Installation begins and the next screen shown is displayed.<br />
(4) Confirm the contents and then click on "NEXT" to display the next screen.<br />
(5) If you want to change the directory where the applications are installed, click on "Browse" and change to the desired<br />
directory. Confirm the contents and click on "NEXT" to install the applications. The next screen is then displayed.<br />
(6) Click on "Finish" to complete the installation procedure.<br />
9
4. Startup and Ending <strong>AQUALAND</strong> <strong>GRAPH</strong><br />
4.1. Startup of <strong>AQUALAND</strong> <strong>GRAPH</strong><br />
Select “Program” and then “AqualandGraph 2 V21” from the “Start” button in the task bar.<br />
4.2. Ending of <strong>AQUALAND</strong> <strong>GRAPH</strong><br />
Either click on the [X] button in the upper right hand corner of the or select the [File (F)] menu and then<br />
select [End (X)] in the pull-down menu.<br />
10
5. Main Window<br />
This is the window that is displayed first when [<strong>AQUALAND</strong> <strong>GRAPH</strong>] is started up.<br />
The is composed of the following three areas.<br />
Log Display Area<br />
Album Display Area<br />
Diving List<br />
This area displays log data on the left side of the main window.<br />
Logs cannot be edited in this area.<br />
This area displays images on the right side of the window.<br />
This is displayed by switching from the diving list.<br />
This area displays diving data in line units on the right side of the window.<br />
This is displayed by switching from the album display.<br />
You can move to another window by either clicking a button in the tool bar of this menu with the mouse or selecting a menu.<br />
A help message is displayed when the mouse cursor is positioned at any of the buttons in the tool bar.<br />
Log Display Area<br />
11
Main Window in Album Display Mode<br />
When the main window is displayed in the diving list display mode, either click the button with the mouse or select<br />
[Switch to Album (A)] of the [Display (L)] menu to switch to the album display mode.<br />
When an album image is clicked with the mouse, an original size dialogue box is displayed in the case of a still picture. In the<br />
case of an animated image, the related application in the AVI file is started up and the animated image is played back.<br />
Album registration is performed from the dialogue box. (Refer to sections “8. Add Log Data” and “8.4. Edit Album” for<br />
further details.)<br />
12
Main Window in Diving List Display Mode<br />
When the main window is displayed in the album display mode, either click the<br />
[Switch to Log List (L)] of the [Display (L)] menu to switch to the diving list display mode.<br />
button with the mouse or select<br />
Attribute Icons<br />
Icons indicating attributes are displayed on the left side of the diving list.<br />
Album Data is registered.<br />
Registered in Trip Summary.<br />
5.1. Change Log Display Data<br />
When the line in the for which a log is desired to be displayed is clicked with the mouse, the selected log is<br />
displayed in the .<br />
In addition, the displayed log data can be changed by clicking on the MOVE button on the tool bar with the mouse.<br />
13
5.2. Menus<br />
Files (F)<br />
Create New Log (N)<br />
Edit (E)<br />
Delete (D)<br />
Creates a new log without transferring data from the watch.<br />
Edits the log that is currently displayed.<br />
Deletes data selected in the .<br />
Create HTML Document (H)<br />
Print (P)<br />
Print Log List (L)<br />
Creates a web page of data selected in the .<br />
Prints data selected in the .<br />
Prints the entire .<br />
Trip Summary (T)<br />
List of Trip Summaries (S)<br />
This function is enabled in the Album Display Mode.<br />
Data selected in the is registered in the .<br />
This function is enabled in the Album Display Mode.<br />
A list of registered is displayed.<br />
Exit (X)<br />
Ends <strong>AQUALAND</strong> <strong>GRAPH</strong>.<br />
Display (L)<br />
Search (S)<br />
Select Log Item (I)<br />
Graph (G)<br />
Extracts data desired to be displayed from the .<br />
Selects a log item desired to be displayed from the .<br />
Displays a graph of data selected in the .<br />
Switch to Album (A)<br />
Switch to Log List (L)<br />
Album Thumbnails (T)<br />
Window is displayed in the Diving List Display Mode.<br />
Switches window to the Album Display Mode.<br />
Window is displayed in the Album Display Mode.<br />
Switches window to the Diving List Display Mode.<br />
Selects whether thumbnail images are to be displayed in the .<br />
Preferences (P)<br />
General (G)<br />
Customized Items (C)<br />
Fixed Items (F)<br />
Dive Locations (L)<br />
Registers information required for operating <strong>AQUALAND</strong> <strong>GRAPH</strong>.<br />
Registers customized user settings that are written into a log.<br />
Registers the diver, weather and other fixed items that are written into a log.<br />
Registers locations that are written into a log.<br />
14
Option (O)<br />
Transfer (T)<br />
Export Log (E)<br />
Import Log (I)<br />
Transfers data from the watch.<br />
Exports all or a portion of diving data.<br />
Loads exported data.<br />
DOS, Ver. 1, Ver. 2.0 and Ver. 2.1 log data are also imported.<br />
Help (H)<br />
Help Topics (H)<br />
About Aqualand Graph (A)<br />
Displays help topics.<br />
Displays the version of <strong>AQUALAND</strong> <strong>GRAPH</strong>.<br />
5.3. Tool Bar<br />
Album Display Button<br />
Diving List Display Button<br />
Graph Button<br />
Displayed in the Diving List Display Mode.<br />
[Switch to Album (A)] of the [Display (L)] menu.<br />
Displayed in the Album Display Mode.<br />
[Switch to Log List (L)] of the [Display (L)] menu.<br />
[Graph (G)] of the [Display (L)] menu.<br />
Print Button<br />
[Print (P)] of the [Files (F)] menu.<br />
Create HTML Document Button<br />
[Create HTML Document (H)] of the [Files (F)] menu.<br />
Create New Log Button<br />
[Create New Log (N)] of the [Files (F)] menu.<br />
Edit Button<br />
[Edit (E)] of the [Files (F)] menu.<br />
Search Button<br />
Back Button<br />
Next Button<br />
Transfer Button<br />
[Search (S)] of the [Display (L)] menu.<br />
Moves back to the previous data of the displaying the current<br />
log and displays the log.<br />
Moves ahead to the next data of the displaying the current<br />
log and displays the log.<br />
[Transfer (T)] of the [Option (O)] menu.<br />
Export Log Button<br />
Trip Summary Button<br />
List of Trip Summaries Button<br />
[Export Log (E)] of the [Option (O)] menu.<br />
This function is enabled in the Album Display Mode.<br />
[Trip Summary (T)] of the [Files (F)] menu.<br />
This function is enabled in the Album Display Mode.<br />
[List of Trip Summary (S)] of the [Files (F)] menu.<br />
15
6. Settings<br />
6.1. General<br />
Settings for information required for operating <strong>AQUALAND</strong> <strong>GRAPH</strong> are registered.<br />
The dialogue box is displayed when [General (G)] is selected from the [Preferences (P)] menu of the .<br />
Registration is finalized when the<br />
button is clicked with the mouse, after which the program returns to the<br />
. Since finalized registration contents are stored in memory by <strong>AQUALAND</strong> <strong>GRAPH</strong>, it is not necessary to<br />
register them each time it is started up.<br />
Changes are canceled by either clicking the button or clicking the button in the upper right corner of the<br />
dialogue box with the mouse, after which the program returns to the .<br />
6.1.1. File Locations<br />
Designate a folder for saving transferred data. A maximum of 9999 sets of data can be stored in a single data save folder. In the<br />
case of storing 9999 sets of data consisting of a single dive having a duration of 1 hour, roughly 400 MB of disc space are required.<br />
During installation, a data save folder named "LOG" is created below the folder in which <strong>AQUALAND</strong> <strong>GRAPH</strong> is installed.<br />
When the<br />
button is clicked with the mouse, the dialogue box is displayed. Specify a save folder<br />
in this dialogue box when desiring to change the data save folder. (refer to section “6.1.6. Select Folder” for further details).<br />
16
6.1.2. Units<br />
Set the units to be used in the logs. Units can be entered using up to 10 letters or numbers. Registered data is not changed<br />
even if the units are changed.<br />
Weight<br />
Capacity<br />
Pressure<br />
Air Consum.<br />
Enter the units to be displayed for weight.<br />
Enter the units to be displayed for tank size.<br />
Enter the units to be displayed for Pres. In and for Pres. Out of the tank.<br />
Enter the units to be displayed for consumption by the tank.<br />
6.1.3. Units when Creating a New Log (Unit : Depth)<br />
Specify the units for depth to be used when creating a new log with Create New Log.<br />
Meter<br />
Feet<br />
Meters are used for the units of depth, and °C are used for the units of temperature.<br />
Feet are used for the units of depth and °F are used for the units of temperature.<br />
6.1.4. Album Thumbnails<br />
Set the album display mode of the of the .<br />
If is checked, images and comments are displayed. If the check is removed, only comments are<br />
displayed without displaying images.<br />
6.1.5. Serial Port<br />
Select a serial port.<br />
17
6.1.6. Select Folder<br />
You can select a folder.<br />
In the case of starting up from Import Log the<br />
button is not displayed.<br />
When the<br />
button is clicked with the mouse, the dialogue box is displayed.<br />
A folder can be created at this point.<br />
18
6.2. Customized Items<br />
Customized user settings and their contents to be saved in a log are registered.<br />
The dialogue box is displayed when [Customized Items (C)] is selected from the [Preferences (P)]<br />
menu of the .<br />
Contents can be registered while classifying for each item. When an item is selected from the list of items in the upper left<br />
part of the dialogue box, the contents registered for each item are displayed in the list of contents in the upper right part of the<br />
dialogue box. Register contents that do not require classification for individual items as "Common" items.<br />
Registration is finalized when the<br />
button is clicked with the mouse, after which the program returns to the<br />
. Since finalized registration contents are stored in memory by <strong>AQUALAND</strong> <strong>GRAPH</strong>, it is not necessary to<br />
register them each time it is started up.<br />
Changes are canceled by either clicking the button or clicking the button in the upper right corner of the<br />
dialogue box with the mouse, after which the program returns to the.<br />
Addition or changes to data are made in the or dialogue box.<br />
When data is entered followed by clicking the<br />
button with the mouse, the program returns to the dialogue box, and the edited data is shown in the list.<br />
19
6.2.1. Items<br />
Items can be entered using up to 12 letters or numbers. A maximum of 1000 contents can be registered.<br />
Displays the dialogue box and adds new items. A check for duplicated data is not performed.<br />
Although items can be added in the form of "Common" items, they are distinguished from the "Common"<br />
items provided by <strong>AQUALAND</strong> <strong>GRAPH</strong>.<br />
Displays the dialogue box and changes the names of selected items. A check for duplicated data<br />
is not performed. Information relating to the contents is retained even if the name of an item is changed.<br />
"Common" items cannot be changed.<br />
Deletes a selected item. The contents registered for that item are also deleted. "Common" items cannot be<br />
deleted.<br />
Moves the display position of a selected item up by one. "Common" items cannot be moved.<br />
Moves the display position of a selected item down by one. "Common" items cannot be moved.<br />
* "Common" items save item contents in the case of loading a user environment from a DOS version or Ver. 1. In addition,<br />
contents registered for "Common" can be referred to regardless of the item selected during log entry.<br />
6.2.2. Contents<br />
Contents can be entered using up to 20 letters or numbers. A maximum of 1000 contens can be registered.<br />
Displays the dialogue box and adds contents. A check for duplicated data is not performed.<br />
Displays the dialogue box and changes selected contents. A check for duplicated data is not<br />
performed.<br />
Deletes selected contents.<br />
Moves selected contents to a different item.<br />
Moves the display position of selected contents up by one.<br />
Moves the display position of selected contents down by one.<br />
6.2.3. Initial definition<br />
Data that is initially displayed for Customized Items during log editing is registered. Items and contents can be selected from<br />
a list by clicking on the<br />
button with the mouse. They can also be entered from the keyboard.<br />
20
6.3. Fixed Items<br />
The following items that are saved in a log are registered.<br />
*Diver<br />
*Weather<br />
*Tank Material<br />
*D.Service (Diving Service)<br />
*Dive Style<br />
*Water Cond. (Water Condition)<br />
*Diving Suit / Inner Wear<br />
*Equipment<br />
The dialogue box is displayed when [Fixed Items (F)] is selected from the [Preferences (P)] menu of the .<br />
Registration is finalized when the<br />
button is clicked with the mouse, after which the program returns to the<br />
. Since finalized registration contents are stored in memory by <strong>AQUALAND</strong> <strong>GRAPH</strong>, it is not necessary to<br />
register them each time it is started up.<br />
Changes are canceled by either clicking the button or clicking the button in the upper right corner of the<br />
dialogue box with the mouse, after which the program returns to the.<br />
Addition or changes to data are made in the or dialogue box.<br />
When data is entered followed by clicking the<br />
Items> dialogue box, and the edited data is shown in the list.<br />
button with the mouse, the program returns to the
Displays the dialogue box and adds new items. A check for duplicated data is not performed.<br />
Displays the dialogue box and changes selected items. A check for duplicated data is not<br />
performed.<br />
Deletes a selected item.<br />
Moves the display position of a selected item up by one.<br />
Moves the display position of a selected item down by one.<br />
Default diver<br />
Default buddy<br />
Default dive master<br />
Registers the data to be initially displayed for "Diver" in the dialogue box.<br />
A diver can be selected from the diver list by clicking the button with the mouse. A diver name<br />
can also be entered from the keyboard.<br />
Registers the data to be initially displayed for "Buddy" in the dialogue box.<br />
A buddy can be selected from the diver list by clicking the button with the mouse. A buddy name<br />
can also be entered from the keyboard.<br />
Registers the data to be initially displayed for "Dive Master" in the dialogue box.<br />
A dive master can be selected from the diver list by clicking the button with the mouse.<br />
A dive maste can also be entered from the keyboard.<br />
6.3.2. Weather<br />
The weather can be entered using up to 12 letters or numbers. A maximum of 100 weather conditions can be registered.<br />
Displays the dialogue box and adds new items. A check for duplicated data is not performed.<br />
Displays the dialogue box and changes selected items. A check for duplicated data is not<br />
performed.<br />
Deletes a selected item.<br />
Moves the display position of a selected item up by one.<br />
Moves the display position of a selected item down by one.<br />
22
6.3.3. Tank Material<br />
The tank material can be entered using up to 10 letters or numbers. A maximum of 100 tank materials can be registered.<br />
Displays the dialogue box and adds new items. A check for duplicated data is not performed.<br />
Displays the dialogue box and changes selected items. A check for duplicated data is not<br />
performed.<br />
Deletes a selected item.<br />
Moves the display position of a selected item up by one.<br />
Moves the display position of a selected item down by one.<br />
23
6.3.4. Diving Service (D.Service)<br />
The diving service (D.Service) can be entered using up to 20 letters or numbers. A maximum of 100 diving services can be<br />
registered.<br />
Displays the dialogue box and adds new items. A check for duplicated data is not performed.<br />
Displays the dialogue box and changes selected items. A check for duplicated data is not<br />
performed.<br />
Deletes a selected item.<br />
Moves the display position of a selected item up by one.<br />
Moves the display position of a selected item down by one.<br />
24
6.3.5. Dive Style<br />
Dive style can be entered using up to 10 letters or numbers. A maximum of 100 dive styles can be registered.<br />
The following operations are available for both and .<br />
Displays the dialogue box and adds new items. A check for duplicated data is not performed.<br />
Displays the dialogue box and changes selected items. A check for duplicated data is not<br />
performed.<br />
Deletes a selected item.<br />
Moves the display position of a selected item up by one.<br />
Moves the display position of a selected item down by one.<br />
Initial definition<br />
Registers the data to be initially displayed for "Dive Style" in the dialogue box. A dive style can be<br />
selected from the dive style list by clicking the button with the mouse. A dive style can also be entered<br />
from the keyboard.<br />
25
6.3.6. Water Conditions (Water Cond.)<br />
Water conditions (Water Cond.) can be entered using up to 10 letters or numbers. A maximum of 100 water conditions can<br />
be registered.<br />
Displays the dialogue box and adds new items. A check for duplicated data is not performed.<br />
Displays the dialogue box and changes selected items. A check for duplicated data is not<br />
performed.<br />
Deletes a selected item.<br />
Moves the display position of a selected item up by one.<br />
Moves the display position of a selected item down by one.<br />
26
6.3.7. Diving Suit / Inner Wear<br />
Diving Suit / Inner Wear can be entered using up to 20 letters or numbers. A maximum of 100 items can be registered.<br />
The following operations are available for both Diving Suit and Inner Wear.<br />
Displays the dialogue box and adds new items. A check for duplicated data is not performed.<br />
Displays the dialogue box and changes selected items. A check for duplicated data is not<br />
performed.<br />
Deletes a selected item.<br />
Moves the display position of a selected item up by one.<br />
Moves the display position of a selected item down by one.<br />
Initial definition<br />
Registers the data to be initially displayed for "Diving Suit" and "Inner Wear" in the dialogue box. A<br />
Diving Suit and Inner Wear can be selected from the list by clicking the button with the mouse. Diving<br />
Suit and Inner Wear can also be entered from the keyboard.<br />
27
6.3.8. Equipment<br />
Equipment can be entered using up to 10 letters or numbers. A maximum of 100 equipment items can be registered.<br />
Displays the dialogue box and adds new items. A check for duplicated data is not performed.<br />
Displays the dialogue box and changes selected items. A check for duplicated data is not<br />
performed.<br />
Deletes a selected item.<br />
Moves the display position of a selected item up by one.<br />
Moves the display position of a selected item down by one.<br />
28
6.4. Dive Locations<br />
Locations and dive sites to be saved in a log are registered.<br />
The dialogue box is displayed when [Dive Locations (L)] is selected from the [Preferences (P)] menu of the<br />
.<br />
Dive sites can be registered while classifying for each location. When a location is selected from the list of locations in the<br />
upper left part of the dialogue box, the dive sites registered for each location are displayed in the list of dive sites in the upper<br />
right part of the dialogue box.<br />
Registration is finalized when the<br />
button is clicked with the mouse, after which the program returns to the<br />
. Since finalized registration contents are stored in memory by <strong>AQUALAND</strong> <strong>GRAPH</strong>, it is not necessary to<br />
register them each time it is started up.<br />
Changes are canceled by either clicking the button or clicking the button in the upper right corner of the<br />
dialogue box with the mouse, after which the program returns to the .<br />
Addition or changes to data are made in the or dialogue box.<br />
When data is entered followed by clicking the<br />
button with the mouse, the program returns to the dialogue box, and the edited data is shown in the list.<br />
29
6.4.1. Location<br />
Locations can be entered using up to 20 letters or numbers. A maximum of 1000 locations can be registered.<br />
Displays the dialogue box and adds new items. A check for duplicated data is not performed.<br />
Displays the dialogue box and changes selected items. A check for duplicated data is not<br />
performed.<br />
Deletes a selected item. All dive sites registered for the location are also deleted.<br />
Moves the display position of a selected item up by one.<br />
Moves the display position of a selected item down by one.<br />
Initial definition<br />
Registers the data to be initially displayed for "Location" in the dialogue box. A location can be<br />
selected from the location list by clicking the button with the mouse. A location can also be entered<br />
from the keyboard.<br />
6.4.2. Dive Site<br />
Dive sites can be entered using up to 20 letters or numbers. A maximum of 100 dive sites can be registered.<br />
Displays the dialogue box and adds new items. A check for duplicated data is not performed.<br />
Displays the dialogue box and changes selected items. A check for duplicated data is not<br />
performed.<br />
Deletes a selected item. The contents registered for that item are also deleted.<br />
Moves a selected dive site to a different location.<br />
Moves the display position of a selected item up by one.<br />
Moves the display position of a selected item down by one.<br />
Initial definition<br />
Registers the data to be initially displayed for "Dive Site"in the dialogue box. A dive site can be<br />
selected from the dive site list by clicking the button with the mouse. A dive site can also be entered<br />
from the keyboard.<br />
30
7. Transfer<br />
Data is transferred from the watch to a personal computer.<br />
The dialogue box is displayed either by clicking the<br />
[Transfer (T)] from the [Option (O)] menu.<br />
button from the , or by selecting<br />
Clicking the<br />
button returns the program to the .<br />
A maximum of 9999 data sets can be stored in a single data save folder. Additional data cannot be stored.<br />
The dialogue box is displayed when the<br />
button is clicked with the mouse.<br />
The number of the serial port is set here that is used to connect Hyper Aqualand and the communication unit from the watch.<br />
31
7.1 Connecting the Communication Unit<br />
First connect the communication unit (CMUT-01 or CMUT-03) to the serial port of the personal computer in order to transfer<br />
data from Hyper Aqualand.Refer to the Hyper Aqualand user's manual for information on using Hyper Aqualand.<br />
7.2 Transfer<br />
<strong>AQUALAND</strong> <strong>GRAPH</strong> transfers data with Hyper Aqualand attached to the communication unit. Refer to the Hyper Aqualand<br />
user's manual for information on using Hyper Aqualand.<br />
1. Switch Hyper Aqualand to the transfer mode.<br />
2. Operate Hyper Aqualand to call up the data to be transferred.<br />
3. Insert the Hyper Aqualand transfer pin into the center connection pin of the three connection pins.<br />
4. Data is sent from Hyper Aqualand when the button is clicked with the mouse, after which the personal<br />
computer begins to receive that data. When transfer is completed, a dialogue box is displayed informing the user of<br />
completion. If transfer has not been performed properly, a communication error warning message is displayed. If this<br />
happens, check the connection of the RS-232C connector and the connection between Hyper Aqualand and the<br />
communication unit. Then click the<br />
button again with the mouse.<br />
5.When transferring different data, repeat the above procedure starting from step 2. If Hyper Aqualand is not in the<br />
transfer mode, repeat the procedure starting from step 1.<br />
32
8. Add Log Data<br />
Log data can be added to data that has been transferred from the watch.<br />
When the button of the is clicked with the mouse or [Edit (E)] of the [Files (F)] menu is selected, the<br />
dialogue box is displayed for the log currently displayed.<br />
The portion of transferred data pertaining to a log that has been created by transferring data from the watch cannot be edited.<br />
33
Location<br />
Dive Site<br />
D. Service<br />
(Diving Service)<br />
Diver<br />
Dive Master<br />
Buddy<br />
Safety Stop<br />
Data is displayed that was registered in the of .<br />
When the button is clicked with the mouse, a list of registered locations is displayed, and a<br />
location can be selected from that list. In addition, a location can also be registered by entering from<br />
the keyboard.<br />
Data is displayed that was registered in the of .<br />
When the button is clicked with the mouse, a list of registered dive sites is displayed, and a dive<br />
site can be selected from that list. In addition, a dive site can also be registered by entering from the<br />
keyboard.<br />
Data is displayed that was registered in the of .<br />
When the button is clicked with the mouse, a list of registered diving services is displayed, and a<br />
diving service can be selected from that list. In addition, a diving service can also be registered by<br />
entering from the keyboard.<br />
Data is displayed that was registered in the of . When the button is<br />
clicked with the mouse, a list of registered divers is displayed, and a diver can be selected from that<br />
list. In addition, a diver can also be registered by entering from the keyboard.<br />
Data is displayed that was registered in the of . When the<br />
button is clicked with the mouse, a list of registered dive masters is displayed, and a dive master can<br />
be selected from that list. In addition, a dive master can also be registered by entering from the<br />
keyboard.<br />
Data is displayed that was registered in the of . When the button<br />
is clicked with the mouse, a list of registered buddies is displayed, and a buddy can be selected from<br />
that list. In addition, a buddy can also be registered by entering from the keyboard.<br />
Enter the depth and time as numerical values.<br />
Weather<br />
Temp.<br />
Visibility<br />
A list of weather conditions registered with is displayed when the button is clicked<br />
with the mouse, and a weather condition can be selected from that list. In addition, weather<br />
conditions can also be registered by entering from the keyboard.<br />
Enter the air temperature as a numerical value.<br />
Enter the visibility as a numerical value.<br />
Dive Style<br />
A list of dive styles registered with is displayed when the button is clicked with the<br />
mouse, and a dive style can be selected from that list. In addition, a dive style can also be registered<br />
by entering from the keyboard.<br />
Water Cond.<br />
(Water Condition)<br />
Tank Capacity<br />
Pres. In (Pressure In)<br />
Pres. Out<br />
(Pressure Out)<br />
A list of water conditions registered with is displayed when the button is clicked<br />
with the mouse, and a weather condition can be selected from that list. In addition, water conditions<br />
can also be registered by entering from the keyboard.<br />
Enter the tank size as a numerical value.<br />
Enter the starting pressure of the tank as a numerical value.<br />
Enter the ending pressure of the tank as a numerical value.<br />
Tank Consump.<br />
(Tank Consumption)<br />
When the<br />
button is clicked with the mouse when , , and have been registered, the rate of surface air consumption is calculated. In<br />
addition, Consump. only can also be registered since values can be entered from the keyboard.<br />
Dives for which the rate of surface air consumption can be calculated by <strong>AQUALAND</strong> <strong>GRAPH</strong> are<br />
those of an average depth of 39 m or less and dive time of 30 seconds or more. Since the rate of<br />
surface air consumption is calculated in 1 minute units, the dive time used for calculation is rounded<br />
down for 0-29 seconds or rounded up for 30-59 seconds.<br />
34
Diving Suit<br />
Inner Wear<br />
Weight<br />
Data is displayed that was registered in the of .<br />
When the button is clicked with the mouse, a list of registered suits is displayed, and a suit can<br />
be selected from that list. In addition, a suit can also be registered by entering from the keyboard.<br />
Data is displayed that was registered in the of .<br />
When the button is clicked with the mouse, a list of registered inners is displayed, and an inner<br />
can be selected from that list. In addition, an inner can also be registered by entering from the<br />
keyboard.<br />
Enter your weight as a numerical value.<br />
Tank (Material)<br />
When the button is clicked with the mouse, a list of tank materials is displayed that were<br />
registered in , and a tank material can be selected from that list. In addition, a tank<br />
material can also be registered by entering from the keyboard.<br />
Equipment<br />
User customized<br />
items<br />
Memo<br />
When the button is clicked with the mouse, a list of equipment is displayed that were registered<br />
in , and equipment can be selected from that list. In addition, equipment can also be<br />
registered by entering from the keyboard.<br />
Data is displayed that was registered in the of . When the<br />
button is clicked with the mouse, a list of registered items and their contents are displayed, and items<br />
can be selected from that list. In addition, items can also be registered by entering from the<br />
keyboard.<br />
This allows you to enter any comments you wish. Comments can be entered using up to 400 letters<br />
or numbers.<br />
Animated images and still pictures are registered in a log.<br />
When the<br />
Window>.<br />
button is clicked with the mouse, added data is finalized and the program returns to the
8.1. Create New Log<br />
A new log is created without transferring data from the watch. This is performed when you want to retain a log even though<br />
there is no data to be transferred, such as when diving without wearing the watch. Since there is no data transferred from the<br />
watch, graphs of logs created with this function cannot be displayed.<br />
An empty dialogue box is displayed either when the<br />
the mouse or [Create New log (N)] is selected from the [Files (F)] menu.<br />
button of the is clicked with<br />
Changes are canceled by either clicking the button or clicking the button in the upper right corner of the<br />
dialogue box with the mouse, after which the program returns to the .<br />
Since and are required items, data cannot be registered unless these items are entered.<br />
Date<br />
Repet. No<br />
Enter the year, month and day as numerical values.<br />
Clicking the button with the mouse displays a calendar dialogue box for entering the date.<br />
Enter the number of times diving is to be repeated on that day as a numerical value. Numerical<br />
values from 0 to 9 can be entered.<br />
Although data can be entered in the same manner as Add Log Data, the following data can also be entered here.<br />
36
Ave. Depth<br />
Max. Depth<br />
Ave. w. temp<br />
Min.w. Temp<br />
S.I.Time<br />
Time In<br />
Time Out<br />
Dive Time<br />
Enter the average depth as a numerical value.<br />
Enter the maximum depth as a numerical value.<br />
Enter the average water temperature as a numerical value.<br />
Enter the minimum water temperature as a numerical value.<br />
Enter the surface interval time in hours, minutes and seconds (HH:MM:SS).<br />
Enter the dive starting time in hours, minutes and seconds (HH:MM:SS).<br />
Enter the dive ending time in hours, minutes and seconds (HH:MM:SS).<br />
Enter the duration of the dive in hours, minutes and seconds (HH:MM:SS).<br />
Data is registered by entering the required data and pressing the<br />
button.<br />
When registration is completed, a dialogue box is displayed asking whether or not an additional new log is to be created.<br />
The program returns to the if the<br />
button is clicked with the mouse.<br />
If the<br />
button is clicked with the mouse, the program returns to the dialogue box.<br />
The data previously entered in the dialogue box is displayed at this time.<br />
8.2. Edit<br />
The currently selected log is edited.<br />
The dialogue box of the log that is currently selected is displayed when the<br />
clicked with the mouse or when [Edit (E)] is selected from the [Files (F)] menu.<br />
button of the is<br />
Although the basic procedure is the same as that for Add Log Data, the portion of the data that has been transferred for a log<br />
that has been created by transferring data from the watch cannot be edited.<br />
8.3. Delete<br />
Log data that you want to delete is selected from the Diving List after switching the to the Diving List.<br />
The selected log data is deleted by selecting [Delete (D)] from the [Files (F)] menu.<br />
37
8.4. Edit Album<br />
Still pictures and animated images are registered.<br />
When the<br />
button is clicked with the mouse, image registration is finalized and the program returns to the<br />
. Registered images are displayed in the Album Display Area of the as thumbnails.<br />
Registration is canceled by either clicking the button or clicking the button in the upper right corner of the<br />
dialogue box with the mouse, after which the program returns to the .<br />
Add a new image to a location selected by clicking with the mouse.<br />
Delete an image selected by clicking with the mouse.<br />
Capture an image and select an image for thumbnail display as desired from animated images selected<br />
by clicking with the mouse.<br />
38
8.4.1. Add Image<br />
Select a location at which you want to add an image by clicking with the mouse. The image is added at the selected location.<br />
When the<br />
button is clicked with the mouse, a dialogue box for selecting a file is displayed. Select the image<br />
file you want to register.<br />
Files of still pictures that can be registered are JPEG / BMP files.<br />
Files of animated images that can be registered are AVI files that can be played back with your personal computer.<br />
A dialogue box for changing the thumbnails is displayed when an animated image file has been added. (refer to section<br />
“8.4.3. Change Thumbnails” for further details)<br />
8.4.2. Delete Image<br />
Select an image you want to delete by clicking with the mouse.<br />
The selected image is deleted when the<br />
button is clicked with the mouse.<br />
8.4.3. Change Thumbnails<br />
Images of animated image files for thumbnail display can be designated by capturing an arbitrary image among the animated<br />
images.<br />
The displayed image is designated as a thumbnail image when the<br />
button is clicked with the mouse.<br />
Thumbnails are left unchanged by either clicking the button or the button in the upper right corner of the<br />
dialogue box.<br />
Begins playback of an animated image.<br />
Pauses an animated image during playback.<br />
Click on and with the mouse to resume playback.<br />
Returns to the beginning of an animated image.<br />
39
8.4.4. Import Log<br />
Log data is imported.<br />
The dialogue box is displayed when [Import Log (I)] is selected from the [Option (O)] menu of the . (refer to section “6.1.6. Select Folder” for further details).<br />
Both exported data and data from an older version can be imported.<br />
* Data is loaded when a folder is designated in which exported data of <strong>AQUALAND</strong> <strong>GRAPH</strong> Ver. 2.0 or Ver. 2.1 has<br />
been saved.<br />
* Data is loaded when a folder is designated in which <strong>AQUALAND</strong> <strong>GRAPH</strong> Ver. 2.0 or Ver. 2.1 log data has been saved.<br />
* Data is loaded when a folder is designated in which data of <strong>AQUALAND</strong> <strong>GRAPH</strong> for Windows Ver.1 has been saved.<br />
Original data is not deleted.<br />
* Data is loaded when a folder is designated in which DOS data has been saved.<br />
8.4.5. Export Log<br />
<strong>AQUALAND</strong> <strong>GRAPH</strong> data is exported.<br />
The dialogue box is displayed when the diving data you want to export is selected from the of the<br />
, and either the<br />
menu.<br />
button is clicked with the mouse or [Export Log (E)] is selected from the [Option (O)]<br />
Log Only<br />
Only a log is exported.<br />
The dialogue box is displayed when the<br />
button is clicked with the mouse.<br />
Log and Diving<br />
record<br />
Log, Diving record<br />
and album record<br />
A log and diving data are exported.<br />
The dialogue box is displayed when the<br />
mouse. (refer to section “6.1.6. Select Folder” for further details).<br />
All data including album data are exported.<br />
The dialogue box is displayed when the<br />
mouse.(refer to section “6.1.6. Select Folder” for further details).<br />
Image files managed in the album are also copied to the designated file.<br />
button is clicked with the<br />
button is clicked with the<br />
Files exported with "Log Only" cannot be imported with <strong>AQUALAND</strong> <strong>GRAPH</strong>. In order to import files with <strong>AQUALAND</strong><br />
<strong>GRAPH</strong>, export files with "Log and Diving record" or "Log, Diving record and album record".<br />
40
9. Diving List<br />
Switch the display if the is in the Album Display Mode.<br />
9.1. Sort<br />
When any of the items displayed in the are clicked with the mouse, data is sorted using that item as the key.<br />
The order of sorting is changed back and forth between ascending order and descending order each time the mouse is<br />
clicked.<br />
9.2. Select Log Item<br />
The dialogue box is displayed when [Select Log Item (I)] is selected from the [Display (L)] menu of the<br />
.<br />
Items to be displayed in the can then be selected.<br />
The items displayed in the list of items on the right side of the display are the items that are actually displayed.<br />
Registration is finalized when the<br />
button is clicked with the mouse, after which the program returns to the<br />
. Since finalized registration contents are stored in memory by <strong>AQUALAND</strong> <strong>GRAPH</strong>, it is not necessary to<br />
register them each time it is started up.<br />
Changes are canceled by either clicking the button or clicking the button in the upper right corner of the<br />
dialogue box with the mouse, after which the program returns to the .<br />
41
Addition of Displayed Items<br />
When an item that you want to be displayed is selected from the list of items on the left side of the display and the<br />
button is clicked with the mouse, the selected item moves to the list on the right side of the display.<br />
Deletion of Displayed Items<br />
When an item that you no longer want to be displayed is selected from the list of items on the right of the display and the<br />
button is clicked with the mouse, the selected item moves to the list on the left side of the display.<br />
Changing Position of Displayed Items<br />
You can change the display position of an item by selecting the item for which you want to change the position from the list of<br />
items on the right side of the display and clicking the or button with the mouse.<br />
9.3. Search<br />
A search is made of the to display only the data that matches a designated key.<br />
The dialogue box is displayed when the<br />
button of the is clicked with the mouse or [Search<br />
(S)] is selected from the [Display (L)] menu. When search conditions are specified and the<br />
button is clicked<br />
with the mouse, a list of data is displayed that contains the matching letters.<br />
However, all data containing letters that you want to search for that item is displayed. For example, in the case of entering the<br />
letters "john" when searching for divers, all divers containing the letters "john" in their name will be displayed, such as<br />
"Johnston", "Johnson", "Upjohn" and "John Smith".<br />
42
The Search function cannot be used in the Search mode.<br />
When Transfer or Create New Log is performed in the Search mode, selection is canceled and all logs are displayed.<br />
In order to return from the search display to the normal display, either click the<br />
mouse, or select [Search (S)] of the [Display (L)] menu.<br />
button of the with the<br />
9.4. Print Log List<br />
You can print out the diving list. Only those items indicated below are printed out.<br />
* Date<br />
* Repet. No. (Repeat No.)<br />
* Location<br />
* Dive Site<br />
* Weather<br />
Although printouts are generated based on A4-size paper, enlargement and other parameters can be changed by changing<br />
the properties of the printer driver.<br />
Refer to the printer user's manual for information on the procedure for setting up the printer driver.<br />
43
10. Display Graph<br />
A graph is displayed of the diving data displayed in the of the . Data added with Create<br />
New Log is not displayed in the graph.<br />
The is displayed when either the<br />
(G)] is selected from the [Display (L)] menu.<br />
button of the is clicked with the mouse or [Graph<br />
When diving list data is selected from the of the while the Graph Window is displayed, a graph<br />
is displayed that corresponds to the selected log. In the case of selecting multiple sets of diving data, the graphs of a<br />
maximum of 8 data sets can be displayed superimposed on each other.<br />
The graph display does not change when more than 8 data sets have been selected. The graph cursor can be moved by<br />
clicking the mouse on the graph cursor MOVE button. The data at the location of the cursor is displayed in the legend.<br />
Sets the background display and other<br />
graph settings.<br />
Sets the display of the lines to be<br />
displayed on the graph.<br />
Prints out the graph as it appears on the<br />
screen.<br />
Displays the as the top<br />
window.<br />
Ends the .<br />
44
Moves the graph cursor to the first data set.<br />
Moves the graph cursor to the previous data<br />
in 5 minute units.<br />
Moves the graph cursor to the previous data<br />
set.<br />
Moves the graph cursor to the next data set.<br />
Moves the graph cursor to the next data in 5<br />
minute units.<br />
Moves the graph cursor to the last data set.<br />
10.1. Panel Settings<br />
The dialogue box is displayed when the<br />
button is clicked with the mouse.<br />
45
Sets the color outside the graph.<br />
Sets the color of the legend.<br />
3 Dimensions<br />
Switches between 2D and 3D display.<br />
Background<br />
Solid Color<br />
Gradation<br />
Sets the background color of the display.<br />
Set the starting color and ending color of the gradation. The background is then displayed with color gradation.<br />
Designate a still picture file to be used for the display. That still picture is then displayed for the background.<br />
Either JPEG or BMP files can be selected.<br />
Display Image<br />
Stretch<br />
Tile<br />
Center<br />
The size of the still picture is adjusted to fit within the graph.<br />
User original files cannot be adjusted.<br />
Still pictures of user original files are displayed in rows if they are smaller than the<br />
background area.<br />
Still pictures of user original files are displayed in the center in their original size.<br />
Grid (Lines)<br />
On<br />
Sets whether grid lines are displayed or not displayed.<br />
Sets the color of the grid lines.<br />
Cursor (Lines)<br />
Sets the color of the cursor lines.<br />
10.2. Set Line Type<br />
The dialogue box is displayed when the<br />
button is clicked with the mouse.<br />
Set the type of line by selecting a line number. Both line color and line width can be changed.<br />
In addition, a similar dialogue box for changing the line type is displayed by clicking on the legend actually displayed in the<br />
Graph Display Area. Line numbers cannot be changed in this case.<br />
46
10.3. Print Graph<br />
The graph is printed out as it appears on the screen when the<br />
button is clicked with the mouse.<br />
Although printouts are generated based on A4-size paper, enlargement and other parameters can be changed by changing<br />
the properties of the printer driver. Refer to the printer user's manual for information on the procedure for setting up the<br />
printer driver.<br />
47
11. Print Log<br />
Data is printed out that has been selected in the of the .<br />
The dialogue box is displayed when the button of the is clicked with the mouse or [Print (P)]<br />
is selected from the [Files (F)] menu. Since a choice of printing patterns is displayed, select the desired pattern by clicking<br />
with the mouse.<br />
Log<br />
Graph<br />
Album<br />
When checked by clicking with the mouse, patterns are displayed that are used to print out a Log.<br />
When checked by clicking with the mouse, patterns are displayed that are used to print out a graph.<br />
When checked by clicking with the mouse, patterns are displayed that are used to print out an album.<br />
11.1. Print<br />
A dialogue box for printing is displayed when the<br />
button is clicked with the mouse.<br />
Although printouts are generated based on A4-size paper, enlargement and other parameters can be changed by changing<br />
the properties of the printer driver. Refer to the printer user's manual for information on the procedure for setting up the<br />
printer driver.<br />
48
11.2. Print Preview<br />
A preview of the printout is displayed when the<br />
button is clicked with the mouse.<br />
The scale of the preview display can be changed by clicking on the or button with the<br />
mouse. The scale can be changed from 40% to 100% in 10% units.<br />
49
12. Create HTML Document<br />
An HTML document is generated from data selected in the of the .<br />
The dialogue box is displayed when the button of the is clicked with the<br />
mouse or [Create HTML Document (H)] is selected from the [Files (F)] menu. Since icons of HTML document patterns are<br />
displayed, select the desired pattern by clicking with the mouse.<br />
Title<br />
Log<br />
Graph<br />
Album<br />
Background<br />
Enter the title of the web site. Titles can be entered using up to 100 letters or numbers.<br />
When only one data set has been selected from the diving list, date (day), repet. no. and location are<br />
displayed.<br />
When multiple data sets have been selected, "DIVING LOG" is displayed.<br />
When checked by clicking with the mouse, patterns are displayed that are used to output a log.<br />
When checked by clicking with the mouse, patterns are displayed that are used to output a graph.<br />
When checked by clicking with the mouse, patterns are displayed that are used to output an album.<br />
You can set the background of the web site.<br />
Saves an HTML document for the selected pattern.<br />
Starts up the web browser installed in your personal computer.<br />
The web browser that is started up is the web browser that correlates with the HTML document based on<br />
file correlation.<br />
50
12.1. Set Background<br />
A background can be set for a web site.<br />
None<br />
Color ...<br />
Image ...<br />
A background is not set.<br />
A dialogue box is displayed for selecting the background color. The selected color becomes<br />
the background color.<br />
A dialogue box is displayed for selecting a still picture file. The selected still picture becomes<br />
the background. Either JPEG or BMP files can be selected.<br />
12.2. Save HTML File<br />
The dialogue box is displayed.<br />
Select a folder to which the file is to be saved, and designate a name for the HTML file. An HTML document is created in the<br />
selected folder and related image files are copied to that folder.<br />
Image file names are assigned automatically so as not to be duplicated within a folder.<br />
51
13. Trip Summary<br />
Multiple sets of log data can be managed collectively in the form of trip summaries.<br />
Log data can only be registered in a single trip summary.<br />
13.1. Register Trip Summary<br />
Trip summaries can be registered by following the procedure described below.<br />
1. Switch the to the Diving List Display Mode.<br />
2. Select the data from the diving list that you want to register in the trip summary.<br />
3. The dialogue box is displayed when the button is clicked with the mouse or [Trip Summary<br />
(T)] is selected from the [Files (F)] menu.<br />
4. The selected trip summary is added when an existing trip summary is selected and the button is clicked<br />
with the mouse.<br />
A new trip summary is created when the<br />
button is clicked with the mouse.<br />
In the case both registered data and unregistered data have been selected for a trip summary in the diving list, unregistered<br />
data is added to the trip summary of the registered data.<br />
52
Create New Trip Summary<br />
Title<br />
Enter a title to be displayed for the list of trip summaries. Titles can be entered using up to 40 letters or numbers.<br />
Date Enter the year, month and day as numerical values. Clicking the button with the mouse displays a calendar dialogue<br />
box for entering the date.<br />
Trip Summary<br />
Items<br />
Data is displayed that was registered in the of . A list of registered items and their<br />
contents is displayed when the button is clicked with the mouse. You can then select the desired item from that list.<br />
In addition, items can also be registered by entering from the keyboard.<br />
Memo<br />
This allows you to enter any comments you wish. Comments can be entered using up to 400 letters or numbers.<br />
Animated images and still pictures are registered in a log.<br />
When the<br />
button is clicked with the mouse, added data is finalized and the dialogue box is<br />
displayed.<br />
Clicking on the button or the button in the upper right corner of the dialogue box cancels any changes<br />
and returns the program to the dialogue box.<br />
53
13.2. Customize<br />
Trip summary items and their contents to be saved in a trip summary are registered.<br />
Registration is finalized when the<br />
is clicked with the mouse, after which the program returns to the dialogue box. Since finalized registration contents are stored in memory by <strong>AQUALAND</strong> <strong>GRAPH</strong>, it is not<br />
necessary to register them each time it is started up.<br />
Changes are canceled by either clicking the button or clicking the button in the upper right corner of the<br />
dialogue box with the mouse, after which the program returns to the dialogue box.<br />
Data is added or changed in the or dialogue box.<br />
When data is entered and the<br />
button is clicked with the mouse, the program returns to the <br />
dialogue box, and edited data is shown in the list.<br />
54
Items<br />
Items can be entered using up to 20 letters or numbers. A maximum of 100 items can be registered.<br />
Displays the dialogue box and adds new items. A check for duplicated data is not performed.<br />
Displays the dialogue box and changes the names of selected items. A check for duplicated data<br />
is not performed. Information relating to the contents is retained even if the name of an item is changed.<br />
Deletes a selected item. The contents registered for that item are also deleted.<br />
Moves the display position of a selected item up by one.<br />
Moves the display position of a selected item down by one.<br />
Contents<br />
Contents can be entered using up to 20 letters or numbers. A maximum of 100 contents can be registered.<br />
Displays the dialogue box and adds contents. A check for duplicated data is not performed.<br />
Displays the dialogue box and changes the selected contents. A check for duplicated data is not<br />
performed.<br />
Deletes selected contents.<br />
Moves selected contents to a different item.<br />
Moves the display position of selected contents up by one.<br />
Moves the display position of a selected contents down by one.<br />
13.3 Trip Summary Display<br />
This is the main window for trip summaries.<br />
Trip summaries are displayed with the following procedure in the case a log has already been registered for a trip summary.<br />
is displayed on the left end of the for those logs that are registered in a trip summary.<br />
1. Switch the to the Diving List Display Mode.<br />
2. Select registered trip summary data from the diving list.<br />
3. The dialogue box is displayed when either the is clicked with the mouse or [Trip Summary (T)]<br />
is selected from the [Files (F)] menu.<br />
55
13.4. Edit Trip Summary<br />
Edits the trip summary currently displayed.<br />
Edit by following the same procedure as that for Create New Trip Summary.<br />
Registers items written into a trip summary.<br />
Deletes from the diving listof the trip summary the log registered in the trip summary.<br />
Information registered for <strong>AQUALAND</strong> <strong>GRAPH</strong> is not deleted.<br />
Selects items you want to display in the diving list.<br />
Displays the list of registered trip summaries..<br />
When a trip summary is selected from this list, the designated trip summary is displayed.<br />
Album Display Area<br />
When an album image is clicked with the mouse, a dialogue box is displayed in the original image size in the case of still<br />
pictures.<br />
In the case of animated images, the application correlated with the AVI file is started up and that animated image can be<br />
played back.<br />
56
13.5. Delete Log<br />
A log registered in a trip summary is deleted from the diving list of that trip summary.<br />
The log you want to delete is selected from the diving list of the trip summary. When the<br />
with the mouse, the selected log is deleted from the diving list.<br />
button is clicked<br />
Information registered for <strong>AQUALAND</strong> <strong>GRAPH</strong> is not deleted.<br />
13.6. List of Trip Summaries<br />
A list of registered trip summaries is displayed.<br />
Select the trip summary you want to display from the list and click the<br />
mouse. The selected Trip Summary is displayed.<br />
button with the<br />
Select the trip summary you want to display from the list and click the<br />
button with the<br />
mouse.<br />
The selected trip summary is deleted. Logs registered for that trip summary are not deleted.<br />
57
14. Limiting Values<br />
The following lists the limiting values for data entered with <strong>AQUALAND</strong> <strong>GRAPH</strong>.<br />
14.1. No.of Registrations<br />
Item<br />
Max.registered no.<br />
Log 9999<br />
Location<br />
Dive site<br />
D. Service<br />
Diver<br />
Weather<br />
Dive style<br />
Water Body<br />
Water cond.<br />
Diving Suit<br />
Inner Wear<br />
Tank (material)<br />
Equipment<br />
User customized items<br />
User customized item contents<br />
Album (per log / trip summary)<br />
Trip summary<br />
Trip summary items<br />
Trip summary contents<br />
1000<br />
100<br />
100<br />
1000<br />
100<br />
100<br />
100<br />
100<br />
100<br />
100<br />
100<br />
100<br />
1000<br />
1000<br />
50<br />
99<br />
100<br />
100<br />
58
14.2. No. of Entered Characters<br />
Item<br />
Max.no.of characters<br />
Weight<br />
Capacity (Tank)<br />
Pressure<br />
Air consum.<br />
Location<br />
Dive site<br />
10 letters or numbers<br />
10 letters or numbers<br />
10 letters or numbers<br />
10 letters or numbers<br />
20 letters or numbers<br />
20 letters or numbers<br />
D. Service 20 letters or numbers<br />
Diver<br />
Dive master<br />
Buddy<br />
Weather<br />
Dive style<br />
Water Body<br />
Water cond.<br />
Diving Suit<br />
Inner Wear<br />
Tank (material)<br />
Equipment<br />
User customized<br />
items<br />
User customized<br />
item contents<br />
Memo<br />
Album comment<br />
HTML document title<br />
Trip summary title<br />
Trip summary items<br />
Trip summary<br />
contents<br />
Trip summary memo<br />
20 letters or numbers<br />
20 letters or numbers<br />
20 letters or numbers<br />
12 letters or numbers<br />
10 letters or numbers<br />
10 letters or numbers<br />
10 letters or numbers<br />
20 letters or numbers<br />
20 letters or numbers<br />
10 letters or numbers<br />
10 letters or numbers<br />
12 letters or numbers<br />
20 letters or numbers<br />
400 letters or numbers<br />
20 letters or numbers<br />
100 letters or numbers<br />
40 letters or numbers<br />
20 letters or numbers<br />
20 letters or numbers<br />
400 letters or numbers<br />
Note: All characters may not be displayed depending on their size, even if the number of characters entered is less than the maximum number<br />
of characters allowed.<br />
59
14.3. Entered Values<br />
Item<br />
Repet. No.<br />
Max. depth<br />
Ave. depth<br />
Safety stop<br />
depth<br />
Safety stop time<br />
Temp.<br />
Ave. w. temp<br />
Min. w. temp<br />
Visibility V.<br />
Visibility H.<br />
Tank Capacity<br />
Pres. In<br />
Pres. Out<br />
Consump.<br />
Weight<br />
Max.no.of<br />
characters<br />
2 numbers<br />
4 numbers<br />
4 numbers<br />
4 numbers<br />
3 numbers<br />
4 numbers<br />
4 numbers<br />
4 numbers<br />
4 numbers<br />
4 numbers<br />
4 numbers<br />
4 numbers<br />
4 numbers<br />
4 numbers<br />
4 numbers<br />
60
15. Communication Unit Specifications<br />
Type CMUT-1 CMUT-03<br />
Power supply<br />
Power consumption<br />
Operating conditions<br />
Supplied by the RS-232C signal line<br />
2mA<br />
Temperature : +5°C to +40°C (41°F to 104°F)<br />
Humidity : 20% to 80% (with no condensation)<br />
Dimensions<br />
W: 7.1cm<br />
D : 11.1cm<br />
H : 3.1cm (incl. connector)<br />
W: 10.8cm<br />
D : 7.1cm<br />
H : 8.6cm (incl. stand)<br />
Weight 105g 270g (incl. stand)<br />
61