C220 - CITIZEN WATCH Global Network
C220 - CITIZEN WATCH Global Network
C220 - CITIZEN WATCH Global Network

Create successful ePaper yourself
Turn your PDF publications into a flip-book with our unique Google optimized e-Paper software.
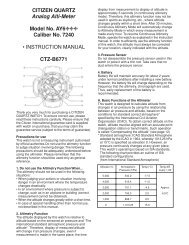
<strong>CITIZEN</strong> QUARTZ<br />
CHRONO MEMO<br />
Model No. JM8XXX<br />
Cal. No. <strong>C220</strong><br />
• INSTRUCTION MANUAL<br />
CTZ-6756<br />
FEATURE<br />
This watch is an analog and digital combination<br />
watch which is provided with unique colour graphics<br />
and other helpful functions convenient to use when<br />
touring by car or motorcycle.<br />
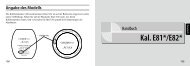
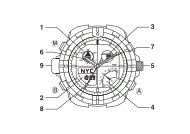
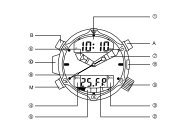
NAMES OF PARTS<br />
SETTING THE ANALOG TIME<br />
1. Wait until the second hand reaches the zero and<br />
then pull out the crown to position (1).<br />
2. Turn the crown to set the correct time.<br />
3. Push the crown to position (0) after setting the<br />
analog time.<br />
The analog indication and digital display of the time<br />
settings can be adjusted separately, thus, the dual<br />
time feature can be used.
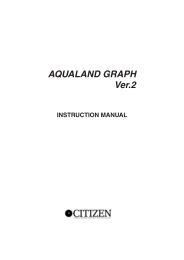
USING THE DIGITAL SYSTEM<br />
MODE SWITCHING<br />
This watch has four modes for the following<br />
functions: time/calendar, alarm, timer and<br />
chronograph.<br />
*AUTO RETURN<br />
If the watch is left in the alarm mode for 2 minutes<br />
without operating any buttons, it will automatically<br />
return to the time/calendar mode.<br />
Each time the M button is pressed, the display is<br />
changed to another mode.<br />
ADJUSTING THE TIME/CALENDAR<br />
A. Adjustment of Seconds<br />
1. When the B button is pressed<br />
for 2 seconds or more, the<br />
watch enters adjustment mode<br />
with the seconds flashing.<br />
2. When the A button is pressed while the seconds<br />
are flashing, the seconds display is reset to”00”.<br />
B. Adjusting the Time/Calendar<br />
1. Each time the B button is pressed during the<br />
adjustment mode (when the seconds are flashing),<br />
the flashing display changes sequentially. Press<br />
the B button the required number of times to<br />
reach the display to be adjusted.<br />
2. Press the A button for each digit adjustment.<br />
(Rapid advance can be made by depressing the<br />
A button.)<br />
• For the 12-hour display, note AM/PM.<br />
• Auto return: If the watch is left in the adjustment<br />
mode (while any display is flashing) for 2 minutes<br />
without operating any buttons, the auto-return<br />
system returns to the normal time display.<br />
• Normal return: Pressing the M button in the<br />
time/calendar adjustment mode (while any display<br />
is flashing) causes the display to return to the<br />
normal time/calendar display.<br />
• The calendar can be set from 1994 to 2099<br />
• The day of the week is automatically set when<br />
the year, month and date are adjusted.<br />
• If a non-existent date (for example, February<br />
30) is set during adjustment, the time/calendar<br />
display will show the 1st day of the month when<br />
returned to the normal time/calendar mode.<br />
• Because the auto-calendar is used, no<br />
adjustment at the end of the month is needed.<br />
USING THE ALARM<br />
A. Setting the Alarm<br />
The alarm can be set by following the same<br />
procedure as that for the time/calendar adjustment.<br />
Select the (flashing) display to be adjusted by<br />
pressing the B button in the alarm mode and set the<br />
time when the alarm sounds by using the A button.<br />
* If the time/calendar mode employs the 12-hour<br />
system for the hours display, the alarm set time is<br />
also shown by the 12-hour system, so AM/PM<br />
should be noted.<br />
B. Switching the Alarm ON/OFF<br />
The alarm can be switched ON/OFF by pressing the<br />
A button in the alarm mode. The alarm will sound<br />
for 20 seconds. While the A button is depressed,<br />
the monitoring alarm sounds.<br />
C. Stopping the Alarm Sound<br />
Press any button to stop the alarm sound.
USING THE TIMER<br />
The timer can be set in one minute increments up to<br />
60 minutes.<br />
A. Setting the Timer<br />
By pressing the B button in the timer mode while<br />
the set time is flashing, the set time is decreased in<br />
one-minute increments. Press the B button<br />
repeatedly until the display shows the desired set<br />
time. (Rapid advance can be made by depressing<br />
the B button.)<br />
B. Using the Timer<br />
1. By pressing the A button, the timer starts<br />
counting down from the set time.<br />
2. When the A button is pressed during<br />
measurement, the timer will stop. When the A<br />
button is pressed in the stop state, the timer will<br />
resume countdown. If the B button is pressed in<br />
the stop state, the timer will be reset to the timer<br />
set time.<br />
3. After the time measurement ends, the timer will<br />
be sounded for about 5 seconds. Then the timer<br />
will return to the timer set time.<br />
<br />
Pressing the B button during measurement causes<br />
the timer to return to the timer set time and starts<br />
counting down again.<br />
USING CHRONOGRAPH (STOP<strong>WATCH</strong>)<br />
A. Chronograph Mode Display<br />
This drawing shows the reset state in the<br />
chronograph mode.<br />
B. Using the Chronograph<br />
For the chronograph, either split time measurement<br />
or lap time measurement can be used optionally. A<br />
maximum of 10 split or 10 lap times can be<br />
memorised. The time when each split or lap time<br />
measurement was finished can be recalled after all<br />
of the required measurements have been taken.<br />
The same procedure is used for both split and lap<br />
measurements.<br />
1. Select either the split time measurement or the<br />
lap time measurement by pressing the M button.<br />
2. Press the A button to start and stop the<br />
chronograph. (Stop and start can be repeated<br />
any required number of times simply by pressing<br />
the A button during the chronograph mode.)<br />
3. When the B button is pressed during the<br />
chronograph measurement, the split or lap time is<br />
displayed for 10 seconds, after which the running<br />
display continues.<br />
(4. When the B button is pressed in the stop state,<br />
the chronograph mode is switched to the reset<br />
state.<br />
Measurement time range: 0 hours 00 minutes<br />
00 seconds 00 to 23 hours 59 minutes 59 seconds<br />
(24-hour system)<br />
• A measurement over 24 hours is automatically<br />
stopped in the reset state<br />
Split Time and Lap Time<br />
Split time: time elapsed from the starting point to an<br />
intermediate point<br />
Lap time: time elapsed in a particular section<br />
C. Chrono-Memo Function<br />
Each time a series of start, stop and split time<br />
measurement is performed in the chronograph mode,<br />
the memo number is increased by one. The time<br />
measurement and the time when the measurement<br />
was finished are recorded as a chrono-memo. This<br />
memo can be recalled after the final measurement.<br />
Notes<br />
• 00 to 99 memo numbers are available, but the<br />
number of memos that can be recalled after the<br />
measurements, is a maximum of 10 (No. 0-8 and<br />
the final stop data).<br />
• The memos are erased at the start of the next<br />
chronograph use, or by the all reset operation,<br />
refer to the ALL RESET OPERATION section. If<br />
necessary, data should be recorded separately.
D. Recalling the Chrono memos<br />
The same procedure is used to recall split time<br />
memos and lap time memos.<br />
1. Press the B button in the reset state during the<br />
chronograph mode (split time measurement<br />
chronograph or lap time measurement), then start<br />
memo display (memo No. 00) is activated. The<br />
chronograph start time (00’00”00) and the<br />
operation time (current time when lap or split time<br />
is measured) are displayed alternately for 1.5<br />
seconds each.<br />
2. By pressing the B button repeatedly, memos No.<br />
01 to No. 08 and the last stop memo can be<br />
recalled. (For any memo, the elapsed time and<br />
the time when the measurement has finished are<br />
displayed alternately for 1.5 seconds each)<br />
3. When the B button is pressed after the last stop<br />
memo is called, the display returns to the reset<br />
state. (By pressing the B button for 2 seconds or<br />
more with a memo recalled, the display also<br />
returns to the reset state.)<br />
(Notes)<br />
• If the number of memos including the start memo<br />
is over 10 only memos No. 00 (start memo) to<br />
No. 08 and the last stop memo can be recalled.<br />
Memos No. 09 and subsequent memos cannot be<br />
recalled.<br />
E. Split Time/Lap Time Conversion Function<br />
After the split time measurement is completed,<br />
when the memo is recalled in the lap time<br />
measurement chronograph mode, the split time will<br />
be converted to the appropriate lap time.<br />
The conversion from lap time to split time can be<br />
performed in the same manner.<br />
ALL RESET OPERATION<br />
After replacement of the battery or in case of<br />
incorrect display and operation (for example, the<br />
display is turned off or the alarm continues to<br />
sound) as a result of the watch being subject to a<br />
strong impact, perform the ALL RESET<br />
OPERATION as follows:<br />
1. Pull the crown out to position (1).<br />
2. Press the A , B and M buttons simultaneously.<br />
(When these buttons are depressed, the display<br />
is turned off.)<br />
3. Release the buttons. (Display of all parts is<br />
turned on.)<br />
4. Press the crown back into place. (At the same<br />
time, the confirmation sounds for 2 seconds.) The<br />
ALL RESET OPERATION is finished.<br />
5. Then set the time correctly.<br />
USING THE CALCULATOR RING*<br />
The following points should be considered while<br />
using the watch.<br />
• Use the calculator as an approximate<br />
measurement device.<br />
• The scale is not defined any particular unit of<br />
measure.<br />
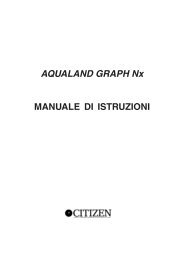
Calculator<br />
1) Elapsed-time calculations<br />
Example: How long will it<br />
take a car travelling 80kph<br />
to go 400 kilometres?<br />
Calculation: Align 80 on<br />
the outer scale with the<br />
speed index () mark on<br />
the inner scale. The<br />
position on the outer scale at 40 will now be lined<br />
up with 5:00 (5 hours) on the inner scale.<br />
*Note that the calculator ring is not equipped on<br />
some models.<br />
2) Speed calculations<br />
Examples: If a car goes<br />
180 km in 2 hours 30<br />
minutes, how fast was the<br />
car travelling?<br />
Calculation: Align 18 on<br />
the outer scale with 2:30<br />
on the inner scale. The<br />
Speed index () mark will now be lined up with<br />
72 (km/hr) on the outer scale.<br />
3) Distance calculations<br />
Example: How far will a<br />
car go if it travels at 60kph<br />
for 1 hour 20 minutes?<br />
Calculation: Align 60 on<br />
the outer scale with the<br />
speed index () mark on<br />
the inner scale. The<br />
position on the inner scale at 1:20 will now be lined<br />
up with 80 (km) on the outer scale.<br />
4) Fuel consumption (litres/hr) calculations<br />
Example: If a car travels<br />
5 hours and uses 30 litres<br />
of fuel, how many litres of<br />
fuel per hour does the car<br />
use?<br />
Calculation: Align 30 on<br />
the outer scale with 5:00<br />
on the inner scale. The speed index () mark will<br />
now be lined up with 60 (6 litres/hr) on the outer<br />
scale.
5) Fuel consumption (litres) calculations<br />
Example: How many litres<br />
of fuel does the car need<br />
to travel 5 hours if it uses<br />
7 litres per hour?<br />
Calculations: Align 70 on<br />
the outer scale with the<br />
speed index () mark on<br />
the inner scale. The position on the inner scale at 5:00<br />
will now be lined up with 35 (litres) on the outer scale.<br />
6) Travel (time) calculations<br />
Example: If a car has 40<br />
litres of fuel and burns it at<br />
a rate of 8 litres per hour,<br />
how many hours will the<br />
car be able to travel?<br />
Calculations: Align 80 on<br />
the outer scale with the<br />
speed index () mark on the inner scale. The<br />
position on the outer scale at 40 will now be lined<br />
up with 5:00 (5 hours) on the inner scale.<br />
7) Kilometre/mile conversions<br />
• Use this feature to<br />
convert between<br />
kilometres and miles.<br />
Example: One mile equals<br />
how many kilometres?<br />
Calculations: Align STAT<br />
() (mile) on the inner<br />
scale with the 10 on the outer scale. At this position<br />
the km mark () will point to 1.6 on the outer scale.<br />
PRECAUTIONS<br />
1. Resistance to water<br />
Check the following chart to determine the water<br />
resistant properties of this watch.<br />
2. Avoid temperature extremes<br />
Avoid leaving your watch in direct sunlight or in<br />
extremely warm locations for long periods of time.<br />
• This will cause malfunctioning and shorten the life<br />
of the battery. Do not leave your watch for long<br />
periods of time in extremely cold places.<br />
• This may cause your watch to gain or lose time.<br />
• Place your watch on your wrist to restore its original<br />
accuracy should it begin to gain or lose time.<br />
3. Avoid strong shock<br />
This watch will withstand the bumps and jars<br />
normally incurred while playing and during sports<br />
activities. Avoid dropping your watch on the ground<br />
or otherwise imparting severe shock to it.<br />
4. Avoid strong magnetic fields<br />
Keep your watch out of the immediate vicinity of<br />
strong magnets. Generally, your watch is not<br />
affected by magnetic fields from such household<br />
appliances as television sets and stereo equipment.<br />
5. Avoid harmful chemicals, solvents and gases<br />
Avoid wearing your watch in the presence of strong<br />
chemicals, solvents and gases. If your watch comes<br />
in contact with materials such as gasoline, benzine,<br />
paint, discolouration, deterioration or damage to the<br />
case, band and other components may occur.<br />
6. Keep your watch clean<br />
It may become difficult to pull out the crown due to<br />
dirt and dust getting caught between the crown and<br />
the watch case when the watch is worn for long<br />
periods of time. To help prevent this happening, turn<br />
the crown freely back and forth occasionally while it<br />
is in the normal set position. Wipe off any water and<br />
moisture that adheres to the case, glass and band<br />
with a soft, clean cloth. Any dirt left on the case or<br />
band may cause skin rash.<br />
A watchband will easily become soiled with dust and<br />
perspiration because it is in direct contact with the<br />
skin. Even a stainless or gold plated band may<br />
begin to corrode if it has not been cleaned for a<br />
long period of time. Mesh bands, because the<br />
meshes are very fine, will lose their particular<br />
“flexibility” if they are left soiled for a long time.<br />
Metal watchbands are usually washed with a brush<br />
in mild, soapy water and well wiped with a soft,<br />
absorbent cloth to make sure all water is removed.<br />
Pay attention to prevent any water from getting<br />
inside your watch when the band is washed.<br />
7. Periodic inspection<br />
Getting your watch checked once every year or two<br />
is recommended to ensure long use and troublefree<br />
operation.<br />
8. Be sure to keep the batteries out of reach of<br />
infants and small children. Should accidental<br />
ingestion occur, consult a doctor at once.<br />
Water resistance
SPECIFICATIONS<br />
1. Type: Combination (analog + digital) quartz watch<br />
2. Time accuracy: Within +20 seconds per month<br />
3. Operating temperature range: 0C-55C<br />
(32F-131F)<br />
4. Display functions:<br />
• Time/calendar<br />
• Alarm<br />
• Chronograph: 24-hour system<br />
• Timer: Time setting range:60 minutes maximum<br />
5. Power cell:<br />
• Parts number: 280-44 (SR927W)<br />
• Voltage: 1.55V<br />
• Lifetime: About 2 years<br />
(Alarm sound...20sec./day)<br />
(Timer sound...5sec./day)<br />
• Specifications may be subject to change without<br />
notice as a result of improvements.