Lopi flushwood shadow box manual - Heatworks
Lopi flushwood shadow box manual - Heatworks
Lopi flushwood shadow box manual - Heatworks

You also want an ePaper? Increase the reach of your titles
YUMPU automatically turns print PDFs into web optimized ePapers that Google loves.
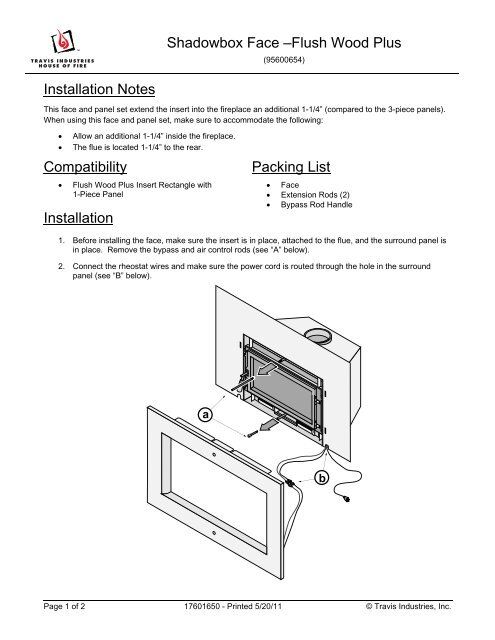
Shadow<strong>box</strong> Face –Flush Wood Plus<br />
(95600654)<br />
Installation Notes<br />
This face and panel set extend the insert into the fireplace an additional 1-1/4” (compared to the 3-piece panels).<br />
When using this face and panel set, make sure to accommodate the following:<br />
<br />
<br />
Allow an additional 1-1/4” inside the fireplace.<br />
The flue is located 1-1/4” to the rear.<br />
Compatibility<br />
<br />
Flush Wood Plus Insert Rectangle with<br />
1-Piece Panel<br />
Installation<br />
Packing List<br />
Face<br />
Extension Rods (2)<br />
Bypass Rod Handle<br />
1. Before installing the face, make sure the insert is in place, attached to the flue, and the surround panel is<br />
in place. Remove the bypass and air control rods (see “A” below).<br />
2. Connect the rheostat wires and make sure the power cord is routed through the hole in the surround<br />
panel (see “B” below).<br />
a<br />
b<br />
Page 1 of 2 17601650 - Printed 5/20/11 © Travis Industries, Inc.
3. Attach the face as shown below (see “A” below).<br />
Shadow<strong>box</strong> Face –Flush Wood Plus<br />
(95600654)<br />
4. Attach the air control and extender as shown below. Attach the bypass ring to the bypass rod, then to the<br />
bypass extender, and install onto the bypass yoke.<br />
WARNING:<br />
Make sure all wiring is inserted into the cavity between the insert and the fireplace.<br />
Failure to do this may cause the wiring to become damaged.<br />
a<br />
b<br />
HINT:<br />
While installing the bypass extension, reach into the fire<strong>box</strong> and hold the bypass<br />
plate and yoke. See the <strong>manual</strong> for a detailed view.<br />
Page 2 of 2 17601650 - Printed 5/20/11 © Travis Industries, Inc.