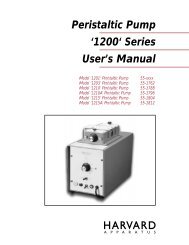
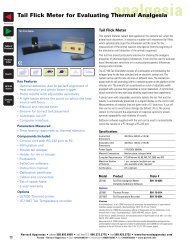
Tail Flick Analgesia Meter Manual - Harvard Apparatus
Tail Flick Analgesia Meter Manual - Harvard Apparatus
Tail Flick Analgesia Meter Manual - Harvard Apparatus

You also want an ePaper? Increase the reach of your titles
YUMPU automatically turns print PDFs into web optimized ePapers that Google loves.
<strong>Tail</strong> <strong>Flick</strong> <strong>Analgesia</strong> <strong>Meter</strong><br />
Users <strong>Manual</strong><br />
Hot Plate <strong>Analgesia</strong> <strong>Meter</strong><br />
Heater<br />
Power<br />
42.5<br />
P<br />
<br />
<br />
0.00.5<br />
START<br />
STOP<br />
P<br />
<br />
<br />
Temperature °C<br />
HARVARD<br />
APPARATUS<br />
Time h.mm.ss<br />
HARVARD<br />
A P P A R A T U S
Contents<br />
2<br />
<strong>Tail</strong> <strong>Flick</strong> <strong>Analgesia</strong> <strong>Meter</strong> Instruction Data<br />
Description<br />
Introduction<br />
General Description<br />
Precautions<br />
Front Panel Layout<br />
Rear Panel Layout<br />
Controls<br />
Switching On<br />
Setting the Temperature<br />
Viewing the Temperature<br />
Operation<br />
Heating<br />
Using the Timer<br />
General Operation<br />
Bibliography<br />
Maintenance<br />
Cleaning<br />
Replacing Mains Fuses<br />
Technical Specification<br />
Support<br />
Page<br />
3<br />
4<br />
6<br />
7<br />
8<br />
8<br />
9<br />
10<br />
10<br />
11<br />
11<br />
12<br />
12<br />
13<br />
14
Introduction<br />
3<br />
General Description<br />
The New <strong>Harvard</strong> Hot Plate <strong>Analgesia</strong> <strong>Meter</strong> is a sophisticated<br />
temperature control and timing system, and has been designed<br />
to perform rapid and precise screening of the narcotic type<br />
analgesic drugs (Morphine, Codeine, etc) according to the Eddy<br />
and Leimback hot plate test. This method evaluates the reaction<br />
time of mice when a heat stimulus is applied to the plantar<br />
surface. This reaction time increases when a central analgesic<br />
is administered to the animal.<br />
Utilising a simple user interface the user can quickly and easily<br />
set up the required hot plate temperature, and a large easy to<br />
read LED display shows the current temperature.<br />
The timer requires a single press of the Start / Stop Key to start<br />
and a further press to stop, with reset automatically executed<br />
when timing is initiated. This function is also duplicated by a<br />
remote Start / Stop footswitch (supplied). The reaction time is<br />
again clearly displayed on a large LED display.<br />
Using digital electronics the hot plate temperature is constantly<br />
monitored and regulated to ensure the actual temperature<br />
accurately matches the desired temperature, and hence no<br />
temperature calibrations will ever be required.<br />
The system is also intelligent and learns the heating<br />
characteristics of the hot plate allowing for fast heating up with<br />
minimal temperature over-shoot and excellent temperature<br />
stabilisation characteristics.
Introduction<br />
4<br />
Precautions<br />
This Equipment has been designed for use with an earthed<br />
mains supply and should not be operated when not earthed.<br />
Connect the power cable of the unit to a suitable three pin<br />
plug in accordance with the following :<br />
Brown lead to the LIVE terminal of your plug<br />
Blue lead to the NEUTRAL terminal of your plug<br />
Green & Yellow lead to the EARTH terminal of your plug<br />
Before operating the Hot Plate ensure that the mains supply<br />
voltage is compatible.<br />
The unit is factory set to 110 Volts or 230 Volts (50/60Hz) as<br />
required.<br />
The mains inlet socket, located on the rear panel, also<br />
incorporates the two mains fuses.<br />
The fuses should only be replaced with those of an identical<br />
type (see the specifications on page 13)<br />
When replacing the mains fuse always ensure the equipment<br />
is disconnected from the mains supply.<br />
Warning : Use of this equipment in a manner not specified<br />
by the manufacturer may impair the protection provided by<br />
this equipment and could invalidate the warranty.<br />
This unit is intended for use as a research or teaching tool<br />
ONLY and is not authorised for use as a component in a life<br />
support device or other clinical system. Therefore neither we<br />
nor our agents can be held responsible should this notice be<br />
disregarded.
Introduction<br />
5<br />
Precautions<br />
Before operating this apparatus care should be taken to situate<br />
the unit in a suitable location, in order to provide optimum<br />
performance. Failure to do so may impair the units operation.<br />
The unit should always be operated on a level, clean and dry<br />
secure surface.<br />
Although the unit only requires minimum free air to circulate<br />
around it, it is recommended that a one inch (2.5 cm) clearance<br />
is provided around the unit where possible.
Introduction<br />
6<br />
Front Panel Layout<br />
1 2 3 4 5 6 7<br />
Hot Plate <strong>Analgesia</strong> <strong>Meter</strong><br />
Heater<br />
Power<br />
42.5<br />
P<br />
<br />
<br />
0.00.5<br />
START<br />
STOP<br />
P<br />
<br />
<br />
Temperature °C<br />
HARVARD<br />
APPARATUS<br />
Time h.mm.ss<br />
8 9 10 11<br />
1 Temperature Display<br />
2 Temperature Increase Key<br />
3 Heater Indicator<br />
4 Power Indicator<br />
5 Timer Display<br />
6 Timer Start/Stop Key<br />
7 Unused Programming Key<br />
8 Temperature Set Key<br />
9 Temperature Decrease Key<br />
10 Unused Programming Key<br />
11 Unused Key Programming Key
Introduction<br />
7<br />
Rear Panel Layout<br />
1<br />
2<br />
3<br />
4.<br />
1 Remote Start/Stop Socket<br />
2 Mains Fuse Compartment<br />
3 Mains Inlet Socket<br />
4 Power Switch
Controls<br />
8<br />
Switching On<br />
Connect the unit to a suitable mains supply, and switch on<br />
using the rear panel mounted Mains Switch (see page 7<br />
item 4). The front panel mounted green Power Indicator (see<br />
page 6 item 4) will illuminate and both the red LED Displays<br />
(see page 6 items 1 & 5) will illuminate.<br />
Setting the Temperature<br />
When the the unit is first switched on the Temperature Display<br />
(see page 6 item 1) will indicate the current temperature of<br />
the top plate.<br />
To adjust the desired temperature briefly press the<br />
Temperature Set “P” Key (see page 6 item 8), at this point<br />
the display will alternately show SP1 and the current set<br />
temperature.<br />
SP1 P<br />
<br />
<br />
>>><br />
37.0 P<br />
<br />
<br />
OUT 1 OUT 2<br />
OUT 1 OUT 2<br />
To change the set temperature use the Temperature Increase<br />
and Decrease Keys (see page 6 items 2 & 9).<br />
When the desired temperature has been entered briefly press<br />
the Temperature Set “P” Key (see page 6 item 8) again to<br />
store and return back to its default view of current temperature.<br />
Note: If the Temperature Set P Key (see page item 8) is<br />
continually held the system will enter the programming mode<br />
which is user locked. Please try to avoid entering this menu,<br />
if you do so switch of the mains power and wait for 10seconds<br />
before switching on again.
Controls<br />
9<br />
Viewing the Set Temperature<br />
To view the set temperature briefly press the Temperature<br />
Set “P” Key (see page 6 item 8), at this point the display will<br />
alternately show SP1 and the current set temperature.<br />
SP1 P<br />
<br />
<br />
>>><br />
37.0 P<br />
<br />
<br />
OUT 1 OUT 2<br />
OUT 1 OUT 2<br />
Press the Temperature Set “P” Key (see page 6 item 8)<br />
again or wait a few seconds for the display to return to the<br />
default view; indicating the current temperature.<br />
Note: If the Temperature Set P Key (see page item 8) is<br />
continually held the system will enter the programming mode<br />
which is user locked. Please try to avoid entering this menu,<br />
if you do so switch of the mains power and wait for 10seconds<br />
before switching on again.
Operation<br />
10<br />
Heating<br />
If the Set Temperature is of a value greater than that of the<br />
current plate temperature then the unit will automatically<br />
switch on the heater, confirmed by the red front panel mounted<br />
Heater Indicator (see page 6 item 3). As the unit nears the<br />
set temperature the heater will be used in its proportional<br />
output mode, this effectively pulses the heater so as to reduce<br />
the heat output, and consequently minimises the likely hood<br />
of a large temperature over-shoot when heating up. Once<br />
the desired temperature has been reached the heater will be<br />
switched off.<br />
As the temperature falls below the desired value so the heater<br />
will be proportional switched on again as required.<br />
Using the Timer<br />
To start the timer briefly press the timer Start/Stop Key (see<br />
page 6 item 6) the display will start counting in tenths of a<br />
second.<br />
To stop the timer briefly press the timer Start/Stop Key (see<br />
page 6 item 6). The timer will stop and display the elapsed<br />
time in the form Mins/Seconds/Tenths of a Second.<br />
Further presses of the Start/Stop Key (see page 6 item 6)will<br />
in turn Start and Stop the timer, each time the timer is started<br />
it will automatically reset to zero.<br />
The function of the Start/Stop Key can be replicated by the<br />
supplied footswitch when connect to the rear panel mounted<br />
Remote Socket (see page 7 item 1), although any kind of<br />
non-latching switch can be used (see the specifications on<br />
page 13).<br />
Note: The timer module includes several specific programming<br />
keys (see page 6 items 7, 10 & 11) that are not, at present<br />
utilised. These keys should not be used unless instructed to<br />
do so by a <strong>Harvard</strong> <strong>Apparatus</strong> Engineer.<br />
If you accidentally change any settings switch off the power.
Operation<br />
11<br />
Using the Timer<br />
Switch the unit on again then briefly press the P key (see<br />
page 6 item 10) the display should show 9.99.9 if this is not<br />
so, use the up and down keys (see page 6 items 7&10) to<br />
achieve this.<br />
Now wait a few seconds for the display to return to its default<br />
status.<br />
If whilst using the timer you obtain unpredictable results<br />
contact your nearest <strong>Harvard</strong> <strong>Apparatus</strong> agent.<br />
General Operation<br />
With the unit connected and switched on, as described<br />
previously on Page 8 set the desired temperature, using the<br />
routine described on Page 8. Wait for the temperature to<br />
reach the desired value and allow to stabilise for 15 minutes.<br />
Drop the animal to be tested onto the the hotplate and start<br />
the timer using the footswitch or front panel mounted stop /<br />
start key.<br />
Stop the timer by depressing the footswitch or front panel<br />
mounted start / stop key once again, as soon as the animal<br />
is seen to lick its paws<br />
Remove the animal from the hotplate. The counter will show<br />
the reaction time of the animal and this should be recorded.<br />
Bibliography<br />
Nathan B. Eddy & Doroth Leimbach: "Synthetic Analgesics.<br />
II Dithienylbutenyl and dithienylbutylamines " Journal of<br />
Pharmacological Experimental Therapeutics. 107 pages 385-<br />
393 1953.
Maintenance 12<br />
Cleaning<br />
!<br />
WARNING<br />
Always ensure the unit is completely isolated from the mains<br />
supply whilst cleaning.<br />
No special maintenance is required other than periodic cleaning<br />
using a soft cloth and a mild detergent on the top plate.<br />
Use a damp cloth to clean the front and rear panels, a mild<br />
detergent should be carefully used for heavily marked areas.<br />
Replacing the Mains Fuses<br />
If the unit fails to power up it is recommended that the mains<br />
fuses be checked before returning the unit for repair or service.<br />
Mains fuse are of the quick blow 20mm type.<br />
If your unit is rated for 110 - 115 Volt use then the mains fuses<br />
must be 10 Amps.<br />
If your unit is rated for 220 - 230 Volt use then the mains fuses<br />
must be 5 Amps.<br />
To change the mains fuses, remove the mains inlet cable from<br />
the rear panel mounted mains inlet socket (see page 7 item 3),<br />
and using a small flat bladed screw driver hook out the small<br />
enclosed fuse compartment (see page 7 item 2).<br />
Remove the two fuses and check both of them, if in doubt replace<br />
both fuses.<br />
When complete close the fuse compartment securely, reconnect<br />
to the mains supply and switch on.<br />
If the unit persistently blows the mains fuse, the unit should be<br />
returned to your <strong>Harvard</strong> <strong>Apparatus</strong> agent for service.
Technical<br />
13<br />
Technical Specification<br />
Temperature Range<br />
Temperature Stability<br />
Timer Range<br />
Remote<br />
Remote Socket<br />
Mains Supply Voltage<br />
Mains Fuse<br />
Dimensions<br />
Weight<br />
35°C to 65°C<br />
+/- 0.3°C<br />
0 to 9Minutes 59 Seconds 9 Tenths of a Second<br />
Momentary make to Start / Stop<br />
6.35mm 2Pole Jack<br />
115 Volts / 230 Volts AC 50/60Hz (Factory Set)<br />
5 Amp 20mm Quick Blow (220 - 230 Volt Units)<br />
10 Amp 20mm Quick Blow (110 - 115 Volt Units)<br />
275mm x 128mm x293mm (W x H x D)<br />
4.5Kg<br />
HARVARD APPARATUS 52-8588 MANUAL REVISION 1.02
Support<br />
14<br />
UK, USA, Canada and France Customer Contact Addresses<br />
UK<br />
<strong>Harvard</strong> <strong>Apparatus</strong> Ltd<br />
Fircroft Way<br />
Edenbridge<br />
Kent TN8 6HE<br />
Tel +44 (0) 1732 864001<br />
Fax +44 (0) 1732 863356<br />
email sales@harvardapparatus.co.uk<br />
USA<br />
<strong>Harvard</strong> <strong>Apparatus</strong> Inc<br />
84 October Road<br />
New Englander Ind Park<br />
Holliston MA 01746<br />
Tel (508) 893 8999<br />
Toll-Free (800) 272 2775<br />
Fax (508) 429 5732<br />
email bioscience@harvardapparatus.com<br />
Canada<br />
<strong>Harvard</strong> <strong>Apparatus</strong> Canada<br />
6010 Vanden Abeele Street<br />
St. Laurent<br />
Quebec H4S 1R9<br />
Tel (514) 335 0792<br />
Toll Free (800) 361 1905<br />
Fax (514) 335 3482<br />
email harvardcanada@compuserve.com<br />
France<br />
<strong>Harvard</strong> <strong>Apparatus</strong> Sarl<br />
6 Avenue des Andes<br />
Miniparc - bat. 8<br />
91952 Les Ulis Cedex<br />
Tel (1) 64 46 00 85<br />
Fax (1) 64 46 94 38<br />
email harvard@isp.fr<br />
Other Customers<br />
In the event of a breakdown, or if you need assistance, please contact<br />
your local agent. If one is not available contact <strong>Harvard</strong> <strong>Apparatus</strong><br />
directly.
Support<br />
15<br />
For service, technical support or in the event of a system<br />
failure, please contact your local <strong>Harvard</strong> <strong>Apparatus</strong> agent,<br />
or our UK office directly.<br />
To ensure we can deal with your enquiry quickly please state<br />
the catalogue number, serial number and date of purchase<br />
in all correspondence. If you are experiencing a fault, also<br />
include a description of the nature of it.<br />
<strong>Harvard</strong> <strong>Apparatus</strong> Ltd<br />
Fircroft Way, Edenbridge, Kent, TN8 6HE, United Kingdom<br />
Tel: +44 (0) 1732 864001 Fax: +44 (0) 1732 863356 E-Mail: sales@harvardapparatus.co.uk