All-Purpose Work Cart - Handyman Club of America
All-Purpose Work Cart - Handyman Club of America
All-Purpose Work Cart - Handyman Club of America

You also want an ePaper? Increase the reach of your titles
YUMPU automatically turns print PDFs into web optimized ePapers that Google loves.
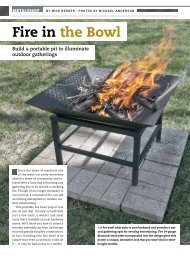
W O R K S H O P<br />
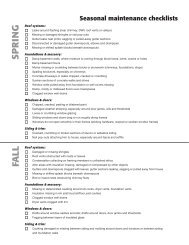
The wheel position on this cart gives<br />
it great balance, making it easy to<br />
move heavy loads. And the side<br />
channel and rail make it easy to haul<br />
long, awkward tools such as ladders.<br />
<strong>All</strong>-<strong>Purpose</strong> <strong>Work</strong> <strong>Cart</strong><br />
Saving time toting tools and supplies leaves more time for work (and play)<br />
B Y D A N C A R Y<br />
The less time you spend hauling supplies to and<br />
from a job, the faster you’ll get the job done. With<br />
that in mind, we designed a multipurpose cart that<br />
will help you tote supplies, tools and gear to various projects<br />
around your home quickly and easily.<br />
This cart features an open bin that’s large enough to<br />
hold just about anything you’ll need, such as tool bags,<br />
paint cans, a mortar-mixing tub or bags <strong>of</strong> mulch. A small<br />
bin between the handles can hold small tools, hardware or<br />
gloves and safety glasses. We even created a channel to<br />
haul a ladder or long-handle tools. The side rail can be<br />
removed when you want to place large objects across the tops<br />
<strong>of</strong> the side panels.<br />
The cart’s 20-in.-dia. wheels will easily roll over most<br />
backyard terrain. They’re positioned so that the weight is balanced<br />
to make even heavy loads easy to move.<br />
Because this cart will spend most <strong>of</strong> its time outdoors,<br />
you’ll need to use exterior-rated materials that are rot- and<br />
corrosion-resistant. <strong>All</strong> lumber should be pressure-treated<br />
pine or a rot-resistant species such as cedar or redwood.<br />
Plywood should be 1/2 in. thick and rated “Exterior” or<br />
“Exposure 1,” or you can choose high-density-overlay (HDO)<br />
P H O T O S B Y S C O T T J A C O B S O N A N D T R A C Y W A L S H ; I L L U S T R A T I O N B Y G A B R I E L G R A P H I C S<br />
8 HANDY J U L Y u A U G U S T 2 0 0 8
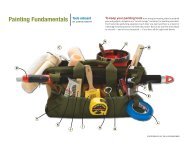
Handle<br />
O<br />
HANDY<br />
WORK CART<br />
O<br />
L<br />
P<br />
L<br />
C-channel<br />
Rail<br />
K<br />
BACK VIEW<br />
I<br />
D<br />
J<br />
P<br />
L<br />
K<br />
L<br />
D<br />
C<br />
A<br />
K<br />
B<br />
L<br />
J<br />
M<br />
K<br />
B<br />
C<br />
C-channel<br />
H<br />
I<br />
N<br />
F<br />
J<br />
Q<br />
H<br />
G<br />
20" dia. wheel<br />
1/2" dia. x 8" bolt, 1/2" washers and locknut<br />
A<br />
B<br />
N<br />
E<br />
Leg<br />
H<br />
G<br />
TOP VIEW — FRAME AND PANELS<br />
FRONT—E<br />
1-1/8" dia.<br />
starter holes<br />
K<br />
L<br />
I<br />
G<br />
Q<br />
C<br />
A<br />
N<br />
H<br />
F<br />
9"<br />
13-1/2"<br />
4-1/4"<br />
6-1/2"<br />
M<br />
D<br />
K<br />
H<br />
A<br />
G<br />
1/2"<br />
dia.<br />
hole<br />
H<br />
26-1/2"<br />
Q B<br />
J<br />
L<br />
For complete plans and instructions to build a<br />
gardening and potting cart, go to<br />
www.<strong>Handyman</strong><strong>Club</strong>.com and click on WEB EXTRAS.<br />
10 HANDY J U L Y u A U G U S T 2 0 0 8
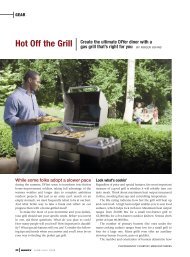
1<br />
2<br />
Short side panel<br />
Bottom<br />
Back<br />
corner<br />
posts<br />
Short<br />
rail<br />
Door<br />
Pilot<br />
hole<br />
Handle<br />
posts<br />
Foot<br />
Kick<br />
Long side<br />
panel<br />
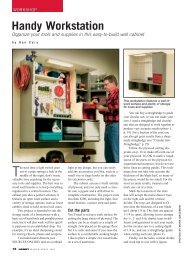
Assemble the wood parts. Use 2-1/2-in. deck screws to<br />
attach the 2x4 parts and 1-5/8-in. deck screws to attach the<br />
plywood to the 2x4 framing.<br />
Follow the door (front-E) detail drawing, to lay out the door<br />
cuts. Drill 1-1/8-in.-dia. pilot holes at each end <strong>of</strong> the hand<br />
hole, and cut between the holes with a jigsaw.<br />
MATERIALS AND CUTTING LIST<br />
KEY NO. DESCRIPTION SIZE<br />
1/2-in.-thick exterior-grade plywood<br />
A 1 Bottom 1/2 x 24 x 40 in.<br />
B 1 Long side panel 1/2 x 16 x 43-1/2 in.<br />
C 1 Short side panel 1/2 x 16 x 41-1/2 in.<br />
D 1 Back 1/2 x 12 x 23-7/8 in.<br />
E 1 Door 1/2 x 16-3/4 x 23-5/8 in.<br />
F 4 Door guides 1/2 x 1-1/4 x 11-1/2 in.<br />
Exterior-grade lumber<br />
G 2 Base-frame sides 1-1/2 x 3-1/2 x 40 in.<br />
H 3 Base-frame crosspieces 1-1/2 x 3-1/2 x 21 in.<br />
I 1 Long rail 1-1/2 x 3-1/2 x 41-1/2 in.<br />
J 1 Short rail 1-1/2 x 3-1/2 x 40 in.<br />
K 2 Back corner posts 1-1/2 x 3-1/2 x 15-1/2 in.<br />
L 2 Handle posts 1-1/2 x 3-1/2 x 31 in.<br />
M 1 Foot kick 1-1/2 x 3-1/2 x 11-1/4 in.<br />
N 2 Front posts 1-1/2 x 3-1/2 x 12 in.<br />
O 2 Bin sides 3/4 x 3-1/2 x 17-3/4 in.<br />
P 1 Bin bottom 3/4 x 3-1/2 x 14-3/4 in.<br />
Q 2 Axle blocks 1-1/2 x 3-1/2 x 12 in.<br />
SHOPPING LIST<br />
1/2-in. x 4x8-ft. exterior plywood<br />
1x4 x 8-ft. exterior-grade board (1)<br />
2x4 x 8-ft. exterior-grade boards (4)<br />
1-5/8-in. stainless steel deck screws<br />
2-1/2-in. stainless steel deck screws<br />
No. 10-24 x 2-in. stainless steel machine screws (6)<br />
No. 10-24 x 3/4-in. stainless steel machine screws (4)<br />
No. 10-24 locknuts (10)<br />
No. 10 stainless steel flat washers (18)<br />
1/2 x 8-in. hot-dipped galvanized bolts (2)<br />
1/2-in. hot-dipped galvanized locknuts (2)<br />
1/2-in. hot-dipped galvanized washers (6)<br />
3/4-in.-dia. x 10-ft. EMT conduit (3)<br />
1-in. EMT pipe straps<br />
1/2-in. x 12-ft. aluminum C-channel (1)<br />
20-in.-dia. cart wheels (2; see SOURCES ONLINE)<br />
plywood, which has a smooth resin top layer. (This material<br />
might be more difficult to find.) <strong>All</strong> hardware should be designated<br />
for use with the materials that you choose. For example,<br />
ACQ-treated lumber requires stainless steel fasteners,<br />
hot-dipped galvanized coated fasteners or fasteners with an<br />
approved proprietary coating.<br />
I used a jigsaw, miter saw and benchtop table saw to cut<br />
the lumber and plywood, but you could make all the cuts with<br />
a jigsaw. You’ll also need a drill/driver to fasten the parts and<br />
bore pilot holes. Safety note: Wear protective eyewear, gloves<br />
and a dust mask when cutting or drilling exterior-rated lumber<br />
and metal.<br />
To work with the conduit, you’ll need a few specialty<br />
tools. I used a hacksaw to cut the pieces and a conduit bender<br />
to make smooth, kink-free curves. You can purchase a conduit<br />
bender at a home center for about $40 or rent one for about $5<br />
to $10 a day. I also used a right-angle drill guide to bore centered<br />
holes through the conduit.<br />
Assemble the wood parts<br />
As you cut the parts and assemble the cart, you may need to<br />
make slight adjustments to the dimensions listed on the cutting<br />
list because the thickness <strong>of</strong> pressure-treated lumber is<br />
sometimes inconsistent — varying as much as 3/16 in. from<br />
piece to piece. You may find it easiest to cut the plywood<br />
parts first and then cut the framing components to fit.<br />
I used deck screws to assemble the wood parts. It’s easiest<br />
to clamp the parts together, drill 1/8-in.-dia. pilot holes and<br />
then drive the screws. I chose not to use any adhesive so that<br />
I could easily replace worn or damaged parts in the future.<br />
First assemble the base frame and attach the bottom. Next,<br />
attach the side panels to the base. Then attach the back corner<br />
posts, foot kick and handle posts to the side panels (photo 1).<br />
Attach the axle blocks, bin sides, bin bottom, back panel and<br />
door guides. Finally, using the drawings as a layout guide, cut<br />
the notch and the handle hole in the door (photo 2). The wood<br />
J U L Y u A U G U S T 2 0 0 8 <strong>Handyman</strong><strong>Club</strong>.com 11
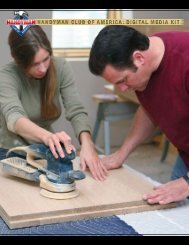
3<br />
BENDING CONDUIT<br />
Creating the complex multiple-conduit raceways <strong>of</strong>ten<br />
seen in commercial buildings isn’t easy, but learning to<br />
make the simple bends this project requires is a snap.<br />
The bending tool features several alignment marks and<br />
degree marks. Follow the illustrated steps below and<br />
photos 3 and 4 to make the conduit parts for the cart. The<br />
key to avoiding kinks: Don’t reposition the bending tool<br />
once you’ve started bending. — DC<br />
4<br />
Angle indicators<br />
Position the bending<br />
tool alignment mark (in<br />
this case the star marking,<br />
see inset) on the<br />
measurement mark and<br />
pull the handle to bend<br />
the conduit. Increase<br />
the bending force by<br />
pressing your foot down<br />
on the tool footrest.<br />
You must make two sets <strong>of</strong> bends to form the handle. First<br />
make a U shape; then bend the straight ends up to a 55-<br />
degree angle. Use the bending tool angle guides to match<br />
the final bend angles.<br />
5<br />
★Alignment mark<br />
ion bend mark<br />
Leg<br />
Handle<br />
HANDLE SIDE RAIL<br />
LEG<br />
1<br />
2<br />
3<br />
1<br />
2<br />
3<br />
1<br />
13"<br />
Trim<br />
ends<br />
to 19"<br />
22"<br />
16"<br />
Trim ends to 22”<br />
(arrow) i on bend mark<br />
★(star) on<br />
bend mark<br />
27"<br />
oni<br />
bend mark<br />
★on bend mark<br />
oni<br />
bend mark<br />
32"<br />
30"<br />
Drill guide<br />
Use a right-angle drill guide to bore the fastener pilot<br />
holes in the conduit. The drill guide features V-channel<br />
supports that center the drill bit over the conduit.<br />
Leg<br />
2<br />
3 Trim ends to 36”<br />
4<br />
20 1/2"<br />
oni<br />
bend mark<br />
13"<br />
36"<br />
I L L U S T R A T I O N B Y T R A C Y W A L S H<br />
12 HANDY J U L Y u A U G U S T 2 0 0 8
6<br />
Drill 1/2-in.-dia. axle holes through the side panel, base-frame side and axle block.<br />
Fasten the wheels to the cart with 1/2-in.-dia. x 8-in. bolts and locknuts. Place flat<br />
washers at each end <strong>of</strong> the bolt and between the wheel and the side panel.<br />
Handle<br />
1” EMT<br />
pipe<br />
straps<br />
Side rail<br />
Leg<br />
7<br />
Attach the handle to the handle posts with 2-1/2-in. deck screws. Place stainless<br />
steel washers between the conduit and the wood to limit the risk <strong>of</strong> corrosion<br />
caused by the ACQ-treated wood.<br />
assembly can be left unfinished, but I<br />
chose to apply two coats <strong>of</strong> barn-red<br />
solid-color deck stain to all exposed surfaces.<br />
Make the conduit<br />
components<br />
To make the handle, front leg and side<br />
rail, I used 3/4-in.-dia. electrical metallic<br />
tubing (more commonly known as<br />
EMT), rather than wood for several<br />
reasons. First, EMT is lightweight.<br />
Second, it’s inexpensive — a 10-ft.<br />
length costs only a few dollars at a<br />
home center. Third, it can be bent to<br />
create smooth, continuous parts.<br />
Finally, it looks cool and gives the cart<br />
a more industrial appearance.<br />
The trick to forming the curved<br />
conduit components is to use an EMT<br />
conduit bender. This tool features<br />
alignment marks that you position at<br />
the different bending points (see<br />
“Bending Conduit,” p. 12). Forming
asic conduit bends is not difficult<br />
(photos 3 and 4), but it might take a<br />
few tries to create smooth curves, so<br />
purchase one or two extra 10-ft. pieces<br />
to practice on before you make the<br />
actual components.<br />
Once you’ve bent and cut all <strong>of</strong> the<br />
parts to size, drill 3/16-in.-dia. pilot<br />
holes for the machine screws (photo 5).<br />
Use a hacksaw to cut the sections <strong>of</strong> aluminum<br />
channel that will cover the tops<br />
<strong>of</strong> the cart sides and the tops <strong>of</strong> the back<br />
and door that are outside the handles.<br />
Attach the wheels,<br />
rails and handles<br />
I used hot-dipped galvanized bolts to<br />
fasten the wheels (photo 6) and stainless<br />
steel deck and machine screws to<br />
fasten the handle, leg and EMT straps<br />
(photo 7). It’s not difficult to find fasteners<br />
that are compatible with ACQtreated<br />
lumber. Unfortunately, cart<br />
wheels and conduit made from stainless<br />
steel aren’t on the shelves <strong>of</strong> most home<br />
centers, so I did my best to create barriers<br />
between the metal and wood surfaces.<br />
Two coats <strong>of</strong> stain don’t provide<br />
impermeable protection, but they limit<br />
direct contact between the treated lumber<br />
and metal parts. I also isolated the<br />
conduit and wheels by using stainless<br />
steel washers between each metal part<br />
and the wood frame.<br />
The aluminum top rails are most<br />
vulnerable to corrosion from contact<br />
with the ACQ-treated wood. I considered<br />
several options and finally chose<br />
to simply attach them with a generous<br />
layer <strong>of</strong> construction adhesive, knowing<br />
that I eventually might have to<br />
replace them.<br />
Once the metal components have<br />
been attached, your cart is ready for<br />
years <strong>of</strong> service. Besides helping with<br />
projects around the house, it makes a<br />
handy chariot — so with the time you<br />
saved hauling supplies, you can reenact<br />
your favorite scene from Ben Hur. u<br />
SOURCES ONLINE<br />
For online information, go to<br />
www.<strong>Handyman</strong><strong>Club</strong>.com/FromHandy<br />
and click on SOURCES ONLINE.<br />
Northern Tool and Equipment (wheels,<br />
No.145121), 800-221-0516, www.northerntool.com<br />
J U L Y u A U G U S T 2 0 0 8 <strong>Handyman</strong><strong>Club</strong>.com 15