KNOW YOUR CHAIN SAW - Handyman Club of America
KNOW YOUR CHAIN SAW - Handyman Club of America
KNOW YOUR CHAIN SAW - Handyman Club of America

You also want an ePaper? Increase the reach of your titles
YUMPU automatically turns print PDFs into web optimized ePapers that Google loves.
Learn chain saw operation from<br />
a world-champion lumberjack<br />
b y M i k e B e r g e r<br />
If you own a chain saw (or simply want one), you know how useful<br />
they are for felling trees, clearing deadfall and preparing firewood.<br />
But along with their usefulness comes the potential for<br />
injury. According to the U.S. Consumer Products Safety Commission,<br />
there were more than 30,000 chain saw injuries last year alone. But<br />
by following proper operating and maintenance procedures, you can<br />
achieve years <strong>of</strong> safe, reliable service from your chain saw and avoid<br />
becoming a statistic.<br />
To better instruct you in proper chain saw etiquette, we sought<br />
out renowned chain saw authority Ron Hartill, seven-time worldchampion<br />
lumberjack. We sat down with Ron for some hands-on<br />
instruction and, in the process, discovered that even if you’re an old<br />
hand at using a chain saw, there’s always a tip or two you can learn<br />
when it comes to safety and proper operation.<br />
World-champion lumberjack Ron Hartill<br />
demonstrates his technique.<br />
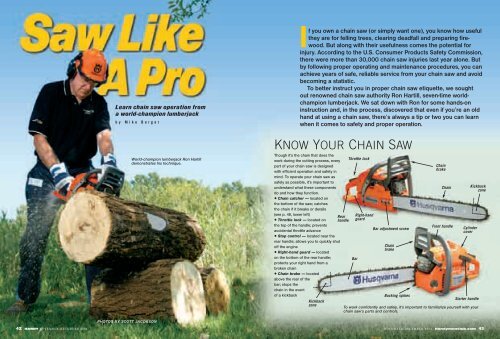
<strong>KNOW</strong> <strong>YOUR</strong> <strong>CHAIN</strong> <strong>SAW</strong><br />
Though it’s the chain that does the<br />
work during the cutting process, every<br />
part <strong>of</strong> your chain saw is designed<br />
with efficient operation and safety in<br />
mind. To operate your chain saw as<br />
safely as possible, it’s important to<br />
understand what these components<br />
do and how they function.<br />
• Chain catcher — located on<br />
the bottom <strong>of</strong> the saw; catches<br />
the chain if it breaks or derails<br />
(see p. 48, lower left)<br />
• Throttle lock — located on<br />
the top <strong>of</strong> the handle; prevents<br />
accidental throttle advance<br />
• Stop control — located near the<br />
rear handle; allows you to quickly shut<br />
<strong>of</strong>f the engine<br />
• Right-hand guard — located<br />
on the bottom <strong>of</strong> the rear handle;<br />
protects your right hand from a<br />
broken chain<br />
• Chain brake — located<br />
above the rear <strong>of</strong> the<br />
bar; stops the<br />
chain in the event<br />
<strong>of</strong> a kickback<br />
Kickback<br />
zone<br />
Rear<br />
handle<br />
Throttle lock<br />
Right-hand<br />
guard<br />
Bar<br />
Bar adjustment screw<br />
Chain<br />
brake<br />
Bucking spikes<br />
Chain<br />
brake<br />
Chain<br />
Front handle<br />
Cylinder<br />
cover<br />
Kickback<br />
zone<br />
Starter handle<br />
To work confidently and safely, it’s important to familiarize yourself with your<br />
chain saw’s parts and controls.<br />
PHOTOS BY SCOTT JACOBSON<br />
42 HANDY N OV E M B E R / D E C E M B E R 2 0 0 4<br />
N OV E M B E R / D E C E M B E R 2 0 0 4 <strong>Handyman</strong><strong>Club</strong>.com 43
Proper<br />
grip<br />
Right foot<br />
through<br />
handle<br />
Left hand on<br />
front handle<br />
To safely start a chain saw, hold the<br />
saw firmly on the ground by placing<br />
your right foot through the rear handle.<br />
Proper operation<br />
Though different brands and individual<br />
models may have specific operating<br />
instructions with respect to their engine<br />
designs, all chain saws share the same<br />
basic safe-operating requirements.<br />
Before you start the saw, carry it at<br />
least 10 ft. from the refueling area, and<br />
make sure that other people and animals<br />
are well away from the working area.<br />
Activate the chain brake by pushing the<br />
front hand guard forward. Grip the front<br />
handle with your left hand. Hold the<br />
chain saw firmly on the ground by<br />
placing your right foot through the rear<br />
handle — make sure the chain is not<br />
making contact with anything (see<br />
photo, above left). Grasp the starter rope<br />
Heavy<br />
boots<br />
Hard hat<br />
Hearing<br />
protection<br />
Eye<br />
protection<br />
Heavy<br />
gloves<br />
Abrasion-resistant<br />
pants or chaps<br />
Wide stance<br />
When running a chain saw, take a<br />
wide boxer’s stance. Do not allow the<br />
kickback zone (see “Know Your Chain<br />
Saw,” p. 43) <strong>of</strong> the bar to engage the<br />
workpiece in any way, and fully wrap<br />
your fingers and thumb around the<br />
handle (see inset).<br />
with your right hand and slowly pull<br />
until you feel resistance. As the starter<br />
pawls engage, pull on the rope firmly<br />
and rapidly.<br />
To safely make cuts, start by positioning<br />
the workpiece (if possible) so that<br />
the saw will neither jam in the cut nor<br />
cause the workpiece to dangerously split<br />
or release tension. In cases where you<br />
can’t move the workpiece, carefully<br />
examine it to determine in which direction<br />
the tension will be released, and<br />
position yourself accordingly. (For more<br />
information on proper felling and limbing<br />
techniques and how stress is released<br />
DRESS FOR SUCCESS<br />
Chain saws are powerful tools, and<br />
therefore potentially dangerous. Safety<br />
always comes first, and it starts with<br />
wearing the proper attire.<br />
Never saw without a helmet, safety<br />
glasses or a full-coverage visor and<br />
hearing protection. Protect your hands<br />
with a pair <strong>of</strong> heavy gloves and your<br />
feet with a pair <strong>of</strong> boots that have a<br />
protective toe-cap and heavy treads.<br />
In addition, wear trousers or chaps<br />
that are designed for chain saw work<br />
and incorporate saw and abrasion<br />
protection. The best chaps meet<br />
<strong>America</strong>n Society for Testing and<br />
Materials standards, which require<br />
them to stop a chain saw running at<br />
2,600 fpm under controlled laboratory<br />
conditions. And if you’ll be working in<br />
the field with other people, wear a<br />
bright-colored jacket so you can easily<br />
be spotted. — MB<br />
during cutting, read Husqvarna’s<br />
free manual “How to Work With<br />
a Chain Saw,” available on the company<br />
Web site — see SOURCES ONLINE.)<br />
Take a wide stance, with your feet<br />
squarely and firmly planted on the<br />
ground. (Ron refers to this as a boxer’s<br />
stance; see photo, near left.) As you feed<br />
the saw through the workpiece, make<br />
sure the chain will not make contact<br />
with the ground or any other object.<br />
Position the bar <strong>of</strong> the saw evenly on<br />
the workpiece, with the bucking spikes<br />
against the face <strong>of</strong> the log, and slowly<br />
feed the saw through the wood.<br />
As you operate the saw, don’t let<br />
the upper quadrant <strong>of</strong> the bar’s nose<br />
(known as the kickback zone) make<br />
contact with any object — if it does,<br />
the saw can suddenly and violently be<br />
thrown backward and can cause serious<br />
or fatal injuries. Though the inertia<br />
chain brake should shut <strong>of</strong>f the chain in<br />
the event <strong>of</strong> a kickback, the best safety<br />
measure is simply to never use the saw<br />
in a way that can cause a kickback.<br />
Always hold the saw firmly with<br />
your right hand on the rear handle<br />
and your left hand on the front handle,<br />
regardless <strong>of</strong> whether you’re right- or<br />
left-handed. Wrap your fingers and<br />
thumbs around the handles to minimize<br />
the effect <strong>of</strong> kickback and keep<br />
the saw under better control (see inset<br />
photo, above).<br />
Sharpening the chain<br />
A chain saw’s ability to cut wood comes<br />
from the sharp, opposing cutters evenly<br />
spaced along the chain. Cutters are<br />
made up <strong>of</strong> two components: a ramplike<br />
depth gauge that controls the depth <strong>of</strong><br />
the cut and a dual-pr<strong>of</strong>ile cutting element.<br />
These two pr<strong>of</strong>iles (referred to as<br />
the top plate and side plate) contain<br />
three different angles that, when combined,<br />
cut through wood like a chisel<br />
and scoop out the chips. But like any<br />
cutting device, the chain can become<br />
dull. If the chain no longer self-feeds<br />
and you find yourself pushing on the<br />
saw to make it cut, it’s time to sharpen<br />
the chain. Likewise, if the saw’s discharge<br />
is dusty rather than made up <strong>of</strong><br />
small wood chips, it’s time to sharpen<br />
the chain.<br />
44 HANDY N OV E M B E R / D E C E M B E R 2 0 0 4
SHARPENING<br />
Stump<br />
vise<br />
Round<br />
File<br />
Sharpening<br />
guide<br />
Flat<br />
File<br />
Stump<br />
vise<br />
Rollers<br />
Cutter<br />
Tools for sharpening a chain include<br />
a round file, a sharpening guide, a<br />
6-in. flat file and a stump vise.<br />
Place the sharpening guide over the chain and position the file over the rollers<br />
and into the cutter. File every other tooth with an even, pushing stroke; then<br />
turn the saw around and file the remaining teeth.<br />
Typical File Sizes<br />
for Sharpening<br />
Chain Pitch<br />
File Diameter<br />
1/4-in. low pr<strong>of</strong>ile . . . . . . 5/32-in.<br />
3/8-in. low pr<strong>of</strong>ile. . . . . . 5/32-in.<br />
0.325-in.. . . . . . . . . . . . . 3/16-in.<br />
3/8-in.. . . . . . . . . . . . . . . 7/32-in.<br />
0.404-in. . . . . . . . . . . . . 7/32-in.<br />
You’ll need only a few inexpensive<br />
items to sharpen a saw chain (see photo,<br />
above). Many chain saw manufacturers<br />
<strong>of</strong>fer sharpening tools specific to their<br />
brand, but most chains can be sharpened<br />
with generic tools available wherever<br />
chain saws are sold.<br />
First you’ll need a round file.<br />
Different-size chains and different cutter<br />
styles call for specific file diameters (see<br />
Depth-gauge<br />
filing guide<br />
Hold the depth-gauge filing guide against the cutter and over the depth gauge. Use<br />
a flat file to file the depth gauge until the file makes contact with the filing guide.<br />
chart, above). You’ll need a file guide to<br />
help you consistently hold the file at the<br />
correct height and orientation within each<br />
cutter. Other items you’ll need include a<br />
depth-gauge filing guide, a stump vise (if<br />
you plan to do any sharpening in the<br />
field) and a pair <strong>of</strong> heavy gloves.<br />
Secure the saw with either a stump<br />
vise (as Ron does) or on a workbench.<br />
Place the file guide over the cutter, and<br />
SHARPENING WITH A DREMEL<br />
If you own a Dremel rotary tool, you can quickly sharpen a chain with the No.<br />
1453 chain saw-sharpening attachment. The sharpener attaches to many <strong>of</strong><br />
Dremel’s rotary tool models and includes sharpening<br />
stones, sharpening guides and complete instructions.<br />
To use the Dremel sharpener, begin on the nearside<br />
teeth, keeping the line on the guide parallel to<br />
the chain (see photo, right). A few light strokes on<br />
each tooth are enough. Next, sharpen the far side,<br />
keeping the back edge <strong>of</strong> the guide parallel to the<br />
chain. Use the same number <strong>of</strong> strokes on each<br />
tooth to maintain proper chain balance. After completing<br />
all <strong>of</strong> the cutters on the top <strong>of</strong> the bar,<br />
advance the chain with a gloved hand and sharpen<br />
the rest <strong>of</strong> the cutters. — MB<br />
Cutter<br />
fits into<br />
slot<br />
Run the file<br />
across the<br />
depth gauge<br />
lay the file across the guide and within<br />
the cutter. File from inside the cutter to<br />
outside using full strokes. Apply pressure<br />
against the cutter rather than down,<br />
and let up on the return stroke (see<br />
photo, top right). File all <strong>of</strong> the cutters<br />
on one side <strong>of</strong> the chain; then file the<br />
cutters on the other side.<br />
As you sharpen the cutters, the<br />
clearance between their cutting elements<br />
and the chain’s depth gauges slowly<br />
becomes smaller. To <strong>of</strong>fset this gradual<br />
reduction, you must also file the depth<br />
gauges. Some sharpening guides double<br />
as depth-gauge guides and are set for<br />
the recommended clearance; if yours<br />
doesn’t do double-duty, you can use a<br />
separate depth-gauge filing guide.<br />
Place the guide over the chain,<br />
making sure its top surface rests squarely<br />
on the chain’s top plates (see photos,<br />
above). Using a 6-in. flat file, stroke<br />
from inside the cutter to outside until the<br />
depth gauge is flush with the top <strong>of</strong> the<br />
slot. Repeat this sequence until all <strong>of</strong> the<br />
depth gauges are the correct height.<br />
46 HANDY N OV E M B E R / D E C E M B E R 2 0 0 4
MAINTENANCE<br />
Improperly<br />
tensioned chain<br />
To perform a snap test, grasp the chain, lift it away from the bar and release. A properly tensioned chain will quickly<br />
snap back into position. A loose chain will visibly sag (photo, above right) and won’t cut efficiently.<br />
Air filter<br />
Cooling<br />
fins<br />
Remove the cylinder cover and clean<br />
any debris from the air filter and<br />
cylinder cooling fins.<br />
Chain catcher<br />
(plastic)<br />
Chain catcher<br />
(metal)<br />
Regularly check the saw’s safety<br />
features such as the chain catcher<br />
(shown here). If the saw has a damaged<br />
plastic catcher, replace it with<br />
a metal version if available.<br />
THE <strong>CHAIN</strong> <strong>SAW</strong> CHAMP<br />
Undefeated seven-time world champion lumberjack<br />
Ron Hartill started his logging career in 1954 in<br />
Greymouth, New Zealand. In 1968 Ron moved to<br />
Vancouver Island, Canada, to work in the West<br />
Coast rain forest, where he specialized in big timber,<br />
felling trees as large as 20 ft. dia. and 300 ft. tall.<br />
He’s cited in the Guinness Book <strong>of</strong> World Records<br />
as the champion in the one- and two-man crosscut<br />
sawing and spring-board chopping categories. Ron<br />
is also the champion <strong>of</strong> eight All-Sooke Day competitions<br />
(the granddaddy <strong>of</strong> all Canadian logging contests)<br />
as well as a gold-medal winner in Finland, where he bested contestants<br />
from 14 European countries at chain sawing, limbing, bucking and felling.<br />
Since 1979 Ron has traveled the world to present safety seminars on behalf<br />
<strong>of</strong> chain saw manufacturer Husqvarna. He has trained numerous employees <strong>of</strong><br />
national, state and local governments across North <strong>America</strong> and was even chosen<br />
for six consecutive years to provide the Christmas tree for the U.S. Capitol. — MB<br />
General maintenance<br />
There are a few other basic steps Ron<br />
recommends you take to ensure your<br />
chain saw operates as efficiently<br />
as possible.<br />
Check the chain tension and adjust<br />
as necessary. As a chain wears, it can<br />
stretch and lose its proper tension.<br />
Check the tension by performing a<br />
“snap test.” At the center <strong>of</strong> the bar,<br />
grasp the chain with two fingers. Lift<br />
the chain away from the bar and release<br />
(see top left photo). A properly tensioned<br />
chain will quickly snap back<br />
into position. If the chain loosely falls<br />
into position or sags, you’ll need to<br />
adjust the bar. Each brand <strong>of</strong> saw has<br />
different provisions for adjustment, so<br />
consult the owner’s manual for the<br />
proper procedure.<br />
Remove the clutch cover and clean<br />
the chain brake band and the chain bar,<br />
as dirt and debris can keep the chain<br />
brake from functioning properly.<br />
Remove the cylinder cover, clean any<br />
debris from the air filter, and clean <strong>of</strong>f<br />
the cooling fins and air intake to keep<br />
the engine from overheating during normal<br />
operation (see middle photo at left).<br />
Inspect the chain brake, throttle<br />
control and chain catcher. Make sure<br />
that all <strong>of</strong> the saw’s safety features work<br />
as designed and are not damaged in any<br />
way (see bottom photos at left). Check<br />
that the chain lubrication system is<br />
functioning properly, inspect the drive<br />
wheel to make sure that it’s not worn,<br />
and tighten any loose nuts, bolts<br />
and screws.<br />
Following these maintenance tips<br />
and operating procedures will enhance<br />
your safety and help you get years <strong>of</strong><br />
service out <strong>of</strong> your saw. u<br />
For online information, go to www.<strong>Handyman</strong><strong>Club</strong>.com<br />
and click on SOURCES ONLINE.<br />
<strong>America</strong>n Society for Testing<br />
and Materials, (610) 832-9585<br />
Dremel, 800-437-3635<br />
Husqvarna, 800-487-5962<br />
48 HANDY N OV E M B E R / D E C E M B E R 2 0 0 4