Fire in the Bowl - Handyman Club of America
Fire in the Bowl - Handyman Club of America
Fire in the Bowl - Handyman Club of America

You also want an ePaper? Increase the reach of your titles
YUMPU automatically turns print PDFs into web optimized ePapers that Google loves.
METALSHOP<br />
By Mike Berger i PHOTOS BY MICHAEL ANDERSON<br />
<strong>Fire</strong> <strong>in</strong> <strong>the</strong> <strong>Bowl</strong><br />
Build a portable pit to illum<strong>in</strong>ate<br />
outdoor ga<strong>the</strong>r<strong>in</strong>gs<br />
S<strong>in</strong>ce <strong>the</strong> dawn <strong>of</strong> mank<strong>in</strong>d, one<br />
<strong>of</strong> <strong>the</strong> ways our early ancestors<br />
shared a sense <strong>of</strong> community and relaxed<br />
after a hard day <strong>of</strong> hunt<strong>in</strong>g and<br />
ga<strong>the</strong>r<strong>in</strong>g was to sit around a crackl<strong>in</strong>g<br />
fire. Though it’s no longer necessary to<br />
our survival, a communal fire can add<br />
an <strong>in</strong>vit<strong>in</strong>g atmosphere to modern outdoor<br />
enterta<strong>in</strong><strong>in</strong>g.<br />
This portable fire bowl project lets<br />
you do just that. It’s easy to build with<br />
just a few tools, a welder and steel<br />
stock that’s available at most hardware<br />
stores. We’ll show you how to create a<br />
wooden assembly jig from 2x4 scraps<br />
that will greatly simplify construction.<br />
In fact, build<strong>in</strong>g this fire bowl is so<br />
simple that even a caveman could do<br />
it — if only he had access to a welder.<br />
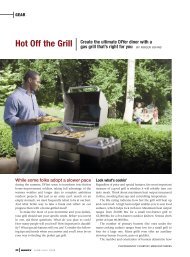
A fire bowl adds style to your backyard and provides a natural<br />
ga<strong>the</strong>r<strong>in</strong>g spot for even<strong>in</strong>g enterta<strong>in</strong><strong>in</strong>g. The 14-gauge<br />
diamond-tread plate <strong>in</strong>corporated <strong>in</strong>to <strong>the</strong> design gives this<br />
project a unique, decorative look that you won’t f<strong>in</strong>d <strong>in</strong> storebought<br />
models.
metalshop<br />
<strong>Fire</strong> <strong>Bowl</strong><br />
A<br />
A<br />
24"<br />
A<br />
Illustration by michael anderson<br />
15"<br />
A<br />
18"<br />
E<br />
6"<br />
B<br />
C<br />
B<br />
C<br />
5-1/2"<br />
D<br />
D<br />
12"<br />
C<br />
16"<br />
C<br />
Cutt<strong>in</strong>g List<br />
1<br />
KEY NO. DESCRIPTION SIZE<br />
A 4 <strong>Bowl</strong> sides 24 x 12 <strong>in</strong>.<br />
B 4 <strong>Bowl</strong>-cradle pieces 1 x 1 x 18 <strong>in</strong>.<br />
C 4 Legs 1 x 1 x 11 <strong>in</strong>.<br />
D 4 Horizontal supports 3/4 x 3/4 x 16 <strong>in</strong>.<br />
E 1 Ash grate 6-3/8 x 6-3/8 <strong>in</strong>.<br />
Shopp<strong>in</strong>g List (All items are steel)<br />
24-<strong>in</strong>.-sq. sheets <strong>of</strong> 14-gauge diamond-tread plate (2)<br />
3-ft. lengths <strong>of</strong> 1-<strong>in</strong>. hollow square tube (4)<br />
3-ft. lengths <strong>of</strong> 3/4-<strong>in</strong>. hollow square tube (2)<br />
12-<strong>in</strong>.-sq. sheet <strong>of</strong> 3/4-<strong>in</strong>. expanded metal mesh (1)<br />
Cut <strong>the</strong> four sections <strong>of</strong> diamond-tread plate that will make<br />
up <strong>the</strong> fire bowl accord<strong>in</strong>g to <strong>the</strong> dimensions shown <strong>in</strong> <strong>the</strong><br />
draw<strong>in</strong>g. There are various ways to cut thick plate such as<br />
this; we used an angle gr<strong>in</strong>der outfitted with a metal-cutt<strong>in</strong>g<br />
Get <strong>the</strong> free mobile app at<br />
wheel. You should be able to cut two sides from each <strong>of</strong> <strong>the</strong><br />
http:/ / gettag.mobi<br />
24-<strong>in</strong>.-sq. sheets.<br />
Web Extra<br />
To read more about wire-feed weld<strong>in</strong>g, scan this tag<br />
with your smartphone or go to <strong>Handyman</strong><strong>Club</strong>.com<br />
and click on Web Extras.
metalshop<br />
2 3<br />
4<br />
Cut all <strong>of</strong> <strong>the</strong> square hollow tube to<br />
<strong>the</strong> lengths specified <strong>in</strong> <strong>the</strong> cutt<strong>in</strong>g list.<br />
Remember to miter each <strong>of</strong> <strong>the</strong> ends<br />
<strong>of</strong> <strong>the</strong> four lengths <strong>of</strong> 1-<strong>in</strong>. tube that<br />
will form <strong>the</strong> bowl-cradle pieces (B).<br />
A metal-cutt<strong>in</strong>g chop saw is <strong>the</strong> perfect<br />
tool for this task, but you can also use<br />
an angle gr<strong>in</strong>der outfitted with a metalcutt<strong>in</strong>g<br />
wheel or a hacksaw. Be careful<br />
to cut accurately — o<strong>the</strong>rwise your<br />
miters won’t fit tightly toge<strong>the</strong>r.<br />
Us<strong>in</strong>g 2x4 scraps, build a wooden<br />
frame that measures 24-1/8 <strong>in</strong>. sq. on<br />
<strong>the</strong> <strong>in</strong>side to serve as an assembly jig<br />
for <strong>the</strong> fire bowl. Position <strong>the</strong> four bowl<br />
sides top-down <strong>in</strong> <strong>the</strong> jig so that <strong>the</strong>y<br />
all rest toge<strong>the</strong>r as shown <strong>in</strong> <strong>the</strong> photo;<br />
<strong>the</strong>n run a weld bead down each <strong>of</strong><br />
<strong>the</strong> jo<strong>in</strong>ts.<br />
Use a square to accurately position<br />
<strong>the</strong> four mitered lengths <strong>of</strong> 1-<strong>in</strong>. tube<br />
that will make up <strong>the</strong> cradle for <strong>the</strong><br />
fire bowl. Once <strong>the</strong> four pieces are<br />
properly aligned and square, weld<br />
<strong>the</strong>m toge<strong>the</strong>r.<br />
5 6 7<br />
Before do<strong>in</strong>g any more weld<strong>in</strong>g, use<br />
an angle gr<strong>in</strong>der outfitted with a gr<strong>in</strong>d<strong>in</strong>g<br />
wheel to smooth <strong>the</strong> welds at <strong>the</strong><br />
corners <strong>of</strong> <strong>the</strong> bowl cradle.<br />
8<br />
Weld <strong>the</strong> four legs (C) <strong>in</strong> position at<br />
<strong>the</strong> corners <strong>of</strong> <strong>the</strong> bowl cradle. Use a<br />
square to ensure that <strong>the</strong> legs are properly<br />
positioned perpendicular to <strong>the</strong><br />
cradle. Once you’ve welded all <strong>of</strong> <strong>the</strong><br />
legs <strong>in</strong> place, gr<strong>in</strong>d <strong>the</strong> welds smooth.<br />
Cut a 6-3/8-<strong>in</strong>.-sq. section<br />
from <strong>the</strong> sheet <strong>of</strong><br />
3/4-<strong>in</strong>. expanded metal<br />
mesh. Position it over <strong>the</strong><br />
bottom <strong>of</strong> <strong>the</strong> fire bowl;<br />
<strong>the</strong>n weld it <strong>in</strong> place. (By<br />
cutt<strong>in</strong>g <strong>the</strong> mesh just a<br />
t<strong>in</strong>y bit oversize, you’ll<br />
have metal to work with<br />
as <strong>the</strong> ends <strong>of</strong> <strong>the</strong> mesh<br />
melt dur<strong>in</strong>g <strong>the</strong> weld<strong>in</strong>g<br />
process.) Gr<strong>in</strong>d any rema<strong>in</strong><strong>in</strong>g<br />
welds smooth,<br />
clean <strong>the</strong> entire assembly<br />
with m<strong>in</strong>eral spirits<br />
and <strong>the</strong>n pa<strong>in</strong>t it with<br />
your choice <strong>of</strong> a hightemperature<br />
grill or eng<strong>in</strong>e-block<br />
pa<strong>in</strong>t. Or you<br />
can leave it unf<strong>in</strong>ished<br />
and your fire bowl will<br />
develop a nice pat<strong>in</strong>a <strong>of</strong><br />
rust as it wea<strong>the</strong>rs.<br />
Weld <strong>the</strong> bottom 3/4-<strong>in</strong>.-sq. horizontal<br />
support pieces (D) <strong>in</strong> place between<br />
<strong>the</strong> legs. Use a 5-1/2-<strong>in</strong>. scrap <strong>of</strong> 2x4 to<br />
establish <strong>the</strong> proper position for <strong>the</strong><br />
support pieces. Once all four are <strong>in</strong><br />
place, gr<strong>in</strong>d <strong>the</strong> welds smooth.<br />
Safety precautions<br />
Work<strong>in</strong>g safely and us<strong>in</strong>g <strong>the</strong> fire bowl<br />
<strong>in</strong> a responsible manner will reduce<br />
your chances <strong>of</strong> an accident or <strong>in</strong>jury.<br />
Be sure to wear <strong>the</strong> appropriate<br />
safety gear and cloth<strong>in</strong>g for weld<strong>in</strong>g<br />
and metalwork<strong>in</strong>g. Cloth<strong>in</strong>g should be<br />
made <strong>of</strong> fire-retardant cotton or wool,<br />
never syn<strong>the</strong>tics, which can melt. Always<br />
wear a helmet when weld<strong>in</strong>g and<br />
a full face shield when gr<strong>in</strong>d<strong>in</strong>g. Also<br />
wear lea<strong>the</strong>r weld<strong>in</strong>g gloves to protect<br />
aga<strong>in</strong>st burns. Of course, you should<br />
always work <strong>in</strong> a well-ventilated area.<br />
Most communities have rules that<br />
regulate recreational fires. Typically,<br />
fires can be no more than 3 ft. dia. and<br />
should be at least 25 ft. from any structure.<br />
Check with your local codes authority<br />
to be sure you’re <strong>in</strong> compliance.<br />
F<strong>in</strong>ally, burn only cut firewood — never<br />
burn construction scraps, particularly<br />
any pressure-treated wood.