Handy Workstation - Handyman Club of America
Handy Workstation - Handyman Club of America
Handy Workstation - Handyman Club of America

Create successful ePaper yourself
Turn your PDF publications into a flip-book with our unique Google optimized e-Paper software.
WORKSHOP<br />
<strong>Handy</strong> <strong>Workstation</strong><br />
Organize your tools and supplies in this easy-to-build wall cabinet<br />
b y D a n C a r y<br />
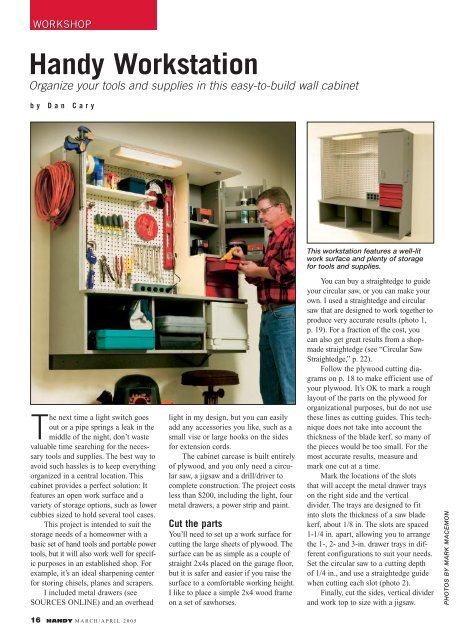
This workstation features a well-lit<br />
work surface and plenty <strong>of</strong> storage<br />
for tools and supplies.<br />
The next time a light switch goes<br />
out or a pipe springs a leak in the<br />
middle <strong>of</strong> the night, don’t waste<br />
valuable time searching for the necessary<br />
tools and supplies. The best way to<br />
avoid such hassles is to keep everything<br />
organized in a central location. This<br />
cabinet provides a perfect solution: It<br />
features an open work surface and a<br />
variety <strong>of</strong> storage options, such as lower<br />
cubbies sized to hold several tool cases.<br />
This project is intended to suit the<br />
storage needs <strong>of</strong> a homeowner with a<br />
basic set <strong>of</strong> hand tools and portable power<br />
tools, but it will also work well for specific<br />
purposes in an established shop. For<br />
example, it’s an ideal sharpening center<br />
for storing chisels, planes and scrapers.<br />
I included metal drawers (see<br />
SOURCES ONLINE) and an overhead<br />
light in my design, but you can easily<br />
add any accessories you like, such as a<br />
small vise or large hooks on the sides<br />
for extension cords.<br />
The cabinet carcase is built entirely<br />
<strong>of</strong> plywood, and you only need a circular<br />
saw, a jigsaw and a drill/driver to<br />
complete construction. The project costs<br />
less than $200, including the light, four<br />
metal drawers, a power strip and paint.<br />
Cut the parts<br />
You’ll need to set up a work surface for<br />
cutting the large sheets <strong>of</strong> plywood. The<br />
surface can be as simple as a couple <strong>of</strong><br />
straight 2x4s placed on the garage floor,<br />
but it is safer and easier if you raise the<br />
surface to a comfortable working height.<br />
I like to place a simple 2x4 wood frame<br />
on a set <strong>of</strong> sawhorses.<br />
You can buy a straightedge to guide<br />
your circular saw, or you can make your<br />
own. I used a straightedge and circular<br />
saw that are designed to work together to<br />
produce very accurate results (photo 1,<br />
p. 19). For a fraction <strong>of</strong> the cost, you<br />
can also get great results from a shopmade<br />
straightedge (see “Circular Saw<br />
Straightedge,” p. 22).<br />
Follow the plywood cutting diagrams<br />
on p. 18 to make efficient use <strong>of</strong><br />
your plywood. It’s OK to mark a rough<br />
layout <strong>of</strong> the parts on the plywood for<br />
organizational purposes, but do not use<br />
these lines as cutting guides. This technique<br />
does not take into account the<br />
thickness <strong>of</strong> the blade kerf, so many <strong>of</strong><br />
the pieces would be too small. For the<br />
most accurate results, measure and<br />
mark one cut at a time.<br />
Mark the locations <strong>of</strong> the slots<br />
that will accept the metal drawer trays<br />
on the right side and the vertical<br />
divider. The trays are designed to fit<br />
into slots the thickness <strong>of</strong> a saw blade<br />
kerf, about 1/8 in. The slots are spaced<br />
1-1/4 in. apart, allowing you to arrange<br />
the 1-, 2- and 3-in. drawer trays in different<br />
configurations to suit your needs.<br />
Set the circular saw to a cutting depth<br />
<strong>of</strong> 1/4 in., and use a straightedge guide<br />
when cutting each slot (photo 2).<br />
Finally, cut the sides, vertical divider<br />
and work top to size with a jigsaw.<br />
PHOTOS BY MARK MACEMON<br />
16 HANDY M A R C H / A P R I L 2 0 0 5
N<br />
A<br />
WORKSTATION<br />
C<br />
P<br />
G<br />
O<br />
K<br />
G<br />
M<br />
J<br />
Q<br />
I<br />
4-3/4"<br />
N<br />
P<br />
B<br />
A<br />
10-1/2"<br />
L<br />
H<br />
M<br />
8"<br />
D<br />
L<br />
7/8"<br />
17"<br />
F<br />
15"<br />
E<br />
F<br />
1<br />
B<br />
G<br />
1/4"<br />
1/4" deep<br />
saw kerfs<br />
spaced 1-1/4"<br />
13"<br />
1-1/2"<br />
B<br />
DETAIL 1<br />
J<br />
R<br />
A<br />
C<br />
D<br />
L<br />
L<br />
H<br />
D<br />
Cutout in<br />
right side<br />
only<br />
22-1/2"<br />
E<br />
B<br />
F<br />
K<br />
K<br />
F<br />
M<br />
I<br />
3/4"<br />
2" rad.<br />
WORK TOP<br />
13"<br />
22-1/2"<br />
6"<br />
2-1/4"<br />
B<br />
G<br />
N<br />
O<br />
6"<br />
12-3/4"<br />
PLYWOOD<br />
DIVIDER, G<br />
SIDES, B<br />
ILLUSTRATION BY GABRIEL GRAPHICS<br />
18 HANDY M A R C H / A P R I L 2 0 0 5
Kerfs for<br />
toolbox trays<br />
Workpiece<br />
2<br />
Cut the 1/4-in.-deep slots for the metal drawer trays in the<br />
right side and vertical divider at the same time. Space the<br />
slots 1-1/4 in. apart.<br />
2x4 frame<br />
1<br />
Use a circular saw or table saw to cut the plywood<br />
parts to size. Tip: Make a 2x4 frame to support the<br />
plywood during cutting. The size <strong>of</strong> the cutting frame<br />
is not critical; the frame shown is 27 in. x 78 in.<br />
Paint the parts<br />
Paint all <strong>of</strong> the parts before assembling the cabinet. Don’t<br />
worry that the paint will interfere with glued joints — screws<br />
are the only fasteners necessary.<br />
Sand all sides and edges <strong>of</strong> the parts with 150-grit<br />
sandpaper. Then apply one coat <strong>of</strong> primer and two coats <strong>of</strong><br />
latex satin or semigloss paint to all plywood parts as well<br />
as the pegboard spacers and wall cleat. I used gray paint<br />
MATERIALS AND CUTTING LIST<br />
Key No. Description Size<br />
3/4-in. birch plywood<br />
A . . . . . 1. . . . . . . Back ....................3/4 x 46-1/2 x 46-1/2 in.<br />
B . . . . . 2. . . . . . . Sides ....................3/4 x 16 x 47-1/4 in.<br />
C . . . . . 1. . . . . . . Top ......................3/4 x 16 x 48 in.<br />
D . . . . . 1. . . . . . . Work top ................3/4 x 17-1/4 x 48 in.<br />
E . . . . 1. . . . . . . Bottom ..................3/4 x 16 x 46-1/2 in.<br />
F . . . . 2. . . . . . . Cubby dividers ..........3/4 x 12 x 15-1/4 in.<br />
G . . . . 1. . . . . . . Vertical divider ..........3/4 x 13 x 33-3/4 in.<br />
H . . . . 1. . . . . . . Bottom shelf ............3/4 x 10-1/2 x 13 in.<br />
I . . . . 1. . . . . . . Upper shelf..............3/4 x 7 x 10-1/2 in.<br />
J . . . . 1. . . . . . . Door back ...............3/4 x 12 x 22-7/8 in.<br />
K . . . . 2. . . . . . . Door sides ..............3/4 x 6 x 22 in.<br />
L . . . . 2. . . . . . . Door shelves ............3/4 x 5-1/4 x 10-1/2 in.<br />
M. . . . 3. . . . . . . Door shelf lips...........3/4 x 1-1/4 x 10-1/2 in.<br />
N . . . . 4. . . . . . . Pegboard spacers.......3/4 x 1-1/4 x 33-3/4 in.<br />
O . . . . 1. . . . . . . Adjustable shelf (opt.) ...3/4 x 5-7/8 x 24 in.<br />
1/4-in. pegboard<br />
P . . . . 1. . . . . . . Back pegboard ..........1/4 x 33-3/4 x 34-1/2 in.<br />
Q . . . . 1. . . . . . . Side pegboard ..........1/4 x 12 x 33-3/4 in.<br />
2x4 pine<br />
R . . . . 1. . . . . . . Wall cleat...............1-1/2 x 3-1/2 x 48 in.<br />
3<br />
Attach the cubby dividers, sides and bottom to the back.<br />
Drill countersunk pilot holes and then secure each piece<br />
with 2-in. coarse-thread screws.<br />
SHOPPING LIST<br />
3/4-in. x 4x8-ft. birch plywood (2)<br />
1/4-in. x 4x8-ft. pegboard (1)<br />
48-in. x 2x4 pine (framing stock)<br />
1-in. toolbox tray (see SOURCES ONLINE)<br />
2-in. toolbox tray (2)<br />
3-in. toolbox tray<br />
4-in. T-hinges (2)<br />
1/4 x 1-1/4-in. machine screws (12)<br />
1/4-in. washers<br />
1/4-in. locknuts<br />
2-in. coarse-thread screws<br />
1-1/4-in. coarse-thread screws<br />
1/4 x 3-in. lag screws (6)<br />
1/4-in. washers (6)<br />
Exterior satin or semigloss paint<br />
Pegboard hooks<br />
Power strip<br />
Suface-mount light fixture<br />
M A R C H / A P R I L 2 0 0 5 <strong>Handy</strong>man<strong>Club</strong>.com 19
Work top<br />
3"<br />
24"<br />
4 5<br />
After attaching the work top, attach the vertical divider, shelves and top.<br />
Drill 1/4-in. clearance holes through<br />
the back <strong>of</strong> the cabinet. Position the<br />
holes in line with the stud markings.<br />
Impact<br />
driver<br />
1/4 x 3-in.<br />
lag screws<br />
Machine<br />
screws<br />
Wall<br />
cleat<br />
6<br />
Lift the cabinet onto the wall cleat with<br />
a helper. Drill 3/16-in. pilot holes in the<br />
studs at each clearance hole location;<br />
then drive lag screws into the studs.<br />
for all <strong>of</strong> the parts except the underside<br />
<strong>of</strong> the top and the left face <strong>of</strong> the<br />
vertical divider, which I painted white<br />
to match the pegboard. Use a roller or<br />
sprayer for the easiest application and<br />
smoothest finish.<br />
Assemble the cabinet<br />
Assemble the parts with 2-in. coarsethread<br />
screws. (Drywall or deck screws<br />
work well.) Drill a countersink and pilot<br />
hole sized for a No. 8 screw before<br />
driving each screw.<br />
Begin by attaching the sides,<br />
bottom and cubby dividers to the back<br />
(photo 3). Next, attach the work top and<br />
then the shelves and the vertical divider.<br />
Finally, attach the top (photo 4).<br />
The door contains four fixed<br />
7 8<br />
Fasten the hinges to the door first;<br />
then attach the hinges to the cabinet.<br />
Use a piece <strong>of</strong> cardboard as a spacer<br />
under the door.<br />
shelves. You can add, remove or reposition<br />
the shelves to suit your storage<br />
needs. Attach a shelf lip to each shelf;<br />
then attach the shelves to the door<br />
sides and door back. Attach one additional<br />
shelf lip 3-1/2 in. above the top<br />
shelf lip.<br />
Hang the cabinet<br />
You can hang the cabinet on a finished<br />
wall surface or on exposed studs. If the<br />
wall is finished, mark the stud locations.<br />
The cabinet must be fastened to at least<br />
two studs, so avoid aligning the sides<br />
over any studs. Place the cabinet on the<br />
floor in front <strong>of</strong> the studs. Mark the stud<br />
locations on the cabinet; then measure<br />
down 3 in. and 24 in. from the top. Drill<br />
1/4-in.-dia. clearance holes through the<br />
Attach the pegboard spacers and<br />
pegboard to the left side and back<br />
<strong>of</strong> the cabinet.<br />
cabinet back (photo 5).<br />
I positioned the wall cleat 28 in.<br />
above the floor and anchored it to the<br />
studs with 3-in. screws. At this mounting<br />
height the work top ends up 42 in.<br />
above the floor and there is room under<br />
the cabinet for a shop vacuum. With a<br />
helper, lift the cabinet onto the cleat.<br />
Using the clearance holes as a guide,<br />
drill 3/16-in.-dia. pilot holes in the<br />
studs. Attach the cabinet to the wall<br />
with 1/4 x 3-in. lag screws (photo 6).<br />
Mark the hinge-hole locations on the<br />
side <strong>of</strong> the door. Drill 1/4-in.-dia. pilot<br />
holes at each location. Fasten the hinges<br />
to the door with 1/4- x 1-1/4-in. machine<br />
screws and locknuts. Then place a<br />
1/8-in.-thick spacer under the door (a<br />
piece <strong>of</strong> corrugated cardboard works<br />
20 HANDY M A R C H / A P R I L 2 0 0 5
Circular saw straightedge<br />
This straightedge guide is easy to build — it has only two parts. The first is<br />
a base piece made from 1/4-in.-thick plywood or hardboard that is 12 in.<br />
wide and as long as 8 ft. The second is an edge guide made from a straight<br />
3/4-in.-thick x 2-in.-wide piece <strong>of</strong> solid wood or plywood that is the same<br />
length as the base piece.<br />
Offset the edge guide on the base piece, leaving enough material on<br />
one side <strong>of</strong> the edge guide for the full width <strong>of</strong> the saw’s baseplate. Drill<br />
countersinks in the base piece;<br />
then drive 3/4-in. wood screws<br />
through the base and into the<br />
edge guide.<br />
Next, trim the base piece<br />
by running the saw along the<br />
edge guide. The trimmed edge<br />
<strong>of</strong> the base piece now matches<br />
the saw’s cutting line, and the<br />
jig is ready to use. Simply align<br />
the trimmed edge <strong>of</strong> the jig<br />
with the cutting line on the<br />
workpiece, clamp the jig in<br />
place and make the cut. — DC<br />
Base piece<br />
Edge guide<br />
pegboard to the spacers with 1-1/4-in.<br />
screws (photo 8).<br />
Fasten the power strip to the<br />
bottom right corner <strong>of</strong> the pegboard.<br />
Drill 1-1/4-in. exit holes for the cord<br />
through the work top and bottom.<br />
Next, follow the manufacturer’s<br />
instructions for installing the lights. I<br />
chose to use an 18-in. fluorescent fixture.<br />
You could also use a set <strong>of</strong> under-cabinet<br />
halogen “puck” or pot lights.<br />
I included an additional shelf that<br />
hangs on the pegboard. The adjustable<br />
shelf is supported by brackets that<br />
hang on the pegboard (available where<br />
pegboard hooks are sold).<br />
Finally, install the metal drawer trays<br />
and fill the cabinet with your tools and<br />
supplies. The next time you need to<br />
repair something, you’ll know where<br />
to find the right tool for the job. u<br />
well) and position the door flush with<br />
the right cabinet side. Drill pilot holes<br />
and fasten the hinges to the cabinet<br />
side (see photo 7).<br />
Now install the pegboard, power<br />
strip and lighting. The pegboard must<br />
be spaced away from the cabinet back<br />
and sides to provide room for the<br />
hooks. Attach the pegboard spacer strips<br />
with 1-1/4-in. screws. Then fasten the<br />
For online information, go to www.<strong>Handy</strong>man<strong>Club</strong>.com<br />
and click on SOURCES ONLINE.<br />
Lee Valley Tools (Veritas Toolbox Trays —<br />
1-in.-deep, No. 05K98.10; 2-in.-deep, No.<br />
05K98.20; 3-in.-deep, No. 05K98.30)<br />
800-871-8158