purefusion - Hair Magazine
purefusion - Hair Magazine
purefusion - Hair Magazine

Create successful ePaper yourself
Turn your PDF publications into a flip-book with our unique Google optimized e-Paper software.
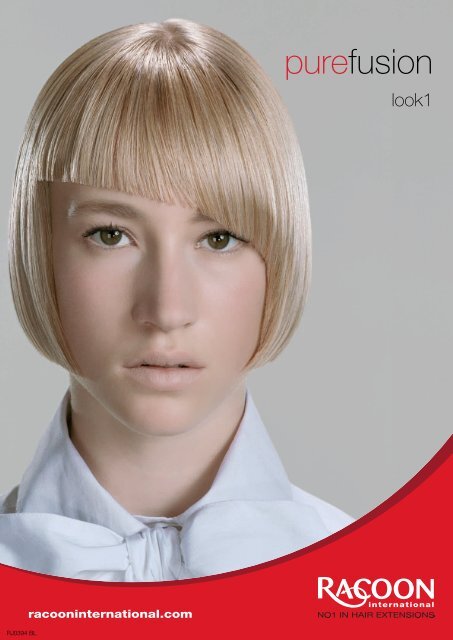
<strong>purefusion</strong><br />
look1<br />
RJ0394 BL<br />
racooninternational.com
<strong>purefusion</strong> step-by-step look 1<br />
before<br />
1<br />
Preparing the hair<br />
2<br />
Sectioning the hair<br />
Cut the hair into a short, sharp,<br />
bob incorporating an asymmetrical<br />
fringe. Remove the bulk of the hair<br />
using thinning scissors, which is a<br />
perfect way of thinning out the hair<br />
without cutting off too much. The<br />
slight graduation to the cut will give<br />
the style strength.<br />
Create a bow arc section two<br />
fingers away from the hairline. The<br />
section should be on an<br />
asymmetric angle, following the<br />
shape of the head.<br />
3<br />
Forming a bond<br />
4<br />
Bleed the bonding through the hair<br />
by pushing up from beneath,<br />
bringing the hands together. Pinch<br />
top and bottom and roll between<br />
the fingers to form a solid bead<br />
using both hands. Repeat until a<br />
solid row of extensions are<br />
created.<br />
Fringe placement<br />
Apply 3 rows of extensions using an even blend of ash<br />
blonde and warm brown (Racoon Euro colours 42, 45<br />
and 24) to match the models natural hair colour to<br />
achieve a fuller and thicker fringe.<br />
RJ0394 BL<br />
racooninternational.com
<strong>purefusion</strong> step-by-step look 1<br />
5<br />
Finished section<br />
When the section is completed the<br />
model should be left with solid rows<br />
of extensions in a bow arc with no<br />
gaps, all the extensions should be<br />
touching. By using Racoon’s unique<br />
micro bonding technique, the bonds<br />
are so subtle that they will be barely<br />
visible, perfect for delicate extensions<br />
work such as this.<br />
6<br />
Cutting<br />
7<br />
Cut the extensions on a graduated<br />
asymmetric angle from a sharp<br />
point just above the eyebrow to a<br />
sharp point at the cheekbone.<br />
Finishing off<br />
Finish with clippers in order to<br />
achieve a really sharp, blunt<br />
edge.<br />
RACOON-<br />
XTEND<br />
THERMAL<br />
DEFENSE<br />
8<br />
Styling<br />
Spritz the hair with a fine mist of<br />
Racoon-Xtend Thermal<br />
Defense to protect the hair from<br />
heat styling, and then enhance the<br />
shape and definition of the style<br />
with styling irons.<br />
RJ0394 BL<br />
racooninternational.com
<strong>purefusion</strong><br />
look2<br />
RJ0394 RH<br />
racooninternational.com
<strong>purefusion</strong> step-by-step look 2<br />
before<br />
1<br />
Cutting<br />
2<br />
Sectioning the hair<br />
Cut the hair into a classic, slightly<br />
graduated, box bob. The<br />
geometric angles of the blunt fringe<br />
and 45 degree angular points at<br />
the front should be finished off with<br />
clippers in order to achieve a blunt<br />
finish with a soft edge.<br />
Section off the top layer of hair,<br />
from the temple to the crown, in<br />
preparation for the placement<br />
patterns. When sectioning off the<br />
placement patterns, always work<br />
with the models growth pattern.<br />
3<br />
Small<br />
triangular section<br />
Create a small triangular section on the right side of the<br />
head. The base of the triangle should be at the top of<br />
the head and the point towards the ear as the placement<br />
is not to create length but to achieve a sharper point in<br />
the final cut.<br />
4<br />
Large triangular section<br />
Create a large triangular section on the left side of the<br />
head, in a reversed angle to the right side. The base of<br />
the triangle should be at the front of the head and the<br />
point towards the crown, in order to create more weight<br />
and hair at the front. Having a larger section on one side<br />
will create a strong asymmetric angle to the finished<br />
style..<br />
RJ0394 RH<br />
racooninternational.com
<strong>purefusion</strong> step-by-step look 2<br />
5<br />
Forming a bond<br />
6<br />
Finished sectioning<br />
Cutting<br />
Bleed the bonding through the hair Starting at the bottom of the<br />
7a<br />
by pushing up from beneath,<br />
bringing the hands together. Pinch<br />
top and bottom and roll between<br />
the fingers to form a solid bead<br />
using both hands. Repeat the<br />
process to create solid rows of<br />
bonds throughout the sections.<br />
triangular section, work the<br />
extensions diagonally across from<br />
the temple to the crown, which will<br />
ensure the hair falls forward on an<br />
angle. Ensure the rows are solid<br />
throughout the section, with the<br />
top 3 rows scattered.<br />
Use a razor to remove the bulk of<br />
the length and weight. Then razor<br />
the ends of the hair to create two<br />
perfect asymmetrical points.<br />
RACOON-<br />
XTEND<br />
THERMAL<br />
DEFENSE<br />
Use a point cutting technique to<br />
blend the extensions with the<br />
natural hair and to also soften the<br />
edges and lighten the angles.<br />
7b 8<br />
Finishing<br />
Spritz the hair with a fine mist of<br />
Racoon-Xtend Thermal<br />
Defense, to protect the hair from<br />
heat styling and then enhance the<br />
shape and definition of the style<br />
using styling irons.<br />
RJ0394 RH<br />
racooninternational.com
<strong>purefusion</strong><br />
look3<br />
RJ0394 BR<br />
racooninternational.com
<strong>purefusion</strong> step-by-step look 3<br />
before<br />
1<br />
Preparing the hair<br />
2<br />
Sectioning the hair<br />
Before applying the extensions,<br />
remove the weight line by cutting<br />
into the perimeter, this will make it<br />
easier to seamlessly blend the<br />
extensions and natural hair. Point<br />
cut the line of the cut, which is a<br />
great way to prep hair for<br />
extensions as it lightens the hairline<br />
and creates texture, enabling the<br />
extensions to blend naturally.<br />
Section the hair into one offset<br />
reversed triangle at the front of the<br />
head, leaving a two finger gap from<br />
the front of the hairline. The<br />
asymmetric angle of the triangle<br />
needs to be positioned with the<br />
base of the triangle towards the<br />
crown and the point of the triangle<br />
at the temple.<br />
3<br />
Forming a bond<br />
4<br />
Bleed the bonding through the hair<br />
by pushing up from beneath,<br />
bringing the hands together. Pinch<br />
top and bottom and roll between<br />
the fingers to form a solid bead<br />
using both hands. Repeat the<br />
process to create a solid row of<br />
extensions throughout the section.<br />
Colour placement<br />
Apply a blend of Plum and Claret Vibrant Euro Extensions (Racoon<br />
colours E70 and E76) throughout the section in order to create a<br />
dramatic colour placement.<br />
RJ0394 BR<br />
racooninternational.com
<strong>purefusion</strong> step-by-step look 3<br />
5<br />
Blending extensions<br />
the<br />
6<br />
Cutting the extensions<br />
7<br />
Styling<br />
After thinning out the extensions,<br />
Use a razor to thin out the<br />
extensions, removing the bulk of<br />
the weight so that the extensions<br />
will hang better and blend well with<br />
the own clients hair.<br />
blend the extensions and natural<br />
hair together using thinning shear.<br />
Following the shape of the initial<br />
cut. To create a side sweeping<br />
fringe, use a point cutting<br />
technique for a soft finish around<br />
the face.<br />
Enhance the shape and definition<br />
of the style using styling irons,<br />
which work perfectly with Racoon<br />
hair extensions. To finish the look<br />
apply a small amount of Racoon-<br />
Xtend <strong>Hair</strong> Serum to give the<br />
hair ultimate shine and a light hold.<br />
RACOON-<br />
XTEND<br />
HAIR<br />
SERUM<br />
RJ0394 BR<br />
racooninternational.com


![[pdf] nominerede – dbca 2008 - Hair Magazine](https://img.yumpu.com/22144921/1/190x245/pdf-nominerede-dbca-2008-hair-magazine.jpg?quality=85)