
You also want an ePaper? Increase the reach of your titles
YUMPU automatically turns print PDFs into web optimized ePapers that Google loves.
Life Fitness Models 9100, 9500HR, 9700HR, and 9700HR w/Decline Treadmills<br />
<strong>How</strong> <strong>To</strong>… <strong>Replace</strong> <strong>the</strong> <strong>Wax</strong> <strong>Bag</strong><br />
<strong>To</strong>ols required: Phillips screwdriver, Side Cutters or Utility Knife<br />
Step 1<br />
Turn <strong>the</strong> power OFF at <strong>the</strong> ON/OFF switch and <strong>the</strong>n unplug <strong>the</strong> unit from <strong>the</strong> electrical outlet.<br />
Step 2<br />
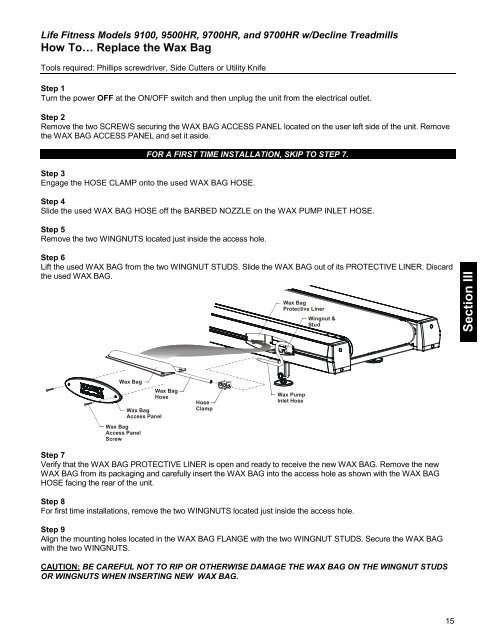
Remove <strong>the</strong> two SCREWS securing <strong>the</strong> WAX BAG ACCESS PANEL located on <strong>the</strong> user left side of <strong>the</strong> unit. Remove<br />
<strong>the</strong> WAX BAG ACCESS PANEL and set it aside.<br />
FOR A FIRST TIME INSTALLATION, SKIP TO STEP 7.<br />
Step 3<br />
Engage <strong>the</strong> HOSE CLAMP onto <strong>the</strong> used WAX BAG HOSE.<br />
Step 4<br />
Slide <strong>the</strong> used WAX BAG HOSE off <strong>the</strong> BARBED NOZZLE on <strong>the</strong> WAX PUMP INLET HOSE.<br />
Step 5<br />
Remove <strong>the</strong> two WINGNUTS located just inside <strong>the</strong> access hole.<br />
Step 6<br />
Lift <strong>the</strong> used WAX BAG from <strong>the</strong> two WINGNUT STUDS. Slide <strong>the</strong> WAX BAG out of its PROTECTIVE LINER. Discard<br />
<strong>the</strong> used WAX BAG.<br />
<strong>Wax</strong> <strong>Bag</strong><br />
Protective Liner<br />
Wingnut &<br />
Stud<br />
Section III<br />
<strong>Wax</strong> <strong>Bag</strong><br />
<strong>Wax</strong> <strong>Bag</strong><br />
Access Panel<br />
<strong>Wax</strong> <strong>Bag</strong><br />
Access Panel<br />
Screw<br />
<strong>Wax</strong> <strong>Bag</strong><br />
Hose<br />
Hose<br />
Clamp<br />
<strong>Wax</strong> Pump<br />
Inlet Hose<br />
Step 7<br />
Verify that <strong>the</strong> WAX BAG PROTECTIVE LINER is open and ready to receive <strong>the</strong> new WAX BAG. Remove <strong>the</strong> new<br />
WAX BAG from its packaging and carefully insert <strong>the</strong> WAX BAG into <strong>the</strong> access hole as shown with <strong>the</strong> WAX BAG<br />
HOSE facing <strong>the</strong> rear of <strong>the</strong> unit.<br />
Step 8<br />
For first time installations, remove <strong>the</strong> two WINGNUTS located just inside <strong>the</strong> access hole.<br />
Step 9<br />
Align <strong>the</strong> mounting holes located in <strong>the</strong> WAX BAG FLANGE with <strong>the</strong> two WINGNUT STUDS. Secure <strong>the</strong> WAX BAG<br />
with <strong>the</strong> two WINGNUTS.<br />
CAUTION: BE CAREFUL NOT TO RIP OR OTHERWISE DAMAGE THE WAX BAG ON THE WINGNUT STUDS<br />
OR WINGNUTS WHEN INSERTING NEW WAX BAG.<br />
15
Life Fitness Models 9100, 9500HR, 9700HR, and 9700HR w/Decline Treadmills<br />
<strong>How</strong> <strong>To</strong>… <strong>Replace</strong> <strong>the</strong> <strong>Wax</strong> <strong>Bag</strong> (Continued)<br />
Step 10<br />
Slide <strong>the</strong> HOSE CLAMP over <strong>the</strong> end of <strong>the</strong> WAX BAG OUTLET HOSE. Position <strong>the</strong><br />
HOSE CLAMP approximately three inches from <strong>the</strong> end of <strong>the</strong> WAX BAG HOSE and<br />
engage <strong>the</strong> HOSE CLAMP onto <strong>the</strong> WAX BAG HOSE.<br />
Step 11<br />
Cut ½” off <strong>the</strong> plugged end of <strong>the</strong> WAX BAG HOSE and slide <strong>the</strong> WAX BAG HOSE<br />
onto <strong>the</strong> BARBED NOZZLE on <strong>the</strong> WAX PUMP INLET HOSE. Be sure to fully seat <strong>the</strong><br />
WAX BAG HOSE. Release <strong>the</strong> HOSE CLAMP.<br />
Engage<br />
Release<br />
Step 12<br />
<strong>Replace</strong> <strong>the</strong> WAX BAG ACCESS PANEL and secure with <strong>the</strong> two WAX BAG ACCESS PANEL SCREWS.<br />
FIRST TIME INSTALLATION IS NOW COMPLETE.<br />
IF WAX BAG IS BEING REPLACED, CONTINUE THROUGH STEP 21.<br />
Step 13<br />
Reset <strong>the</strong> WAX FILL STATISTICS as follows.<br />
Step 14<br />
Press and hold <strong>the</strong> PAUSE KEY. While holding <strong>the</strong> PAUSE KEY press <strong>the</strong> CLEAR KEY twice. Continue to hold <strong>the</strong><br />
PAUSE KEY until <strong>the</strong> DISPLAY reads “ SERVICE MENU.”<br />
Step 15<br />
Press any UP ARROW KEY until you see “MAINTENANCE” in <strong>the</strong> DISPLAY. Then press ENTER. The DISPLAY<br />
will begin to scroll automatically through available options.<br />
Step 16<br />
When <strong>the</strong> DISPLAY reads “REFILL WAXER SYSTEM”, press <strong>the</strong> ENTER KEY. The DISPLAY will read “REPAIR<br />
LOGGED.”<br />
Step 17<br />
<strong>Wax</strong> replacement is now complete.<br />
Step 18<br />
<strong>To</strong> verify that <strong>the</strong> wax refill has been completed correctly, press <strong>the</strong> CLEAR KEY once to return to <strong>the</strong> “SERVICE<br />
MENU.”<br />
Step 19<br />
Using any of <strong>the</strong> UP ARROW KEYS, scroll until “INFORMATION” is displayed. Then press ENTER.<br />
Step 20<br />
Press any of <strong>the</strong> UP ARROW KEYS until “WAX MOTOR INFO” appears in <strong>the</strong> DISPLAY. Press ENTER and verify<br />
that <strong>the</strong> DISPLAY reads “100/100 FULL.”<br />
Step 21<br />
Press <strong>the</strong> CLEAR KEY three times to exit diagnostic.<br />
16