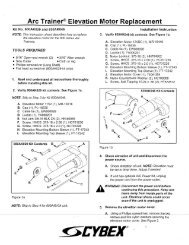
Elevation System Adjustment for 3900 and 4500 Only.
Elevation System Adjustment for 3900 and 4500 Only.
Elevation System Adjustment for 3900 and 4500 Only.

You also want an ePaper? Increase the reach of your titles
YUMPU automatically turns print PDFs into web optimized ePapers that Google loves.
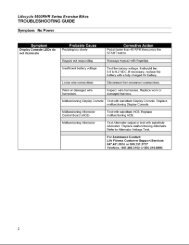
PSB256.doc Page 1 of 3<br />
PRODUCT SUPPORT BULLETIN<br />
Title:<br />
TR <strong>3900</strong>/<strong>4500</strong>: <strong>Elevation</strong> <strong>System</strong> <strong>Adjustment</strong><br />
Date:<br />
November 30, 2000<br />
Bulletin No.<br />
635-0256<br />
Revision Letter:<br />
A<br />
Date of Last Revision<br />
N/A<br />
Distribution to:<br />
þ Service Providers<br />
þ Product Support<br />
o Star Trac Sales<br />
o Product Users<br />
þ Distributor<br />
o Installer<br />
Written by:<br />
Jason Buelna<br />
Approval(s)<br />
Signature on file<br />
ECO Reference<br />
N/A<br />
Model(s) Affected<br />
The TR <strong>3900</strong>/<strong>4500</strong> treadmills have different display codes that will appear when an elevation<br />
anomaly has been detected. Some of these codes can be corrected by making adjustments to the<br />
elevation system. This Product Support Bulletin will list the display code, cause <strong>and</strong> possible<br />
solution.<br />
EL1 (TR <strong>3900</strong>) <strong>and</strong> EL STL (TR <strong>4500</strong>)<br />
Cause: One cause <strong>for</strong> the EL1/EL STL is when the elevation motor can not reach its intended<br />
destination. This happens mostly while the machine is trying to reach 15% elevation.<br />
Solution (TR <strong>3900</strong> only):<br />
1. Elevate the machine to 15% or as close to it as possible if it was not already there. Note: You<br />
may get an EL1 while attempting this.<br />
2. Loosen the U-bolts that hold the front h<strong>and</strong>rail to the frame (this is under the motor shroud)<br />
<strong>and</strong> raise the front rail about 1 inch or until the elevation cap is visible.<br />
3. If there is at least a 1/8-inch gap between the elevation cap <strong>and</strong> elevation can, no adjustment<br />
is needed. If there is not a gap, proceed to step 4.
PSB256.doc Page 2 of 3<br />
4. Relieve the tension on the elevation belt by loosening the elevation idler.<br />
5. Turn the elevation can pulleys clock-wise to raise the machine until there is 1/8-inch gap<br />
between the cap <strong>and</strong> can.<br />
6. Elevate the machine until the display registers 15% elevation (on the display window).<br />
7. Reinstall the elevation belt <strong>and</strong> tension the elevation idler until there is 60 lbs (+/- 5 lbs).<br />
8. Test the elevation to verify operation. Bring the machine down to 0% to make sure it does not<br />
go too low, then elevate the machine back up to 15% to ensure it does not hit the elevation<br />
cap.<br />
9. Tighten the U-bolts to secure the front h<strong>and</strong>rail to the frame. Note: If you hear a rattling noise<br />
in the h<strong>and</strong>rail, you may have over tightened the U-bolts. Loosen the U-bolts <strong>and</strong> the rattling<br />
should go away.<br />
Solution (TR <strong>4500</strong> only):<br />
1. Elevate the machine to 15% or as close to it as possible if it was not already there. Note: You<br />
may get an EL STL while attempting this.<br />
2. Loosen the U-bolts that hold the front h<strong>and</strong>rail to the frame (this is under the motor shroud)<br />
<strong>and</strong> raise the front rail about 1 inch or until the elevation cap is visible.<br />
3. If there is at least a 1/8-inch gap between the elevation cap <strong>and</strong> elevation can, no adjustment<br />
is needed. If there is not a gap, proceed to step 4.<br />
4. Engage the Motor Test Mode.<br />
5. Note the elevation incline number (the number on the left side of the in<strong>for</strong>mation window), exit<br />
the Motor Test Mode <strong>and</strong> enter the Maintenance mode.<br />
6. Change the EL MAX number to the number noted in the Motor Test Mode. Make sure to press<br />
the START key to save the change.<br />
7. Exit the Maintenance mode <strong>and</strong> test the elevation by lowering it to 0%, then back up to 15%.<br />
The elevation cap should not hit the can <strong>and</strong> the ELSTL display code should not appear on<br />
the display. If the ELSTL continues to appear, repeat the above steps once more.
PSB256.doc Page 3 of 3<br />
8. Tighten the U-bolts to secure the front h<strong>and</strong>rail to the frame. Note: If you hear a rattling noise<br />
in the h<strong>and</strong>rail, you may have over tightened the U-bolts. Loosen the U-bolts <strong>and</strong> the rattling<br />
should go away.