SER 251 - Grundig-info.de
SER 251 - Grundig-info.de
SER 251 - Grundig-info.de

You also want an ePaper? Increase the reach of your titles
YUMPU automatically turns print PDFs into web optimized ePapers that Google loves.
D Montageanleitung<br />
Satelliten-Einbau-Receiver <strong>SER</strong> <strong>251</strong> Best. Nr. G.AF 9100<br />
für TV-Chassis CUC 2032…2080<br />
bestehend aus: SAT-Baustein 29504 106 2500<br />
Prozessorplatte mit EPROM 29305 319 0300<br />
Sechskant-Flachmutter 81189 993 9400<br />
Montageanleitung 72010 029 1001<br />
Bedienungsanleitung 28017 942 0401<br />
Hinweis zu TV-Chassis CUC 2033 / 2058 / 2059 / 2080:<br />
Bei Geräten die mit <strong>de</strong>r Prozessorplatte 29305 219 1400 und einem Softwarestand 29798 010 0100 o<strong>de</strong>r höher bestückt sind,<br />
entfällt <strong>de</strong>r Wechsel <strong>de</strong>r Prozessorplatte und <strong>de</strong>s EPROMs.<br />
Achtung: MOS-Vorschriften beachten<br />
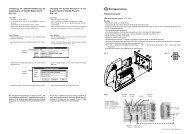
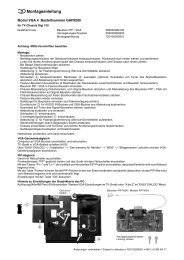
Montage:<br />
- Netzstecker ziehen und Geräterückwand entfernen.<br />
- Rasthaken Y aushaken.<br />
- Rastnasen Z ausrasten und die Ab<strong>de</strong>ckung abnehmen.<br />
- Fixiernase X abzwicken.<br />
- Den vorgesehenen SAT-Antenneneingang ausbrechen.<br />
- R43050 auf <strong>de</strong>r Chassisplatte auftrennen.<br />
- Prozessor IC81050 durch Prozessorplatte 29305 319 0300 ersetzen (siehe Hinweis zu TV-Chassis).<br />
- SAT-Baustein auf die Steckerleiste ST-SB <strong>de</strong>s Chassis stecken.<br />
- Ab<strong>de</strong>ckung aufsetzen und einrasten.<br />
- Sechskant-Flachmutter auf F-Connector <strong>de</strong>s SAT-Bausteins schrauben.<br />
- Geräterückwand aufsetzen und Gerät anschließen.<br />
- Nach <strong>de</strong>m Einschalten <strong>de</strong>s Gerätes erscheint automatisch das Menü "SPRACHAUSWAHL". Über die Menüs "SPRACH-<br />
AUSWAHL" –> "LAND EINSTELLEN" –> "SATELLITEN" –> <strong>de</strong>n gewünschten Satelliten mit Hilfe <strong>de</strong>r Cursor-Tasten ""<br />
o<strong>de</strong>r "" auswählen und mit <strong>de</strong>r Taste "OK" bestätigen. Nach Anwahl <strong>de</strong>s Satelliten wird <strong>de</strong>r automatische Sen<strong>de</strong>rsuchlauf<br />
gestartet. Die Programmbelegung erfolgt in <strong>de</strong>r Reihenfolge <strong>de</strong>r werkseitigen Vorprogrammierung <strong>de</strong>s SAT-Bausteins und<br />
wird automatisch gespeichert.<br />
Hinweis:<br />
Bei Verwendung eines Multischalters mit DiSEqC-Umschaltung ist zu kontrollieren, ob auf <strong>de</strong>r Chassisplatte Pin 15 <strong>de</strong>s SAT-<br />
Bausteins mit Pin 16 <strong>de</strong>s IC81050 verbun<strong>de</strong>n ist. Bei fehlen<strong>de</strong>r Verbindung ist diese nachträglich herzustellen.<br />
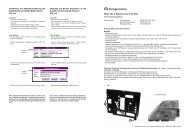
Ab<strong>de</strong>ckung<br />
Cover<br />
Z<br />
X<br />
Z<br />
Y<br />
Än<strong>de</strong>rungen vorbehalten / Subject to alteration • 72010 029 1002 • 0700 • E-BS 33
GB Fitting Instructions<br />
Built-in Satellite Receiver <strong>SER</strong> <strong>251</strong> Or<strong>de</strong>r No. G.AF 91000<br />
for TV Chassis CUC 2032…2080<br />
consisting of: SAT Module 29504 106 2500<br />
Processor Board with EPROM 29305 319 0300<br />
Hexagon Hea<strong>de</strong>d Nut 81189 993 9400<br />
Fitting Instructions 72010 029 1001<br />
Operating Instructions 28017 942 0401<br />
Note to the TV chassis CUC 2033 / 2058 / 2059 / 2080:<br />
For units equipped with a processor board 29305 219 1400 and having a software version 29798 010 0100 or higher, the<br />
replacement of the processor board and of the EPROM is not necessary.<br />
Attention: Observe MOS regulations<br />
Assembly:<br />
- Disconnect the mains plug and open the TV set by removing its rear panel.<br />
- Disengage catch Y.<br />
- Disengage the locking lugs Z and remove the cover.<br />
- Cut off the fixing lug X.<br />
- Break the provi<strong>de</strong>d cutout for SAT aerial input.<br />
- Disconnect R43050 on the chassis board.<br />
- Replace the processor IC81050 by the Processor Board 29305 319 0300 (see note).<br />
- Plug the SAT module on the connector ST-SB of the chassis.<br />
- Attach the cover and lock it in.<br />
- Screw hexagon hea<strong>de</strong>d nut on F-connector of SAT module.<br />
- Attach the rear of the cabinet and connect the set.<br />
- After switching the unit on the "Adjust language on screen" menu appears automatically. Via the menu –> "Adjust language<br />
on screen" –> "Adjust country" –> "Satellite" –> select the <strong>de</strong>sired satellite with the cursor button "" or "" then confirm<br />
with "OK". After selecting the satellite the automatic station search is started automatically. The programmes are allocated<br />
in the or<strong>de</strong>r preprogrammed in the factory for the SAT module then are stored automatically.<br />
Notes:<br />
On application of a DiSEqC multi-switch it is to be checked whether Pin 15 of the SAT Module is connected with Pin 16 of<br />
IC81050 on the chassis board.<br />
If they are not, connect them.<br />
Ab<strong>de</strong>ckung<br />
Cover<br />
Z<br />
X<br />
Z<br />
Y