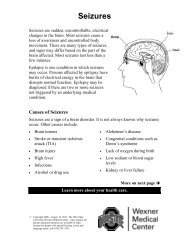
Theraband Exercises after Above Knee Amputation - Patient ...
Theraband Exercises after Above Knee Amputation - Patient ...
Theraband Exercises after Above Knee Amputation - Patient ...

You also want an ePaper? Increase the reach of your titles
YUMPU automatically turns print PDFs into web optimized ePapers that Google loves.
<strong>Theraband</strong> <strong>Exercises</strong> <strong>after</strong> <strong>Above</strong><br />
<strong>Knee</strong> <strong>Amputation</strong><br />
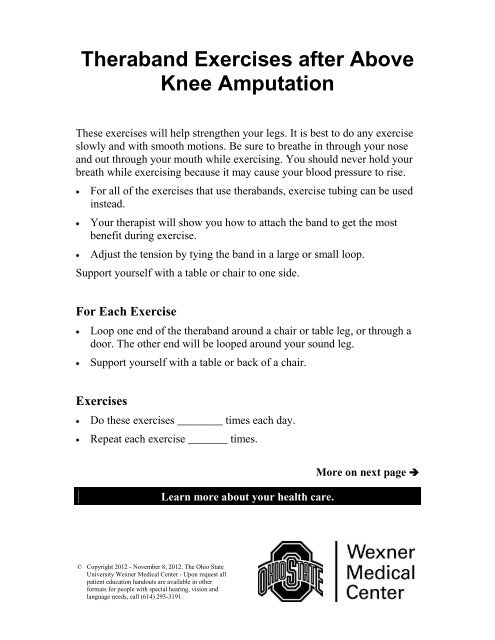
These exercises will help strengthen your legs. It is best to do any exercise<br />
slowly and with smooth motions. Be sure to breathe in through your nose<br />
and out through your mouth while exercising. You should never hold your<br />
breath while exercising because it may cause your blood pressure to rise.<br />
For all of the exercises that use therabands, exercise tubing can be used<br />
instead.<br />
Your therapist will show you how to attach the band to get the most<br />
benefit during exercise.<br />
Adjust the tension by tying the band in a large or small loop.<br />
Support yourself with a table or chair to one side.<br />
For Each Exercise<br />
Loop one end of the theraband around a chair or table leg, or through a<br />
door. The other end will be looped around your sound leg.<br />
Support yourself with a table or back of a chair.<br />
<strong>Exercises</strong><br />
Do these exercises ________ times each day.<br />
Repeat each exercise _______ times.<br />
Learn more about your health care.<br />
More on next page <br />
© Copyright 2012 - November 8, 2012. The Ohio State<br />
University Wexner Medical Center - Upon request all<br />
patient education handouts are available in other<br />
formats for people with special hearing, vision and<br />
language needs, call (614) 293-3191.
Page 2<br />
Leg cross over (Hip adduction)<br />
1. Stand with your sound leg closest to the chair<br />
or table.<br />
2. Support your weight on your prosthetic leg<br />
and bring your other leg forward and across in<br />
front of your body.<br />
3. Slowly return to the starting position.<br />
Pull to the back (Hip extension)<br />
1. Stand facing the table or the back of a chair<br />
and hold on with both hands.<br />
2. Support your weight on your prosthetic leg<br />
and bring your other leg backwards behind<br />
you, stretching the band.<br />
3. Slowly return to the starting position.<br />
Pull to the side (Hip abduction)<br />
1. Stand with your prosthetic leg closest to the<br />
chair or table.<br />
2. Support your weight on the prosthetic leg<br />
and hold onto the chair or table as needed.<br />
3. Bring your sound leg out to your side away<br />
from your body and away from the chair or<br />
table.<br />
4. Slowly return to the starting position.
Page 3<br />
Pull to the front (Hip flexion)<br />
1. Stand with your back towards the chair or table.<br />
2. Support your weight on your prosthetic leg and<br />
bring your other leg forward away from your<br />
body, stretching the band behind you.<br />
3. Slowly return to the starting position.<br />
Talk to your doctor or others on your health care team if you have<br />
questions. You may request more written information from the<br />
Library for Health Information at (614) 293-3707 or email:<br />
health-info@osu.edu.