Create successful ePaper yourself
Turn your PDF publications into a flip-book with our unique Google optimized e-Paper software.
Class X<br />
EXPERIMENT No: 10<br />
AIM: To show experimentally that carbon dioxide is given out during respiration.<br />
Materials Required :<br />
Germinating seed, conical flask, small test tube containing KOH, small thread, bent capillary<br />
tube, beaker and cork.<br />
Procedure :<br />
1. Take some germinating seeds of moong dal in a conical flask.<br />
2. Place a small test tube containing KOH solution in hanging position in the flask.<br />
3. Fix a bent capillary tube with one end in conical flask and other end in the beaker<br />
containing colored water.<br />
4. Keep the set up for about two hours and observe change in water level in capillary tube.<br />
Observation :<br />
Germinating seeds<br />
1. Note the water level position at the start of the experiment.<br />
2. Record the rise of water level in capillary tube.<br />
3. Record water level change in record book.<br />
Result and Inference :<br />
1. Germinating seeds absorb oxygen of conical flask and release CO . 2<br />
2. Released CO is absorbed by KOH<br />
2<br />
<strong>81</strong>
3. Water rise up in capillary to fill space created by gas.<br />
4. Germinating seeds give out CO during respiration.<br />
2<br />
Precaution :<br />
1. Mouth of conical flask should be air tight with cork.<br />
2. Handle KOH carefully since it is corrosive.<br />
3. Seeds should be germinated and respiring.<br />
4. Hang small test tube with the help of a fine thread.<br />
5. Colored water gives better observation.<br />
82
Class X<br />
EXPERIMENT No: 1<br />
AIM: To sturdy the following properties of Acetic Acid ethanoic acid:<br />
i. Odour<br />
ii.<br />
iii.<br />
iv.<br />
Solubility in water<br />
Effect on litmus (blue)<br />
Effect on litmus (red)<br />
Materials Required : 5% acid (Acetic acid), sodium hydrogen carbonate (solid), blue, & red<br />
litmus paper strips, distilled water, two beaker (100 ml), Four test tubes with stand, a dropper, lime<br />
water & passing tube.<br />
Procedure : Study the pretties of acetic acid (according to the following table.<br />
Sr. No. Experiment ObservationInference<br />
1. Odour : It smells like Acetic acid has vinegar<br />
Smell the sample of vinegar<br />
acetic acid carefully<br />
taken in a test tube.<br />
2. Solubility :<br />
a. Add 1 ml of the given Acetic acid dissolves Acetic acid is soluble in<br />
sample of acetic acid in in water in water<br />
2 ml of water.<br />
b. Add more acetic acid in It also dissolves Acetic acid is soluble in<br />
the above test tube<br />
water in all proportions.<br />
3. Effect on litmus :<br />
With the help of dropper Only blue litmus Acetic acid is acidic in<br />
of acetic acid on paper turn red. nature.<br />
(i) blue and (ii) red litmus<br />
paper<br />
Red litmus gives no<br />
colour change<br />
4. Reaction with sodium<br />
hydrogen Carbonate :<br />
a. Take 1 ml of the acetic A brisk effervescence Acetic acid produce CO2<br />
acid and add to it a pinch produces with a gas with sodium hydrogen<br />
of sodium hydrogen. clourless gas carbonate.<br />
Carbonate<br />
83
. Pass CO gas in Lime Lime water turns Milky colour of lime water is<br />
2<br />
water. milky. insoluble in calcium<br />
carbonate.<br />
Result :<br />
Acetic acid (ethanoicatid) has following properties :<br />
a. It has vemigar like smell.<br />
b. It is highly soluble in water<br />
c. It turns blue litmus to red.<br />
d. It produces CO gas with sodium hydrogen.<br />
2<br />
Precautions :<br />
1. Handle ethanoic acid very car fully.<br />
2. Small mount of sodium hydrogen carbonate should be added in smell mouth of acetic<br />
acid to contemp intensity of CO evolution.<br />
2<br />
84
Class X<br />
EXPERIMENT No: 2<br />
AIM: To study the soaponification reaction of preparation jof soap.<br />
Materials Required : Vegetableoil (25 ml) Suchas castor oil or coconut oil, sodium hydroxide,<br />
common (about 10g), distilled water, two beakers (250ml capacity), two test tubes, measuring<br />
cylinders (50ml salt), a glass rood, a knife.<br />
Procedure :<br />
1. Place about 25 ml castor oil coconut oil in a beaker of 25 ml.<br />
2. Make 50 ml 20% solution of sodium hydroxide in distilled water.<br />
3. Pour 30 ml of above prepared solution of sodium hydroxide in 25 ml of oil taken above<br />
in beaker in the form of thin stream and stir the mixture.<br />
4. The above mixture of beaker becomes viscous and thick, this is a soap.<br />
5. Dissolve 10 g sodium chloride in about 15 ml of water. Add this solution in the soap<br />
formed above with constant stirring till the mixture cools & become solid.<br />
6. Leave it for a day till the mixture and cut it into desired shapes and sizes.<br />
7. Remove the soap from the beaker and cut it into desired shapes and sizes.<br />
85
Precautions :<br />
1. Take care in use of solid sodium hydroxide as it is corrosive and cause seveee burn<br />
skin.<br />
2. Stir the mixture carefully so that it does not spill out.<br />
86
Class X<br />
EXPERIMENT No: 3<br />
AIM: To sturdy the comparative cleansing capacity of a sample of soap in soft and hard water.<br />
Materials Required : : Distilled water (soft water), under ground water (hard water, soap cake,<br />
digital balance, two beakers (100 ml), two glass rods, two test tube with test tube stand. a<br />
measuring scale & measaring cylinder (50 ml).<br />
Procedure :<br />
1. Label the two beakers A and B.<br />
2. Take 20 ml of distilled water in beaker A and put 50 m l of hard water in B.<br />
3. Weigh 1 g of soap and put it in each beaker.<br />
4. Stir the content of both beakers with separate glass rods.<br />
5. Take the two test tubes and place them in a test tube stand and label soap them I and II.<br />
6. Pour 3 ml of above prepared soap solution of beaker A and B in the two textures places<br />
in the stand.<br />
7. Take in the test tube I and II and shake them ten times by placing them on it's mouth.<br />
8. Foam or lather will form by shaking the test tubes (two minutes each.)<br />
9. Measure the length of the lather produced immediately by using measuring cylinder<br />
and record observations:<br />
Observations :<br />
a. Volume of soft and hard water taken in beaker A and B = ................... ml.<br />
b. Mass of the soap put in each beaker = .................. g.<br />
c. Volume of the soap soltuon taken in test tube and II = ................. ml.<br />
87
S.<br />
No.<br />
Water<br />
take<br />
Initial length (cm)<br />
Test tube reading<br />
Final length (cm)<br />
Form/lather<br />
Produced (cm)<br />
1. Soft<br />
Water<br />
2.<br />
Hard<br />
Water<br />
1. A rich lather is produced in test tube I containing soft water.<br />
2. A sticky scum in produced in test tube II containing hard water.<br />
Result : For cleaning purpose the foam or lather needs to be produced should be more, thus soft<br />
water is suitable for washing.<br />
Precautions :<br />
1. Always use distilled water as soft water.<br />
2. Use same soap sample for both water.<br />
3. Hard water if not available can be prepared by dissolving 5 g of calcium chloride or<br />
magnesium chloride in the foam produced.<br />
4. Measure the length of the foam produced immediately.<br />
88
Class X<br />
EXPERIMENT No: 4 (i)<br />
AIM: To determine the focal length of a concave mirror by obtaining image of distant object.<br />
Apparatus / Material Required :<br />
A concave mirror, a mirror holder or stand, a small screen (hard sheet of whit<br />
paper/cardboard) fixed to stand, scale, notebook, pencil.<br />
Procedure :<br />
1. Fix the concave mirror on the mirror holder or stand and place it on the table near an<br />
open window of the laboratory.<br />
2. Locate a distant tree / building from the open window (if an open window is not available<br />
then obtain the image of window itself of the screen).<br />
3. Place the screen in front of the mirror.<br />
4. Adjust the position of the concave mirror and the screen so that a sharp, inverted and<br />
diminished image of a distant object is formed on the screen.<br />
5. Note the position of the screen and concave mirror stand with the help of meter scale.<br />
6. Find the distance between the centre of concave mirror and the screen. This distance is<br />
equal to the focal length of concave mirror Record the focal length.<br />
89
7. Repeat the experiment a few times by changing the position of the mirror stand and<br />
note the corresponding change position of the screen.<br />
8. Calculate the mean value of the focal length.<br />
Observation and Calculation:<br />
S.No. Position of the Position of the Focal length of the<br />
concave mirror white screen (Q) conceave mirror (Q-P)<br />
(P) (in cm) (in cm) (in cm)<br />
1 _______ _______ f1 = --------<br />
2 _______ _______ f2 = ---------<br />
3 _______ _______ f3 = ----------<br />
4 _______ _______ f4 = -----------<br />
Precautions :<br />
Mean value of focal length of concave mirror f<br />
= f1+f2+f3+f4<br />
4<br />
= --------- cms<br />
1. The concave mirror should be fixed in the vertical plane.<br />
2. The base of the concave mirror stand and the screen should be parallel to the meter<br />
scale.<br />
3. Record the position of screen only when a well defined, inverted and diminished image<br />
of the distant object is formed on the screen.<br />
90
Class X<br />
EXPERIMENT No: 4 (ii)<br />
AIM: To determine the focal length of a convex lens by obtaining an image of a distant object.<br />
Apparatus/Material Required :<br />
A convex lens, convex lens stand, a small screen (hard sheet of white paper/cardboard) fixed<br />
to a stand, a measuring scale.<br />
Procedure :<br />
1. Fix the comex lens on the lens holder or stand and place it place it on the table near an<br />
open window of the laboratory.<br />
2. Locate a distant tree/buliding from the open glass window (if an open window is not<br />
available then obtain the image of the window itself on the screen.<br />
3. Place the screen behind the convex lens.<br />
4. Adjust the position of the convex lens and the screen so that a sharp, inverted and<br />
diminished image of a distant object is formed clearly on the screen.<br />
5. Note the positions of the screen and the convex lens stand with the help of measuring<br />
scale.<br />
6. Find the distance between the optical centre of the lens and the screen. This distance is<br />
equal to the focal length of the convex lens. Record the the focal length.<br />
7. Repeat the experiment a few times by changing the positions of the convex lens stand<br />
and note the corresponding changed position of the screen.<br />
8. Calculate the mean value of the focal length.<br />
91
Observation and Calculation:<br />
S.No. Position of the Position of the Focal length of the<br />
convex lens white screen (Q) conceave mirror (Q-P)<br />
(P) (in cm) (in cm) (in cm)<br />
1 _______ _______ f1 = --------<br />
2 _______ _______ f2 = ---------<br />
3 _______ _______ f3 = ----------<br />
4 _______ _______ f4 = -----------<br />
Mean value of focal length of concave mirror f<br />
= f1+f2+f3+f4<br />
4<br />
= --------- cm<br />
Q<br />
92
Precautions :<br />
1. Fix the convex lens vertically in the lens holder.<br />
2. The base of the lens stand and white screen should be in line with the measuring scale.<br />
3. Record the position of the lens and screen only when a well defined sharp image is<br />
formed.<br />
93
Class X<br />
EXPERIMENT No: 5<br />
AIM: To trace the path of ray of light, passing through a rectangular glass slab, for different angles<br />
of incidence and to measure the angle of incidence, angle of refraction, angle of emergence and<br />
interpret the result.<br />
Apparatus / Material Required :<br />
Glass slab (rectangular) A drawing board, all pins, drawing paper/white sheet paper drawing<br />
pins, protector, scale and pencil.<br />
Procedure :<br />
1. Fix a plain sheet of paper on a drawing board with help of drawing pins.<br />
2. Place a rectangular glass slab in the middle of the paper and draw its boundary with a<br />
sharp pencil.<br />
3. Fix two pins (P and Q) vertically along a straight live on one side of the glass slab.<br />
4. Now look through the glass slab form the other side and fix two pins (R and S), so that<br />
those pins and the image of the pins P and Q are in a straight line (when seen through<br />
the glass slab).<br />
94
5. Remove the glass slab and all the pins one by one and draw small circles around the<br />
pin pints.<br />
6. Join the points P and Q and extend the line to meet the face AB of the slab at E.<br />
7. Similarly, extend the line obtained by joining points R and S to meet the other face DC of<br />
the slab at pt F.<br />
8. Join points E and F.<br />
9. Draw perpendiculars to the two faces of the slab at point E and point F.<br />
10. Measure (i) the angle of incidence (ii) the angle of refraction (iii) and the angle of<br />
emergence and record and observation.<br />
11. Repeat th experiment for different angles of incidence and determine the<br />
corresponding angle of refraction emergence.<br />
Observation and Calculation:<br />
No. Angle of Angle of angle of Difference betwee the<br />
incidence refrection emergence angle of incidence and<br />
(i) (ii) (iii) angle of emergence (i-e)<br />
1<br />
2<br />
3<br />
4<br />
Conclusion :<br />
1. Angle of incidence = Angle of emergence<br />
2. Incident ray is parallel to the emergent ray<br />
3. Angle of refraction is less than angle of incidence<br />
4. With the increase in angle of incidence, the angle of refraction increases.<br />
95
Precautions :<br />
1. The drawing board should be of some soft wood.<br />
2. The pins should be fixed in an upright position.<br />
3. While fixing pins the bases of all the pins should be in the same straight line.<br />
96
Class X<br />
EXPERIMENT No: 6<br />
AIM: To study (a) binary fission in Amoeba and (b) budding in yeast with the help of prepared<br />
slides.<br />
Materials Required :<br />
Compound microscope, permanent slides of binary fission in Amoeba and budding in yeast,<br />
charts of binary fission and budding.<br />
Procedure :<br />
1. Focus the slide of binary fission of Amoeba under low power of compound microscope.<br />
2. After observing under low power change to high power of magnification.<br />
3. Observe various stages of cell division in binary fission of Amoeba.<br />
4. Draw diagrams of different stages of binary fission in Amoeba.<br />
Binary fission in Amoeba<br />
97
5. Focus the slide of budding in Yeast under low power of compound microscope.<br />
6. After observing under low power, change to high power of magnification.<br />
7. Observe various stages of cell division in budding in Yeast especially chain of buds.<br />
8. Draw diagrams of different stages of budding of budding in Yeast.<br />
Budding in Yeast<br />
Observation :<br />
1. Binary fission in Amoeba shows division of nucleus by stretching.<br />
2. Nucleus breaks into two nuclei slowly and cytoplasm also divides (cytokinesis).<br />
3. Two small daughter cells (Amoebae) are formed at the end.<br />
4. Budding in Yeast shows many cells attached with each other forming a branched chain.<br />
5. Nucleus starts dividing first by stretching and followed by cytokinesis.<br />
6. Daughter cells originate as small buds of parent cell and grow very fast.<br />
7. Daughter cells remain attached with parent cells and separate later on.<br />
Precautions :<br />
1. Keep microscope in box when not in use.<br />
98
2. Clean the stage of microscope before and after use<br />
3. Do not tilt the microscope. Microscope should be held vertical.<br />
4. Slide should be firmly clipped on the stage.<br />
5. First observe under low power of microscope and then change to high power lens.<br />
99
Class X<br />
EXPERIMENT No: 7<br />
AIM: To trace the path of rays of light passing through the prism.<br />
APPARATUS/MATERIALS REQUIRED: Drawing board, sheet of white paper, glass prism, pins,<br />
scale, protractor, cello tape<br />
PROCEDURE:<br />
1. Take a white sheet of paper and fix it on the drawing board with cello tape or pins.<br />
2. Draw the outline of prism with the sharp pencil as shown then remove the prism.<br />
3. Choose the suitable point X which acts as a point of incidence roughly in the middle of<br />
AB as shown in the figure. Draw normal N to this point.<br />
1<br />
4. Draw a line making angle 30 degrees with the normal. This line will form the incident ray<br />
for angle of incidence 30 degrees.<br />
5 Properly place the prism within the outline ABC.<br />
6. Place two pins P and Q at least 6 cm apart on the incident ray line and view their images<br />
100
with one eye closed from the side AC of the prism. Fix another two pins R and S on the<br />
paper such that the tips of these pins and images of the incident ray pins (P and Q) all lie<br />
in the same straight line.<br />
7. Remove the pins and prism. Encircle the pin pricks with a sharp pencil.<br />
8. Join R and S and extend it backward to point Y on AC. Draw a normal N as shown in the<br />
2<br />
diagram.<br />
9. Join XY, which shows the path of light ray inside the prism.<br />
10. Now PQXYRS shows the path of the rays of light passing through the prism.<br />
11. Repeat steps 2 to 10 for other angles of the incidence.<br />
OBSERVATIONS:<br />
From the diagram it is clear that as the ray moves from air ( optically rarer medium ) to glass<br />
(optically denser medium ) it bend towards the normal. And when it moves from glass( optically<br />
denser medium ) to air( optically rarer medium ) it bends away from the normal.<br />
RESULT :<br />
PQXYRS represents the path of light ray through the prism as shown in the diagram.<br />
PRECAUTIONS :<br />
1. The same prism should be used for all observations.<br />
2. Prism should be placed properly inside the drawn marking.<br />
3. The angle of incidence should be taken between 30 degrees to 60 degrees.<br />
4. The separation between the pins should not be less than 6 cm.<br />
5. The pins should be fixed vertically and firmly.<br />
6. The points of incidence should be taken approximately in the middle portion of the<br />
prism.<br />
101
Class X<br />
EXPERIMENT No: 8<br />
Aim:- To find the image distance for varying object distances in case of a convex lens and draw<br />
corresponding ray diagrams to show the nature of image formed.<br />
Material and Apparatus required:- Convex lens preferably of focal length 15 cm, candle with<br />
stand, lens holder, a screen with stand, matchbox, meter scale.<br />
Principle:- The nature and position of the image form by convex lens depends upon the position of<br />
the object with respect to convex lens. The image may be real or virtual. For real image, the object<br />
should be placed on the focus or beyond the focus and for virtual image, object should be between<br />
optical centre O and focus F.<br />
Position of<br />
the object<br />
Position of<br />
the image<br />
Size and nature<br />
of the image<br />
Ray-diagram<br />
An infinity at focus F 2<br />
Highly diminished, real and inverted<br />
Beyond 2F 1<br />
between F and 2F<br />
2 2<br />
Diminished, real and inverted<br />
At 2F 1<br />
at 2F 1<br />
Same size real and inverted<br />
Procedure:-<br />
1. Obtain an approximate value of the focal length of the convex lens by focusing the image<br />
of a distant object.<br />
2. Fix a meter scale on the table with a cello tape.<br />
3. Fix lens in a lens holder and place it in the middle the meter scale, such that its principal<br />
axis is parallel to the meter scale.<br />
4. Mount a candle vertically on a candle stand, light it with a matchbox and place it on the left<br />
hand side of the lens. Adjust the height of the candle or the lens such that the tip of the<br />
lighted candle lies or the principle axis of the lens.<br />
102
5. Place a vertically mounted card board pasted with graph paper (Screen) on the right side<br />
of the lens. Adjust its height such that the entire image can be taken on the screen.<br />
6. Make adjustment to get a sharp image of lighted candle on the screen, by keeping the<br />
lighted candle at (1) far away from lens (at infinity) (2) beyond 2F (3) at 2F(4) bet 2F and F.<br />
Take at least three observations.<br />
7. When a burning candle is kept at focus, It is not possible to obtain a sharp image at any<br />
position of the cardboard.<br />
Observations :-<br />
Rough focal length of the lens = ………………….…cm<br />
S. No. Position of lens (cm) Position of candle (cm) Position of the image on<br />
the screen (cm)<br />
Nature of image<br />
Result:-<br />
1. As the object moves towards the focus of the lens the size of the image increases and it<br />
moves away from the focus.<br />
2. When object is brought too close to the lens, the image on the other side is not seen.<br />
Precautions:-<br />
1. Perform the experiment at a shaded place.<br />
2. For obtaining the rough focal length of the lens any distant object can be considered either<br />
a tree or sun. If focusing the sun, then not look the image directly, it may hurt the eyes.<br />
3. The aperture of the lens should be small.<br />
103
Class X<br />
EXPERIMENT No:9<br />
Aim:- To study homology and analogy with the help of preserved/available specimens of either<br />
animals or plants.<br />
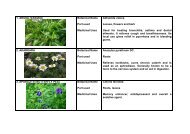
Materials Required : Specimen of turnip root, water melon fruit, bougainvillea shoot with thorn,<br />
cucurbit shoot with tendril, Figures of human hand and wing of bat and photographs of bird wing<br />
and butterfly wing.<br />
Procedure : Take parts of plant and animal objects in terms of Homologous and Analogous<br />
organs as follows-<br />
Homologous organs : Bougainvillea shoot cucurbita shoot<br />
Human hand and wings of bat<br />
Analogous organs : Turnip root and water melon fruit<br />
Observations :<br />
Bird wing and butterfly wing<br />
1. Look for the point of origin of thorns in bougainvillea and<br />
tendril of cucurbit.<br />
Compare that both structures are stem.<br />
Feel the point and the hardness of the thorn.<br />
Tendril<br />
Thorn<br />
What function does it perform?<br />
Look the shape and tenderness of tendril.<br />
What function does it perform?<br />
Bougainvillea thorn & Cucurbit tendril<br />
2. Look the basic skeletal structure of human hand and<br />
bones of the bat wing.<br />
Compare the internal skeletal structure of wings of<br />
boot.<br />
How does hand help holding objects?<br />
How does wing help fly in the air?<br />
Human hand & Wing of Bat<br />
104
3. Look the shape and structure of root of turnip and fruit of water<br />
melon.<br />
Compare the food storing part in turnip and water melon.<br />
Identify that food eating part of turnip is root and food eating<br />
part water melon is fruit.<br />
4. Look the basic structure of wing of bird and wing of butterfly.<br />
Compare the fine structural details of wings of bird and<br />
butterfly.<br />
Turnip root & Watermelon fruit<br />
Observe different types of feathers found on<br />
the wing of bird.<br />
Try to identify the scales present on the wing<br />
of butterfly.<br />
Precaution :<br />
Wing and feather of bird & Butterfly wing<br />
1. Be careful while touching thorn of bougainvillea.<br />
2. No damage should be done to either bird or butterfly.<br />
<strong>105</strong>